


Work In Progress / Sweatbox
Subforums
-
Showcase (57,673 visits to this link)
-
- 530
- posts
-
A:M Stills (86,969 visits to this link)
-
Works In Progress (WIP) (59,591 visits to this link)
-
- 3.1k
- posts
5,158 topics in this forum
-

Desk
by starwarsguy- 4 replies
- 516 views
I made the desks for the bank for my short, The Chase. Looking for comments and critique. These won't be viewed in too much detail though. Just background while they walk through the bank.
Last reply by starwarsguy, -

- 5 replies
- 2.1k views
I was goofing around with some of my characters to create a desktop image for my computer... just thought i'd share. Not sure if this post will go through as I seem to be having some problems with "timing out". original is at 1024 x 768. The hair on the guy is "inspired" by Adam Sessler for you XPlay viewers out there.
 Last reply by Zaryin,
 -

- 10 replies
- 992 views
Hey...just something I thrutogether yesterday for a DVD menu. Reminds me of the old joke..."I spent a WEEK in Detroit one day..." Try not to get mugged while watching this... Of interesting note...other than the Renaissance Center and one or two other building, the whole city is a copy-paste of one model...the 'Ambassador Bridge' is a model I had lying around, as are all the vehicles and other props. I am re-rendering right now to slow it down from 6 sec to 8 sec...plus I populated it a bit more. DETROIT_ZOOM2sm.mov
 Last reply by NEKOSEI,
 -

- 4 replies
- 687 views
Hey all. Still working on the logo, just trying to figure out how to make it look more metalic. Also, any idea on how to create a bevel would be much appreciated.
 Last reply by 3DArtZ,
 -

- 1 follower
- 15 replies
- 1.3k views
I haven't done any modelling for a long time, so when I saw a model, very similar to this, done in Blender on DeviantArt, I thought I would brush up on my skills and recreate it (especially as it's a very simple model).
 Last reply by case,
 -
sometime ago, i saw diamond texture on this forum, please does any one have the link, otherwise does any one have the material settings to create a diamond material.
 Last reply by robcat2075,
 -
I posted my dice character earlier. I now have a walk cycle for him. I tried constructing it three different ways. First, I tried starting with the down positions, then the contact positions. My final try was starting with the hip up and down motion and then going back to the beginning and, starting with the contact positions, went straight ahead. I liked this one the best. None of them were hard to put together, but I attribute that to A:M's great tools rather than my skill. I am posting my last effort. All comments and crits (of the work, not my religious or political beliefs) welcome! Scott Dice_Walk.mov
 Last reply by pixelmech,
 -

- 10 replies
- 1.1k views
This is with multipass two passes This is without multipass aflare.zip I did this in V13 because ( v14 didn' t like flare light added to model) a reported problem.
Last reply by johnl3d, -

- 16 replies
- 1.7k views
I ran a little test, did you know you can smartskin a bone to control HAIR? I added a new smartskin to the bone, turned grooming mode on and groomed the hair at different angles. hair.mov
 Last reply by AniMattor,
 -

- 15 replies
- 1.6k views
Hi I ran out of time to get my entry in for the Sci-Fi/Fantasy contest. I'm still going to finish it so I thought I would post a detail from a different camera angle and ask for critiques. It's the only way I am going to get past the likes of Mr. Talbot and Mr. Freeman. I'll save the final view for some other time. I need to tweak the models and the rigging quite a bit more to get rid of some of that creasing and the lighting is currently producing some unsightly patches so I will have to play with that too. Anyway feel free to comment. Cheers
 Last reply by Eos,
 -
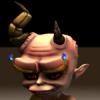
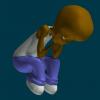
So after being deeply annoyed by some houseflies, I came up with this idea for a short animated piece about a dude trying to kill this one housefly. So I'm going ahead with it as a minor side project. So here are the two characters, my PC connected to the scanner is currently indisposed so I use my laptop webcam to take an picture of the drawings, so I'm sorry for the low res, the high res ones will be posted later
 Last reply by Darkwing,
 -

- 46 replies
- 6.5k views
Here's a semi-realistic toe I've made. It's nail even grows realistically. If you have/think you can do better, then post it in here. But I doubt you can. I'm off to bask in my glory and make the ultimate ear.
 Last reply by Mr. Jaqe,
 -

- 3 replies
- 758 views
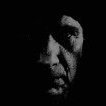
The local DJ's remarked how they hated one of the renderings of their faces on their homepage, so I figured I'd try and recreate 'em in 3D... For those who know what they look like, I think Todd didn't come out all that bad, despite the fact the colors are all off. Not much I can do about that since I'm color blind . Scott is still a work in progress..
Last reply by Shredder3, -

- 12 replies
- 1.3k views
Thought I'd try something today just for kicks. I had noticed in v14 that you can export OBJ files... I don't recall in previous versions of having a workable feature of this. So - I decided to test it out in getting some displacement and normal map textures for a model. I started with a basic 4 point patch and unwrapped it for texturing purposes - and so that when I export the model I'd have it already unwrapped for whatever program I use to sculpt the texture details in. Once I exported this patch I loaded it up in my sculpting app.. For this test I used Silo. I sculpted in a sort of - I guess you'd call it an eye and then exported the displacement map and No…
Last reply by Epoch, -

- 1 follower
- 8 replies
- 3.7k views
Experimenting with a woodcut look. This test is modeled in Zbrush, then smoothed with their clay/sharp edges algorithm, and remeshed to app. 30k polys and exported. Then imported into A:M (took some time!!) When inside A:M I peaked all splines, thus essentially bypassing A:Ms spline system (I bow my head in shame). When additionally setting the subdivs to the lowest setting, it is possible to get a managable model in A:M. But of course, this is for hard body animation only (which doesn’t bother me). Deforming this model would propably yield some undesirable results. An example of a real world wood carved puppet
 Last reply by ludo_si,
 -

- 4 replies
- 580 views
This is the basic room with 9,000 patch. I made the cornice and I was pretty deep into it and selected almost all of them and accidently press delete when I was aiming for the forward slash and deleted the whole thing, then I prayed and waited for the system to catch up and then press undo and it all came back. Quickly I save the file, and thank my lucky stars. Close call! Turn the cornice into a bump map. I am thinking of doing the same for the ceiling with a tin impression, and a center piece for the art deco chandelier. I am doing a new render in stereo and I'll post it in the stereo of the feb contest as this is the inside of the house that I modeled for the contest.
Last reply by ruscular, -

- 8 replies
- 584 views
This is a quick animation for something I am trying. It is rigged and animated real quick and dirty. I just wanted to see how it worked. I built this model in another app and imported to a:m as obj. It came in well and had all the texture and bumb maps intact. I rigged it, animated it, and rendered it in a:m. I wont say which app I used because we arent supposed to talk about competitors, but any app that can output obj can be used. It is kind of high poly because the model was subdivided but a low poly version would have worked just as well as it is going to splines. I don't know what use it is but I just feel like exploring other things I can do with a:m. attached …
Last reply by dborruso, -
- 1 follower
- 24 replies
- 3.2k views
My grandest material essay so far... bony stegosaurus style-plates with contrasting tiger-striped Dino-Hyde© in between. This is one color material... and one displacement material (the skin detail is very faint but it's there)... and no maps! a turn-around: platesAllDispH264.mov platesAllDispH264.mov Yeah, it's got some pops.
Last reply by robcat2075, -

- 1 reply
- 409 views
I am having a bit of trouble getting the decal to look right on this. it is supposed to look like orange paint applied to the glass. right now it looks like orange tint applied to glass.
Last reply by nf1nk, -

- 17 replies
- 2.1k views
Here is a director's chair I built the other day. I found a free wood working project with schematics! No really! I used the diagrams for the wood working project and traced in A:M. Cool way to test out wood working projects I guess. I also used Jeff Lee's fantastic web based sky light rig gizmo! That thing rocks! Anyone needs a director's chair I will post it somewhere... it doesn't fold up though. Vernon "!" Zehr
 Last reply by KingSalami,
 -
- 4 replies
- 1.1k views
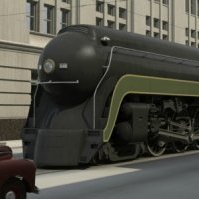
The latest addition to my railroad needs long sheets of diamond pattern steel plate. I wanted these plates to look well used, slightly rusty and to have varying amounts of dried dirt on them. I wasn't looking forward to building the material because while it's relatively easy to build show-room new surface finishes, I had never been happy with any of my attempts at old steel and procedural dirt looked too much like soft edged clouds. I thought the only way I could get hard edged dirt would be a decal. However after much experimentation I've got a material that's more than adequate. At this distance it's fairly convincing. The diamond pattern is a tiled normal decal. …
 Last reply by Fuchur,
 -

- 6 replies
- 632 views
Some of you may remember the image I did for the April image contest, which you can see here: http://www.hash.com/stills/displayimage.php?album=30&pos=41 I was asked if I would donate this scene for inclusion on the AM CD, and I agreed to do so. However, the CD is intended for new users to be able to load up the scene, click 'render' and have the nifty scene produce a cool result. My scene there relies on Darktrees for about 90% of the texturing, and since the Simbiont is a 3rd party utility (and a little confusing to get running for someone who's never even used AM), I agreed to do a remake of the scene using only textures/materials that can run in …
 Last reply by pdaley,
 -

- 16 replies
- 1.7k views
Well, I guess the Discovery needs a cockpit, so here goes. Again, it would be nice to have some accurate blueprints to work from, but the model is getting there. Some of this is guess work as the cockpit is not completely shown in the movie. Still have the overhead panels to complete along with the seats and rear wall section. Once the model is complete, it will be posted in the models section to go along with the Discovery model. Al
Last reply by John Bigboote, -
- 3 followers
- 15 replies
- 2.8k views
Dispersion is how refraction bends the different colors of white light differently causing the color fringing you see in prisms, cheap camera lenses and other irregularly shaped transparent objects. This is an attempt to simulate it by changing the Index of refraction of the glass material as the color of the light is swept across the spectrum during a multipass render. I also moved the light to fringe the shadow a bit. This is not a fast process, but if you need dispersion, it can be done.
Last reply by robcat2075, -
- 1 follower
- 20 replies
- 1.4k views
Hey guys, following my tests with displacment for folds in clothing, I discovered that no matter how I altered my settings I can not avoid getting these little black dots where the displament map is on the model. I am thinking that the dots are pixels that are brighter then the surrounding pixels in the gradient of the blur that I used on the map and the toon renderer is pickign it up as an edge. is that possible? or is it a compression thing? I've tried both png(profile stripped after ps save) and tga files. any help or suggestions would be appreciated here is an image sowing the problem.
 Last reply by Ganthofer,
 -

- 5 replies
- 664 views
Some small QT clips of clouds using V13a9 displacement , all done on one patch, also tested how shadows fell on the cloud disp. geometry, these are only tests, decal of a cloud with thebackground black for transparency, so far decal used 3 ways, Displacemnet, varying percentages (even animated percentages) Color 100% Transparency 100% Michael[attachmentid=15006][attachmentid=15007][attachmentid=15008] Last test clip[attachmentid=15009] Cloud_Disp_test2.mov Cloud_Disp_test3.mov Cloud_Disp_test5.mov Cloud_Disp_test6.mov
Last reply by Kamikaze, -

- 22 replies
- 1.9k views
Started this dragon to test the new displacement. This was just a quick preliminary to check the effect. Still need to decal the rest of the model (arms and legs). [attachmentid=13386] and a wireframe so that you can gauge the effect. [attachmentid=13387]
Last reply by John Bigboote, -
- 1 follower
- 25 replies
- 3k views
Hello, I'm trying to create water using the very useful tutorial at The Babbage Patch. I encounter a problem, however, when I try to apply the displacement material onto a simple square. The material is set up correctly, but when I apply it to the object, it comes out as a blank white sheet. Here's a screenshot-- I've followed all the instructions very carefully. The only problem I have in mind is a difference in software; the author created his tutorial with A:M 2001, and I'm using A:M 2005. On the other hand, does anyone have a different way of creating an ocean? I'd ultimately like to create a wake from a ship as well, but I have to get by this …
Last reply by The Bird Man of Alcatraz, -
- 5 replies
- 777 views
These two coins have displacement maps on them with similar settings. Both maps attempt to create details raised above the main surface. The top one with the simple bumps on it shades as expected for the light coming from above the camera's left shoulder. The more complex one, with the monkey image, has a varied result with different details seeming to be lit from different directions. Does anyone know why? DisplacementTest.zip
Last reply by R Reynolds, -
- 8 replies
- 960 views
displacew.mov another tinkering moment that needs massive tweaking
Last reply by johnl3d, -
- 7 replies
- 2.1k views
Here's something I've been wondering about for 20 years... Could i use A:M to scan a complex model to make a displacement map to put on a simple model and give it the shape of the complex model? In this test case I used a surface constraint to measure the difference in radius between the left shape and the right one. With some text editing and spreadsheet jiggling I made a bitmap out of that data and applied that to the simple shape on the right. The "scan" was very lo res, just 30 pixels around the perimeter, and it has a glitch in it, but the basic concept worked. If I could streamline and automate the workflow a bit, the scans could be very high res and work in al…
 Last reply by Rodney,
 -
- 0 replies
- 311 views
talked with Gene and came up with this [attachmentid=16104] Sent him the project file displace.mov
Last reply by johnl3d, -
- 2 replies
- 441 views
Hi all I thought i was just seeing another bone. But noticed this disc showing up in the action window and the choreorgraphy too. has any one seen this before? here's a couple of snap shoots This one is in the action window These are from the choreorgraphy window choreorgraphy window rendered
Last reply by Phil, -

- 1 follower
- 2 replies
- 660 views
Hello, We've (John "Hubukai" Hubickey and I) are still working on sets for our characters. The thought entered my mind that these characters should be good for any set we make for them, so I've been playing around with the old roto feature a little in A:M. I found that I don't really need to do it that way, since A:M puts out really nice alpha channels in the TGAs that can be used to copy your character from a blank scene and paste onto a photo directly, via Photoshop. The Idea was to use the rotoscope feature in A:M (right-click on the "shortcut to camera" in the PWS under the Choreography) to light and adjust the camera angle to fit the photo. Then take into photosho…
 Last reply by DanCBradbury,
 -
- 9 replies
- 750 views
Okay, so in order to be able to continue my animation excersices I need a fully functioning character. I finished the eye setup - a la Sphere's deformed in a pose to keep the pupils onthe surface(see keeKat model on hash cd) and deformation boxes to add character to the character! quick and dirty test http://www.vrcops.com/vids/DTest1.mov Mike Fitz
 Last reply by nyahkitty,
 -
- 1 reply
- 399 views
I animated a simple distortion box on two simple models to see it this works in beta first shows boxes going over model [attachmentid=16200] the second is results [attachmentid=16201] you might want to move the slider to see the effect slowed down animdistortw.mov animdistort.mov
 Last reply by Dhar,
 -

- 5 replies
- 688 views
Its' a pretty straightforward 5 point patch. Why is the decal distorting on it? There are actually two 5 point patches on the jpeg next to each other- both distorting!
 Last reply by JoshB,
 -
- 6 replies
- 600 views
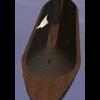
I started out with a single spline with several CP's connected to form a rudder shape. After selecting that closed loop, I extruded twice. Once done with extrusion, I wanted to stitch the sides together to create the side faces. On my first stitch, I noticed the distortion you see in the jpeg. Normally I see that with overlapping splines, but how can that be on such a simple shape? Two extrusions is all. Also, when I select a CP and pull it away, there is no other one hiding behind it - if that makes any sense. Any ideas?
Last reply by Eric2575, -
- 4 replies
- 461 views
Pretty self explanatory. When I use a decal and apply it as a distortion map, it produces these tears in my model's arms. The percentage is only set to about 70, so it's not like it's stretching the map all to heck and back. The decal is applied in a on/off pose with the models arms set to origin in the correct orientation with a "cylindrical" application method. What is causing these tears?
Last reply by Eric2575, -
- 1 follower
- 17 replies
- 1.6k views
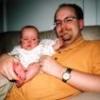
My daughter kicked the plug out before I could finish it but here it is. I still havent added cp weights, smartskinning or even comstraints although I am reading up on them. The animated lacks weight and the timing is off (things I was trying to fix before the plug was pulled).
 Last reply by thefreshestever,
 -
At this point I have the room and some of the lights, once I feel I have these basic elements right, I will start adding the glasses and the smoke, and the creepy people. Interesting point the door in the back has no texture or color yet and neither does the ceiling. I am not sure I need to add texture to the cieling. Also does anyone hav any tips on shooting in confined spaces? should I pull off a wall or go with wide angles?
Last reply by DanCBradbury, -
- 6 replies
- 1.8k views
Last night's topic for the four-hour Animation Showdown was "Dive!" Our character had to dive into a pool. I found this one quite grueling. It's not much but at least he got off! See it on my Showdown page (QT Sorenson 3 - 148K)
Last reply by robcat2075, -

- 3 replies
- 742 views
Following up on robcat's post earlier, here is my attempt at a "Dive!" for the showdown on digitalrendering's forums. http://www.hash.com/users/zachbg/blog/DiveTest3.mp4 Quicktime 6 required, 350K, 5 seconds. Animation and rendering done in four hours as per the showdown rules. He must be wearing rockets on his shoes, huh? Comments and crits always welcome. Zach "I can't tie my shoes in four hours..."
Last reply by ZachBG, -

- 11 replies
- 1.2k views
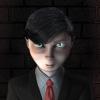
Hello, all! I just bought A:M about three weeks ago, after reading a press release that an OS X version had been released. I'm not a 3D artist, but I am a graphic designer and A:M seemed like an affordable way to experiment and play with 3D. Anyway, as I started playing, I decided I'd focus on trying to figure out how to model some of the comic characters I'd worked on in the past and decided I'd start with a parody of Star Trek I'd started as a web comic back in 1996 and then did as a PDF comic in 2000. The character designs I'd used were pretty simple and there was a focus on character to them, rather than striving for likenesses. (You never know what they'll …
 Last reply by CRToonMike,
 -

- 1 follower
- 9 replies
- 1.1k views
I'm making this DNA molecule project available in response to this thread. It's a little tricky to work with: the four nucleotides are different models, with each atom modeled as an eight-patch sphere. There's a separate model for the skeleton of a seven-base pair double helix composed of non-rendering splines, with an action that adds the nucleotides to it as action objects. The choreography contains three instances of the helix stacked on top of each other, with the bottom two instances having "translate to" and "orient like" constraints to the top instance. Basically, this molecule has a strand that repeats the sequence GATTACA three times, together with its comple…
Last reply by johnl3d, -

- 9 replies
- 1.2k views
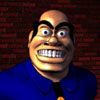
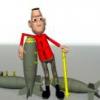
Hey, I saw a show (thats the only hint im giving) with this guy in it. I thought he looked fairly simple, so i decided to make him in AM. The modeling took about 2 hrs at most, then the rigging was about an hr, and render setup was bout 15 min. Rendered with radiosity it took about 50 minutes here he is
 Last reply by D.Joseph Design,
 -

- 1 follower
- 3 replies
- 690 views
I have been working on modeling more realistic eyes. In the past I have used simple sphere with a decal. The eyes here are more detailed in their construction. The eyes are not spheres but have that shape shown in Steven Tubbrit's tutorial. Larger Image They are based on my interpretation of the following tutorials: Making an eye - by David Simmons Making an eye - by Steven Tubbrit The model is off the cd. I want to fix the ripples in her cheek and add that flesh piece in the corner of the eye. What to you think? Mark
 Last reply by Odog2020,
 -

- 1 follower
- 12 replies
- 1.4k views
Being a huge Doctor Who Fan I thought I would need my own TARDIS. I have been watching the latest series and just got back in to how cool Doctor Who was. This TARDIS is to scale based on plans I found on the internet somewhere. Some guys actually build real versions. The doors open and close and as soon as I finish up a couple of clean ups on the model, I will post it up here fo anyone that wants to use it. Image: You can download a larger version of the rendering below.
 Last reply by Stuart Rogers,
 -

- 12 replies
- 1.3k views
In this thread it was asked how to make a dodecahedron. I have attached a project file that shows one way of doing that: Project1.zip
 Last reply by steve392,
 -

- 9 replies
- 1k views
I was cleaning off the ole hard drive and found this pic of a Dodge Viper I built in 8.5, this was a real pain in the neck because 8.5 didn't have the "maintain curvature" feature, I would have liked to have had that on certain parts of of this sucker
 Last reply by gra4mac,


