


Work In Progress / Sweatbox
Subforums
-
Showcase (57,661 visits to this link)
-
- 530
- posts
-
A:M Stills (86,956 visits to this link)
-
Works In Progress (WIP) (59,580 visits to this link)
-
- 3.1k
- posts
5,158 topics in this forum
-

- 28 replies
- 1.9k views
Well! Trying not only to have fun... animating. Have a look and listen. Your comments are welcome. In modern society people get burnedout also on vacations. Perhaps it is media... burning us out? We - six billion communicating by electric media - hypnotized most of us of media electrified. Not as the way we have lived for seven million years - in small groups - about a hundred of us in each group - smelling, hugging, boxing, feeling the one you are talking with, listening to. You can test yourself to see your qualifications to get burnded out: http://www.aafp.org/fpm/970400fm/lead.html Measure your wellness with the Adult APGAR Answer the 5…
 Last reply by Vash,
 -

Business Joe
by KenH- 19 replies
- 1.6k views
I've finally got back to making characters in AM! Here's one I'm using for a client. They wanted a simple flash look and I used the toon render to achieve this. Going to start animating him now. Thanks to Mark S for the rig!
 Last reply by kwhitaker,
 -

- 5 replies
- 929 views
this is my first successful model (in my opinion)
 Last reply by Seiferus,
 -

- 10 replies
- 1.1k views
Well, I know that I start on a lot of models, post them in here, get help when needed, and then abandon making, much less thinking about finish them. Recently I got so upset that I erased all my files, models in the works, all the hopefuls I did for two, all my ABC, and TAoA:M. Yeah, that was stupid. Anyways, I started to do this model, after about a week break from A:M. I am working off of two different size rotoscopes, not a big problem, but I need help with this oddly shaped human head. To reassure you, I am not going to abandon this model because I get frustrated, I am going to finish the head, nice and smooth, or ugly and jagged. I need some hel…
Last reply by Odog2020, -
I started working on a project that I started awhile back, rerigging the kong model with the squetch rig (still lots to do). Unfortunately, at the time I didn't realize that materials are lost during import of the model into the rig, so he has no fur, will rerig at some point. I saw the post by MrBones for the bvh files (thanks) and tried it out using Andy's tut (and thank you) on using them with the squetch rig. Here's the test, I think he had a few too many. BVH_test.mov
 Last reply by mtpeak2,
 -

- 1 reply
- 410 views
will post file tomorrow with tga file sprite ccloud.mov
Last reply by johnl3d, -
- 4 replies
- 906 views
Hey guys - if anyone is interested the first anim for C2 software guy is up on their company site (which I already posted before, but just from my site) They had me do two funny "chat" animations (upper right corner of site) - "on" for when it was avail and "off" for when not avail http://www.c2crm.com/ Here is the second anim that I hadn't posted yet, which I think is completed w/ voice over and a pic of the 3 characters http://www.3dcharacteranimation.biz/patton/ Have a great rest of the weekend - Eric
Last reply by flashawd, -

CactuZ from TreeZ
by Guest mrsl13- 0 replies
- 540 views
A CactuZ from Marcels TreeZ plugin... Mike
-

- 2 followers
- 18 replies
- 2k views
Hi, this is the first model I've built with A:M, started out as a simple sketch for a rotascope
Last reply by JB1, -
- 2 followers
- 26 replies
- 3.6k views
Well its time again for my annual student film. This year "turtles & dominos (or dominoes)" with a title still in the works. So far the story about a turtle who is finishing a large domino setup when his nephew is dropped over for a visit. Based on an encounter with my own nephew. The rules: as 2nd year students we are abided to.... - not exceed 3 min - allowed to have selective color - dialouge - sync sound A relatively up-to-date "nephew" wire render. Enjoy.
 Last reply by the_black_mage,
 -
- 1 reply
- 553 views
Since Sunday I have killed my old film and have started a new with AM. Here is my set in progress. Film deadlines are April 26th..
 Last reply by starwarsguy,
 -

- 24 replies
- 2.3k views
Here's a little character I resurrected from a old idea of mine. He's meant to be pretty simple, but I'm not sure he's going to have much emotion without eyebrows, and with button eyes. I was hoping to use mesh deformers on him for some good squash and stretch, but I haven't had much luck or time to experiment with them yet. comments? matt
 Last reply by Dearmad,
 -
- 0 replies
- 661 views
I mentioned this some time ago in the Star Trek Red Squad thread and delayed opening a new thread up for it until now. So here's the lowdown. With Red Squad, it obviously has it's main and secondary characters with dialogue. The thing is, where this takes place on starships, these guys aren't the only crew members on the ships. So what I'm hoping/asking for, is if anyone has any decently "semi-realistic" heads that they're willing to donate to simply be background crew members who mill about, use computers etc. They could be guy or girl, though I don't have any female bodies built, so you may have to supply that as well, but if all you have is the head, I'll take tha…
Last reply by Darkwing, -

- 5 replies
- 1.7k views
i was working on this for one of the Mascot contests but never quite got it finished. This is mostly an experiment with displacement maps. DinoRoar.mp4
 Last reply by John Bigboote,
 -
sometimes my scenes are very large in objects, please how can i set my camera option to render only area in camera view.
Last reply by robcat2075, -

- 2 replies
- 548 views
This is the front part of my Alcatraz building how can I cut off the white background on the camera or do I have to do a reset mode in the help ? can you save a model in choreograph or you have to export it ?
Last reply by tbenefi33, -
- 3 replies
- 360 views
Did a 1.98 special on a camera fader using a simple model the gradient combiner and a pose slider. With a little tweaking could be better fader.mov
Last reply by johnl3d, -

- 11 replies
- 2.6k views
Hey Everyone. Often when I am trying to set up that "perfect" camera shot in my scene, I get deceived by the fact that I can see too much of the camera angle. In other words, things beyond the edges of the camera can be seen while placing the camera at a good angle. Then when I render I realize that I got too much or too little in the view. So I made a simple 16:9 "View Blocker" model so that when I'm setting up my camera, I'll have an easier time seeing only what will be rendered. Maybe some of you could use this little help. Here it is. Attached is the model and a choreography with it set up on the camera Also the two pics show with and with…
Last reply by robcat2075, -
- 3 replies
- 698 views
Heigh-ho. In this thread, Noah Brewer describes a technique for blending two different scales of models into the same scene, so you can create, say, a pull-back from a close-up of a person out to the city which the person is in. I decided to try it out, and this was the result. http://www.hash.com/users/zachbg/cameramatch.mov Lady Goodbody is in a separate choreography from Shaggy and the background, and no scaling is done in either choreography. See Noah's post for details. Project file attached (uses characters from the 2005 CD). Lady_G_Runs.prj
 Last reply by Rodney,
 -
- 0 replies
- 479 views
Here's the project. Open your pose slider window and click on the main camera model to bring up the positioning sliders. To use the camera control options you need to turn off the null targeting. Any questions on how to use it just ask.
Last reply by mtpeak2, -
- 2 replies
- 541 views
I have the new constraint path for the camera made and I have a action made on to the cell doors opening into the main building The action doors are like 13 sec and the camera path is like 1:18 minutes how can I make the camera movie after the cell doors open in the main office I need it camera to pause for like 13 sec ?
Last reply by robcat2075, -
- 12 replies
- 1.1k views
Here's a test of a rotating camera rig that is part of your model. The rig is installed in our very on Thom model. All camera movement is done with pose sliders.
Last reply by KenH, -

- 1 follower
- 1 reply
- 633 views
There may already be a way to do this but if no one has posted anything yet.... Here's a way to switch between camera shots, angles, rotations etc... just using one camera, during one render. I've included the project file so you can pick at it. 1. Set the camera's "Interpolation Method" to "HOLD". 2. Move the camera to a different point in time. 3. Now the camera will quickly switch from one view to the next. camera_switch.zip
 Last reply by rusty,
 -
- 1 reply
- 313 views
Something I'm working on ......I would like to have a camera view of something falling ...this is a test with playing with a darktree material to make it interesting I set up the objects falling with newton then removed the ground and set up the camera newt.mov
 Last reply by Kamikaze,
 -

- 1 follower
- 0 replies
- 554 views
I render 1 animation short (TGA sequence), when the camera zoom n pan the line have flicker (shake). What render setting i should be to do? i'm use AM v11.1. please help me. thank q.
Last reply by one_piece, -

- 0 replies
- 538 views
I'm still working on my Camilla model, the modelling is all but done. Except the teeth, I've started adding constraints and smartskinning for the female character. But on the start-up of the program, some of the joints are not in the start-up pose. I can tweak them back to Zero, and then save it. But on restarting the program, they are back to their incorrect positions. This doesn't happen on all the joints, just some of them. Anybody got any ideas, why the start position isn't saving with the project... Nasty looking ankle... on every start-up... Tweaked back to correct position, setting the rotation of the ankle back to zero... I'm buildin…
Last reply by Krazyman, -
- 10 replies
- 4.4k views
here is my Camp fuel Lantern I am working on
Last reply by Maniac, -

- 14 replies
- 728 views
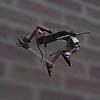
I'm setting up my two [at the moment] UAV's for a straffing run. To make them appear very quickly from behind the tank column, I just translated UAV_T1 to its companion, T2, reduced T2 to about 5%, then enlarged it to 100% over a few frames. So far, so good. Now I want to add a muzzle flash to the guns. I got a good, straightforward tutorial on A:M. I propose to translate the muzzle flash to the gun, make a repeating action so the gun just fires constantly, and then use the ON/OFF to make it visible as necessary. But the UAV and the flash have to grow together. Can the bone in the flash be a child of the chin turret bone? On aiming the gun: I'd like to see the g…
Last reply by Kelley, -
- 3 replies
- 360 views
I added a shrimp to the Fish Animation. [a bit hard to see in this frame, but...] It was hard to align on a Path, so I slaved it to a Null and dragged the Null across the scene. After rendering the scene out, I added six more and translated them all to the same Null. But only the first seems to want to move. For this iteration, I'll add more Nulls, but for the future, can a Null control more than one object?
Last reply by Kelley, -

- 0 replies
- 299 views
The correct texture pattern on the cube is only on the front side. How can I change the orientation of this? This is probably so simple I'm just overlooking it. It seems that when I place this pattern on a model, it only applies it from the front. Obviously I want to make a floor with this, but when I drop this simbiont on a floor, it gives me the elongated pattern seen on the top of the cube. Answer: Open the material's properties and click on Transform. There you would type in a value of 90 in the X rotate value, which will give you a top down orientation to this particular material.
Last reply by Eric2575, -

- 2 replies
- 405 views
i have a tripod modal that needs nulls in it it has bones all ready but i want some nulls in to make it easier to animate any help with it will be much appreciated hears the modal [attachmentid=13196] tripod3.zip
 Last reply by MMZ_TimeLord,
 -

- 7 replies
- 953 views
It needs work. This may be the hardest thing I've done to date. I downloaded the "fixed" Shaggy, but I had a lot of problems with the hands slipping and popping, probably due to pulling beyond his arm's reach. One thing I accomplished here is getting a character off a path and animating it further without disturbing the previous action. Yay! It needs a lot of work, and it's not even really finished, but here it it: The Door's Stuck 960KB Quicktime, Sorenson 3. Comments welcome!
Last reply by Biotron2000, -
- 10 replies
- 621 views
Using the little Mignola demon faerie, I have an eight-frame wingbeat cycle. I'm trying to build an Action in which he arches his back [chest out] stretches his arms out to the side, brings them front and claps his hands twice. Then drop into the 'ready-set-go' runners position. I want the wing cycle to happen sporadically as part of the warm up...but can't find a way to dupe the keyframes as a group. [in previous apps., I could Select>Alt>and drag copies] You'll see in the timeline where I duped the action one keyframe, one channel at a time. But is there a faster way? Second, when I paste the new keyframe in, it inserts a keyframe in every channel. Then …
Last reply by Kelley, -
- 1 follower
- 25 replies
- 3.6k views
I'm working on a scene that has quite a bit of hair in it. The hair is actually leaves, ivy that is hanging on a wall. Can I render that out separately, and what about the shadows the leaves cast on the wall? Eric
Last reply by robcat2075, -
- 6 replies
- 464 views
I'm trying to add some haze to a night scene, but all settings convert it to daylight [camera background color being white] I tried other colors, but they don't look right. I tried black, which preserved the 'night-ness' but loses the sense of haze in the fore ground. How to get a light haze with a night sky?
Last reply by Kelley, -

- 4 replies
- 494 views
I kind of deleted my projects window with all my models and everything
Last reply by Eric2575, -

- 3 replies
- 498 views
Just an experiment ... but OK, I made a Dome model, and applied a material to it, I even applied a decal on to it and placed it in a Cho. with the camera positioned inside of it. In the Cho., in Camera view, it seems like I have things set up all right but, when I do a render all I get is a blue color where the render should be. I also tried setting the background color in the camera properties to other colors but that does not change anything either. How can I get a rendered look of what the camera is pointing at ? Just not obvious to me. AM-14C Thanks Creating_a_Mood.prj.txt
Last reply by GAngus, -
- 10 replies
- 960 views
I could use some help with setting up a simple rolling action. Up to and including v13 I could set keyframes by typing in a frame number, then rolling a bone to the desired position and upon release I got a keyframe. Now In v16b I can only get a frame if I hit the key button but the "keyed" roll value is always zero regardless of the bone's displayed Z rotation value. Referring to the attached screen grab; as I roll the bone the entire horizontal green timeline moves up and down as a solid line while the vertical scale stretches with it. I can only get a non-zero roll value at a key frame by manually moving the cp on the timeline. I'm assuming that there is another …
Last reply by R Reynolds, -

- 8 replies
- 882 views
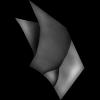
Hello, all. I'm in the early stages of modeling a set for a short piece I'm working on, but I'm getting some strange artifacts that I can't seem to shake. I based my volumetric settings on this thread ( http://www.hash.com/forums/index.php?showtopic=3994 ), but I don't seem to be getting the same quality of render. Number one issue is the sharp diagonal banding on the light shaft. I've set my klieg width to zero, as instructed, but no dice. It's not the "quality" setting in the volumetrics, either--even at 99999%, the banding is as sharp as ever. Number two is the missing shadows behind the urinal pipes. What happened to them? Is it because of the Z-bu…
 Last reply by filipmun,
 -
- 1 reply
- 377 views
Be sure you have the particles set to show
Last reply by johnl3d, -

- 1 follower
- 92 replies
- 10k views
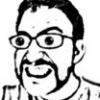
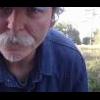
Hi everybody, I'm a big fan of the rock band Rush and cannot resist using the boys as models with which to improve my skills. Attached is my latest effort to render (from left to right) Neil, Al, and Ged. Comments and criticism are appreciated. Feel free to rofl; I gotta toughen up my ego anyway.
 Last reply by case,
 -

- 35 replies
- 3k views
'kay, so here's the piston, cam and flywheels. yet to do are the cylinder and the stand. I'm trying to work (at this point) without using decals or materials. they will be added later. It's based on an old Popular Mechanics article where a candle is used to "power" this engine. The flame from the candle fills the cylinder, then a valve closes off the flame. This creates a vacuum in the cylinder which is the "power stroke" which opens the valve and the flame is then readmitted to the cylinder. and so on. I've got to get the flywheels and piston to look as though they were machined stainless steel. This is just a start, and I need to study up on reflect…
Last reply by oakchas, -
- 9 replies
- 1.1k views
Speaks for itself.
 Last reply by jon,
 -

- 1 follower
- 10 replies
- 883 views
Hi! Been a while since Ive done anything major in A:M. So I wanted to once again expand my modeling skills. So to do that I decided I want to model my camera (At least my digital one ). My camera is a Canon Rebel XT. The lens I will model with it will probably be my Sigma 15-30mm F/3.5-5.6, which is a big lens. Eventually I want to model all my camera gear (Film cameras, all my lens, flashes, tripod, etc). I just started the process, the model is in its very rough stages right now: I will post an AO render when there is enough to look good Photoman
 Last reply by jason1025,
 -

- 1 reply
- 811 views
Here is a Cape Animation I've been working on, it's a work in progress. I'm not fully happy with it yet but so far this is the best result I've come up with The Cape was animated with the cloth wizard. If anyone here has any advice on how to get the cape to animate more naturally please help me with advice on Cape animation... Cape Test Thanks, Allen
Last reply by ZachBG, -
- 6 replies
- 831 views
Posted this topic in the Showcase last month but never really got any replies... Does anyone have any tips on the kind of Cloth simulation I need to do for large cape animation. Go to my Batman page I have Tests on Cape Animation there & so far that's the best I can get. Alienfilms.net/Batman/ The Cape has a low patch count. Should the patch count be higher, or would that help at all? It ether looks to heavy, to light or to stiff... I'm using A:M 8.5 but plan on getting 10.5 pretty soon. If anyone has any tips I'm all ears. Thanks! Edit: Added Link
 Last reply by Zaryin,
 -
- 3 replies
- 536 views
OK. Givin' up on the cape for now. It's just NOT in the cards for a long haired character...not in motion anyway. My cape had 3 layers of dynamic chains, and looked a LOT more active in the app than it does after render, what happens to all that cool secondary motion? I'll post my test in the WIP forum because this one will not allow attachments. Basicly, I rendered it 2 ways: WITH collision detection and WITHOUT. With CD the cape bounced off the hair repeatedly and sprang and recoiled furiosly out of control. Without CD, as in this test post, the hair simply passes thru the cape. An interesting side note: I saw 'THE INCREDIBLES' last night. They sort of co…
 Last reply by cfree68f,
 -

- 15 replies
- 1.6k views
Hey everybody... As the time with my family gets shorter and shorter I find myself with little spare time. One day after work a friend of mine wanted to go to the comic shop. As you might have guessed I picked up 2 volumes of "The Ultimates" by Mark Millar. If you're a comic fan, I would highly reccomend it. Anyway, I was inspired by the style (which is really groundbreaking) and decided to make this quick little "doodle" in a rare free afternoon that I found. Chances are, I won't be able to finish this...but here's the torso. Modeled from scratch except for the temp belt buckle and the textures are a combination of materials, dark trees and maps. …
 Last reply by agep,
 -

- 2 followers
- 45 replies
- 5.6k views
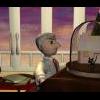
Here's a character (Captain Crazy Pants) I was working on before I took a trip to the ER for emergency abdominal surgery (was july 11, and I am almost back to "normal"). Since you're all waiting for the Mascot contest voting to begin, I thought this might be the time to post before the excitement begins...I had intended to do more with him and add some auxillary friends - but my energy level hadn't been up to snuff and I found it difficult to sit at computer for any length of time. Ok...ok...enuff with the excuses and sympathy gathering... I will probably return to this set of characters at some point as I want to have some new friends to integrate with photos …
Last reply by NancyGormezano, -
- 1 follower
- 27 replies
- 2.4k views
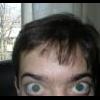
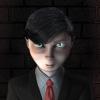
I thought I'd just share a current WIP of one of the characters for Red Squad. I seem to be getting closer to conquering facial texturing which I'm quite proud of I must say The problem with how I did it though was that I only had two angles so in the future I would get more angles out of the actors before creating their facial map
Last reply by jason1025,

