Krazyman
-
Posts
30 -
Joined
-
Last visited
Krazyman's Achievements
New User (2/10)
0
Reputation
-
It's handy to know, that I can post a nude 3d model with a (WARNING NUDITY) tagged to the heading... I built a female model myself, which I'm currently smartskinning. But I was hesitant to post any pictures, as I wasn't quite sure how to do it without raising a few eyebrows. Anyway... I would love to see the model without the censor stickers on it, as well as a few pictures of the mesh. As I'd love to see how you tackled the building of the model, as there's a few ways of going about it. The real talented people just diving in headfirst, me... I like to keep fiddling with the model until it starts resembling what I want.
-
You could make a lightning DECAL or Animation in an art program, with a transparent background. Paste it onto a big square, flat model, then place it in the background. Fading it in and out when needed, with a few dotted around the background, rotated, moved and rescaled when needed. Or if you're not that artistic, you could get a picture of lightning and chop off the background, leaving only the lightning. Then using it as a decal, paste it onto your background square model. I know it works on static images, as I've used this technique before. Along with rain, fog and snowstorms. The snowstorms, I've seen but not tried yet, but know it works. Think of it like a projector screen, that is transparent, each one containing a lightning bolt Animation or Decal.
-
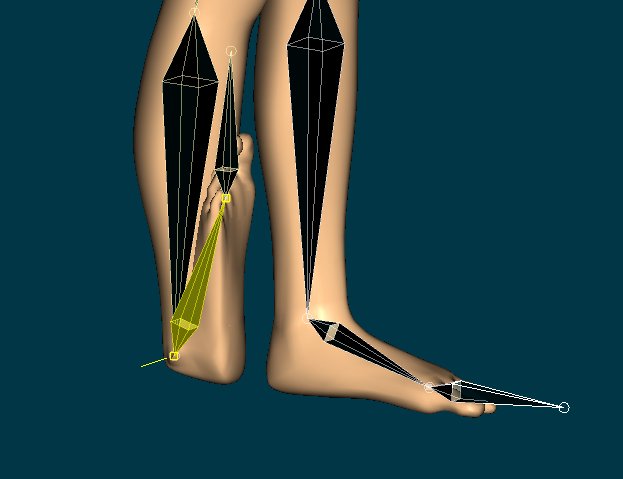
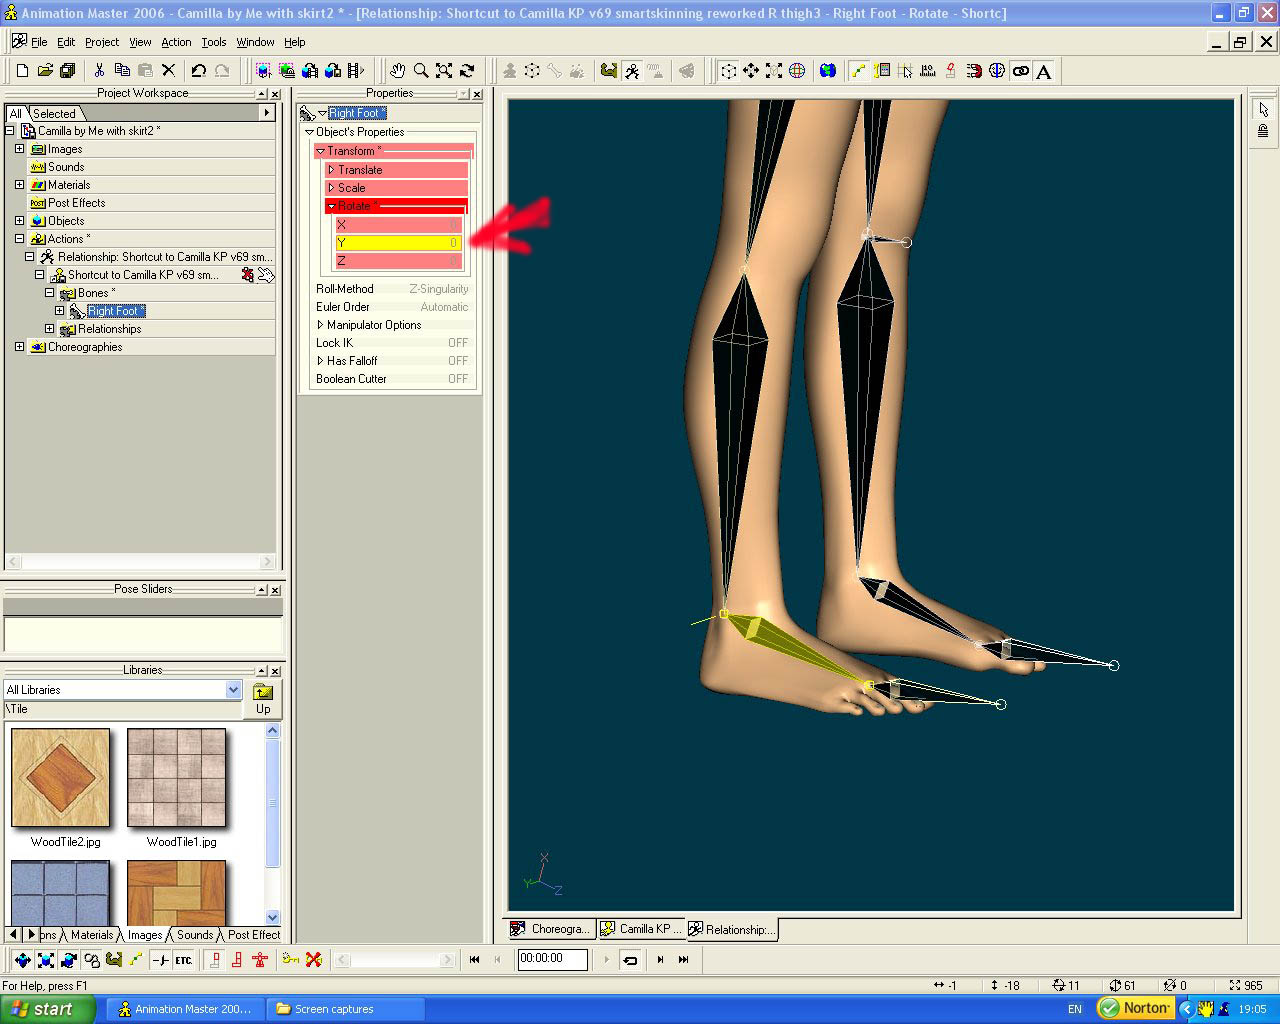
I'm still working on my Camilla model, the modelling is all but done. Except the teeth, I've started adding constraints and smartskinning for the female character. But on the start-up of the program, some of the joints are not in the start-up pose. I can tweak them back to Zero, and then save it. But on restarting the program, they are back to their incorrect positions. This doesn't happen on all the joints, just some of them. Anybody got any ideas, why the start position isn't saving with the project... Nasty looking ankle... on every start-up... Tweaked back to correct position, setting the rotation of the ankle back to zero... I'm building in JOINT CONSTRAINTS and JOINT LIMITS, but I'd like to set the joint limits to 'OFF' on start-up, and the constraints to 'ON' by default. Can this be done, or does it have to be set every time the figure is loaded ? P.S. this is my first model with constraints and limits...

-
Looks like you're following the same tutorial as I did, as your mesh is pretty similar to what my female character began as. Yeah! I agree with Will as well , the first pic shows a bad L shaped join at the bottom right of the blue circle, I had to do loads of them. The biggest problems I had, was the big five point patch above her backside that didn't want to smooth down and her backside crumpling in when I added the bones, when she put her leg forward. But thats probably down to inexperience on my part, I also found that building the model is a learning experience, you get ideas how to refine your mesh, tweaking it as you go along... The modelling is looking good, as for the mesh, I can't comment, as I'm still learning... I bet you can't wait to build the torso...
-
That's done the trick, the nose looks spot on now... I'll be interested to see the rig and the walk animation, if you make one. As a dogs knees are almost at stomach level, and their ankles are quite high up their legs, leaving them walking on their tip-toes.
-
Looking good... although I reckon the front section of its jowls, just under its nose, could be raised a touch. So you get a nice arcing curve, also... the nose of a dog isn't joined all the way on the outside, look at the picture... As for your eye problem that you talked about, were you modelling it off a hungry dog. My dog used to look exactly like that, when he was watching me eating... no kidding. Eyes wide open, living in hope that you'll drop something... I agree, eyes are difficult to do. I found the easiest way for myself was to model some of the eye and eyelid, using rotoscopes. Then to make a sphere and use it for an eyeball, lining it up with the real position of the eyeball, then pulling the eyelids into position. I learnt that off a Zandoria studios, modelling tutorial disk. But as it is, you'd be only tweaking it. As it looks like a real fine dog, and it doesn't really need much doing to it...
-
I agree, the neck does look too long. The model is good, but there is a problem with the modelling of the mouth. You've given it an elongated human mouth, if you look at a dogs mouth, you'll find it has a flap of skin that hangs from its nose centre, all the way to the corner of its mouth called its muzzle. This flap of skin, drapes over its teeth and down and over its bottom jaw slightly. The flap is normally heavier towards the front of the dogs jaw, hanging lower there. Then raising up towards the back of the mouth, you may need a bone or two, one each side to move it. If you want to animate it. Or maybe a few poses could do, like muzzle out and in and up and down for snarls, for animation purposes... P.S. go to yahoo, click on image above the search bar and type in dalmation, there's a close up, front pic of a dalmation there that shows what I mean...
-
Great... how about altering the model to make a few friends for him when you've finished tinkering the main model, so they can have some adventures down on the farm. I reckon a girl pig, skinny pig, i reckon he's the butch, rough and tough pig, a tall pig, small pig, fat pig. The alterations for the characters only need be subtle to radically alter the characters... P.S. his right leg seems to be swinging out when he walks, but it may just be the angle of the animation thats tricking the eye...
-
I think it looks great, like something out of 'The nightmare before christmas.' The only niggle that I have is the furry pom poms on its face, they look out of place. Unless you're going to add hair to the rest of it, you might try a couple of fangs. Although technically inaccurate, it would give it a nightmare before christmas type of simplistic feel.
-
Glad to hear your computers working, but be wary of static electricity when spring cleaning your PC. Always touch the case first, to dishcharge static from your body, or wear one of those wrist strap with a wire and a crocodile clip on one end. Used to earth yourself, attatching the crocodile clip to your case. Or get one that goes into the wall plug. (I think its called an earthing strap.) Naturally of course, most peoples hands are all over the case when spring cleaning their PC.
-
The case fans wont need replacing, unless they have stopped working. You can see if they're running by taking off the cover, starting up your computer and seeing if they're turning. If the case fans work, the only upgrade that you'd need would be the 'Heatsink and fan' for the CPU chip, that ROGER described in his earlier reply...
-
Not a good idea to keep your PC on the floor, as dust tends to settle to the ground and the computers fan acts like a vacuum cleaner. The scotchbrite idea on the fans is a good idea for an intake filter, although it would reduce the air coming into your PC somewhat... For added ventilation, I always remove a few of the metal plates that cover the card slots at the back of my towers...
-
If he's lucky, it could just be the case fan that's knackered...