


Work In Progress / Sweatbox
Subforums
-
Showcase (57,661 visits to this link)
-
- 530
- posts
-
A:M Stills (86,955 visits to this link)
-
Works In Progress (WIP) (59,577 visits to this link)
-
- 3.1k
- posts
5,158 topics in this forum
-

- 3 replies
- 571 views
Hey guys, this storyboard is actually for a class I am taking, but I decided that what better presentation then a video? Let me know what you guys think. Storyboard - 'Unexpected Headache' Crits please, it's due Thursday.
Last reply by Heath_Naylor, -

- 3 replies
- 918 views
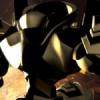
Bear is A:M Robot is 3DS Max Everything else is ZBrush. Thanks for looking!
 Last reply by adamjames,
 -

- 0 replies
- 479 views
In response to Bruce's deranged but welcome request for celebrating Halloween in this thread: http://www.hash.com/forums/index.php?s=&sh...ndpost&p=141506 & as I can definitely never resist a chance to embarass myself - I now present 2 clips - Both OLD (halloween 2000, hamming it up with a new netcam) - definitely BAD - and unfortunately complete (what's to improve?, some things are best left raw, and highly compressed). The first clip "I see Dead Piggies" was just soooooo wonderful it just begged to be used in the making of the second "Space CowGhoul". Post your past Flim-Flams here if you don't have a website (or would rather keep it pri…
Last reply by NancyGormezano, -
I was incredibly bored today so i decided to make the whole entire Unown Alphabet from Pokemon. Try to read the message below before you look at my index, and post if you could read the whole thing. I'll get a few laughs myself out of this...
 Last reply by Cross,
 -

- 2 followers
- 40 replies
- 10k views
.
 Last reply by Rodney,
 -

- 2 followers
- 16 replies
- 1.7k views
Here's a test for a concept that didn't make its way into a BUS STOP segment. This was inspired by one of JohnL3D's experiments. UP_0000.mov mp4 version: UP_0000.mp4 It's all cloth.
Last reply by robcat2075, -

- 49 replies
- 4k views
Hi Hasher gang, I just did a little work on the character I'm working on. Lots of work ahead, just chuggin along. Doing some refining of the rig and poses and adding some new poses-- (Finger bending-spreading/mouth shapes/ facial muscle moves). I'm starting to get tired of looking at him with no clothing on... so I guess I should be working on that soon. I don't know if I want to do full cloth simulation or try to do partial with a unibody structure. Any tips? *edit: Thanks MAAM user group for the suggestions.
Last reply by entity, -

- 5 replies
- 2k views
A while ago a few said they would be intererested in reading about how I am going about making my short film the cuckoo, and asked if I might put a diary, wireframes and other developmental stuff for the project on my website. As a result I've updated my website with a diary, wireframes, info on how I textured my characters, etc..... http://www.shaunfreeman.com/wip.htm Any thoughts or suggestions are welcome. Cheers Shaun
 Last reply by Zaryin,
 -

- 39 replies
- 2.6k views
I've been working to update the "Yeti" model from my sci-fi scene trying to get him up to snuff. I'm going to use him in a short I'm planning to get around to (some year). I'm currently working on the facial rig but I want to get some feedback on the overall model. Anyway, let me know what you think. Thanks. Kevin
Last reply by NancyGormezano, -

- 1 follower
- 3 replies
- 763 views
At the top of my "Stills" page are dual and single disc wide springer axle kits I drew. David R. Britton Jr.'s Stills Gallery I have included links to wireframes also. Dave Britton Jr.
Last reply by dbritton, -

- 9 replies
- 872 views
I updated this model as I never finished it some time ago ,anyway things have moved on since then and I think its much better
Last reply by steve392, -

- 4 replies
- 398 views
Is there a way to update an action in a chor without removing it and then re-applying it? Whenever I make a change to an action that has already been applied to a model in a chor, I have to remove the action and then re-apply the changed action for it to take effect. Hitting the spacebar or saving the project does not update the changes to the chor. Is there an easier way or is that it?
Last reply by Eric2575, -

- 20 replies
- 1.7k views
Here's my main character that I thought was done, but I decided to touch-up his body. Here's the original body:
 Last reply by 3DArtZ,
 -

- 1 reply
- 479 views
some of the models on the new CD there are a few more but it started too get crowded....I just noticed the wookie's arm is only showing .... should mention i just dragged them onto the chor and sort of arranged them did not try to pose which explains the arm positions
 Last reply by KenH,
 -
- 10 replies
- 970 views
Just a small question. I tried earlier and wondered why I couldn't upload a movie of 9 seconds I made with the animation Master. The first time, some months ago, I thought it was my computer with virussscanner and firewall. Now I tried again and I can only fill in the description, and then I come to the thumbnail page. I can push any button, nothing happens. Is it my computer or is it the protected area I'm bouncing on? Not that I worry that much, but I thought I would let you know. Thanks, MadFox.
Last reply by Madfox, -
- 7 replies
- 542 views
I get the message saying Im not allowd to upload this type of file ,but its an mp4 h264 codec 5.7 mb I don't have a clue whats wrong .any ideas
Last reply by steve392, -
- 1 follower
- 12 replies
- 1.5k views
When I go to the stills galleries, I don't have the option to upload anymore? Is it just me?
 Last reply by Eric Camden,
 -

US Mail Box
by Dhar- 4 replies
- 614 views
I needed a simple US mail box, couldn't find one. So I made this to share with everyone. Has a bone for the mail slot door. Logo included in the zip file. [attachmentid=14363] Mail_Box_Model.ZIP
 Last reply by arkaos,
 -
- 1 reply
- 303 views
Still playing with dup wizard this time with a few blcoks made and duplicated with the wiz I applied some metal and glass materials on the the new 12 cd and did a quick render adupbox.mov
Last reply by johnl3d, -

- 9 replies
- 1.6k views
Animating a walk were the figure is carry some flowers. I'd like the flowers to have some secondary movement to the hand and arm carrying them. What would be the best way to do that ? At the moment the flowers are separate from the figure. Should they part of the figure model or constrain them to the model in the chor. Or another method altogether ? regards simon
Last reply by Simon Edmondson, -
- 1 reply
- 394 views
This is to anyone whose work belongs to a label, or anyone who had used pre-recorded music from a commercial band that is carried by a label. Now, in the past for some film work, I have used commercial music and had to go through the artists, their label, ascap, and bmi to get written permission to use the music for our production, along with paying a one time fee (or in some cases no fee as long as we listed everything in the credits). So, here's my question. We are doing a videogame. A popular band asked us if they could do music for the game. In this case it would be all new original music that has not been featured on any work they have done for any label. So, th…
Last reply by Dhar, -

- 16 replies
- 1.9k views
I've always liked the squash and stretch look of the Veggie Tales character's eyes and wondered how to do it in A:M. There were several posts on this forum showing how it was done with distortion boxes so I gave it a try. Very cool... then it made me wonder if the same technique on a generic round character head would make it easy to generate a bunch of unique characters very quickly without having to do any rerigging or remodeling (other than a new distortion box). After a little experimentation I came up with a design that works pretty well in most deformations - except for really extreme stretches. The example video shows one model instanced three times in t…
Last reply by strohbehn, -

- 1 follower
- 15 replies
- 1.7k views
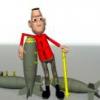
I am producing a Trek parody as a safety film for a local business interest. Here are some pictures of the models in progress. I am a beginner but A:M makes it so easy. What a worthy investment! Where ya been all my life A:M??? http://www.eventhorizonmedia.net/am/am.html
 Last reply by Sevenar,
 -

- 11 replies
- 1.1k views
Hi, I am trying to render an image that looks like fairy dust emitting from a simple ball object. I used a sprite and when I render the image(with alpha) it looks great. Fairy dust is emitting off of the object and it looks like a comet. But it only looks good when I look at it in quicktime. When I bring it into programs like an AVID or final cut all I can see is the object and not the sprites. I need to render it with the alpha because I want to use this comet as a transition between shots(a lot of shots). I am posting two images. One image is what I want it to look like the other is what the exact same image looks like in an editing program. Any help woul…
 Last reply by MATrickz,
 -
- 3 replies
- 499 views
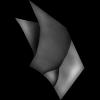
Iv been trying displacement maps on hair and it looks promising ,still a bit like a rug at the moment but still messing
Last reply by steve392, -

- 1 reply
- 411 views
Here's a technique for quickly laying a surface texture over an irregular object without first needing to decal it. The various projection map types work well for regular-shaped objects like sphere's, planes and cylinders. For irregular rounded shapes a projection mapping type which is based on the surface normal is often a better solution. AM doesn't currently have this option but for stills you can use the environment map to project a texture. Just add an environment map material and select an image. A spherical projection is ideal because it avoids pinching at the poles, but even simple photographic textures work well. On larger flat areas the texture will stre…
Last reply by johnl3d, -
- 1 follower
- 2 replies
- 481 views
Since I have been off (from work... ) this week I been pushing some ideas I've been thinking about on my commute to & from work so here is another one. I used an expression to move a series of bones on a plane to make waves. The actual expression was applied to each bone with a simple copy and paste and a tweak. It needs adjustment since it is a bit fast but I wanted to try a render. So I grabbed a boat off the cd, a darktree material, for the water, added a null following a spline on the grid, to contrain the boat's position and rendered. Its only a single multipass to speed things up ( slow computer) and a litttle jaggy but here it is wavetest.mov …
Last reply by johnl3d, -
- 15 replies
- 1.6k views
So I do not own a program yet that saves in "AI" and so I downloaded a demo of corelx5 draw to try out and make some shapes to use the Illustrator file import wizard in AM . It seem to me to be a pretty nifty way of saving some time on certain kinds of modeling. Especially for buildings, walls , windows , things with holes etc. I was kind of curious what others thought of this process. Do they use it often, seldom , never ? Are there any pitfalls , or issues . The splines it created so far for me seemed decent when imported and need little fixing but I have not really done a lot of this. So woul…
 Last reply by John Bigboote,
 -
- 8 replies
- 1.2k views
I've adding bones and contraints relationships. I must be doing/missing a step. When i reopen the saved project they're all gone. any ideas? Im using version 19.5a
Last reply by Phil, -
- 1 reply
- 399 views
viewA bit of a copy of Emilio's road realy ,but its good practice wmv 450 k I added a lot of volumetric lights
 Last reply by jamagica,
 -
- 8 replies
- 2.2k views
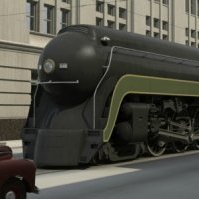
I'm working on a continuous 2 min. "shot from a drone" clip of my locomotive traveling for 1 mi.(1.6 km) to check for smoke and steam dynamics/densities and various lo-res cheats on the stone ballast that embeds the railroad tracks. It begins as a long shot, moving to a close-up and ending as a "running along beside" medium shot. The surrounding countryside is made up of twenty-one instances of the same one tenth of a square mile mesh arrayed along either side of the track. To add variety to each landscape instance I plan on applying a different pose to each one. The left ten instances shown already have some poses applied. While I was styling another pose, mostly usin…
Last reply by robcat2075, -
- 0 replies
- 508 views
vlight.mov Trying an idea for something I'm working on V14_alph4 project vlight.zip
Last reply by johnl3d, -

- 1 follower
- 2 replies
- 503 views
Hi, Here is my most recent render of the USS BB-33 Arkansas. i haven't finished the modeling, decaling and texturing yet because i haven't been able to find any close-up images of the front and middle of the ship. Comments appreciated.
 Last reply by Kamikaze,
 -

- 2 followers
- 49 replies
- 4.2k views
It's been a very long time since I've posted....well anything (2007?). I've been logging onto the forums pretty regularly for inspiration and have been working on this for couple months. I present to you, the USS Evenstar.....a work-in-progress.
Last reply by PurpleDingo, -
USS Midnight 1 2
by Darkwing- 2 followers
- 63 replies
- 5.2k views
Over the past week I've been working on a model for a friend to go in his Star Trek fan series, Red Squad. Anyways, I'm at the texturing stage now and figured I'd post what I have. I've beveled everything and for the most part, it's actually all one piece, at least the main hull, saucer and nacelles are.
Last reply by Darkwing, -
Hiya folks! Here is a new piece that I worked on in collaboration with a number of people. AM was used for the basis of the metronome and related effects (so hopefully I can post it in this section, instead of the OT section). You'll need quicktime and its 19mb: http://www.iliadic.com/ut.mov Comments and criticism are welcome! Check out the rest of my site at http://www.iliadic.com Enjoy!
 Last reply by pugless,
 -

- 8 replies
- 1.4k views
Today, in a fit of boredom, I made a 3D Thom icon for A:M on my desktop, because it's silly for a 3D app to have a 2D icon. And then that project mutated into this:
 Last reply by starwarsguy,
 -
UV-map weirdness 1 2
by Tore- 2 followers
- 54 replies
- 8.4k views
Having experienced some strange behavior when handling UV-maps in A:M, I am wondering if I am doing something wrong, or this is a bug. It goes like this: 1. I make a (in this case very simple) model in A:M. 2. Exporting the model (without UV's) as an .OBJ 3. Importing the model into 3DCoat. 4. ...and gets this automatic UV unwrapping. 5. Still in 3DCoat I then paint something on the model. 6. And export the model as an .OBJ with enclosed Targa color map. 7. Back into A:M I import... 8. ...and gets this distorted result - even if I render the model. The projection bulges and weave, and t…
 Last reply by ludo_si,
 -

- 34 replies
- 3.3k views
Hi all, Here's a WIP of a hair style on Lady Goodbody using the v.11 hair system. I call this one "the Miss America look". The renders are pretty speedy if you use lights with z-buffered shadows. And the hair looks better with those lights, too. Thanks Hash guys, especially Randy and Ken for bringing the Mac version along so far, and for the great hair system. Jim
 Last reply by Animus,
 -

- 4 replies
- 434 views
I notice that there's a built-in [?] offset when V.13 pastes a copy. Every time V.11 pasted the copy directly over the original, I half wished it wouldn't. Now that it doesn't, I find that I have need of the old way, particularly when making multiples that have to sit on the same baseline...like the engines on the Junkers flying wing, like the tank bogey wheels I'm trying to align. Can the offset be disabled, or re-set to a known figure, so that 'X' number of cliks up, and 'X' number sideways will put the copy back on the baseline?
Last reply by Kelley, -
took the model from here http://johnl.inform.net/pages/light&material.htm added some hair and got the attached light_mat_hair.mov
-
- 2 replies
- 519 views
another attempt to play with hair using an animation this time with 2 qts hcreature.mov
Last reply by KenH, -
- 1 reply
- 459 views
been working with v11 hair...thanks Collin for the tut..anyway wanted to see how well the dynamics work so I set up thom with the skip action from the cd added some hair and got this. the skip action didn't like thom's arm though test.mov
 Last reply by hypnomike,
 -

- 12 replies
- 1.5k views
This is a test to see how v11 hair could be used for eyebrows and eyelashes. The result is conclusive. I'm pleased with the results. What do you think? I'm not quite completed with the eyebrows though. I spent most of my time on the eyelashes.
Last reply by entity, -
- 1 reply
- 523 views
I recently changed my Avatar to a clip of one of my 'gurlee gurls' unleashing her hair, it worked pretty well for a test...thought I would show the gang. In the model, the character's hair is 'down' with dynamics ON...then I made a pose with hair 'UP' and dynamics OFF... and as I animate I turn the pose from ON to OFF and the hair falls and becomes dynamic, which I thought was purty cool... I plan to further explore the ability to use grooming mode in poses and actions. To see the clip, simply roll-over my avatar and a button will appear to see the QT sample.
Last reply by johnl3d, -

- 2 replies
- 982 views
post your comments please! -Mike
 Last reply by dborruso,
 -

- 3 replies
- 657 views
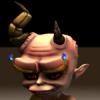
Hey- Meet Harriet. Good Side: V 11's hair modelling tools are quite nice, and I love the way they react to your characters motion...I'm having fun and look forward to rigging Harriet with TSM and the new CP weights... Bad Side: This model keeps crashing the renderer. On this test I was lucky to get 69 frames rendered, but it was a 150 frame chor. I set it to render overnight, usually, and come in to see A:M has crashed. Today I came in and saw it had crashed so I figured maybe I should download the latest version, 11E. So I did, and then went to open this project. Crash. So I uninstalled v11 and cleaned out the registry. Reinstalled, open proj-crash, open model-…
Last reply by KenH, -
- 2 replies
- 572 views
Just to try it I rerendered the sprite follow path thing I posted with an alpha channel and used it as the hair "sprite" to see how it would look growing and moving at the same time johnl3d weirdhair.mov
Last reply by steve392, -
- 4 replies
- 731 views
setting color thickness kinkiness over time really great idea f11_.mov
Last reply by johnl3d, -
- 6 replies
- 689 views
http://johnl.inform.net/pages/111btest.htm animated displacement material trial with a little hair project file v11_1b available 111btest.mov
Last reply by johnl3d,

