robcat2075
-
Posts
28,400 -
Joined
-
Last visited
-
Days Won
425
Content Type
Profiles
Forums
Events
Everything posted by robcat2075
-
I may not understand what you are trying to do , but you can drag the red bar of an action (when it's in the chor) to any time in the timeline.
-
That looks great. Except for maybe the thumb. I think making it on the same plane as the fingers is an unnatural default position and harder to CP-weight so it moves well. I've found this easier to rig: http://www.hash.com/forums/index.php?s=&am...st&p=292232
-
If they appear to work, they'll work. If they have a fault it was probably something that was there already. The warning is just a CYA thing to perfectionists. Perhaps the only reason Hash doesn't do it themselves is lack of people power to manage it, and not wanting to be responsible for maintaining 1000 models against every possible thing that might crop up when the software is revised. Most free models will need some revision to be ready for a new purpose. Many have rigs that were "ok" in their day but we would consider lacking now. Same model, still works the way it always did, but now we expect more from them.
-
That would be the "Extras CD" c. 2006 or so. I believe the contents are downloadable but I know not the link.
-
Hi Rob, Yes I did get the books! I sent a thank-you to the e-mail address onthe packing slip... quikthnkr@excite.com Is that not you? I guess it is different than the email i got from you before.
-
I'm rendering... "Time Remaning: 2:29"
-

Doing some animating ,got this
robcat2075 replied to steve392's topic in Work In Progress / Sweatbox
Must be some previous dispute between those two. -
Cute character! We'll look forward to seeing his adventures.
-
It's not quite your birthday here yet, but I'll jump the gun and wish you a happy one in advance!
-
Finishing up my May 11 second club entry
robcat2075 replied to strohbehn's topic in Work In Progress / Sweatbox
It's not that the strategy is bad. It helps keep the character alive. But hard to keep the weight on. It's hard to have believable weight to begin with... and then to believably shift it... ouch. It seems to take longer to polish small things than big things. -
Finishing up my May 11 second club entry
robcat2075 replied to strohbehn's topic in Work In Progress / Sweatbox
I think that's a very promising clip. It doesn't have that floating from pose to pose look that most of these things do. It's clear you're aware of the challenge of showing weight and mass. My favorite moment is when he launches himself up the ladder. Little things like the way his left heel sinks a bit when he puts his weight on that foot are nice touches. Less certain are the moves he has to do when he is shifting from one foot to another or repositioning a foot. (some of those may be unintentional foot slips. I'm not sure.) Those are hard to do and hard to diagnose. The way he supports himself sometimes with his right arm helps to cover these up a bit. I think the big pulling up gesture he does around 180+ would have served better to accent "see 'em back". Too late to change that now; that would be a major rework. Does the right hand really need to be drifting from about 150-175? I'm not real big on mouth shapes, but when you're doing a "w" word like "When you let..." you can probably make it stronger by doing an "oo" shape to precede the "wh", which is what we tend to do anyway. It gives you more of a place to go from than the resting mouth shape and should make the "wh" have a bit more hit to it. some other notes: strohbehmMP4.mov (sorry, misspelled your name) -
Anti-aliasing(correct term?) in rendering possible
robcat2075 replied to Path other's topic in New Users
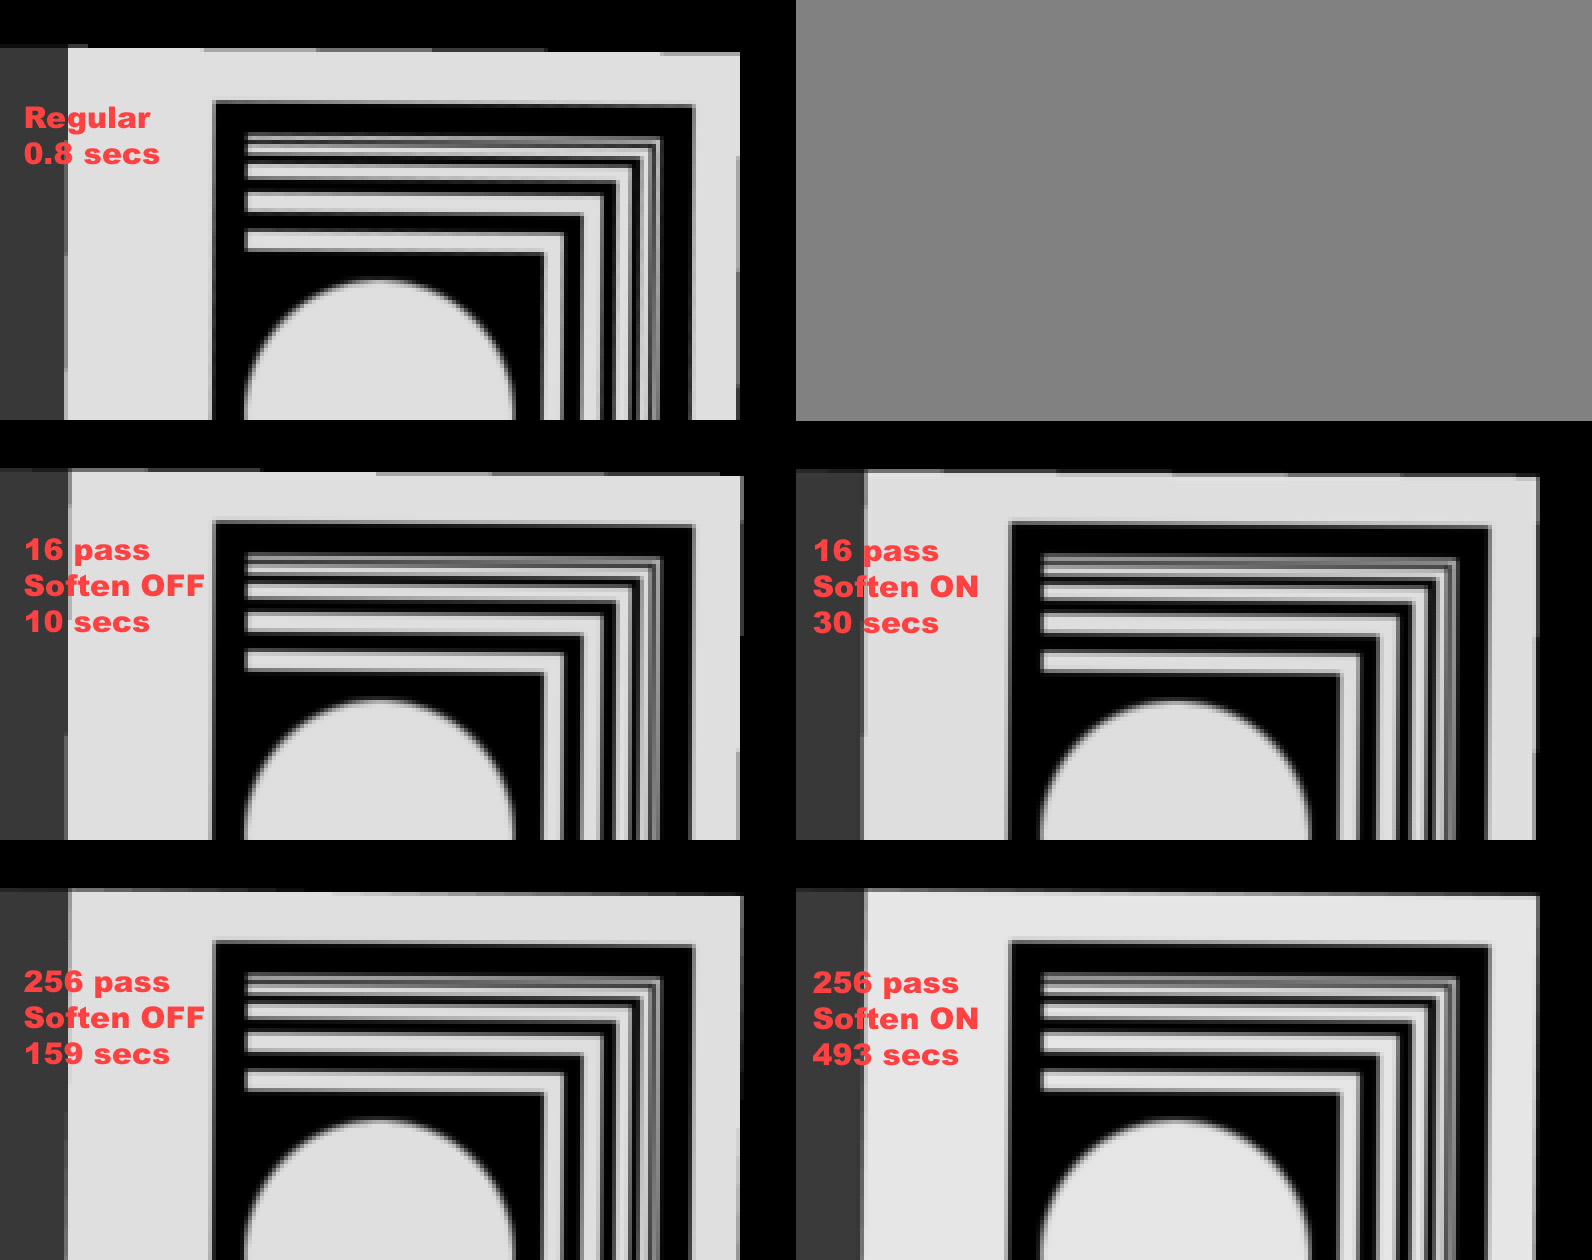
I would say the anti-aliasing of the decal in the three images you posted is functionally identical. There may be a pixel or two of difference, but it is definitely getting well-anti-aliased in the regular render. If the AA of the mesh was acceptable (and this level would be in most circumstances) I'd definitely choose the regular render over the 16 pass render(4x4) render because it is so much faster. Is that something supposed to be fixed in V15f? Did it get AMReported? -
Finishing up my May 11 second club entry
robcat2075 replied to strohbehn's topic in Work In Progress / Sweatbox
Here's one idea for dealing with no-forehead characters... the eyelids seem to be rigged to just open and close. If you rig them so you can shape the line of the lids you can start to suggest things like \ / and / \ and _ / and \ _ Any character will benefit from shapeable eyelids, but this one especially so. It may be too late to re-rig him for this spot, but for the future... -
Anti-aliasing(correct term?) in rendering possible
robcat2075 replied to Path other's topic in New Users
Those decals look completely anti-aliased, no? -
Anti-aliasing(correct term?) in rendering possible
robcat2075 replied to Path other's topic in New Users
Well, no wonder you're getting bad results! I thought i had posted the actual targa but I guess not. try this... AntiAliasingTestAlpha02.zip -
Anti-aliasing(correct term?) in rendering possible
robcat2075 replied to Path other's topic in New Users
Something must be wrong because you are not getting the good anti-aliasing of decals that I'm getting in V13. In V13 the anti-aliasing of the decal is as good as a 256 pass render. Do you still have 13 installed? to try? -
I don't think that's true - if you look at first image I posted - the decal doesn't get AA'ed at all in the regular render, compared to the 256 pass render (and like I said before - I purposely made the decal ugly - used it straight from Robert's original jpeg post and skewed it) http://www.hash.com/forums/index.php?act=a...st&id=44048 I downloaded yours so I could duplicate the exact angle. Here's what i get in a regular "final" render, multipass OFF. Blow it up and look at it. The decal is as anti-aliased as anti-aliased can be. It's even better anti-aliased than the the actual edge of the patch you can see beyond it. here's a (hopefully) uncompressed png

-
teaser podTH264.mov
-
Anyone remember the days before 5-pointers? There was something called the "hanging spline" that you tried to make work.
-
In V13 I can move multiple keys (including pose keys) as long as I don't select any Pose ON/OFF keys at 00:00 a Pose ON/OFF key at 00:00 seems to act like an anchor preventing the others from moving. Aside... be careful when shift-selecting keys. Shift-selecting additional keys can sometime cause previously selected keys to get unselected. Make sure everything you want to move is green before you start sliding things around.
-
In your case, you do this in your chor. You can connect anything as long as you're not creating a "circular constraint" in which one bone is trying to be constrained to a second bone which is already trying to be constrained to the first bone. I'd say you constrain the model bone of the man to the model bone of the chor. Or, suppose your car has some sort of suspension rigged where the body of the car can jiggle a bit from where the model bone is. then you'd constrain the model bone of the man to whatever bone is the main chassis of the car. What if your car had rigged power seats that could move in relation to the chassis? Then you'd constrain the man to the bone for his seat. "offsets" allow a bone to be constrained to anther bone without being snapped to the exact same position. The "use offset" button should be on by default when you make a constraint in V15. Before you had to turn it on manually.
-
Looks like a good proof of concept! constraints. You can constrain any object (or bone) in the chor to any other object (or bone ) in the chor. You'll need a Translate To and an Orient Like constraint. With offsets, of course.
-
remember it's just the rectangular edge of a bitmap that doesn't seem to get AA'd in a regular render. The interior is AA'd just fine. In actual practice the edge of a bitmap is rarely seen because most decals are created to be larger than the patches they are applied to. If a bitmap has to be smaller than the patch it is applied to you can solve the edge problem by clipping 1 pixel in the alpha channel. And then you can use regular render and still have nice decals. Here's five renders; the decal (with 1 pixel clip) looks equally good in all, but took way less time in regular render.
-
Recent jobs done with A:M
robcat2075 replied to John Bigboote's topic in Work In Progress / Sweatbox
The biggest difference between V6 and V-now will be that displacement doesn't depend on mesh density anymore. Don't know if that's an issue here. -
A is Eric's original 49-pass render resized in Photoshop to 50% B is the same render with a 1-pixel blur, then resized in Photoshop to 50% I think B pretty much eliminates AA issues. Another 3D app I have has some options on how anti-aliasing is done. It's basically the trade-off you see above. You can have sharpness or you can have smoothness, but you can't have both. They are opposite uses of the available pixels in the image. Multi-pass is just a primitive brute-force approach to AA and motion blur. The regular renderer is the one uses some intelligence to pick out things that need effort put into them. Perhaps it can be modified to offer the option of a 3rd anti-aliasing stage on top of the two it has now. That might be a worthwhile feature request. But I think you could get the equivalent result by rendering at 2x the size and resizing it down.