robcat2075
-
Posts
28,400 -
Joined
-
Last visited
-
Days Won
425
Content Type
Profiles
Forums
Events
Everything posted by robcat2075
-
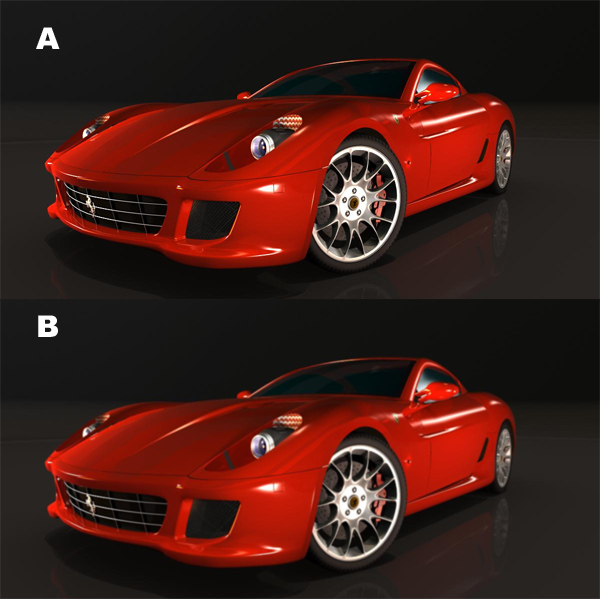
Which do you like better... A or B?

-
5 passes is expected to be worse than 49. What am I missing?
-
I recommend MPEG4 or Sorenson3, just because they are reasonably fast and small when rendering. "Animation" typically makes huge files. Don't use it for posting movies here.
-
nice Robot! I forget the brand name, but he looks a bit like toy that was a bunch of snap together plastic parts that you could make figures out of. Not Legos. It was something way less brick-ish.
-
the graphics card wont' play any role in anti-aliasing in a final render. But that looks great! I'm not bothered by any aliasing. Just to try, render it at 2x the res, do a 1 pixel blur, then shrink it down to this size. That ought to fix anything.
-
The little hops the cactus does work real well. Nice segment.
-
switch your file save type to TGA, then turn buffers>alpha off. then switch back to whatever type you were using.
-
I'm started on mine...
-
If particles can be included in an alpha channel, render one sequence with an alpha channel and make is a layer or rotoscope in front of the other sequence (which woudl also be a layer or rotoscope.) If they can't... hmmm... BTW, if you are resaving any of your TGA sequences as QT and need to preserve an alpha channel, "Animation" codec is the only one that supports an alpha channel.
-
I recall you were asking about how to get the slow in/slow out at the top of a jump. This vid isn't specifically about that channelbiasmp4.mov but show how to edit your channels to get any shade of motion you want.
-
You're going to have one animation with sprites emitted from the left-side object and fading out as they pass the middle You're going to have another animation of sprites emitted from the right-side object and fading out as they pass the center the second one is the one you will need to run backwards so it looks like sprites are going TO the right-side object SOMEHOW (not hard but godawful to try to explain in one sentence) you composite both animations to show simultaneously so sprites appear to be emitting from left and landing on right. And you hope the fade-in/fade-out in the middle fools people. You will not get this right on your first try. It would take me about a day of experimenting to discover small details and get it all working together.
-
Yes, any sufficiently bright point of light can cause a lens flare. They will all radiate around the axis of the lens.
-
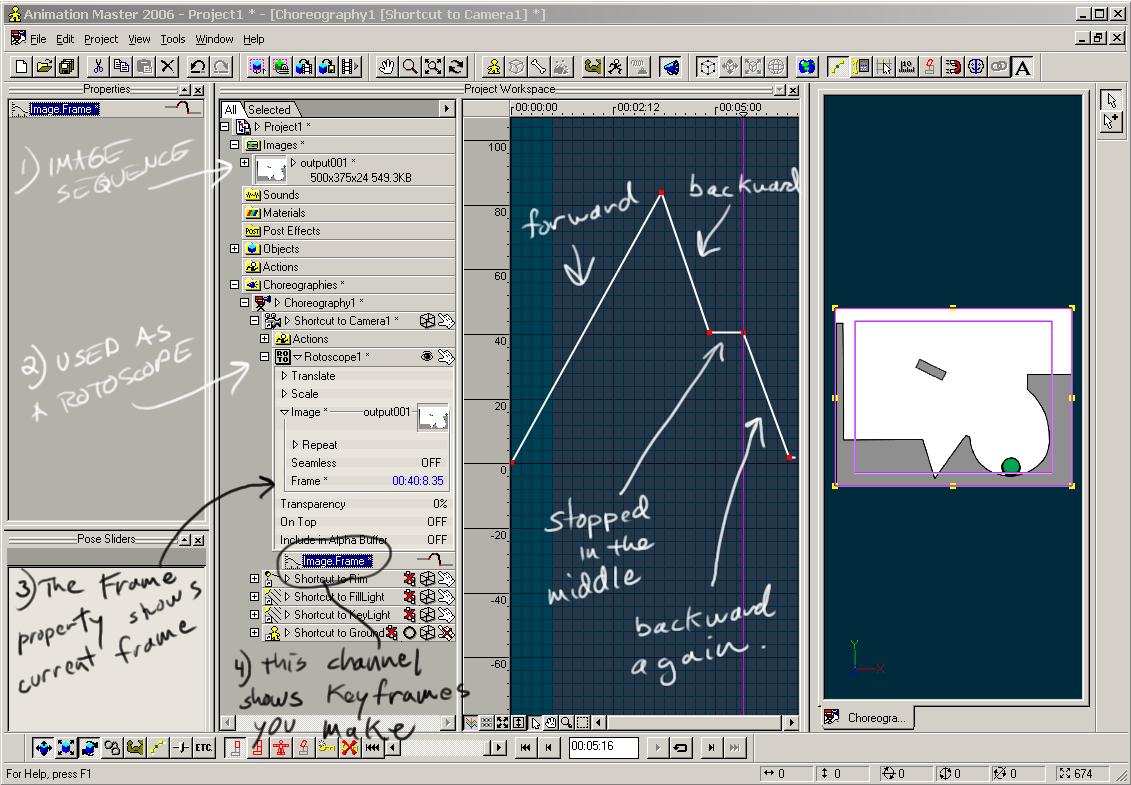
Worst case... renumber the frames. image sequences on layers and as decals have a "frame" property that lets you show any frame on any frame. You'll need to enable Show More THen Drivers to key it in a chor. Seems to me you could key the end at teh beginning and the beginning at the end to make a sequence play backward.
-
That looks wonderful! One thing about the lens flare... the various flares should have a common point of convergence (usually the center of the photo). Unless there's a reason they don't?
-
the only way i can think of to get particles to look like they are landing in a certain formation would be to render them being emitted from that formation and then reversing the footage.
-
that window doesn't work in my version. Post a message telling everyone to come to the A:M forum (www.hash.com/forums) to ask their questions.
-

Large Patch count Rendering in Layers
robcat2075 replied to Shelton's topic in Work In Progress / Sweatbox
BTW, this is slightly OT but with OpenEXR rendering you can actually get each light separated out and adjust lighting after you've rendered. Yes, I've read that they might render a background once and just slap it on an A:M style "Layer" behind a character in the foreground. Also some of their backgrounds are plain 2D paintings. -
Large Patch count Rendering in Layers
robcat2075 replied to Shelton's topic in Work In Progress / Sweatbox
A:M doesn't have a way to permanently tag a model as being part of a certain group (AKA "Layer") for rendering purposes, but you can manually turn models off (Properties>Active ON/OFF )as needed if you want to render items separately. And there is a way to get just a rendering of shadows. I did this while testing some lighting for a TWO scene that had many characters and much scenery All of this presumes you are somewhat knowledgeable about compositing issues and techniques. -
Great lookin bug! Not sure about the high hips but I guess that is anatomically accurate. The roto problem seemed to be related to a mistaken file location. Maybe the same with your BVH file?
-
One of the mentors at AnimationMentor said that when he ran out of ways to make a walk look weightier he would increase the time that both feet are on the ground. I notice that you have the trailing foot lifting off right when the leading foot contacts the ground. That's a bit unlikely. If it stayed behind for a few more frames, pushing the body forward, I think that would help.
-
and make sure you have exporters in your hxt folder http://www.innovateenterprises.com/AM/
-
Recent jobs done with A:M
robcat2075 replied to John Bigboote's topic in Work In Progress / Sweatbox
Smooth camera moves, with motion in different axa at once like we see in Matt's animation, are pretty difficult to get "for real". -
Hi Mark, well it's about time you were getting around to animating! If I were to pick out one crucial missing element it would be the compression pose right after the heel contacts the ground. Basically the body falls into each new step and doesn't immediately rebound up at the moment the heel touches the ground. It takes a *few* frames for the leg force to undo the downward momentum of the body and get it going back up again. Richard Williams talks about this in his book on p. 103 (and I show it in my vid on posing walks. In the tut link in my sig.) I think that is the hardest part of walks to get working right.
-
regrettably , it's easier to do than to describe.
-
Recent jobs done with A:M
robcat2075 replied to John Bigboote's topic in Work In Progress / Sweatbox
mmm... juice... me thirsty... Looks great!