robcat2075
-
Posts
28,276 -
Joined
-
Last visited
-
Days Won
406
Content Type
Profiles
Forums
Events
Everything posted by robcat2075
-
I have had that happen when i was doing custom scripts. Not sure of the exact cause If you want to post it or send it to me I could try to look at it later.
-
The body looks good. There's something about the proportion of the fingers to the hand that looks odd.
-
I'd call that one "paparazzi flash bulb." cool find.
-
I didn't see the sound version until too late, but you pretty much got that across without the sound! (You oughta delete that top one and point to the replacement)
-
Another element is that the reflection from the glass will be two if you're close enough. One from the front surface and one from the back. And if the windows is dirty that can mess the reflections up too.
-
-You've got a straight leg when the heel contacts. That's good. It's supposed to be straight. However, you might try to pose that so it's just a hair off of straight so that there isn't a huge knee pop when you fix the next thing... - the body is moving back up right when the heel contacts. The mass of the body really squishes down for a few frames after the heel contact before it rebounds up again. - the hips look very stiff. you can turn the hips to the left when the left leg is forward and to the right when the right leg is forward. It's a very slight oscillation. -The shoulders can counter the turn of the hips.
-

Animation WIP for a critique
robcat2075 replied to Bruce Del Porte's topic in Work In Progress / Sweatbox
In 3D I think you'd have to suggest it rather than duplicate it. But he's still rebounding the moment his heel hits. If he slunk on thru before his back foot came off the ground maybe it could be done. Remember the back foot is what has to push him forward enough for him to coast up and over the leg in front. If the back foot is already sliding forward on the frame after the front heel hits, it hasn't done much pushing. -
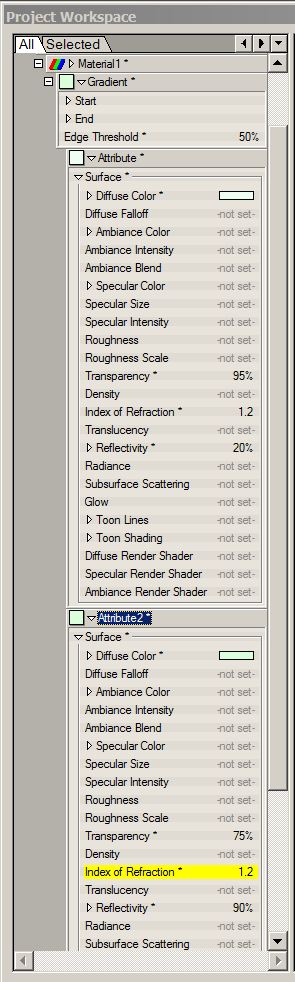
Aside from refraction (not a huge issue in flat planes of glass) the reflection of glass is other main thing. Glass reflection is not uniform. Looking flat at it, it has fairly little reflection, maybe 10-20%. Seen on edge it is almost completely reflective, maybe 90%. In A:M you can do this with a gradient combiner material, setting the first attribute to ~20% transparency and the other to ~90% and setting the "Edge Threshold" to 50%. A very large or antique pane of glass with probably have some deviation from absolute flatness. "Roughness" can do that with the "Scale" set quite large.

-
I like that!
-
I just tried notes in V15 and that worked too.
-
Would there be interest in a Bouncing Ball Bootcamp?
robcat2075 replied to robcat2075's topic in Showcase
Here's the form the bootcamp class might take: 1 Gravity and Inertia. Why the ball moves the way it does. 2 Simple bouncing ball. How to create this motion with A:M. 3 Squetching ball. Why the ball changes shape. 4 Jumping ball. Why we use anticipation. -
Animation WIP for a critique
robcat2075 replied to Bruce Del Porte's topic in Work In Progress / Sweatbox
Here's a guy who tried a Keep on Truckin' walk http://youtu.be/PNYpLE20P3Y but it's still not quite like the original...
-
To make a streak material , on a Material attribute>Change type to>particle system>Streaks
-
brace yourself... it's called... sparks! You can try this but I just whipped it up from scratch and I find that you have to customize particle effects for each new situation. Sparks2.prj
-
Problem with Darktree materials - I see the targeting ball of death
robcat2075 replied to Master chief's topic in New Users
I haven't installed the darktree materials since I put this new computer together so i had to do this ... First, there should already be a "darktree" folder in the top of your V15 or V16 folder where your A:M is installed. It has 11 .dll files in it. This should be installed with A:M. Next I downloaded a repository from the darktree website like this: http://www.darksim.com/Repository/DTRep_thumb.zip I unzipped that to the top of my "Hash Inc" folder. Because of some permissions thing I had to unzip it to a spot on my data drive and manually copy and paste to my Hash Inc Folder. You should end up with a folder "DTRep" in your "Hash Inc" folder with numerous folders inside it. Then in A:M in the PWS I did Materials>New Then I did Attribute>Change Type to>Plugin>Darksim>Simbiont AM (That's gotta be the longest menu tree in all of A:M) In the properties for this new "Simbiont AM" material i clicked on "Load DarkTree" and navigated to the above mentioned folder to find one of the .dsts or .dstc files I had to close and reopen he material preview window to get the preview sphere to update. -
I do recall some of those.
-
thanks for dropping in to clarify that, Yves!
-
Animation WIP for a critique
robcat2075 replied to Bruce Del Porte's topic in Work In Progress / Sweatbox
Looks Freaky! The guy in gray walking toward the cam... -he starts going back up immediately upon his heel hitting the ground. too soon. His mass will keep going down for a few more frames before he heads up again. It's slight but it's gotta happen. -his feet are pointed straight ahead. Almost everyone points toes out especially casual people. Devil: -same walk issues although we don't have as much time to catch it. - I tend to slap the foot down after the heel contact pretty fast , but for the devil's slow walk here it may be too fast . -is his left thumb supposed to look like a penis around 03:09? If it is, you might keep the right hand farther back so the silhouette is clearer. If it's not supposed to look like a penis... it looks like a penis. -if you did his right hand in FK instead of IK when he's doing the pointing stuff that would get you more natural motion in relation to his torso and easier to get the arcs right. -after he turns to his right we sort of lose his right hand action against his red body in back. Guy in Gray second shot... -I presume the shadow walking off without him is intentional... perhaps if the camera angle was lower we could see more of the shadow and it would catch our attention better? -the cigarette looks magnetically drawn out of his hand rather than being tossed away. that's going to need to be a bigger gesture for us to get what he's doing; I wasn't sure what it was until I watched it several times. -When he walks, his toes look more pointed out, that looks better. - same issue with rebounding back up too soon after the heel contact I was able to play first file but it didn't' scrub well, I'm not sure why. -
I didn't even know there were notes! i tried it and was able to save and reload a model with notes (v16), although I don't know what you would do if you had more than one line to enter.
-
216 downloads so far! That's quite a few for our little forum. The eyeballs are out there.
-
I suppose it wouldn't have to always be a Bee. All sorts of creatures would have reason to go by a flower... bees, butterfly, worms, mice...
-
I like the stop mo look. Have you tried this at 12fps?
-
Is Stereo on by any chance? There's gotta be something out there at 46:12 that's causing it. You might try deleting elements and resaving (under a new file name) until the chor stay at the proper length. Then you'll know what you deleted was the culprit. Is there a sound file involved?
-
"Bees and Flower" Different bees coming to the same flower trying to get pollen out. Everyone makes their own unique Bee.
-
extended material animated on 4x4 grid
robcat2075 replied to johnl3d's topic in Tinkering Gnome's Workshop
that looks early 60's somehow.