Caroline
-
Posts
1,248 -
Joined
-
Last visited
Content Type
Profiles
Forums
Events
Everything posted by Caroline
-
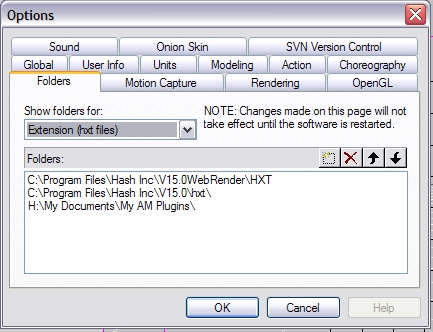
And, this probably isn't it unless you've been messing with the program files, check that your hxt folder is being pointed to in Tools Menu > Options. (You should have only the 2nd one showing - the first was for TWO webrender, and the third is for 3rd party stuff I've picked up) Edit - the hxt folder is for plugins that extend the base A:M code. Like Import / Export or 3d Painter, or TSM.

-
Thanks, David, I think I get the euler rig idea. And I guess you'd still have the problem of CP weighting to make the joints smooth anyway, and being such a small rig it would not be worth spending all that time unless you were going the whole hog. Sorry, that was tongue in cheek - even I installed it once a long time ago to try it out. I was trying to give an idea of the huge complexity of it.
-
I haven't a clue what to look at . Sorry. My initial reaction is that I prefer to animate it more than the TSM rig, specifically the arms, but that would probably be true of the 2001 rig too. I love your feet. They are a big improvement. I would like fingers to roll, but could not test that. I could not find the Back and Back2 bones that are in 2001, the Chest Controller does not seem to bend him sideways as well as the two bones together. And I could not work out how to go about installing it And now I'm going to ask a really dumb stupid embarrassing question, because I really don't understand the nuances of rigging. Why don't I ever see a rig just made up of Euler constraints? Is it that it's for much easier control or best for FK/IK? Like my arm model here seems to work OK for me, with no extra hidden bones, or complexities. EulerArm.mdl I'm not saying it would be best for animating, but just for simple stuff, or a character that doesn't come on very much? And I would love to see simple reviews of each of the rigs, even from other people, because I'm sure they each have their place. eg TSM - simple to install, but you need to keep the version before final installation. Squetch - total control over every least twitch, but you need many undamaged brain cells to install.
-
I'm glad you are considering coming back - it's a great software. But like anything worthwhile, it takes a long time to become a master. Despite what it says under my avatar, I've been learning for 2.5 years, and am still just gradually grasping the complexities. And definitely worth $49 (and no shipping costs). What you get for $49 is the full program for twelve months. After one year the program will not work any more until you renew. It is a subscription based software. No CD in the drive. For $299 you can buy a CD, which will give you updates for one year (I don't know if that is Jan-Dec or 12 months). But the program will still work after one year. As long as you have a working CD in the drive. As for your V8 tapes, I came in on V12, and there were a lot of V8 tutorials floating around the net. I found these very useful, as long as I remembered that some things have changed. The principles are still the same. Splines are the same. You can go to the Hash site and check out the manuals too. The first thing to do after purchase is to do The Art of Animation:Master course, which will take you through all the basics. One other thing. Even though this program is solid, it will occasionally crash. Not as often as Internet Explorer, or MS Office. But with anything, A:M or not you should get used to making different versions rather than saving over the same thing all the time. That's advice not only related to A:M, but to all software. We look forward to seeing your contributions in the forum.
-
Works for me too. Whole forum about materials: http://www.hash.com/forums/index.php?showforum=46 and here: http://www.hash.com/forums/index.php?showforum=130 This one will keep you going for a while: http://www.colins-loft.net/free/mats/Demon_Skin_Material.htm The TaoA:M one is the best to get you started, though.
-

Problem with hair - Five point patches are bald
Caroline replied to thefreshestever's topic in New Users
Another great way to find out if all your normals are facing the right way is: Tools Menu > Options > Rendering Tab. Change Quality to Shaded & Wireframe. Change Show Back Facing Polys to OFF. This makes normals that are facing away from you look transparent, so they are easy to pick up. One warning though, if you leave that setting on and forget about it, you will get the transparent areas and wonder why Useful Shortcut keys: Shift 1 turns on and off normals (same as going into options) and Shift 6 turns on and off back facing polys as above (I just found this out myself, so thank you). (Those numbers are the ones above the letters, not the num pad) -
Using hair for grass is a fairly advanced usage of hair. This is the manual page for hair: http://www.hash.com/Technical_Reference/v110/Hair.htm Scroll 3/4 of the way down to find a smiley face. Instead of the Smiley face photo, replace that with a photo of grass to give you the varying colours that grass has. That's what I did for this image: http://www.hash.com/stills/displayimage.ph...um=58&pos=4 Exercise 20 in TaoA:M also has the technique for colouring hair by decal.
-
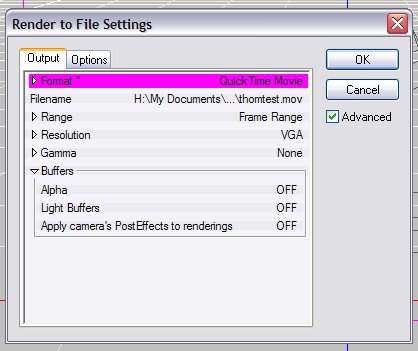
I'll have that cookie, thank you. To make your black sky blue is here (under Buffers):
-
I started in 3d only to help my son through grade 11 & 12 (turns out they didn't do any 3d), and I knew absolutely zilch, so I know where you're coming from. Even though I still feel I know nothing compared to all the greats in this forum, I have learned so much this far, mostly by doing tutorials, and reading everything I could at internet cafes while hanging about waiting for people. Just understanding 3d space on a flat screen is something completely different. Take baby steps, and study one part at a time. For example, with materials, go read everything in the old material forum, search google - other programs refer to materials as 'shaders'. Check out links for 'Materials' at http://hashlinks.wordpress.com/. And of course, ask questions here.
-
Great explanations by Robcat, and the best advice of all - do The Art of Animation:Master exercises. There's a whole forum dedicated to it. This helps you be able to articulate specific questions - it's really hard to understand or ask questions when the whole 3d thing is so shadowy. Further reading: Alpha Channel discussion Layers (with examples of alpha channels) Texturing for Dummies (generic, not A:M specific) Yves' learned tutorials on Skylights/alpha/materials But first of all, and most important - work through all the exercises of TaoA:M, and if you post your work in the TaoA:M forum, we may encourage you on the way
-
That's great news, Will - that tutorial is a classic that I have missed. Maybe a link at the end of the blog to your other CD tutorials to purchase? I started to understand how to decal from your brilliant decalling video.
-
I'm glad somebody asked (and answered) that, as it was something I'd been wondering. So from reading that, this is what I get in summary: That a cookie map pixel is there or not, according to the alpha (or keycolour). A transparency pixel is given an opacity based on the blackness of the mapped pixel. However, a cookie map has a Value percentage, so that if I had an orange map on a blue model, and a value of 75%, then it would be 75% orange and 25% blue. A transparency value just affects opacity. (Photoshop Elements is cheap, and Artweaver is free - I find the Gimp difficult)
-
Thanks for pointing those out, Rodney, it's great they are still there. And, yes, thank you to Martin for hosting all kinds of stuff. This is the link to the front page of the Extra CD there: http://www.hash.com/amtutes/X_Vol001/. There's a whole bunch of other tutorials in http://www.hash.com/amtutes/ that I thought were lost too. I have been compiling all my A:M Links, just in case I get vapourized, and have been editing out the ones that were gone. I shall have to put some of these back in. There are a heap of wonderful tutorials around the net, created by many selfless people. If anyone's up for a bit of light reading, here are some links: http://hashlinks.wordpress.com/
-
Screen print: This is not for chosen groups, but it is in the same place for them too.
-
Is this the site for the 2001 rig that you lost? http://www.eggington.net/Hash/2001RigDocs/intro.html
-
What stock models do you mean? The 'stock' models that came with A:M over the last couple of years are in that data.zip a couple of posts back, like KeeKat and Shaggy etc. You can get some free (and paid for) models from Eggington (although that site seems to be down at the moment). You can also get a HUGE number of models on the extra DVD that came with A:M 2006 at http://www.hash.com/store/.
-
The plugin's called Treez, and you can find Holmes's tutorial here: http://www.hash.com/forums/index.php?showtopic=30938 That whole Tutorial forum is worth going through.
-
If you click on the first post, the blue girl, it's actually a gorgeous animated gif. Thanks for the site.
-
Just wandering through the forum - http://www.hash.com/forums/index.php?showforum=64 - it looks fabulous. I should not single out my admiration of Nancy's lavish treatments (but I will), as all of it looks wonderful so far.
-
I think this is the same as Rodney's, but simpler and with .pngs. You just have 2 decals one on top of the other, and you animate the percentage of each decal over time. And you do need to click Show More than Drivers to get the decals to display in the choreography. AnimatedDecals.mov Project+pngs. AnimatedDecals.zip If you need a third static decal underneath the animated two, you can do that too.
-
I'm not sure how you are currently doing it? Decal going transparent to show diffuse? I have to go to work now, but I'll have a look later. Fireworks will save a .png, I think? That should work with transparency. Also you will probably need to click the Show More Than Drivers if you are animating a decal to fade in and out:
-
Tutorial on using SmartSkin here (in Wink): http://www.clipsandscripts.com/tutorials/c...a_smartskin.htm And Holmes' Smartskin: http://www.hash.com/forums/index.php?showtopic=29742 I find SmartSkin is easier to understand than cp-weighting, but if you are using the same character in an animation a lot, then cp-weighting is probably better than smartskin.
-
In TaoA:M there is an Exercise 17, which uses Dynamics. A while ago I wrote an alternative method using Steffen's Newton Physics plugin (it's a small pdf document): http://www.hash.com/forums/index.php?act=a...st&id=23696 That should give you the basic principle. Here you will find the usage of the other things it can do: http://www.hash.com/NewtonPhysics/ And here are the example movies that have been created using the plugin: http://www.hash.com/NewtonPhysics/samples.html
-
The .mdl file is just a text file - mine always opens in a new tab too, so I copy the whole page and create a new text document called x.mdl and paste the text into it, then I can load it into A:M. Same with .prj.