Caroline
-
Posts
1,248 -
Joined
-
Last visited
Content Type
Profiles
Forums
Events
Everything posted by Caroline
-
Show Back Facing Polys? Tools Menu > Options, Rendering Tab. Choose Shaded mode, and make sure Show Back Facing Polys is ON. If that is OFF, the patches that face away from you look transparent. It's a good way of finding flipped normals. To flip them the right way, select the Patch tool, click on the patch, and press the F key.
-
So you select the part that is going to cover the image. I notice that in step 6 in my post above, I did not spell out that you Save that Selection (Select Menu > Save Selection), before you save as the 32bit tga. I will edit the post to reflect that. Do you think that's what messed you up? When you import that tga into A:M, the part of the image that was not selected should look black in the PWS, but when you create a layer with it in the choreography, it will be transparent. My post above does it with layers - I do not recall how Victor did it, exactly. When you say you get stuck - what do you mean by stuck? Have you had PSE before? What's different about version 6.0? Have they allowed you to disable the horrible Organizer yet?
-
Hi, Photoman - welcome to the forum! How are your A:M skills? Basically compositing live action and animation is just like using Photoshop layers. You have the live action as a layer behind the animated person. So you have your animated model, and render it out with an alpha channel to .tga format. You then create a choreography with the live movie as a layer, and bring in the .tga sequence in front of that layer. Where the black alpha channel was rendered, that will be transparent, showing through to the live action. You should probably experiment with stills on one frame first, to get the hang of it. Mini tute here: http://www.hash.com/forums/index.php?s=&am...st&p=266940 If all that sounds like blaa-blaa, then you might need to do a little more reading and experimenting This page http://www.alienlogo.com/tincan/ will introduce you to splines, and there is also an Alpha Channel tutorial.
-
I haven't used the duplicator wizard myself, but here's a couple of links you could look at: Snail Shell Thread ftp://ftp.hash.com/pub/movies/Duplicator.mov (33mb, and you probably need the techsmith ensharpen codec installed to be able to watch it.)
-
Hi, LostValley, and welcome - it took you a long time to make your first post . Your question is rather broad, so there are many different answers. What sort of picture? How much animation? Could it be applied as a decal onto a cube and then moved around? Or could you model parts of it, and then animate them? If you have a look at The Art of Animation:Master manual you will get a glimpse of how to model, how to animate, how to apply a decal. For the font wizard, which is the one I think that Robcat is talking about, you can look at Holmes's tutorial.
-
That's a monster that brushes and flosses regularly. Take it slowly, and anything is possible, and even if you only part finish it, you'll learn something about organic modelling
-
This thread looks interesting - I haven't tried it, and looks complex, but tell us if it works! http://www.hash.com/forums/index.php?showtopic=21535 If you search for +tire +tread there are a few threads that might help.
-
You get into the ftp site in your browser (Internet Explorer or Firefox). No password needed, you just enter the address ftp.hash.com/pub in the address bar (no http://). You get presented with a list of folders, which you can click on to open. Oh, and welcome to Hash! You'll find the documentation here: http://www.hash.com/2007web/reference.htm The important one is The Art of Animation Master, which has all the introductory exercises and tutorials that you will need to get started. (I find that site does not work for me in Firefox, but is fine in Internet Explorer)
-
That's called tweening (in-betweening), and it's what the computer does between keyframes, to make the transition from one keyframe to another. Classic video from Robert Holmén: Making Bones Stay in Place
-
You can't use a null for that? I was just playing. Here's a couple of nulls. The pupils are constrained to one null, and the eyeballs to another. head.mov Project: head.prj
-
Create a null in bones mode. Right click > New Null. Then constrain the eye bones to the null - (Aim At Constraint, I would think) Then when you move the null, they eye bones will always aim at the null. Solid mesh? I don't understand that term. Do you mean a separate skull cap? Or do you mean modelled hair rather than particle hair. For a cartoony character, that might be the way to go.
-
(2) I tend to use the arrow keys. Select the object with the mouse in the chor window, then use the arrow keys up and down. Hold the Shift key and arrow to make it jump in a bigger step. (3) From the manual "Nulls are non-rendering objects used in constraint setups or as action objects. Nulls can be added to objects, actions, and in choreographies. One common use is using a Null as an Aim At object for a constraint (e.g. aiming the character's eyes)." As Fuchur says, they don't 'do' anything. Just add a null (right click > New Null), and constrain a couple of bones to it. When you move the null, the bones move.
-
That's a nice effect with the toon looking eyes. A null would be easier to control them I guess. I just checked the compression of your .mov file, and you are not using a compressed format, which is why you are getting such large files. In the advanced render settings, where you choose 'quicktime movie', you can click Set, which gives you a list of other compressions. I use Sorenson 3, others use Mpeg, or H264. The default one, Animation, which is what you used, is not very compressed, if at all.
-
Thanks for the tip - I am still experimenting with weights, so I haven't had that problem yet, but I will remember that. I hope.
-
You can use constraints with a prop just as in the choreography. Just drag the gun into the action, it will appear as an action object, and apply your constraints, like Translate To. Exercise 6 in TaoA:M deals with a couple of constraints.
-
When I delete half my model, I do this: 1. SAVE the model + project 2. Select the points I want to keep. 3. Press Ctrl C to copy 4. Press Ctrl A to select all the points 5. Press <Delete> to get rid of all the points. 6. Press Ctrl V to paste It may seem complicated, but it does mean that you don't have to break the splines like you have to in this model. Try it once. You'll like it!
-
The manual John is talking about is here: http://www.hash.com/2007web/reference.htm It's called The Art of Animation:Master Manual in Adobe Reader format, and if you do the exercises, you will give yourself an easier life and much karma
-
Make sure you are right clicking on the actual green control points, not 'untitled' in the Project Workspace - you could press the delete key after selecting them. Also, when you delete like this, the splines will still be linked at the end, which might not be what you want. You could select what you want to keep, press Control C to copy, then Control A to select all, then delete key, then Control V to paste back what you copied first. This will stop the splines being linked at the end.
-
You have two problems - the first is that you are in modelling mode, and not in the pose window. The second is that you have not selected the rotate manipulator. I notice that it says to create a pose - I do the flatten in a new action, so that the flatten can be discarded after decalling. Also, while decalling, you should turn off hair - Shift 8.
-
There are the exercises in The Art Of Animation:Master, exercises 10 and 11 Plane and Giraffe. They show you the basics of decalling, but not flattening. Try Colin's Texturing: http://www.colins-loft.net/FaceTexture.html and if you are going very advanced, Rusty's Facial Layered Mapping Tutorial: http://www.virtualmediastudios.com/tuts/mapping/ For purchase, there is the Siggraph 2006 training DVD from Hash for $50, which has William Sutton's decalling video. This is the one that made me understand decalling.
-
That's a great exercise, but very difficult. If you need some help, here's a thread where we went through some of the problems: http://www.hash.com/forums/index.php?showt...27433&st=15
-
Have you tried restarting the computer? Was it working before? If so, what is different about your computer now? Have you installed anything? Updated drivers?
-
Looking good. To delete a pose completely, as well as deleting in the relationships folder, under the model's User Properties, right click the pose there and delete too.
-
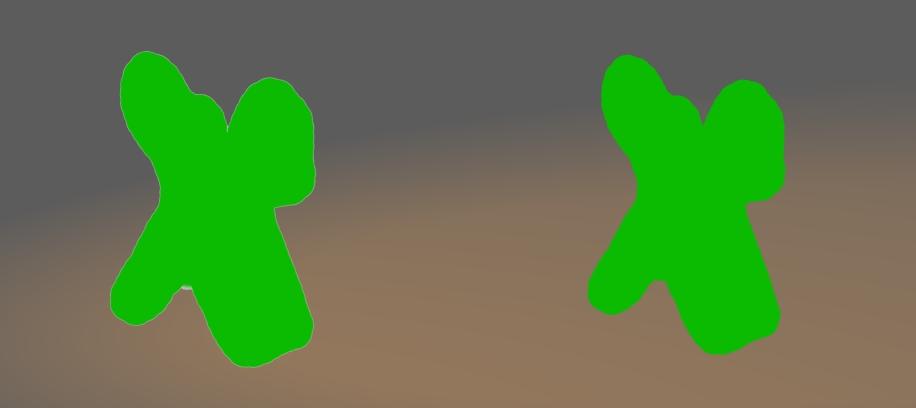
Did you have the mask enabled when you did the Solidify? (I did several times) My steps are - create the mask. Save the mask. Disable the mask. Run Solidify. Save the tga. If you run Solidify with the mask enabled, the filter will only work in the area unmasked. I can't test PSP, as I can't find my old disk for the moment, but Photoshop Elements works fine on a cookie cut. The one on the left is without Solidify, the one on the right with. (That was fun, I don't think I've used Cookie-cut. It's neat.)