Caroline
-
Posts
1,248 -
Joined
-
Last visited
Content Type
Profiles
Forums
Events
Everything posted by Caroline
-
http://www.hash.com/forums/index.php?s=&am...st&p=265900 This works well. The Flaming Pear Solidify plugin is at: http://www.flamingpear.com/goodies.html and works with Photoshop Elements as well as Photoshop.
-
Oh I get it, this is like your fire tutorial. Looking good. (When did you last make such a controversial model? )
-
Is this the Olympic torch? Can the flame trail behind as it moves?
-
The image needs an alpha channel, possibly? In Photoshop Elements, select your transparent bit with the magic wand, then click Select Menu > Save Selection, and save it. Then save your image as a 32 bit tga. Oh, if that doesn't work, you might have to invert the selection - after selecting with magic wand, Select Menu > Invert, then save the selection then the tga. I can't remember if that's necessary. Edit: I found this post with all the steps (same name as yours!) http://www.hash.com/forums/index.php?showtopic=31739
-
A klieg light. I created this by deleting all the lights in the choreography, then creating a Klieg light (right click in chor > new > light) called Light1. I then played with the settings until I got the effect I wanted, then animated it to move. Width: 30cm Width Softness: 100% Falloff: 500cm Cone Angle: 20° searchlight.mov Project: searchlight.prj The A:M manual has this to say about lights: http://www.hash.com/Technical_Reference/Ge...Html/LightP.htm It explains the three types of lights.
-
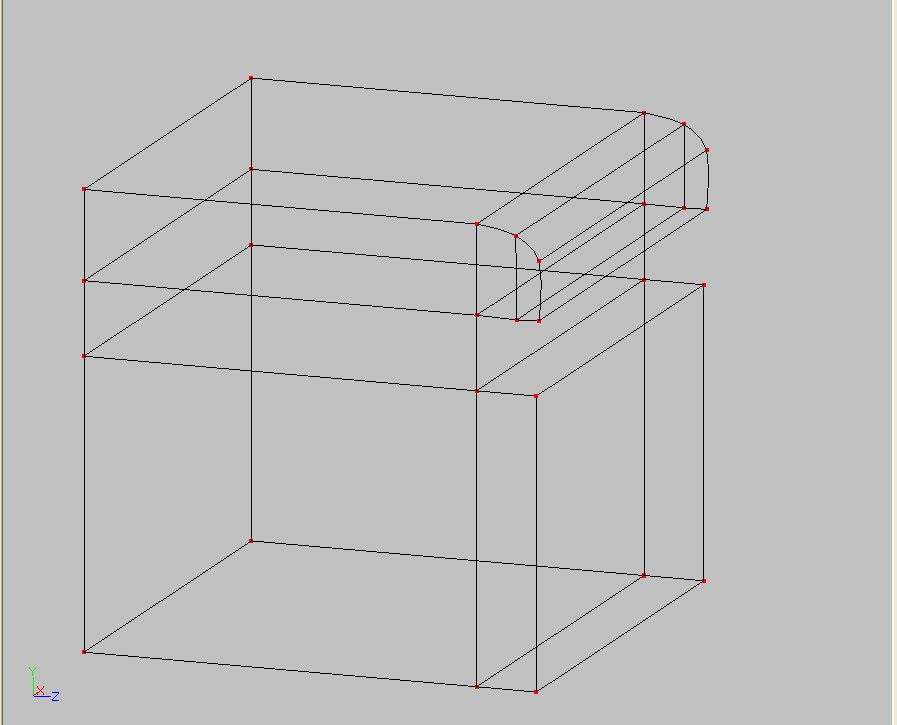
Ok there's 2 hard things in here - the curve at the top, and the hole cut out of the cube. This is my best shot, and it's not so good, I will admit to a crease at the top, and there are people out there that can do much better. But perhaps it will give you an indication of how few splines you need. The best tutorial for learning splines is at: http://www.alienlogo.com/tincan/ Have a look at the basic splinemanship tutorials.

-
Umm. There's a heck of a lot of splines in there. It must have been a bear to make smooth. Let me see if I can come up with something. Just so you know for next time, if you have finished with this one.
-
I guess it makes sense if you don't need too much detail.
-
No, don't retract - if you've had this problem then others probably will too, and if they search the forum, then they may find the solution. Also, it's a happy reminder to check 1) Mirror Mode and 2) Animate Mode (when things won't animate). I for one need this reminder.
-
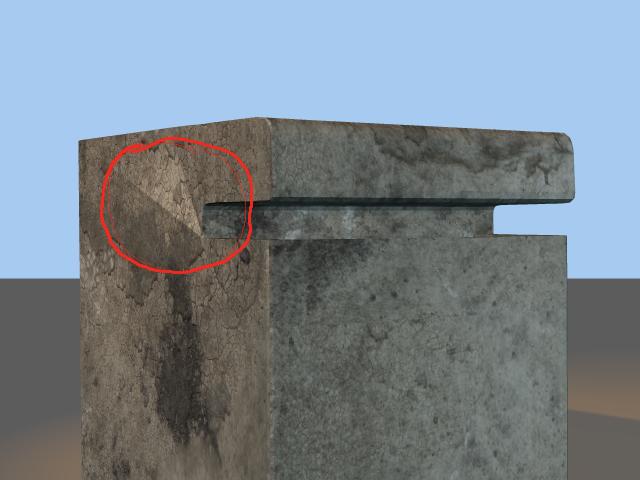
Hi, Alejandro - nice texturing. I think you may have a 'crease' - if you post a wireframe of the splines then we can check your splines are good. (Render to wireframe, not final in advanced render settings) (Or a screen print will work too) Also, the bunker looks solid. When you look through the eye hole there doesn't appear to be any room for anyone inside.
-

Want to post links to animations for critique....HOW?
Caroline replied to Pesto's topic in Work In Progress / Sweatbox
www.mytoons.com allows you to upload animations. -
And render to tgas not a mov, because if something happens half way through at least you have half of it rendered. Looking forward to seeing it.
-
Masna - it's a worthwhile pay for tutorial at: http://www.rafhashvideotapes.com/animatecdroms.html I have a few of Anzovin's videos, and they are all good.
-
Hello, Ishida - I'm not quite sure what you want to do - is it a 'slideshow' of 1500 pictures? You should just be able to drag an image into the choreography and use it as a layer. Like this post: http://www.hash.com/forums/index.php?s=&am...st&p=266940 This post has a background image, then the yellow 3d character, then a foreground image on top.
-
You could look at the TWO (Tin Woodman of Oz) thread - this is the movie made in A:M, and I believe each frame is between 15mins - 1hour each. This is from Ice Age: Try the material baking if you have v15, because it will be quicker than materials. (Search for +bake +material, I guess).
-
I'm only a wannabe, but from my experience on TWO, the only time I touched the model bone I lived to regret it, and redid the scene. If you rotate the model bone in the animation, you are rotating the whole model. If it is a person-type model, that would not be very good animation, as to rotate yourself, you move your shoulders, then hips, then feet. Those movements would be on different key frames. So I used the model bone to put a character into the right position for the first frame, then didn't touch it after that, unless of course he was making a sudden jump not in the camera view.
-
Hi, evan - It's a great thing to experiment, but sometimes things can disappear before you know it. When that happens, click Help Menu > Reset Settings. Then exit Animation:Master and restart it. All settings will have returned to when you first installed.
-
Tools Menu > Options > Rendering Tab > Draw Particles / Hair = OFF Or the shortcut key is Shift 8 When you render and turn particles on, they will stay on in your chor until you turn them off again. And vice versa.
-
Search is good - you've probably found it already. Just in case, it's called Treez and Holmes's tutorial is here: http://www.hash.com/forums/index.php?showtopic=30938 It's brilliant.
-
Isn't that also what the new NLE (non linear editor) can do? Someone did a tutorial, but I can't find it because "NLE" is too short to search for, and I can't figure out how it works. Edit: I found it: http://www.hash.com/forums/index.php?showtopic=29222 But it does not seem to work for single tgas, just sequences, as john says. I was hoping you could specify the length to show a single photo.
-
New Material. Right click Attribute Change Type To > Plugin > DarkSim > SimbiontAM Then in the SimbiontAM properties click Load DarkTree. This is where you have to have the Darktree materials from john's link downloaded. This site has rendered them and shows what they are: http://www.pixelburg.com/am_materialtest/ Only the DarkTrees from Darkling Simulations FREE(!) Simbiont 2.1 package and DarkTrees from Matt Andersen are still available for download.
-
I don't know what is wrong with your settings. Maybe someone else can immediately pin point it? What I would try is changing the Rendering Options to use This Dialog, rather than The Camera, and then render to tga with all options turned OFF except particles, and see how that goes.