Caroline
-
Posts
1,248 -
Joined
-
Last visited
Content Type
Profiles
Forums
Events
Everything posted by Caroline
-
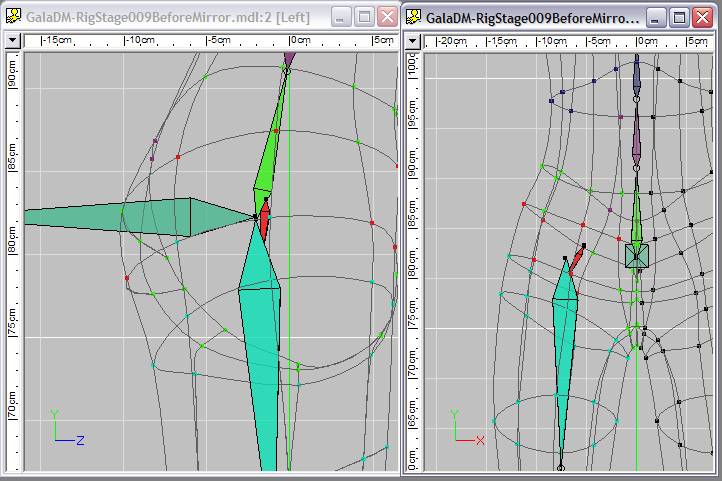
----- I would say it is because "right upper arm 1" roll handle is pointing forwards not backwards. (One of the first things the 'rigging experts' taught me, during the workshop, thanks experts ) You'll need to go back to the version before you ran Rigger, correct it there, and rerun Rigger. It is possible to correct it afterwards, but you have to track down every bone created by TSM during Rigger and change them. It was the TSM constraints ON - when I went into User Properties, under the Model's properties, and turned them all OFF to start, turning TSM ON made it go wonky.
-
A bit wayward you say? Lol - That was the project you posted - I would guess that your model is not embedded in the project - maybe you could sent the .mdl file? (You may have to zip it first, if the forum does not like a .mdl).
-
Have you rechecked EVERY pose? Because as Robert says, the only thing that makes a bone move when an action is started, is if a pose is turned on. Can you zip up your model and attach it so we can take a look? In my TSM mode, the right arm is parented like yours, so it wouldn't be that.
-
Steve - all your Setup constraints should be in one pose. You can open the + next to Relationships, then User Properties Relationships, then whatever folder is under that, then right click your Setup pose and Edit Relationship. Is your fan bone roll handle pointing the same way as your upper right arm 1 bone - towards the back? (Roll handle is the one sticking out at right angles to the bone, so that you can rotate the bone)
-
Thanks, Robert - I did not notice you were watching while I edited. I shall go back and relook at your hack afterwards, but I am a bit nervous of stuffing up my TSM plugin again for the moment .
-
Thank you, Steffen - the rmweight plugin works very well. One small unimportant thing - I had to run it twice for this model - it finds 17 weight errors, then still will not mirror, and finds one more weight error afterwards. GalaDM_RigStage008l.zip
-
Vern, I'm glad you brought up fingers, as that's what I'm re-working on now. I think I agree that I prefer when the splines overlap a little when squished - that's what my own fingers do, but I thought maybe I just have fat fingers (though not as fat as Bertram's). Do elegant fingers squish? --Edit --- I was going to go back on 'advanced fingers', because I was having all sorts of troubles with fan bones not hiding, and the thumb not working at all. However, I must have accidentally messed up TSM while I was 'hacking' a few pages back, and I have uninstalled and reinstalled TSM, and it works fine And I re-watched the advanced fingers movie, and the movement of the base of the fingers definitely seems worth having. (With non-advanced, you get one bone with roll handle to curve the fingers very simply; with advanced, you get two bones, and movement of the base of the fingers, so that the palm can be shaped.)
-
Just a nonsense post here, to show how happy Gala is dance.mov (BVH animation, where the shoulders don't work properly, and the knees sometimes flip.) But it does show up some areas where I could fix her up, especially a couple of points in the hip. Smartskin at the weekend.....
-
Steffen - how about this one - simple cylinder has middle spline weighted 50% bone 1, 50% bone2. Cylinder.mdl Click the left cp on the middle spline, it shows 50% each. Click the x at the top right to close the window. The weighting is now corrupt, to see it, edit the same cp again, and it has a 0% there. If you edit it a third time, it comes up with an error message that it is repairing, but doesn't. The weight has to actually be deleted, and applied, before it will work. Should I be doing this here? Or should I make a Report? Actually, if I had been clicking Done, instead of the x, I don't think this would have happened. Not sure.
-
- Definitely not, Steffen - that was brilliant. The only issue with the plugin was that I did find that the bones called "right" copied and weighted correctly, but the bones called "Right" copied, but did not weight (I had unticked case-sensitive). I fixed that by renaming the "Right" ones "right". Did I say that plugin was wonderful? I was so scared I'd have to do the other side by hand. Do you have a public plugin to fix the 0%, then, Steffen? Mark - did you report it? Or shall I? I did notice it doing that, but I could not believe that it happened on so many CPs.
-
That's actually very good, Hisako - the nose being pinched makes it look 'odd' to us, and she has a funny lower lip - I don't think lower lips go in in the middle. The cheek maybe could be a bit higher, and more pushed out - feel your eye socket, and the cheekbone below it - the cheekbone comes out quite a bit to protect the eye from damage. But some people's faces are flatter than others. Smooth out your splines a bit, especially the ones crossing the spline circling the face. I am working with a model (Gala) that has 'incorrect' splines in the face that cause creases. When she is decalled, you don't notice it at all. The three point patch at the top of the head will be covered by hair. I can't tell from that resolution what other splines may be problems. Check with the comma , key that your splines are all continuous. As an experiment, you could put a decal on temporarily just to see how she looks - save the model first (keep saving models under different version names): 1. Right click the model in the PWS, choose New > Decal 2. Choose a front facing photo - it will go into the model. 3. Resize the photo to fit the face (it probably won't, but don't be too fussy) 4. Right click the photo and choose Apply, then Stop Positioning. Check it out, but don't save the model.
-
Did you download ftp://ftp.hash.com/pub/misc/data.zip? The web application only comes with the program, so you may need to download the 160mb of data. Could you copy it from the pc to the mac instead? They are only text files.
-
Question for the Experts, please I had A LOT of corrupt weightings - ie, weights that had the correct percentages, but an extra duplicate weight with 0%. To fix them, I had to select the whole left side of the body, Edit CP Weights, and go through EVERY SINGLE CP and Delete Weight for each 0%. At least 2/3 of the CPs had this duplicate 0% weight. 1. What did I do wrong for this to happen? 2. Was there a quicker way to fix it? Thanks.
-
Stage 10 - Mirrorbones plugin Model to practice MirrorBone on: GalaDM_RigStage010BeforeMirror.zip Steffen's MirrorBone plugin is AMAZING. Download it here: http://www.sgross.com/plugins/ Unzip and install the hxt into your hxt folder (under Program Files\Hash v15.0) Make a named group of the left half, and save the model as a starting point. It will probably take a few goes to fix up any residual problems with your model. This is what I had to do (I probably made every mistake it is possible to make): 1. I had to go through EVERY CP and delete any 0% weights. - I will ask the question in a separate post 2. Ensure that the centre spline IS on the center. 3. Check that the cps are mirroring - turn on Mirror Mode, and move a cp on the left. If the corresponding one on the right does not move, the tolerance is not sufficient. I changed my tolerance to 0.05. Important - Remember to turn off Mirror Mode. 4. All body, spine and head bone positions should have their Start and End X at 0 - I was not accurate enough early on, so I went through and changed all these. 5. Change "Right" to "right" - even though the "case sensitive" option mirrors bones, it does not include the weights for these bones. While making these changes, save often under a different version number (throughout all this rigging process, I have been saving the model, not a project). To use MirrorBones: 1. Select the left half group 2. Right click the selected group, and choose Plug-ins > Wizards > MirrorBone. These are the settings I used: When the operation has finished, you will have a group called "Unassigned CPs". Click this group, to see what CPs have not been assigned to the bone. I had just a few in the head. Assign these CPs to the correct bone. (Isn't this MAGIC? It copies both bones and mirrors weighting. I could not believe how well it works - after I'd fixed up my model ) If you have a bad result, and there are a lot of "Unassigned CPs", then check the list above, to make sure that everything in your model is correct. Mirror Constraints: If the weighting seems to have worked out OK, the next step is to mirror all the constraints. 1. Either create a new action and keep the action window open, or edit the Constraints Relationships and keep the window open (this makes sure that the constraints will be copied at 50%). If you don't do this, the 50%s will be set to the default 100%. 2. In the model, right click, and choose Plug-ins > Wizards > MirrorConstraints. 2. Search for: right 3. Replace with: left 4. Click OK. All your fan bone constraints will be mirrored to the left hand side. (Also magic ) Save under a new name - I keep saying this, but do it more often than I say. Even though you have mirrored bones, you must still run TSM Flipper, otherwise the TSM Rigger will crash. Right click in Bones mode, and choose Plug-ins > Wizards > TSM Flipper. Nothing will happen (I hope). Right click in Bones mode, and choose Plug-ins > Wizards > TSM Rigger. Wait for your model to be rigged. Test. If necessary revert to the saved model before TSM Flipper, and fine tune the CP Weighting. I had to fix up the jawbone a little bit, and I still have to fix up some weighting on Gala's sides. After I do an animation, there will probably be more…. Tomorrow I will post the 'almost finished' model, and hopefully an animation, so that you can see Gala in action after this stage. - sleepy icon.

-
After doing the spine and hips, I redid C/F/A, to update any of the mesh on the right hand side. I deleted all Left side bones too, as these will be recreated by the MirrorBone plugin: 1. Click the top left leg bone in the model. 2. Click the bone name in the hierarchy 3. Press * on the numpad to expand all. 4. Hold the Shift key down, and Shift click the last bone in the left leg hierarchy 5. Keep the Shift key down, and press the Delete key. Repeat for left arm bone. Delete left leg target.
-
Stage 9 - Spine and Hips The hip is a combination of the "spine" bone, and the "1 right leg" bone, similar to the right arm and right upper arm bone in the shoulder. In the same way as you did the shoulder, weight the spine and right leg in an action window in Muscle mode, tiled vertically with another action window in either Skeletal or Muscle Mode, so you can interactively see the result of the weighting. I think I have worked out my weighting method, which is how I have done the spine and hips - I think it needs a few days, as I have had here, to figure out a workflow that suits yourself.: 1. Using base model, create a fan bone, with the "spine" as the parent. Edit the Setup Relationship, and create the 50% orient-like constraint as before. As for the position of the fan bone, I did not finalise this until some way into weighting. With the model in bone mode, and an action window tiled, you can move the position of the fan bone about, and see exactly what difference it makes to the joint. This is where I settled on (the red bone): 2. Create an action over about 2:00 secs, that illustrates where weighting is needed. 3. Create a second action just so you can edit the weights (safer to do this in an action window, so you do not accidentally move the CPs) 4. Have the two windows tiled vertically, both in muscle mode. Left is editing, right is the animation you created in step 2. 5. In the right window, move the timeline slider to a point where there is a problem 6. Often the problem CP is buried and hard to pick, so in the left hand window click each CP until the problem one is highlighted. Weight the CP in either window and click Apply, until the problem is corrected. 7. Click OK. Slide the timeline slider to check the problem is resolved. 8. Repeat from step 5. 9. Save the model under the next version name, then run TSM Rigger on it. 10. Check that the weighting works in the final rig. If it doesn't, save the TSM rig under a different name (like "deletethis"), and reload the saved base model. In the action window, make the CP work in the final rig, and then put the same weighting on the base model. If you have checked steps 3-6 enough, then there should only be a couple of CPs to have to do this step with. I have not been able to get the hip exactly right, so I will be able to fix this up as an example of SmartSkin when fully rigged. (And I seem to have lost my hip animation, due to excitement over MirrorBones, so I will have to recreate that tomorrow )
-
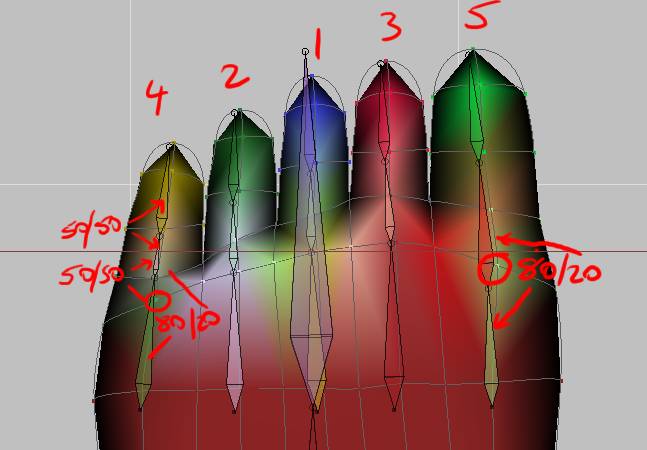
Catching up There should be nothing new here. Knee - see Elbow rigging. I rigged the knee like the Elbow, but it seemed to need less weighting. Ankle - see wrist. Ankle with fan and some weighting Toes - see fingers Toes all weighting, no fan. These are the numbers TSM has assigned to the toes: Little 4 Ring 2 Middle 1 Index 3 Big toe 5 Each toe consists of toe -> toe2 -> toe3, with toe being embedded in the foot. These are the weighting I gave them: Center of toes 50% toe2 and 50% toe3 Spline connecting toe to foot 50% toe2 and 50% toe One CP above and below foot 80% toe 20% toe2
-
I think you copy weights using the MirrorBone plugin available from Steffen Gross's site: http://www.sgross.com/plugins/index.html I guess I will be using and describing this shortly, but I am still catching up the bits I have covered, but not completed yet (toes, knees, copying mesh to the other side), before hitting the spine and hip, so as yet I don't know much about it. Search for "+mirror +weights" then there are a number of threads covering it.
-
Congratulations - it looks fabulous. It really caught the sea swaying movement.
-
Window Menu > Tile Vertically That will tile all the windows you currently have open - you can click Window Menu > New Window to open a second window of your current view. Then when you have the two windows you want, click Window Menu > Tile Vertically again. The great thing about that, is that when you select a CP in one window, it is highlighted in the other window. Another thing you might want to try, is View Menu > Workbook - this gives you tabs at the bottom of your screen, so you can easily see how many windows you have open, and easily pick one.
-
I got a few moments: 1 right hand control 1 right hand (this is the original culprit) 1 right hand attacher 1 right inter hand Oh, I think there were only 4 - it seemed like more before All these bones need their roll handles turned towards the back, like the lower arms. I believe that the rigger would have worked out OK, if the right hand had been pointing back first. One of the great things about diving in so deep like this into a rig, as that I've lost my fear of the unknown. I've always been terrified before of touching a completed rig, in case it breaks, but the TSM rig (and any other, I supposed) can be changed after it has been completed.
-
It's all to do with the hand - I suspect when you rigged, the hand's roll handles were pointing forwards (I could be wrong though ). I set all the hand bones (lots of hidden ones too), so that the roll handles pointed backwards, and it works. I have to go out now, and work tomorrow - if you don't figure it out, I can detail all the bones I changed.
-
Not messing up, this is a "workshop" - only too glad to have you in it. I plan to gather up all my corrected posts into a pdf at the end, and put it into first post, so feel free. Are you sure about the roll handles? That fixed mine - can you zip up the model and post? I'm thinking about head interchanging. I think it would be better to interchange whole heads than have a complicated mesh. That would entail having a neck that widens in a pose to accept the new head, but that would be really easy. Just have a bone on the main model where the head should be, and treat the head as clothing. Alternatively you could have a really complex mesh, and use pose sliders to rearrange the head features. Depends on whether you are doing realistic, or cartoon, I think. Cartoonish = less splines.
-
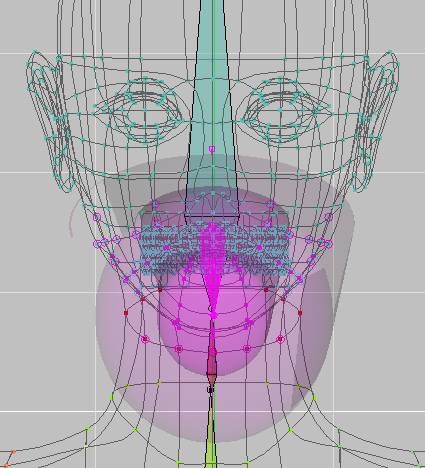
Stage 8 - the Head Jaw first. I have not yet covered 'Easy CP Weighting'. So here it is. I'm not quite sure why I haven't been doing this as a first step, and then finetuning. Is this what you other riggers do, or do you just weight each CP from scratch? 1. In modelling mode, create a group called "Jaw Weighting", which includes all the CPs that will be affected by the jaw movement - take out the top lip, teeth, tongue, etc. 2. Hide all but this group. Hiding the other cps means that they will not be weighted, even though the weighting falloff might include them. 3. All head CPs should be attached to the head bone. In side view, click the head bone, and add a bone for the jaw (clicking the head first ensures that the jaw is under the head in the hierarchy). 4. Rename the bone "Jaw", and in the properties, change Has Falloff to ON. 5. The aim now is to have the inner 'pill' cover all cps that should be fully weighted to the jaw, and the outer 'pill' cover all cps that gradually fall off to the head. Put your mouse over the percentages in the PWS, and click and drag to the right and left to change the percentages. You will see the pill size change. Remember we are working in 3d, so any change to X is visible from the top view. 6. When you have the inner and outer pills positioned, right click the Jaw bone, and choose Compute CP Weights. WARNING - if you do not click the Jaw bone, but right click and choose Compute All CP Weights, then any weighting you have done so far will be lost. 7. Create an action, and test out the jaw movement in the action. Return to bones mode, and fine tune the positions of the pill. Remember to choose Compute CP Weights (just for the jaw bone) before testing in the action. These are the values that I have used: And this is what it looks like from the front: 8. This is mine, but there is one neck spline CP that I will fine-tune using Edit CP Weights in modelling mode. riganim017.mov And spot the deliberate mistake The lower teeth should be included. 9. In modelling mode, control click the tongue group and the lower teeth group to choose them. Hide other CPs, and in bones mode, assign all the cps to the jaw. It is easier to do the teeth after the rest, because there is no falloff with the teeth. GalaDM_RigStage008afterjaw.zip
-
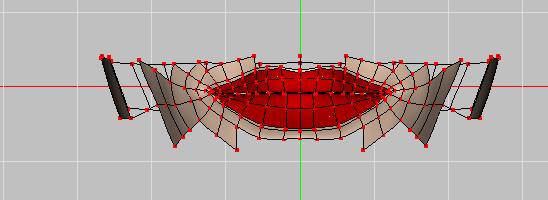
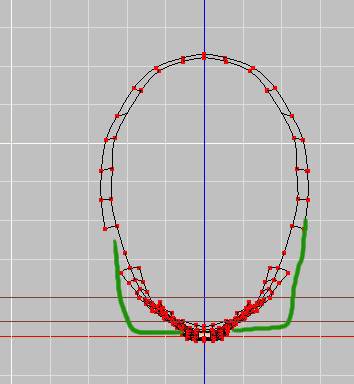
This is the mouth area of something I'm attempting to model at the moment: This is the top view: The green splines on this top view is a possibly exaggerated position of your splines: Try hiding areas and looking at the one area from lots of angles. It is very difficult to make a face without a front and side view. It is also very difficult to take photos of front and side, because they never seem to match up. I have never understood why the bit between the nose and the mouth can be one size from the front and totally different from the side. Look at all the A:M models you can find, and analyze the splines in them. In this forum, especially in WIP, there are heaps of pics of faces with splines. Research. It all takes a very long time. If it were easy, everybody would be doing it