Caroline
-
Posts
1,248 -
Joined
-
Last visited
Content Type
Profiles
Forums
Events
Everything posted by Caroline
-
Cool! - I had to do that one to believe it - I thought for certain I knew how to do fan bones In explanation - 'Compensates' are used when you create a constraint to offset the constrained bone from the other bone. (Just to add to the confusion, it works differently from about 14.b (?) onwards.) For example if you were to create a Translate To constraint, in v13, the constrained bone will immediately do a Translate To and leap to the other bone. After 14.b (?), the constrained bone will stay in its position, but do a Translate To relative to its current position - If the other bone moves the constrained bone will also move, but at the distance defined by the 'compensate'. Updated Fan Bone Creation: (At the end of all this, if we are all still here, I will do a pdf of the correct parts, and put it into the first post. For the moment, I think it is good to leave all my mistakes there, as I can't be the only one making them. Can I?!!?) 1. Click on the bone "1 right upperarm2". This selection will ensure that the new bone will have this bone as its parent. 2. Create a small bone with the same orientation as "1 right lowerarm1", and call this bone "Right Elbow Fan". 3. Assign the central Elbow spline to "Right Elbow Fan" 4. Right click in Bones mode, and choose New > Pose > On/Off. A special Action window for "Relationships" (poses) will open. 5. In top view, right click on the elbow fan bone. Choose New > Constraint > Orient Like. With the eyedropper, choose the lower arm. A new constraint appears in the PWS. 6. In the PWS, change the constraint to have an enforcement of 50%. Ensure the Rotate Offsets are all 0° - these are the compensates. riganim003.mov

-
This was the tutorial that give me that lightbulb moment of what 3d actually is: http://www.hash.com/users/jsherwood/tutes/SkyLark.pdf It's very old, but the concept of making a flat face that you then move into 3d made me appreciate 3-dimensional space. When I saw your face, it looked just like this one, and the tutorial shows you how to go about joining the parts. And a quote from it: if your a perfectionist like me, you spend hours on just moving the control points just millimeters - that is certainly part of modelling Have you tried the TaoA:M exercises? 11.5 is about making a face - a bit differently from this way.
-
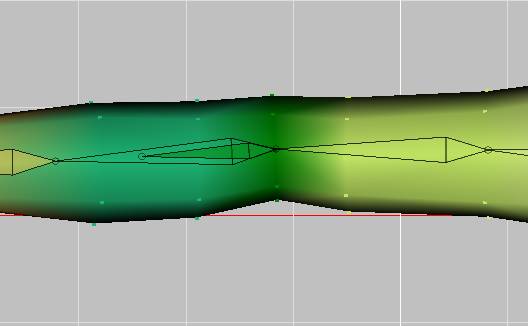
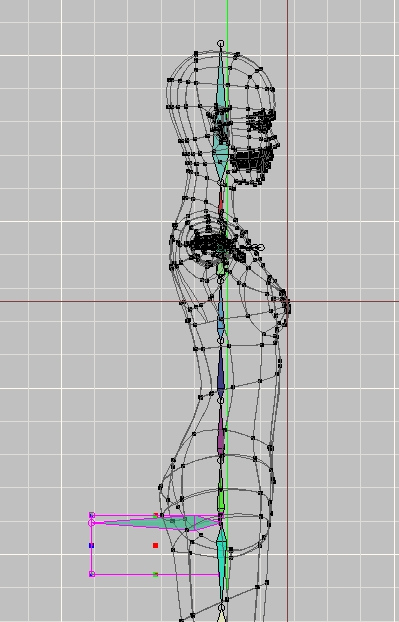
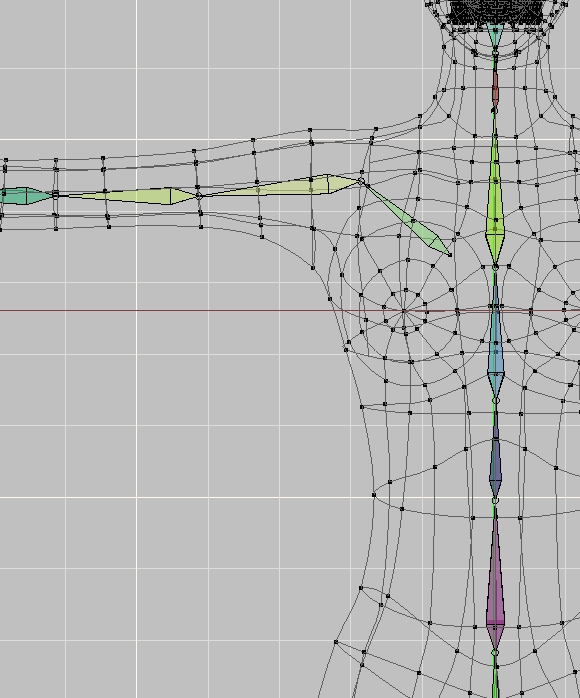
Stage 4 - Intro to Fan Bones There are several types of joints in the human body: Hinge joints - elbow, fingers, knees Pivot joints - head, ankles, wrists Ball & Socket - hips, shoulders. We will first look at hinge joints, being the easiest of the joints, as they only move in one direction. You can see here that our elbow movement is very unpleasant. riganim001.mov Create a small bone at right angles to the upper and lower arms at the elbow. Call this bone "Right Elbow Fan", and make sure it is under "1 right upperarm2" in the bone hierarchy. Assign the elbow spline to this bone, as in the picture. Right click in Bones mode, and choose New > Pose > On/Off A special Action window for "Relationships" (poses) will open. In top view, right click on the elbow fan bone. Choose New > Constraint > Orient Like. With the eyedropper, choose the lower arm. A new constraint appears in the PWS. Repeat creating the constraint, and choose the upper arm. In the PWS, change each of these new constraints to have an enforcement of 50%. Close the action relationship window. Create a new action to try out our pose. In the pose sliders, turn Pose1 ON. Using the R (rotate) key, rotate the lower arm. The movement is much better. (Not perfect, but better.) You can see that the elbow spline, that is assigned to the fan bone, is aligned 50% between the upper and lower arms. riganim002.mov
-
Technical Terms A Rig - the entire bone structure, by which you control moving the model. Geometry bones - bones that are directly assigned to control points Constraints - limitations to bone movement, set up in Poses, usually either on or off - eg. Orient Like, Aim At Fan Bones - small bones that are assigned control points, but are also assigned constraints. For example, a fan bone assigned to the elbow ring spline would be oriented 50% like the forearm, and 50% like the biceps. This prevents the elbow spline from moving too much either way when the arm is bent. CP Weights - a CP can be given a weight. So a CP on the elbow spline can be weighted 50% to the forearm, 50% to the biceps. The CP will never be pulled too far in one direction. SmartSkin - created in a special action window, and defines what happens when a bone is moved in a particular way. Can eliminates creasing and stretching. Null (or Target) - something for a bone to point at. For example, you could create a null for the eye bones to follow. The null is much easier to move than the eye bones would be. A null can also be created in an action or a choreography. For nulls on steroids, if you have a rainy weekend, look at this mushroom cloud tutorial. I'll add to these as I think of them.
-
Thank you for catching that - I've not found the manual very useful up to now, but I am now studying it VERY carefully. In summary for the roll handles (so that's what they are called) Arms back Fingers up Thumbs go away from the direction of the curl Legs in the same direction as the foot Body bone down After auto-assigning bones, make sure: Chin is fully assigned to head Body bone has nothing assigned to it (they go to the spine) IK Foot Controls have nothing assigned (they go to foot and toe controls) Finger control points are assigned to fingers, not hands. However, don't be too fussy, we will probably change assignments as we go through weighting each joint. GalaDM_RigStage003a.zip
-
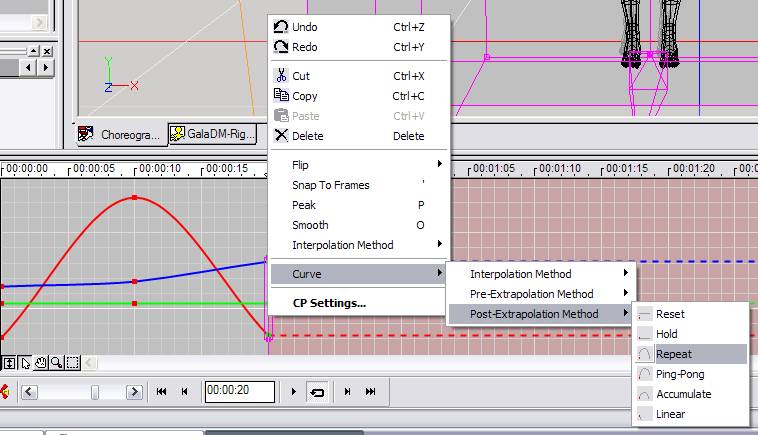
Nancy replied while I was taking screenshots, and her way is by far the best (doh). Just because I have screenshots, I will put them up for completeness This way is probably quicker, but actions are reusable, so go with Nancy. 1. View the splines along the Timeline. 2. Drag a selection over the last cps. 3. Right click them and choose Curve > Post-Extrapolation Method > Repeat 4. You will see them repeat. Notice the nasty jump in the blue channel - this is because my last blue point was not in the same place as my first blue point. Also, the sharp point at the bottom of the red will result in jerky motion. (Use Actions )
-
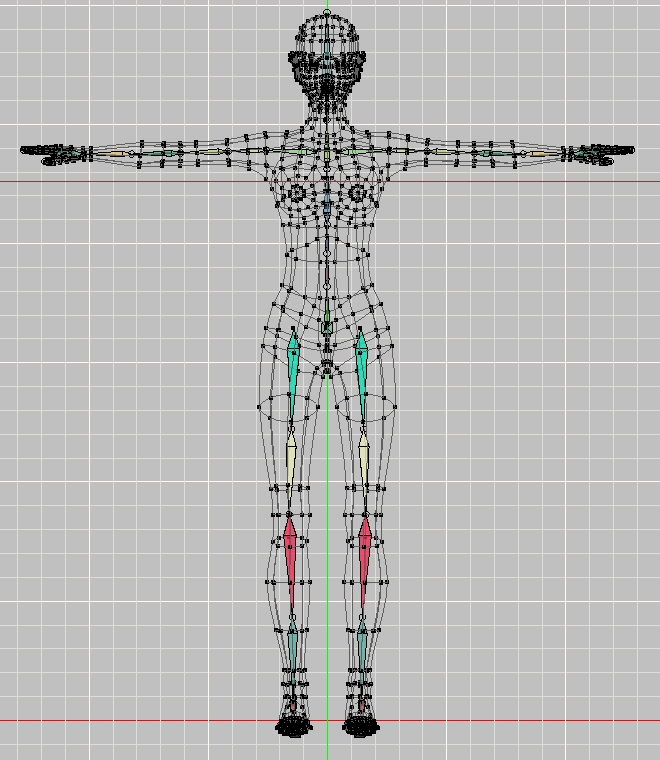
Stage 3 - Assign Control Points 1. Right click in Bones mode. Choose Auto Assign Bones. This will automatically assign all control points to the nearest bone. 2. Make sure that the whole head including the chin is assigned to the head bone. 3. Save your project. GalaDM_RigStage003.zip You can now finish the TSM rigging: 1. Right click in Bones mode, choose Plug-ins > Wizards > TSM Rigger. 2. Wait for the bones to be "calculated" 3. Click Rig. 4. Wait for the bones to be rigged. TSM is now installed into your model. Wasn't so hard, was it? However, do not save this project, we have a way to go yet. I am hoping that everything that can go wrong will go wrong, so that we can troubleshoot here. 5. Create an action using this model (remember we're not going to be saving this project) TSM models always have to have their constraints set to on before using them - one of the more frustrating things about learning TSM is animating the bones, and wondering why the mesh is not following the bone. 6. In the Pose Sliders turn TSM Constraints ON. That wasn't meant to happen What this means is that the rotation of the bones was incorrect, and we have to go back to your saved stage 3 model. All of the horizontal bones need to be rotated in the upright direction, as in this picture: Question for the experts - is there any way of avoiding this rotation step? Did I do something wrong that all the bones came in sideways? (I realise now that I should have done this rotation before flipping.) I will fix this tomorrow and upload a fixed model for us to continue with.
-
Stage 2 - TSM Flipper 1. Right click in the bones window, and choose Plug-ins > Wizards > TSM Flipper. A mirror of the bones appears. Just to prove that this is a live show, I find to my horror that Gala is not symmetrical. So we will have a side lesson in Copy / Flip / Attach. You can follow along if you want, or you can fast forward and download stage1b (located after these instructions). 1. In Modelling mode, select all CPs - Ctrl A. 2. With the left arrow key, make sure the central spline is directly on the Y axis. 3. Press <Esc> to deselect. 4. Click any cp on the body. 5. Press the / key to select all connected. 6. Press H to hide the eyes and teeth. 7. Click on the central spline between two cps. (I do not click an actual cp on the spline, because sometimes it will select the horizontal spline, not the vertical one) 8. Press the , key to select the spline. 9. Turn Show Manipulator Properties On. 10. Press S for the scale tool. 11. Change the X scale to 0. Turn Show Manipulator Properties Off. 12. Select the left half of the model up to and including the central spline. I do this zoomed out roughly, selecting more than I should, then zoom in and use the Alt key to deselect cps. You will be able to tell from the outline of selected CPs when you have deselected all the ones on the wrong side, as the outline will be very close to the Y axis.. 13. Press Ctrl C to copy. 14. Press Ctrl A to select all 15. Press Delete to delete all. 16. Press Ctrl V to paste. 17. With all the CPs still selected, shift click the central spline (between cps), so that a bit of the spline goes green. (This might take a few clicks in different places to get it to go green) 18. Right click on the selected area and choose Copy/Flip/Attach. Fill any 5 pointers that haven't filled. Most of them did, to my surprise. I also had to rejoin a couple of splines on her rear, because of an awkward 3 point patch. Now in Bones mode, click the Body bone, and use the N key to realign all the bones in the body. Remember to mouse-drag, and don't to use the arrow keys, so that all bones are moved together. The spine should be EXACTLY on the Y axis. Also reposition the IK Foot control, which is not in the Body hierarchy. Tips 1. Make sure you don't have Mirror Mode on (I did and things don't work right. ) 2. Filling 5 pointers - hide most of the mesh, use the lasso tool to select the 5 points, and click the 5 point patch tool. I have not had this fail, as long as you only select the 5 points, and do not catch others behind. Corrected GalaDM: GalaDM_RigStage001b.zip Repeat the original step 1 - TSM Flipper, and what a relief, everything matches. Save your project under a different name. In a perfect world, Stage 2 would have included assigning control points, but I'm doing this warts and all, because real life happens (Wipes sweat off brow and goes to find something to restore nerves) GalaDM_RigStage002.zip
-
Thank you, you guys are great! What an honour to be pinned. And I thought Stage 1 was going to be easy. It's fantastic to get an understanding of WHY you do things - I could have looked at a TSM model all day, and not realised WHY those leg bones were straight. Gala's splines are probably too simple for great animation - I looked at Project Bertram's fingers, and wondered why he had so many splines. I guess we'll find out why. That IK foot control is another reason to look at bones in multiple views Corrected GalaDM with better rotational position, and fingers and toes better positioned: GalaDM_RigStage001a.zip Tips: 1. I find Deskpins invaluable. (I haven't tested it on Vista) I can copy a picture, like Mark's dots from the internet, paste into Irfanview, and use Deskpins to keep the Irfanview window on top so that I can refer to the positions. 2. Remember to walk away from the computer often. (I'm suffering from animator's neck again )
-
$299 gets you v15 CD that gives you updates for v15, and will not expire. You can take the CD and put it into different comuters. It is like your licence to use. CD must be in the computer to run it. I think you get Extra DVD, and hard copy TaoA:M. But I have not bought it, so cannot say from personal experience. $49 gets you a subscription for 12 months, with all updates for that 12 months. After 12 months the program expires until you subscribe again. No CD needed, but is tied to one computer, which you activate by internet. Internet access is not required after activation. Manual and TaoA:M are pdf downloadable from web site. The models that were on the CD are downloadable from the Hash ftp site, but you don't get the Extra DVD, which can be purchased separately. What's new: http://www.hash.com/am2007/ http://www.hash.com/am2006/ http://www.hash.com/am2005/ http://www.hash.com/am2004/ And stability. Hope that helps. Personally, I like the $49, and I like the idea of it being an annual subscription at a very good price. Cool drill - maybe the glowing is from specularity?
-
I'm surprised to hear that the shortcuts differ. I haven't come across any that do. However, there is a list (an old one from 10.5) here: http://home.comcast.net/~christhom/Shortcuts.pdf And you can change the shortcuts to suit yourself in A:M: 1. Click Tools Menu > Customize 2. Click the Keyboard tab. I think you can search pdfs nowadays in Adobe Reader. There are some shortcut keys in The Art of Animation:Master manual too. I tend to use: The views - numbers on num pad T = Turn M = Move , = select spline . = invert selection / = select connected cps Shift 8 = turn on/off particles S = scale R = Rotate Those are the main ones I can think of, so there aren't too many. If I'm doing something repetitively then I try and remember the shortcut, like swapping between F8 (bones) and F9 (whole Model) when animating. Just for the moment I'm using Ctrl D (decal on/off) a lot, but next week I will probably have forgotten it. Oh, and good to see you on the forum.
-
That's cool - you don't have to watch the whole thing - image properties, thanks, Rodney. Also, rotoscope does work for me too. Don't know what I was thinking. What's your video format? One other thing, if you're importing a sequence of tga or jpg images, import them as an "Animation or Image Sequence", but just choose the first one, don't try and select all of them. By clicking the first numbered image, it will automatically load the sequence.
-
1. Make sure that you import it as an "Animation or Image Sequence" 2. Decal it, not rotoscope. So if you have the action window open, right click THE MODEL under OBJECTS, not under action, and do New > Decal. Then position and apply. That just worked for me with a QT mov. Edit: I don't know how to set the length, etc - maybe you could edit the video before applying it?
-
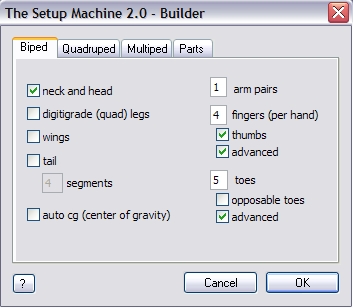
----------------------------------------------------------- Edited 24th October 2008 This is the pdf document of this thread, with all the superfluous info removed. Rigging_Gala_with_the_TSM_Rig.pdf The models (Before and After): GalaWorkshopModels.zip The rest of this thread is useful to see comments and movies at various stages, if you require extra information. Please feel free to add questions etc to this thread, and if you end up with a better Gala model, I will substitute yours for the "After" . ----------------------------------------------------------- In this thread I am going to rig Gala with the TSM rig. (Gala is available with the v15.0 subscription in the data download) Hopefully this will encourage others to try TSM, and also encourage me to get a good working model **Edit: I have assumed that you have basic rigging knowledge. If you don't, everything you need to know can be learned from Mechadelphia's Rigging Basics ** **Edit: Overview video of how TSM works http://www.pluginz.com/product/10614?g=3152#gallery ** I would welcome advice and crit from experts out there, as I have limited practical knowledge. Stage 1 - Set up bones This is the GalaDM mesh on its own. GalaDM_RigStage000.zip 1. Load the GalaDM model 2. In Bones Mode, right click and choose Plug-ins > Wizards > TSM Builder 3. Make your settings look like this: 4. Click OK 5. In a side view, click the bone that sticks out at the back (Body). 6. Press the N key (that's Translate) and drag the Body bone to the hip area. It is important you use the Translate (N key), and not the Standard Manipulator, as the Standard Manipulator only drags the one bone. The Translate will drag the Body bone and all bones in the hierarchy. Don't use the arrow keys to move it, either, as only the Body bone will move. 7. Press the S key (that's Scale), and scale the Body bone so that the head fits as in the picture. 8. Move and scale the top of the leg into position using the N and S keys, and the same for the shoulder bone. 9. Check top and side views. Do each finger. 10. Position each individual bone in the correct places. (There shouldn't be too many, here - mostly the fingers). We are using the Advanced fingers, so there is an extra bone in the hand. You will probably find the hand bone gets in the way, so hide it in the PWS temporarily. Remember to unhide it again. I'm not absolutely sure about the positions of the shoulder bone. 11. And the toes - I think the toes have 2 bones, and the third base bone goes into the foot, so that the foot will be able to curl a little. And that's the end of stage 1. Make sure you save your project under different names at each stage, in case you want to go back. Here's GalaDM after stage 1. GalaDM_RigStage001.zip Tips 1. When doing a small area like fingers or toes, hide the mesh in modelling mode then go to bones mode to size the bones. And hide/show bones using the eye in the PWS. 2. You can hide / show a hierarchy by Shift-Clicking the eye at the top level. 3. To expand/contract a hierarchy, click on the top level. Press the * key on the num pad. 4. Remember to check all views - the first stage 1 I uploaded here, the toes were a long way under the feet.
-
Those ones you listed are the ones that come up when you don't have cps selected. John's picture shows what comes up when you do.
-
Very nicely thought out and well-documented so far.
-
Still looking awesome - I'm enjoying a regular Friday post.
-
You can only change the thickness in the hair emitter, not the hair system, so where it says 0.1cm. This makes sense, because you can have several emitters in one hair system with different thicknesses. Click on the word thickness, and you should see 0 - 100% in the timeline. Move the slider to 50% and change the thickness to 1. Move the slider to 100% and change it to 0.1. You should now have a spline to play with. Sadly, I think the diffuse colour along the length is still broken in v15.
-
Couldn't find it and don't remember what I post yesterday, let alone way back when. However, you will find all details about changing thickness here: http://www.hash.com/Technical_Reference/v110/Hair.htm It's the dodo section, which explains about feathers. (Brush up on hair - teehee)
-
Are you sure you have cps selected? Do you see Sweeper and Extruder plugins?
-
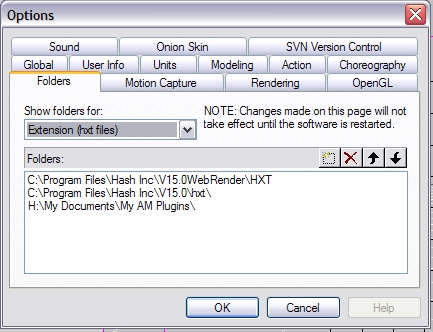
And, this probably isn't it unless you've been messing with the program files, check that your hxt folder is being pointed to in Tools Menu > Options. (You should have only the 2nd one showing - the first was for TWO webrender, and the third is for 3rd party stuff I've picked up) Edit - the hxt folder is for plugins that extend the base A:M code. Like Import / Export or 3d Painter, or TSM.
-
Thanks, David, I think I get the euler rig idea. And I guess you'd still have the problem of CP weighting to make the joints smooth anyway, and being such a small rig it would not be worth spending all that time unless you were going the whole hog. Sorry, that was tongue in cheek - even I installed it once a long time ago to try it out. I was trying to give an idea of the huge complexity of it.
-
I haven't a clue what to look at . Sorry. My initial reaction is that I prefer to animate it more than the TSM rig, specifically the arms, but that would probably be true of the 2001 rig too. I love your feet. They are a big improvement. I would like fingers to roll, but could not test that. I could not find the Back and Back2 bones that are in 2001, the Chest Controller does not seem to bend him sideways as well as the two bones together. And I could not work out how to go about installing it And now I'm going to ask a really dumb stupid embarrassing question, because I really don't understand the nuances of rigging. Why don't I ever see a rig just made up of Euler constraints? Is it that it's for much easier control or best for FK/IK? Like my arm model here seems to work OK for me, with no extra hidden bones, or complexities. EulerArm.mdl I'm not saying it would be best for animating, but just for simple stuff, or a character that doesn't come on very much? And I would love to see simple reviews of each of the rigs, even from other people, because I'm sure they each have their place. eg TSM - simple to install, but you need to keep the version before final installation. Squetch - total control over every least twitch, but you need many undamaged brain cells to install.