Caroline
-
Posts
1,248 -
Joined
-
Last visited
Content Type
Profiles
Forums
Events
Everything posted by Caroline
-
I have not seen this message, but here are a couple of things you could try: 1. Restart the computer then start A:M. 2. Uninstall A:M, restart the computer, reinstall A:M, restart the computer and start A:M. 3. Go into Task Manager (Ctrl + Alt +Del), click the Processes tab, and see if there is a process Master.exe, and end the process(es). (Note - it looks like you may be running Vista, so I am not sure whether Task Manager is the same under Vista as it is in XP.) I don't know why it would worry about another A:M process, as I often run several instances at the same time working on different projects. Good luck.
-
Is that a force on the particles, john?
-
AM2007.exe is just the setup file, so you can put it onto your desktop, or in a folder called for example "internet downloads", or anywhere. You then double click it to run it, which runs the installation process, which distributes all the program files into a folder called Program Files\Hash Inc\v1?.?, which you shouldn't touch, generally. You can then delete AM2007.exe because it is not part of the installed programs. Just for info, if you are using Windows, the installation also adds items to the "windows registry". The registry holds settings and options for programs, like what were the most recently used files. That is why you must use "uninstall" to get rid of a program, and not just delete it, otherwise you will leave all the registry information there.
-
I installed v14, and I get the same result as you. To use v15, you would have to buy the annual subscription.
-
On my Help>About screen the last line, in the licensed to area, shows the expiry date. I have the web (no student) edition that lasts one year. If you got a CD, that will not expire. Welcome to A:M - it really is a cool piece of software.
-
This probably does not help you, as I am not using v14, although I would have thought v15 would have a problem there if v14 has. I created a new chor in v13 and v15. I dragged thom into it. I right clicked and clicked New > Volumetric > Dust. This is my result in v13: And in v15: They both appear to have the same turbulence applied. What results are you getting? Are you right clicking and choosing New > Volumetric > Dust?

-
Well done - that was a lot of work in many different areas of A:M. Great atmosphere. Maybe Ex 20 - fur on the pitbull?
-
Holmes to the rescue: http://www.hash.com/forums/index.php?showtopic=31432 And TechTalk #6 Font Wizard: http://www.hash.com/forums/index.php?showtopic=13249 And cool examples from johnl3d: http://www.hash.com/forums/index.php?showtopic=31270
-
For alpha channels, you could look at the Alpha Channel tutorial from this page: http://www.alienlogo.com/tincan/
-
I hope you are familiar with Photoshop, or its equivalent. You basically do it in layers, using different tgas with alpha channels, and build up the photo. This is a painting by Rousseau with Thom added to it. 1. Create a new project. 2. Import the background image (this can be a jpg, as an alpha channel is not required on this one). 3. Import the Thom model (or your own). 4. Create a choreography, and position Thom in it. Delete the ground from the choreography. Render the chor to a tga. Render with the advanced settings, and under Buffers, make sure alpha is turned on. This will create a tga with black around Thom, but with an alpha channel defining where he is. 5. Import the Thom.tga you just created. 6. In Photoshop (I used photoshop elements), create a selection (alpha channel in photoshop) around the part of the picture that you want to have in front of Thom, save the selection (Select Menu > Save Selection) and save the picture as a 32 bit tga. 7. In A:M import that picture. 8. Create a new choreography. Delete the ground. Right click the camera > New > Rotoscope. Select the background picture. 9. Right click the camera > New > Rotoscope. Select the Thom.tga. 10. Right click the camera > New > Rotoscope. Select the tga you edited in Photoshop. Only the part that was selected in Photoshop should show, allowing Thom to appear behind it. 11. Render.
-
Online manual page for various options with rendering: http://www.hash.com/Technical_Reference/v105/Multipass.htm
-
Are you able to use .tgas instead of the .mov? What format is the .mov (ie, compression type). You should be able to see that in QuickTime - Window Menu > Show Movie Inspector > Format. Maybe it is a weird compression. But .tgas always (?) work.
-
.mov works for me. Try this: 1. Import the .mov as an animation sequence. It will show up under Images. 2. Drag the .mov onto your model. 3. Choose Decal. 4. Position the decal (.mov) and right click it and click Apply. Right click it again and click Stop Positioning. 5. Drag the model into the choreography. 6. Render. The .mov does not show for me until Render time. However, if this does not work for you, it could be some codec issue. You could try a sequence of .tgas as noted in the above thread.
-
The working .chm help file can be downloaded from: ftp://ftp.hash.com/pub/updates/windows/Am2007/Master.chm (50MB). Put Master.chm in the A:M program folder (mine is C:\Program Files\Hash Inc\V15.0), overwriting the small Master.chm that may already be there.
-
With the advent of the downloadable version of Animation:Master, the manuals are available virtually. As Rodney says, the best chance of success with A:M is to do complete The Art of Animation:Master (TaoA:M) course. It's fun and rewarding! You can post all your exercises in the relevent thread in the TaoA:M Forum, where you may get feedback and encouragement from other members of this forum. You can download both The Art of Animation:Master manual and the Technical Reference from: http://www.hash.com/2007web/reference.htm The data to complete the exercises is at: ftp://ftp.hash.com/pub/misc/Data.zip (162MB) Videos of most of the exercises are at: http://www.hash.com/2007web/vm.htm We look forward to 'meeting' you!
-
Hi, petokosun - you don't save your project as a jpeg, you render your project to a .tga or jpeg or movie format. My post here will direct you to The Art Of Animation:Master, which hopefully will answer your early questions.
-
Hi - to get the most out of Animation:Master, there is an introductory manual that comes with the program. The Art of Animation:Master Manual can be downloaded from: http://www.hash.com/2007web/reference.htm. If you have the internet version of A:M v15.0, you will need the data that comes with A:M, downloadable from ftp://ftp.hash.com/pub/misc/Data.zip If you have an earlier version, you will find the necessary tutorial data on your CD. Work through each exercise from exercise one, and you will get an idea of most of the features in A:M. It will probably answer your question also about changing your project into a jpeg (called rendering). Exercise 1 has Render in it. If you find that your settings look different from the ones in the manual, then click Help Menu > Reset Settings, and restart A:M. This will put all settings back to the way they were in the beginning.
-
Tools > Options > Rendering > Turn Particles OFF Before you close the rendering window. I have tried doing shift 8, but it is not always reliable. And what Ken says - when doing the hair, I turned realtime down to about 1%, unless I was doing a portion with the rest of the model hidden.
-
Huh. And you let us help you in all innocence. Never mind - you're going to need all the help you can get Hair is a good idea. That's one of the things that's so great about A:M is there are multiple solutions.
-
Have you worked through The Art of Animation:Master exercises? This will answer a lot of your questions. In Exercise 7 Can you Say That? you get to use a premade model and lip sync. In Exercise 12 Lip Poses you get to use a model and move the control points to make the lips move. You might need to rig your character's mouth with a bone to make the jaw open and close. Rigging is introduced in Exercise 9 Flower Power. Screen shots of where you are at and where you are having problems would help.
-
Maybe if you used material effectors, it could be rendered in layers. I guess particles are OK with an alpha channel render.
-
Perhaps particles are turned off? To turn them on again, Tools Menu > Options > Rendering. Final Shading, click Draw Particles / Hair ON. Or Shortcut key is Shift 8.
-
What sort of help? Where are you getting stuck? Have you looked at Colin's tutorials? http://www.colins-loft.net/tutorials.html And this? http://dement3d.com/tutorials/toontutorial...eling/head.html (Sorry, haven't a clue who you are talking 'bout - shall google ) Edit: I should have googled first - the mouth is flat and simple. I wonder if this document would help you: http://www.hash.com/users/jsherwood/tutes/SkyLark.pdf It's a very old tutorial, but is one of my favourites.
-
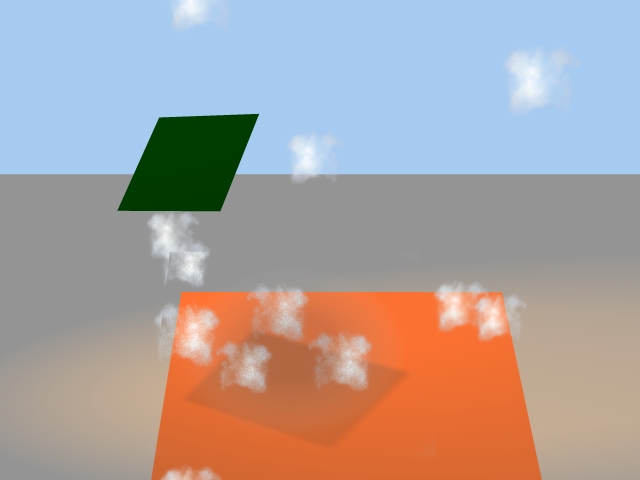
Overlay geometry in A:M could work. Depending on the resolution and quality needed, because this is a bit hazy on the particles. This is a mess, but I don't have a lot of time today, and my particles would not go where I wanted them. The green square is casting that square shadow on the orange. Notice that the 3 particles around the shadow square are a bit darker than the others. The shadow square has no influence on them. As an experiment, I created a square that has a spherical combiner - spherical because I wanted the edges blurred, and i wanted it round so that I could tell what was what. The spherical combiner consists of one circle 100% transparent, the other 70% transparent and grey. They are blurred too. In the picture you can probably make out the circular dark haze above the shadow square. So you could move this square with the transparent material around and make it act like a shadow, and the particles are seen through the 70% transparency.