robcat2075
-
Posts
28,276 -
Joined
-
Last visited
-
Days Won
406
Content Type
Profiles
Forums
Events
Everything posted by robcat2075
-
While pursuing an AMReport Steffen found a way to optimize the Sub-Surface Scattering code. My first simple test gives promising results: that's almost 60% more frames per minute. This change is in v17 beta 5 available now!

-
I agree. Fine looking models!
-
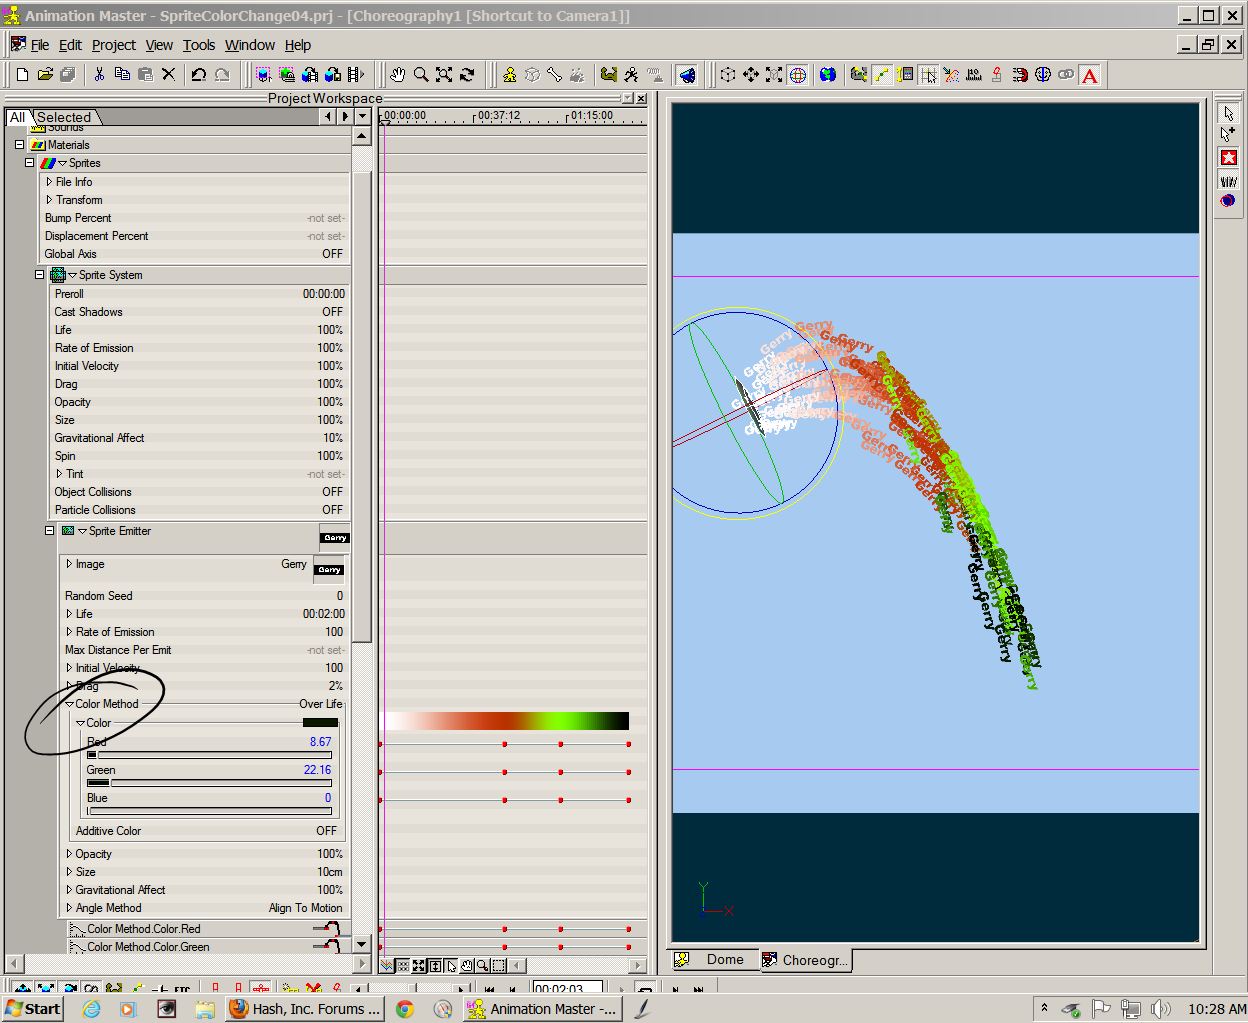
Defining color changes as a "percent" of the sprite's lifespan means you can later edit the lifespan of the sprite and not have to go back and adjust all the color keys to suit the new lifespan. When the sprites lifespan is 2 seconds, the color you have keyed at 50% will happen at 1 second. If you change the sprite's lifespan to 3 seconds the color you have keyed at 50% will now happen at 1 1/2 seconds.
-
Here's how to do color-changing sprites: Create a sprite material in the materials folder drop it on the emitter group of your model Put that model in a chor Have the Chor window open and visible. Back at the original sprite material in the PWS>Materials folder, expand Sprite System>Sprite Emitter Set "Life" to a time in seconds:frames Expand Color Method> Color Set Color Method to "Over Life" Switch the PWS timeline window to curve-editor view The units at the top will now be percent, not time scale that window until all 100% is visible keyframe some color setting at 0% (the start of the sprite's life) keyframe some color at 100% (the end of the sprite's life) keyframe anything inbetween. Because the color keyframes are mapped out over "1:40:00" as representing 100% you will need to switch back to the non-curve-editor view of the timeline and zoom back in to test scrub a few seconds in your chor. Notice in this test example I also set "Use Additive Color" to OFF, so that teh exact keyframed colors would be displayed on the sprites instead of their color values being "added" to the background. This keeps black (0,0,0) from being invisible. SpriteColorChange04.zip That certainly shouldn't happen since the particle settings should be the same text in the file whether it's a PC or Mac file.
-
Aha... you shouldn't key the color over life while the timeline is displaying frames. You have to switch to the curve editor to make it display the % on the timeline, meaning percent of the life. Internally A:M represents 100% as 1:40:00 and that's what you see if you don't switch to the curve editor. If you try to key a color at 5:00 on that you will really be keying it at some tiny portion of 100% Now, why does it create red when i try to key black...
-
but "5:00" should equal five seconds, not five frames. 0:05 should equal five frames.
-
In my initial investigation i seems that if i set the "life" of the sprite to 5:00 (i regard that as 5 seconds) it really only lives 5 frames. Do you get that?
-
Keyframing the color under "Color Method" will cause the sprite to change colors but it seems change much faster than the lifetime of the sprite
-
V16 right? Yes. TSM2 works in V16
-

2d Game Assets / Pop's Face Project
robcat2075 replied to tbenefi33's topic in Work In Progress / Sweatbox
how do you use this in a 2D game? -
ftp site? ftp://ftp.hash.com/pub/updates/windows/
-
The Passing of a Titan (Paul Forwood)
robcat2075 replied to Paul Forwood's topic in General Announcements
I am very sorry to hear that. I noticed Paul had not been around for a while and was worried. Paul was a great asset to the A:M user community for a long time and his contributions will be missed very much. But I'm sure this is even sadder a time for Paul's family. Thank you for letting us have a bit of his time and best wishes to all of you. -
Teeth added... If you like stereoscopic 3D and have red-blue glasses or can cross your eyes, you can also see . The 3D button at the bottom of the Youtube player lets you choose your preferred 3D viewing format.
-
Idea for the house.... can you mess up the shingles a bit so they are not all so perfect?
-
great curves!
-
I believe you need to have a bone ( a root bone?) selected for it to appear in the menu. it is included in v16
-
I know nothing of installing Squetch, however.... if you have a situation you can repeat that crashes A:M, (and does it in v17) that would be a good thing to bundle up and submit to AMReports www.hash.com/reports You'll need to get an account name and password from Jason but he'll set you up. Crashes get fixed quickly. Back to Squetch.... of course you saved your work in versions as you went along so it would be easy to step back and find where the departure between written process and your result first started.
-
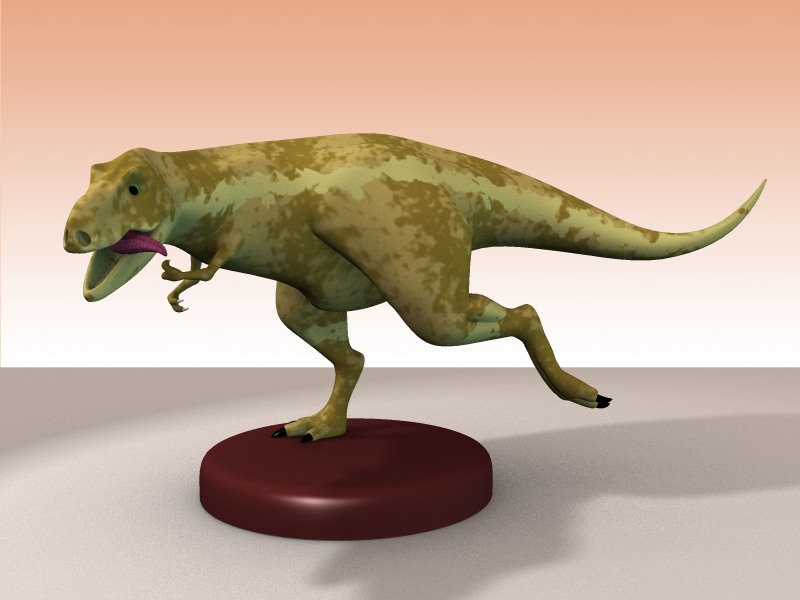
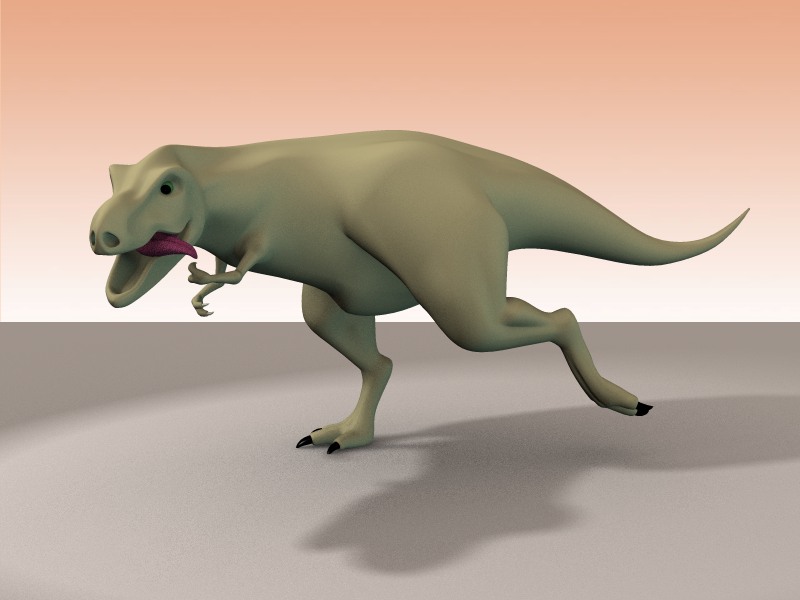
I'm sure it would look better. I looked in that Blender thread but I only saw a couple of images. There are great painted dinosaurs all over the web, but i need to learn to paint like that. Like... where's the right place to put wrinkles and where to put small scales where to put large ones and what are plausible color patterns...
-
Thanks, everyone! You know what bugs me? Why wasn't I doing this 12 years ago? I had A:M, it pretty much had everything you need to do this already... but I barely scratched it. Why didn't I see the possibilities and pursue this newfangled 3D thing better?
-
These are just temporary colors from a combiner material: If you have Firefox or Chrome you can see a turnable WebGL version: http://p3d.in/7uj2I/
-
Those hair feathers are working well!
-
-
Now with itsy-bitsy, teensy-weensy, armsy-warmsies and drooling tongue action...
-
great looking vehicles!
-
(We now return to being happy with A:M)