Leaderboard


Popular Content
Showing content with the highest reputation since 07/27/2025 in Posts
-
It's spline controllers... see? Rocky42_000.mp44 points
-
I've been messing about with a 'watchfolder' script (in python) that monitors a directory and when it finds a new sequence of PNG images it converts the sequence to MP4 video and moves the PNG sequence to a datetime stamped directory inside a 'processed' directory. There are a number of things that are still rough about the program. Firstly, the majority of people will not install python, set it up, run python programs etc. right? Correct. So, I compiled it into an executable .exe file. That seems to work pretty well. The python script has a watchfolder.ini file where users can quickly adjust settings. If no .ini file is found default locations and values are used. [settings] watch_dir = F:/watch_folder ffmpeg_path = ffmpeg framerate = 24 timeout = 5 video_basename = video max_runtime_minutes = 30 reset_timeout_on_video = true Here we can see: - The script uses a specific directory/folder so that's where the PNG sequence would need to be rendered to - The script uses FFMPEG for the conversion and the path here suggests it is in the users environmental settings. Perhaps better to specifically state where the FFMPEG executable files are located. For example: C:/ffmpeg/bin - Framerate can be changed to allow more (or less) frames to be generated. - The timeout is in seconds and suggests how long the utility waits to see if another frame is being generated. If frames are expected to take longer than 5 seconds to render this value should be increased. - The base name of the output video can be changed here (it's just named video by default and new videos get incremented with a number each time a new video is created (video1.mp4, video2.mp4, etc.) - Max runtime (if set) limits how long the watchfolder program will monitor the folder. - The timer for the max runtime can be set to refresh each time a new video is created so a new 30 minute timer starts. Set to false if a reset of the timer is not desired. The actual python script: import os import time import shutil import keyboard import subprocess import re from datetime import datetime import configparser # === DEFAULT CONFIG === DEFAULTS = { "watch_dir": "F:/watch_folder", "ffmpeg_path": "ffmpeg", "framerate": "24", "timeout": "5", "video_basename": "video", "max_runtime_minutes": "0", "reset_timeout_on_video": "false" } INI_FILE = "watchfolder.ini" def load_config(): config = configparser.ConfigParser() if not os.path.exists(INI_FILE): config["settings"] = DEFAULTS with open(INI_FILE, "w") as f: config.write(f) print(f"[i] Created default {INI_FILE}") else: config.read(INI_FILE) for key, val in DEFAULTS.items(): if key not in config["settings"]: config["settings"][key] = val return config["settings"] def get_png_files(watch_dir): return sorted([f for f in os.listdir(watch_dir) if f.lower().endswith('.png')]) def get_next_video_filename(watch_dir, basename): count = 1 while True: candidate = f"{basename}_{count:04d}.mp4" if not os.path.exists(os.path.join(watch_dir, candidate)): return candidate count += 1 def guess_pattern(filename): match = re.search(r"([^.]+)\.(\d+)\.png$", filename) if match: prefix, digits = match.groups() return f"{prefix}.%0{len(digits)}d.png" return None def convert_sequence_to_mp4(watch_dir, first_file, ffmpeg_path, framerate, video_basename): pattern = guess_pattern(first_file) if not pattern: print(f"[!] Could not determine pattern from {first_file}") return output_name = get_next_video_filename(watch_dir, video_basename) output_path = os.path.join(watch_dir, output_name) print(f"[+] Converting to MP4: {output_name}") try: subprocess.run([ ffmpeg_path, "-y", "-framerate", str(framerate), "-i", pattern, "-c:v", "libx264", "-pix_fmt", "yuv420p", output_path ], cwd=watch_dir, check=True) print(f"[✓] Video saved as: {output_name}") except subprocess.CalledProcessError as e: print(f"[!] FFmpeg failed: {e}") def move_sequence_to_archive(watch_dir, png_files): now = datetime.now().strftime("%Y%m%d_%H%M%S") archive_dir = os.path.join(watch_dir, "processed", now) os.makedirs(archive_dir, exist_ok=True) for f in png_files: shutil.move(os.path.join(watch_dir, f), os.path.join(archive_dir, f)) print(f"[→] Moved PNGs to: {archive_dir}") def monitor(settings): watch_dir = settings["watch_dir"] ffmpeg_path = settings["ffmpeg_path"] framerate = int(settings.get("framerate", 24)) timeout = int(settings.get("timeout", 5)) video_basename = settings["video_basename"] max_runtime = int(settings.get("max_runtime_minutes", "0").strip()) * 60 reset_on_video = settings.get("reset_timeout_on_video", "false").lower() == "true" print(f"👁️ Monitoring folder: {watch_dir}") print(f"[i] FFmpeg: {ffmpeg_path}, timeout: {timeout}s, framerate: {framerate}fps") if max_runtime > 0: print(f"[i] Will auto-exit after {max_runtime // 60} minutes (unless reset)") start_time = time.time() previous_files = set(get_png_files(watch_dir)) last_change_time = time.time() while True: # Check for Escape key press if keyboard.is_pressed("esc"): print("[✋] Escape key pressed. Exiting.") break time.sleep(1) # Auto-exit if timer exceeded if max_runtime > 0 and (time.time() - start_time > max_runtime): print("[!] Max runtime reached. Exiting.") break current_files = set(get_png_files(watch_dir)) if current_files != previous_files: previous_files = current_files last_change_time = time.time() continue if current_files and (time.time() - last_change_time > timeout): png_files = sorted(current_files) print(f"[⏳] Sequence complete: {len(png_files)} files") convert_sequence_to_mp4(watch_dir, png_files[0], ffmpeg_path, framerate, video_basename) move_sequence_to_archive(watch_dir, png_files) previous_files = set() last_change_time = time.time() if reset_on_video: print("[i] Timer reset after video creation.") start_time = time.time() print("[✓] Monitoring stopped.") if __name__ == "__main__": try: settings = load_config() monitor(settings) except KeyboardInterrupt: print("\n[✓] Monitoring stopped by user.") My take is that this option for a hotwatch directory and execution of ffmpeg script would be best added to Animation:Master itself but if there is interest we can pursue this and more. This script only converts PNG sequences to MP4 video but all manner of video formats is possible and even gif animation. The utility currently does not have an interface/GUI but that would be a next step that allows the user to adjust settings in the interface and even opt for different outputs. Here's the sequence I was testing with: video_0017.mp43 points
-
Digging through my HD again looking for some old projects. I was commissioned at one point by Hash to model Batman, such a fun project, thought now days I would probably model him with half as many patches, always less is more.. especially with splines.
 3 points
 -
Hi Guys, I'm happy to share an animation I've been working on the past few months, I'll try to make a long story short... Since all this Covid 19 stuff things have been different, previously most of my spare time was spent working on fine art projects a lot of work I did preparing for art shows was put on hold and like many people it's been a stressful time. I guess psychologically the best way I've been able to deal with it has been to tap into my silly side and rekindle some of the things that inspired me in my younger years. Using Animation Master was one of those things, it was the first app that got me seriously into 3D and actually helped land me my first job out of college. I made a friend on this forum over 20 years ago (Bud) Mike Lium, we eventually lost touch and reconnected on Facebook even though I wasn't using A:M much or posted 3d stuff he was always a friend... always encouraged me and my art. These past couple months while working on this animation I couldn't wait to surprise him with it. Sadly I didn't finish it in time, and found out he passed away a few weeks ago. So I dedicate this to Bud. Mike https://vimeo.com/417019628
2 points
-
Could only find "upload images" so I'll post it here and please let me know the proper way to do this and if you can play this video. VLC was used to convert it. This particular video had a lot of help from robcat (the glowing threads) DWfinalTitleC.mp42 points
-
Two more slight variations Rocky44_000.mp4 @John Bigboote wanted a bigger shape on Ro-cky Rocky44x_000.mp42 points
-
Um... well... I needed a model to test with and Herodude just happened to be here. After an initial generic standing pose I decided to try a 'trip and fall'. I suppose this might be a setup that would convey the general idea although I think it'd pay off to start over from scratch now that the general idea is there. Added a side view that I rendered just prior to doing the front camera view.
2 points
-
I got a 3D resin printer. My first print is the teapot from the Three Teapots Benchmark As it is printed on the build plate. This took one hour to print. At this scale the walls are paper thin. After curing and removing the supports:
1 point
-
works like a charm flare_test.avi1 point
-
lost a modeI was working so debide for fun just build a simple one testubndsimpl.prj
1 point
-
In Edge (win11) Settings>Appearance then "Page colors" select from the drop down (Dusk, Dessert, ...) then Page colors - set slider to left (OFF ???) for "Only apply page colors when high contrast themes are on" I use "Dusk"
1 point
-
Amazing work!1 point
-
Attached is my Batman scene file with decals, easier then looking through any DVDs Batman.zip
1 point
-
My fav view of him so far.
1 point
-
Darker coloured suit and some colour corrections in PS.
1 point
-
Looks good, now we just need a cigarette dangling out the corner of the mouth.1 point
-
A rendering of Bats, finally arms down.
1 point
-
I dusted off A:M the other day just to scratch an itch to create, and 48 hours later I'm still here. Then I notice on the forum a contest happened when I wasn't looking! The entries are amzing, and congratulations to the winners. You all are amazing artists, and I am humbled be your talents.1 point
-
Congratulations! I really enjoyed the creativity and originality of the entries. Robert did a great job presenting the winners. This was fun.1 point
-
And here is Power Mad Squirrel and her counterpart, Angel.
1 point
-
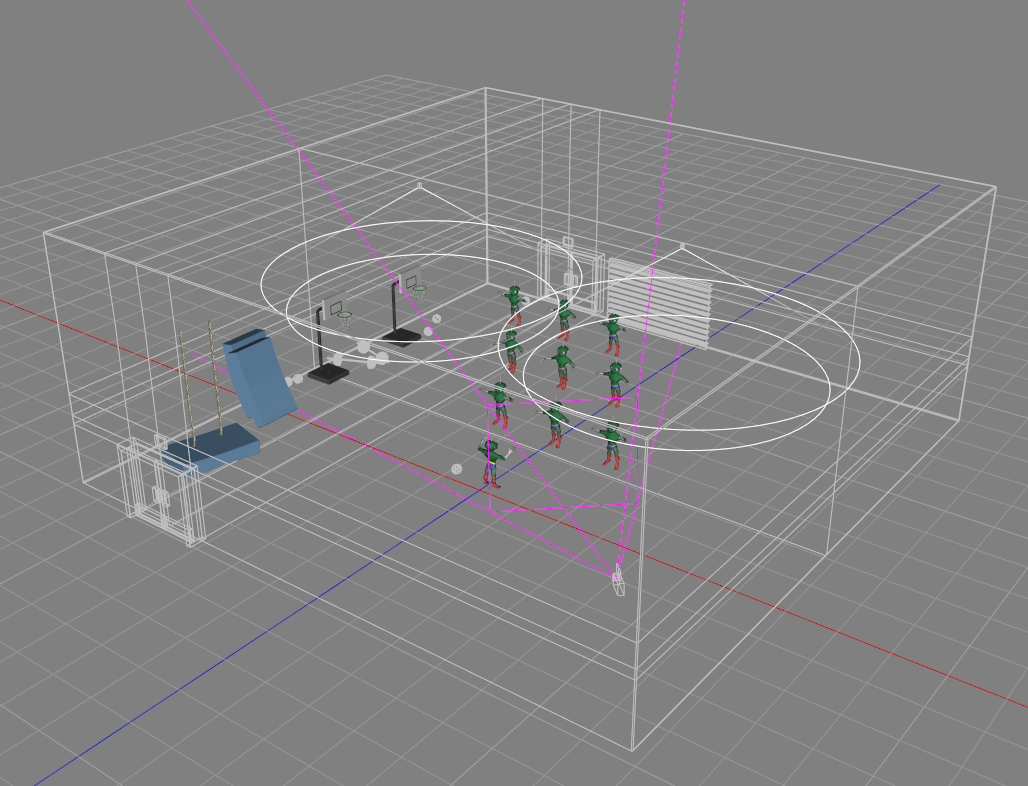
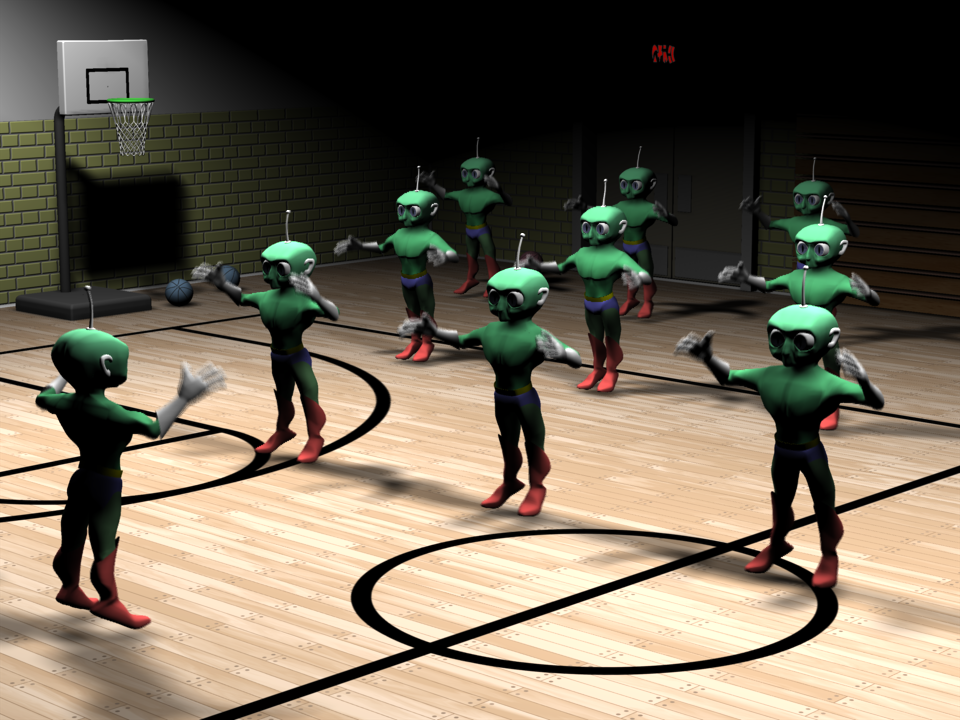
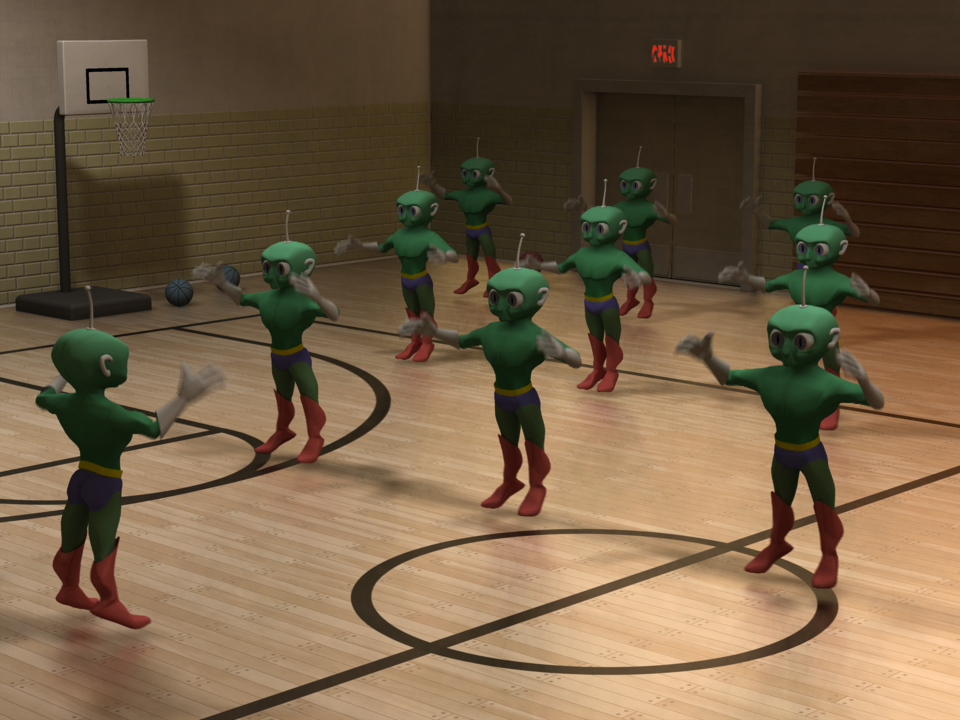
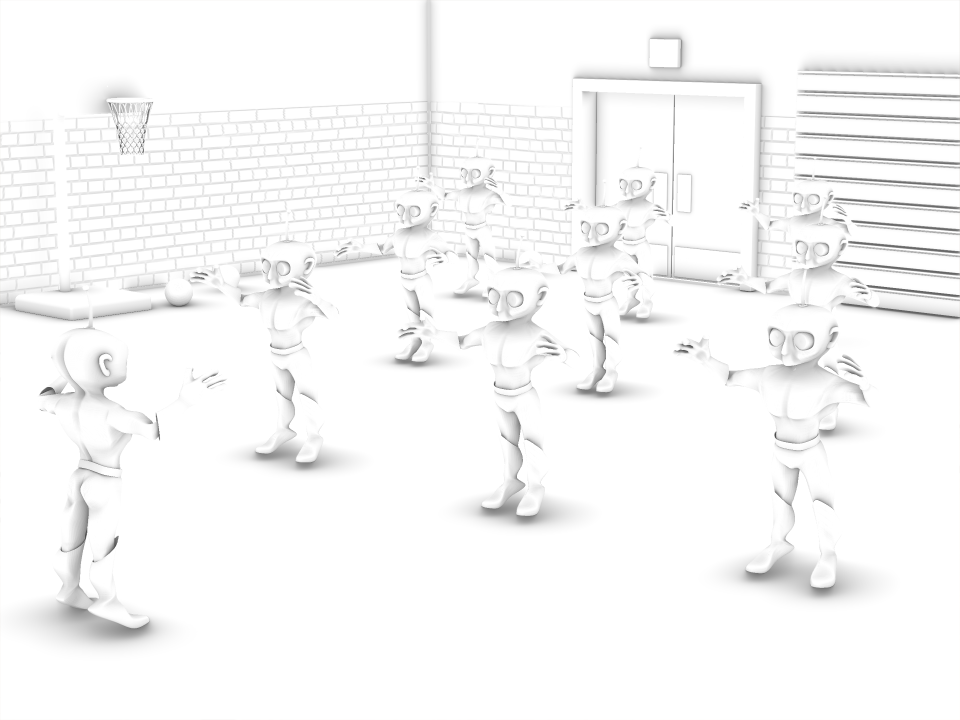
Here is another modern render of one of my old Animation Showdown animations. I added a school gymnasium set and rendered with radiosity. A birdseye view of the chor looks like this. The set is a completely enclosed box with two kleig lights in the ceiling... A conventional render with those two lights gets this... That is very severe. If I were going to use conventional lighting I would need add a number of fill lights in strategic places. Here is a radiosity render. The shadow areas are no longer pitch black and there is visible detail even where the lights do not directly shine. Overall, however, it is too dark for my taste. Increasing the Intensity of the lights so that the charcters were well illuminated caused the brightest spots on the floor to become overbright and clip. Instead I applied a gamma correction to the radiosity render. I''m liking this much better... Unfortunately, the shadowing that was indistinct in the raw render is now ever weaker. To give that some more bite i rendered a pass with ScreenSpace Ambient Occlusion (SSAO)... ... and composited that by "multiplying" it with the Radiosity. I did that in After Effects but an A:M "composite Project" can do the same operation. This PNG alternates "before" and "after"... SSAO has no anti-aliasing so I had to render those at 3x3 times the normal resolution to make smooth versions suitable for compositing. When A:M introduced Radiosity our computers weren't ready for it. Each render took so long that animation was unthinkable. But now with a modern CPU and NetRender it is within reach. My 640x480 test renders for this scene took only about 3 minutes per frame. After i got my settings decided and cranked up the quality, the full-frame final renders took only about 20 minutes each. Get started with Radiosity with Yves Poissant's Cornell Box Tutorial Learn more at Yves Poissant's Radiosity/Photon Mapping Pages
1 point
-
I think we had ( Art School ) Ray Dream first, then Moved to Infini D . . . then Lightwave, ( wasnt a big fan ), some of our lecturers were employed by companies and universities using Softimage on SGI gear I was like man can we go to your work and play to which they replied, only if you want to make 3D with command prompts - eeecch!! I thought the isometric graph interface would be good transitioning from graph paper drawings for Ray Dream . . . but it was not and it was slooooowwwww on the schools Macs . . . I picked up AM when I started my first job in advertising, we had to produce some ads and infini d wasnt cutting it, one of the guys at our company told us about Dylan Perry from then Momentum, he made a call and Dylan dropped past with AM 96 / 98 I think, gave us a 15 minute quick start guide . . . I produced 2 x 30 second TVC's like in a couple of hours, the modelling was exactly how it ought to be, the rendering, rigging was so intuative . . . rendering, rigging, the works ! best app ever, ran fast on macs and pcs but it did crash a lot back then ha ha . . . so did you eve use Bryce 3D or Poser lol1 point
-
Re-rendered these guys with some ambient occlusion for my site, figured I'd share them here as well. Cheers 🍻
1 point
-
I got my feet wet in the '3D Printing' arena this week... turned out kinda cool! I uploaded a hash model of my Tireman character to sculpteo.com(via OBJ exporter with a .mat file for colors...) and interacted with their online 'repair-bot'... which sent me back to A:M to make revisions maybe 8-10 times as I learned what I could and could not get away with... and mostly what geometry was deemed 'too thin' for the scale I had chose... which was 3.8" tall. This print cost $80...I am pretty happy with what I see. My method was to pose the character using his TSM rig in a chor and save it out from there as a .mdl... which I opened and deleted all the bones and decals from... the 'Tireman' on his hat was a decal so I modeled it and replaced it with real 3D geometry. I was under the assumption that to make a 3D print I would need to make my model 100% waterproof- meaning 1 continuos mesh, but I was wrong. Sculpteo's 'repair' bot- which takes about 5-10 minutes to work- seems all the interjoing geometry into 1 fuseable mesh. I DID model the base and included it's depth in the model, because I did not know if the model would be too top-heavy to stand on it's own. Sculpteo took about 1 week, the box came HEAVILY packaged for damage vis USPost. I might adjust some colors and make some more for 'thank-you's' for my clients. I'll post a wireframe of the model later. I recommend Sculpteo dot com!
1 point