NancyGormezano
-
Posts
7,863 -
Joined
-
Last visited
-
Days Won
15
Content Type
Profiles
Forums
Events
Everything posted by NancyGormezano
-
Very clever indeed - looks great! However there's some stuff in your explanation that I'm trying to wrap my head around and not understanding: I don't understand constrained to GROUND plane...Do you mean the tree complex model is constrained to the terrain model via a surface constraint? - where the terrain model has an aiming bone? or multiple aiming bones (1 for each tree)? Not sure how you did a surface constraint for the tree model in a POSE? (in the CHOR? to the terrain model) - I understand doing the surface constraint in the chor - just not in a pose? Did you do multiple surface constraints - ie 1 for each tree bone? to some aiming bone in the terrain - or did you just do it just for the main tree and the other trees follow (but potentially dip below the surface?) If you add more instances of the complex tree model - wouldn't you have to do the constraints in the chor for the new instances as well? (not understanding the pose thingy again). Do you use the same aiming bone(s) as targets? or do you have lots of aiming bones ? Translate and rotate which model? the tree model? Or are you translating/rotating the aiming bone(s) in the terrain? I've never really played with surface constraints - but this opens my eyes to possibilities (ok, ok - maybe my eyes are still slits) Very cute!
-
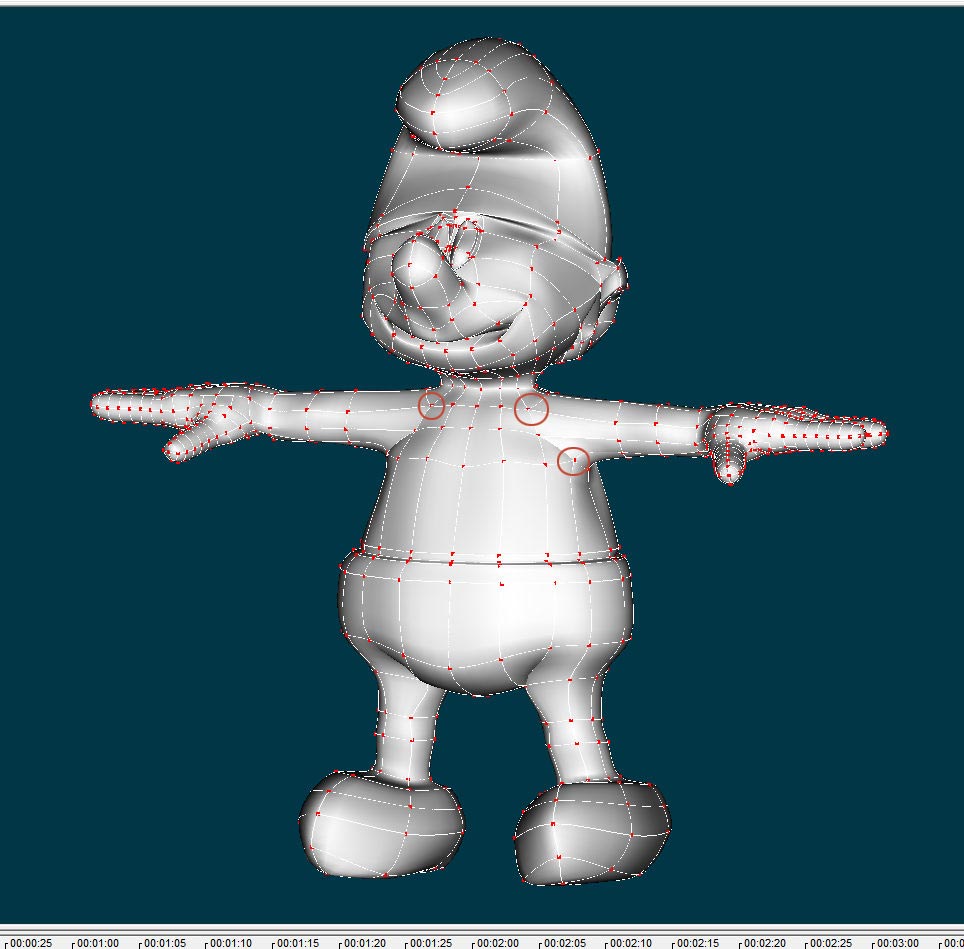
tres vrai, tres vrai ! But your smurf is improving quite nicely! One other thing that I would add is that it is generally better to model the mouth in a neutral position (neither smiling, nor frowning) for purposes of rigging and facial animation - it's then usually easier to get a wider range of mouth expressions
-
Hoo hoo - very cute!
-
fantastic!
-
terrific, terrific, terrific !
-
Alien barbells
-
nice link - thanks
-

Representing action movement with blur
NancyGormezano replied to Eric2575's topic in Work In Progress / Sweatbox
GREAT! -
3D character on site w/ transparent background
NancyGormezano replied to flashawd's topic in New Users
That looks pretty good - thanks for the info. -
That looks fabulous Robert!
-
Yay Steve! Happy Birthday
-
You do not have to do anything special for the camera background color. A:M will make the alpha channel black (or totally transparent) for where the background is not obscured by any models. If you turn on alpha buffer in A:M (when rendering tga files, qt movies) - you are essentially creating an 8 bit channel in addition to the RGB 8 bit color channels that defines the opacity of each pixel. In A:M the alpha channel will contain white for totally opaque and black for totally transparent. Try rendering a simple image into tga format with alpha buffer ON - the sky/background color will appear to be black - If you bring that image into any other program that understands alpha channels, ie tga format - you will be able to composite this image with another background.
-
After you've selected the 5 cps that make the 5 pt patch - the green "donut" tool should light up/become active - click that button. However, sometimes the donut doesn't light up (for some unknown reason) - in that case there are steps to try to force it to show: 1) select the 5 cps, hit "." to select the other cps, then hit "." again to reselect the 5 cps (donut should light up), if not, then 2) select 5 cps - hit "hide" so that only the 5 cps are left showing. Reselect the 5 cps. Donut should show. if not, then 3) then there is probably something funny with the 5 cps and the splines, - sometimes, but not often - and you don't think the splines are wrong - save/close the model and reopen and reselect. if not, then 4) respline the area. last resort.

-
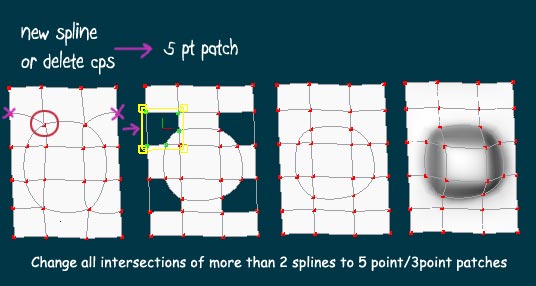
Hi Remy - looking good - One thing I notice is that you have lots of places where more than 2 splines meet/cross - Those places will cause peaking/creasing. In A:M you will have to use 5 pt patches instead to minimize that. There are some restrictions (creasing wise) of using them in combo with hooks, etc - but here's a general diagram for converting.
-
I'm not sure of the look that you will be going for but, I have some photos that I took of Torajan skulls/bones on a trip to Sulawesi (Indonesia) a long time ago. The Toraja people have the custom of placing their dead in caves on mountain sides. The wooden caskets decay and the descendants arrange and rearrange the collections of ancestor's bones thruout the ages. If you don't already have reference photos, my photos might serve as reference for "grunging" up the skull, and the teeth. Let me know if you'd like them. These bones/skulls are highly grunged from being exposed, as well as being asymmetric, with imperfectly aligned and many missing teeth. I think I like the AO lighting better for a clean, laboratory look. Just depends on the style you are going for.
-
Nice skull ! Terrific job. This guy must have had dental insurance. Maybe not so perfect teeth would be interesting?
-
Can hair be rendered out separately
NancyGormezano replied to Eric2575's topic in Work In Progress / Sweatbox
I don't think it's the emitter (just tried - 1:25) - it's some other setting - either in your render settings (AO) - or some property of the hair system ... density?, dynamics?, collision?, roughness? etc - can you upload the hair material ? EDIT: uploaded another emitter example in previous post in case you missed it
-
Can hair be rendered out separately
NancyGormezano replied to Eric2575's topic in Work In Progress / Sweatbox
You betcha - I wouldn't be doing hair if it took 7 hours/frame. I have to wonder Do you also have AO on? - and Roberts question about the size of the image for the leaf shape is a good one. You don't need a high resolution image. And I would also wonder about the alpha channel for the leaf shape as well - transparency (anywhere) will also increase render times - In my testing - that I just ran (15j plus) - I took Orkarella - rendered at 1280x960, 5 pass, soften ON, default lighting, alpha on - took 33 secs (or 13 secs at 640 x 480). When I switched the image for all the hair systems, to a leaf shape (approx 400 x 400) with a more complicated outline - render took 1:10 minutes. Have you tried rendering with 15j plus? 15i might have a problem? EDIT: - 3rd example just tried with a more complicated emitter image - ie more transparency, increased thickness of emitter to make more overlapping of transparency areas - and still only took 5 mins
-
Fire with tga image sequence
NancyGormezano replied to johnl3d's topic in Tinkering Gnome's Workshop
Nice! -
Interesting - looks terrific! What is controlling the direction of the knee or elbow bend? a switch?
-
In your example screen captures - I see many differences in the surface settings besides changing the transparency (eg line settings, gradient, specularity, color) - when I take your model and ONLY change transparency I do not get any change in the line widths. 5 pass. The difference that appears above the horizon is a known issue - you would need to add a background model (eg dome) to obscure the empty "sky/background color"
-
"Island" Main Character 1
NancyGormezano replied to higginsdj's topic in Work In Progress / Sweatbox
You would probably be better off doing the rigging first, before decaling, unless you don't mind the possibility of having to redo some of it. You may find that you need to change splines for rigging, which has the possibility of messing with the decals. Also, not knowing which rig you will be installing - and the method you will be using - it is important to remember that if you export from an action during the rigging process - that decals don't always survive the way you intended - and rework/cleanup will be required. There may be other situations that also have problems with decals (can't remember what, however) Great character - good potential for interesting expressions! -
In my observation, it seems that displacement behaves differently depending on how the pattern aligns with the splines - I used the same image for displacement and color (to show how it aligns), using gray values of 0, 128, 255 (tga), applied to flat grid, but did not cover the whole grid. 4 pass no soften. I haven't tried using exr images for decal.
-
I believe you will need something to "blur" for the "sky/background" I also wonder, if there are no lights and no objects - what is there to blur? but just the blue color? You can add a rotoscope - or some dome type object to fill the "sky/background" and to be blurred
-
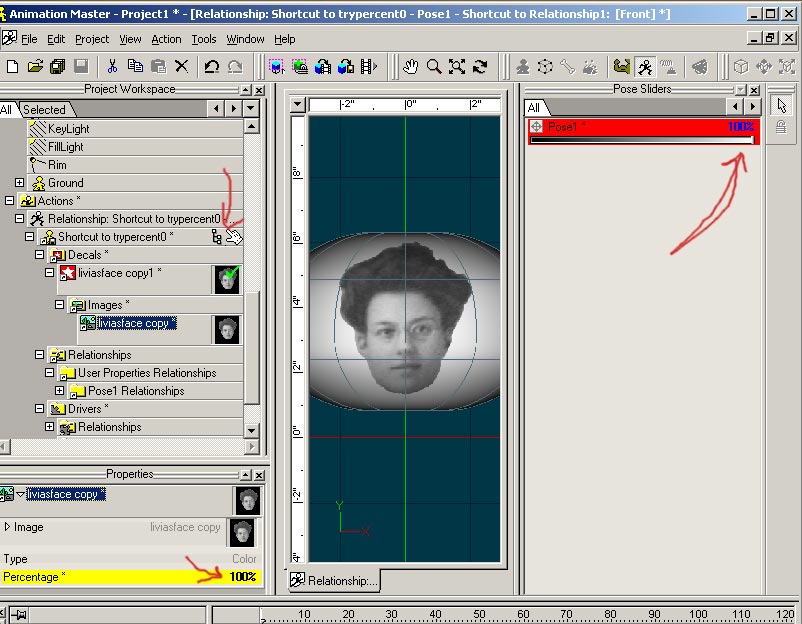
Try this: 1) apply blush decal to model 2) set the blush decal color = 0% (in the model) 3) start a new relationship - New/pose/percentage 4) in the relationship - turn on "show more drivers" 5) Relationship should start off with % of pose slider = 100%; then set decal color % = 100% 6) move % of pose slider to 0%, set color % = 0% 7) close relationship window, save model