NancyGormezano
-
Posts
7,863 -
Joined
-
Last visited
-
Days Won
15
Content Type
Profiles
Forums
Events
Everything posted by NancyGormezano
-

Making a sprite emitter or hair emitter disappear
NancyGormezano replied to Eric2575's topic in Work In Progress / Sweatbox
I don't have a project - but if I look at John's example movie here - I see that when the transparent emitter and a sprite image with an alpha channel occlude - there are artifacts. Not sure if the sprite is in front of emitter or vice versa in his example. It does not seem to matter if the sky or ground is the background. I'm guessing that John was using a sprite image that had an alpha channel, as well as that the emitter surface patches were made 100% transparent (not sure if he did it with setting surface property or with a cookie cut patch image) EDIT: - maybe it's also related to having additive color =ON as well? -
The default color for the ground is not set to orange - it's white - it looks orange because of the default lighting in the default chor - The default light colors are rim/klieg type = orange, fill/sun type = blue, and key/sun type= white - you can change the colors to whatever you want.
-
I did my part by posting a link to "Then Came the Plagues" to my cousin's facebook wall (she has billions of bff's) - I suggested she should get her kids, and her mother to add that little ditty to their Passover Seder Haggadah. The reading of the plagues is my favorite, favorite part of Passover. I love the Plagues.
-
click doesn't always work - space bar does - that's a better way
-
are you sure the eyelash doesn't move ? most of the time that is a screen refresh problem with hair if it appears to be stuck. Click in window - should clear it up

-
And I would add - make your klieg lights have volumetric effect =ON Similarly to what Holmes suggested, here's a project where the model contains both red and blue volumetric klieg lights, and the action rotates the model (so no action objects required) You can also model the housing - but not sure you will need it rotate.prj policelightnoblursmall2pass.mov
-
character looks great - the sss skin has possibilities - but what's with the shadow in the eyeballs? is that because of sss? reflections?
-
ahhhh...yes multiple emitters in 1 hair system being colored by 2 different images still works - I had set the the length of 2nd emitter to 0% - but when changed to 100% - it worked! Now figure out how to make spec color of emitter different than surface spec color please, please, pleeeeesseee.
-
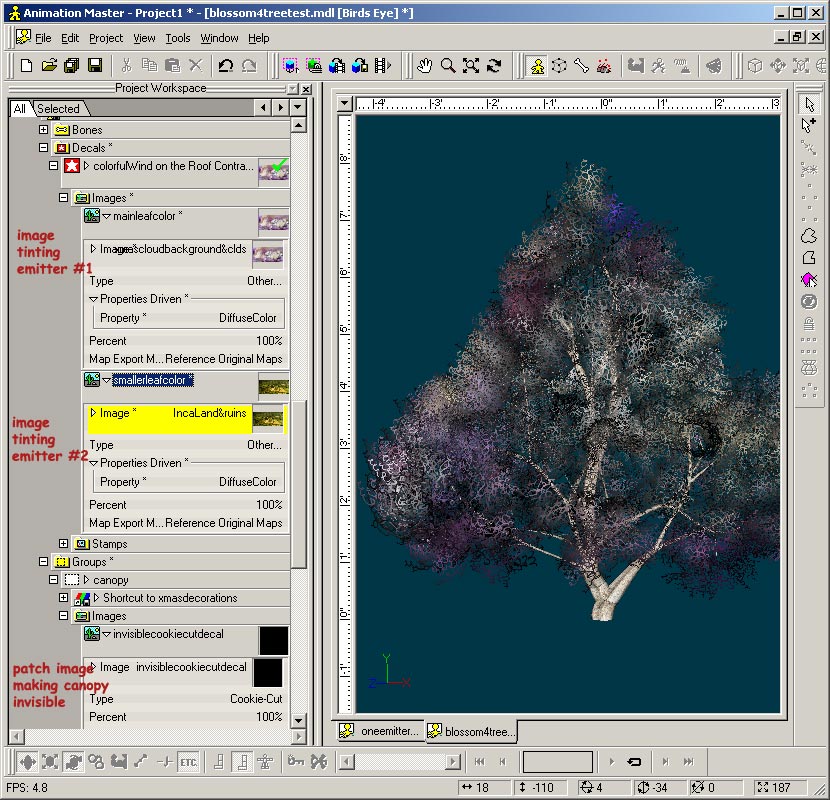
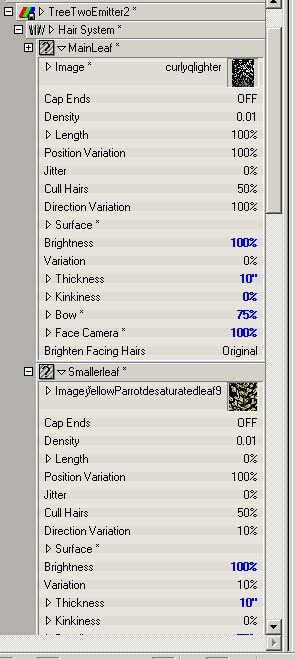
Umm...that was 2005...so hair works differently now in 15jplus, and now again, differently than it worked in 15e. In 2005, I had 1 hair system, that had 2 emitters, where each emitter used the same image (could have been different images) for the "leaves", but the coloring of each emitter was tinted/driven by a different decal image applied to the same group surface - ie there was 1 decal container applied to the canopy surface - The decal container had 2 images, where the type for both of the images in the decal container was set to "other" and the property the image was driving was the diffuse color of one of the hair emitters. Therefore I could mix and match tintings, colorings of the emitters (via changing decal images) as well as experiment with using different images (shapes and colors) for the emitters. I don't think having 2 emitters for 1 hair system works the same any more (I can't get it to work the same) - so would probably have to have 2 hair systems (each with 1 emitter) if you want 2 different looking leaf emitters on the same surface (ie the canopy group), being driven by 2 different decal containers. As for hiding the canopy group, or making it invisible - I did a trick then, which became not necessary in 15e, but might be necessary again in 15jplus. The trick was - I have a small 100 x 100 tga image which is essentially an empty alpha channel (all black alpha channel) - and I add it to the canopy group as a patch image (NOT as a decal) and I set the type to cookie-cut - therefore making the canopy invisible, but doesn't make the hair emitter on the group invisible. In 15e - one didn't need that trick, one could set the group surface specular color, transparency, other surface properties to be different than the emitter surface properties - but in 15jplus - I have yet to figure out how to have different properties - I can not seem to find the secret formula for setting the spec color for the hair emitter to something other than white (and also be different from the group surface spec color) - if you figure that out - please, please let me know. It is driving me batty.
-
Depends on how complicated your scene is, as well as visibility range, and if its for an animation or a still? Are you trying to recreate the image you posted? Or something different? Hair would definitely be a good choice for one method, for lots and different varieties, with easy variations in shading, tones. If you want realistic plant imagery - use image emitters for the hair that are taken from photos of the plant (like the leaves in your photo) If for an animation, you would probably want to use multiple methods - background billboard imagery, then "cut-out decal" imagery, hair plants, modeled plants - for far to near viewing. EDIT: Mark Skodacek - does wonderfully realistic hair trees, foliage, and is probably more what you were looking for. However when looking for some of my old examples of plants - I found this thread and this image for hairy garden plants
-
Noooooooooo....!!! If Robert did it a lazy way, then we wouldn't be able to think him crazy...I kinda enjoy thinking of him as insane. This experimenting, besides having great entertainment value, has the possibility of providing a spark for something more useful ... It's known that complicated materials have an impact on render times (sometimes quite severely) - decals are usually, almost always faster, and easier to create, but of course have other drawbacks.
-
Happy Birthday!
-
Yup - that propell-lah thang has me totally convinced..have to agree with Marcos. Quite Amazing! (as well as wonderfully ridiculous)
-
OMG - a Holmes Cooked Light Butter Tutorial? A permanent cure for the Vapors? Eternal Life? Exactly what I was looking for. No more black holes for me, I can hardly contain the alpha void. I am known to stare blankly on the edge of abcesses...er...abysses...(abyssi?) exceptionally well! I'm off to do me some learnin'...Thanks!
-
hmmm...Seems like I can do most things to the exr files in AE 4.1 that I can to all files - I guess AE automatically converts to 8 bit ? - just not in PS, would have to change it to 8 bit - In 16 bit very few operations are available (just a few filters - eg gaussian blur, sharpen, noise, high pass, etc). I'm not understanding the utility of exr files - other than for more precision eventually? Where? I'm also not understanding A:M light buffers and how to generate, and how to use them in some program? But I also haven't fooled much with A:M composite - a bit confusing as well
-
Thanks, I got the plugin - but I don't seem to be able to do anything with the exr files from A:M in PS 6.01, other than read them - and I haven't figured out how to generate the different channels in the exr file from A:M. I suspect I wouldn't be able to use them in AE 4.1 either (haven't tried). Coincidently, I share common ancestors with Martin, as my great grandmother's maiden name was America Hash. Martin's 5th great grandfather was my half 4th great grand uncle. That makes us half sixth cousins once removed (which makes Heath my half sixth cousin twice removed). This could account for some of my weirdness...but not all.
-
Yup - too blurry. Don't think a smart anti-aliasing filter would help either as in the smaller images, the displacement resolves to too few pixels (stairstepping/edge crawling effect is due to contrast with adjacent pixels). Need the extra pixels in larger images so that they can get "sampled/averaged" to more graduated, less contrast tones. No different than noisy, busy textures, or thin hair rendered at low resolutions flickering. I'm guessing.
-
On second thought, char flat render pass with AI=100, may not be what you want, need - you probably want to render with lights on, no shadows, AI=0 to get self shadowing, specularity, other surface properties on the models - unless rendering to exr does that for you. I've never used exr nor light buffers - so that may be what you want instead - I would have to experiment (don't think I have anything that works with exr - ps 6, AE 4.1)
-
A slight blur post effect might also help in anti-aliasing instead of oversampling? Reduction in resolution of the original render averages the pixels in some manner which is a form of anti-aliasing. Same with blur. It looks to me like displacement runs into problems when it resolves to less than 1 pixel. That's what anti-aliasing is for.
-
I would do the char render flat shaded probably. This can be done with setting AI=100 with no lights on. This will have No occlusion & No shadows. I thought you were doing a shadow pass as well as an occlusion render ?
-
I would render the objects (with no background) with alpha buffer - then in AE I would composite the objects & desired background - then in AE I would set the occlusion pass render to multiply on the composite of the objects and desired background. (In my example that I did in PS - the globe is roughly selected and I sloppily cleared it's background - which accounts for rough edges - it would have been cleaner if I had done a flat shaded alpha buffer render in A:M with just the globe)
-
Not sure I totally understand what you are wanting (not sure why you want to separate occlusion) - but if your occlusion render contains only values/shades of gray (ie you did a white render of your scene) and you also have a color layer, would using "multiply" in your composite program (AE?) work for you ? In my example I only did a flat shaded color render and an occlusion render(100%AI, AO), did not have lights, shadows - but those could be composited as well.
-
When you render to a tga sequence (or mov or png) you have the option to render with an alpha channel: camera/output options/buffers/alpha =ON you will NOT have the option if you render to jpg, avi, bmp
-
wonderful !
-
Looks very cute - congrats on finishing! Found some grammatical errors - Should be "You're a cloud" instead of "Your a cloud". Same with "You're a sun". And probably "I am yellow and hot" not "am yellow and hot"