-
Posts
1,851 -
Joined
-
Last visited
-
Days Won
1
Content Type
Profiles
Forums
Events
Everything posted by rusty
-
I've never seen a 'translate to' constraint do that. Is it possible that there is a key frame on the pencil somewhere that is pulling it? In any event, the curves editor should show you this movement and allow you to peak the curve so nothing moves. Maybe you set a key frame on the pencil at frame zero and also set a key frame one frame before the constraint goes active... and perhaps you also set a key frame on the constraint's enforcement (setting it at zero) one key frame before. Doing either might cause the pencil to move beforehand if these key frames are not peaked or set to 'zero slope' because the computer is still trying to translate between the two key frames even though both are in the same position. I hope that makes sense. You need to look at things in the curve editor to see this. Hope this helps, Rusty
-
I like it! Different that's for sure! I just had my screens calibrated and the only crit is that it looks pretty dark (or my calibration was not done well). Will you place a camera on the ball (or whatever it is) that comes down this thing? Next, instead of a water slide... a lava slide? Rusty
-
Tim, I do this more often then not. My scenes tend to be complex. How you break it up depends on the scene. The most common way is to render background, mid-ground, foreground with the characters being in the mid-ground. I'll usually put the scene together in one project file then determine how many parts I'm going to have then save that project file to several files then start removing things. You must be careful of shadows crossing over more then one part. Actually you must be careful of many things. This of course uses alpha channels. A whole different way, which I've never tried is to take a black box with 1/4th of it cutaway and render the upper left, upper right and so on. Cheers, Rusty
-
Then look at my tut for a much faster way to do the same thing. :-) Rusty
-
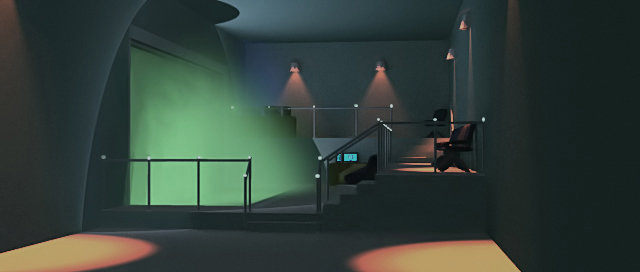
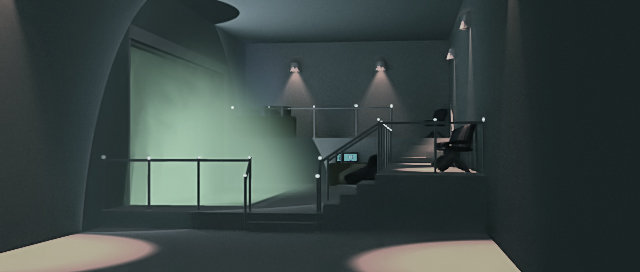
BTW, this set (The Listening Chamber) was modeled about two years ago by Fred Kask working from design specs I sent him. He did a great job. r
-
Show off. :-) Very nice. "Lighting range expanded"... you've added more diffuse light probably using the Levels command (or curves) or, perhaps PS's Shadow/Highlight. "Gamma"... even after reading your forum posts and tuts on this I don't understand this very well. Probably you just raised the gamma until it looked right. Please elaborate on what you did so I can reproduce this in AM. BTW, I used AM V14's Composite to fine tune this shot. Cheers, Rusty
-
Thanks for the kind words. Mood? Powerful, alien, terrifying... the scene before shows a guarded 6 foot thick steel door leading to this room. In scenes before this you're shown glimpses of something and you know that there is something alien and terrifying beyond the green misty window. That sort of thing. What version looks closest to 'real' (or the mood I'm after)? Rusty
-
Hi, Often I get too close to a shot and lose perspective. Here I'm going back and forth on the lighting. Your feedback would be appreciated. 1 2 3 Cheers, Rusty
-
Phil, That just the Hash Christmas Bulb... it shows up every year around Christmas time. After Christmas it should go away. I take it you do not see this in the modeling window. Make a copy of your project that you can mess up then, delete all poses and relationships and see it that fixes it. If so, you need to figure out which relationship is causing this. If not, do you place that action in the chor? If so, something is creating it in the action. You'll find it. Oh, have you inadvertently placed more then 3 hooks on the same patch? All I can think of. Rusty
-
Last time I saw something like that I discovered that the model I was coping was three models on top of one another. How that happened was a mystery. If your sure the original model is not the same way then I don't know. r
-
You might be able to use a spot light with a negative value in the brightness to project a dark area. This use to work. If it still works then you could craft a 'figure like' model (just a flat figure) and rig it and make it white. Then animate it moving the way you want it to move then render against a black background (basically a negative image of what you want). Then you apply this animation as a rotoscope to the 'negative' spotlight -- the white will let thought the 'light' (which is darkness right) and the black should block the darkness. Then you just project and move your animated figure in your set as needed and timed to go with the animation of the figure you did (so the figure waves its arms or whatever as you move it across the wall by moving the spotlight). As for mixing AM and real life sets... this is too large an area for me to get into here. Anzovin Studio has a great 2 CD video tutorial on doing this. Don't remember what it costs but I do know its well worth the money. Hope this helps! Rusty
-
Just a quick sanity check... you did drag and drop the sound file into the chor yes? And you should hear the sound file if you scrub through the chor (advance the frames by hand). r
-
I think that you are short-changing your ships. Nuke that generic material and create some custom maps (aka images used as decals... you need at least color and bump types) showing pipes, docks, hatches, containers, steering jets, port holes, heat dispensers and etc. One map type (can't remember which) shows as brightly lit/dark areas and can be used for rows of windows. Just my .02. Rusty BTW, I too had to create two dozen 'asteroids' -- very similar look to yours.
-
If you mean paint directly on a 3D model... not in A:M. However, there's good and bad news. Good news, a program called 3D Paint was created about a year ago and it allows you to do so with A:M models. Bad news, its not free... don't remember the cost but I can tell you that it is worth the price. Search for 3D Paint within the forum. Hope this helps, Rusty
-
There is something going on that we are not seeing. Please do some screne captures of the process you are going through and the dialog boxes and post them. Thanks, Rusty
-
Just set them to 'on' (or a percentage) in the model's properties... that is, in the PWS highlight the mode the go it the model properties either by opening the properties window or, by clicking on the down arrow on the model's name. Then go to the model's poses under 'user properties' and set the default pose values. Hope this helps! Rusty
-
Nice! Agreed. Rusty
-
hi This thread has reminded me that I have video tuts on TSM2 somewhere. As I recall its one of the CD tuts that Anzovin sold. All my reference stuff is on a bookcase behind me but the CD is somewhere in a 4' stack of CDs and I'm lazy. I'll add a task to Outlook LOL. Cheers, Rusty
-
Regardless of what bone it is, to reduce its size you must open the model and within the 'modeling' window grab the end of the bone and move this toward the beginning of the bone. Do not put the bone in 'scale' mode or all children bones will shrink with it. If the bone is the 'model bone' (that invisible bone you get with all models), to select it, in the modeling window in bones mode and click on the model name in the PWS. Hope this helps, Rusty
-
I don't think too many people go to that much trouble squash and stretch a sphere but of course you can if you wish. And anything is good practice. I'm sure it is good for animation and I'm sure that you could create many different kinds of rigs to do the same thing. All is cool. Good work. Edit: All the beginner classes and tutorials I've seen do this have all used one bone in the center. To squash and stretch they just selected the sphere in muscle mode then pressed 'S' to go into scale mode and stretched or squashed in this manner. There is also a very cool expression you can use that will insure that the volume of the sphere remains the same -- I don't know it off hand (wish I did) but the tutorial is on the Hash site somewhere.
-
Hi, I don't think anyone mentioned this but along with the other suggestions you should always have a middle-of-the-model spline which runs exactly along Y0 (and BTW, the front should face the front). This spline should be one continuous spline. It looks like you do not have this. The reason you want to do this is because normally you'll only model one side then do the copy/flip/attach. You do this so a] you only have to model one side (less work) and b] you want both sides of your model -- especially a face -- to be exactly mirrored. You can change this later (though I wouldn't advise it) but while modeling you want it this way. The reason you want your model mirrored exactly is because, among other things, all of the AM tools and plug-ins depend on this and you'll want to use these ('other things' include ease of flattening or UV mapping, texturing, CP assignment and weighting and, animating). Many times you will model both sides for sanities sake or so you can see what you are doing but then you delete one side and do the copy/flip/attach. Also, say you think you are done but then find you have to change something... make the change on one side the copy/flip/attach. Anyway... my 2 cents, Rusty Edit: BTW, one time a friend modeled a car but when he placed on a 'path' with the 'Path' constraint it was upside down and pointed the wrong way! The reason was he had modeled it facing backward and also had found the model bone and mucked with it. It is the model bone that aligns itself on the path and it is the model bone which aligns itself with the 'world view' in the chor and, when in chor view, determines the pivot of the model.
-
Something seems off but I don't know what. The legs seem twined (they always move together) and, if there is a diving board, normally you jump and bounce on it before diving. The legs seem to jump at frame at one point. Oh, I know what is off... maybe... after the character extends its legs, the character does not rotate at the center of gravity but rather at the base of the legs. In truth, I'd have to look at someone diving to be sure. Rusty
-
Welcome back 'mage', Outside of putting a single bone in the center, I've never tried to 'rig' a sphere. Unless you had a particular reason for doing so (you wanted the sphere to do something more then squash and stretch), you wouldn't rig a sphere with much more than a single bone. Most people don't even add a bone to it -- they just use the 'model bone' which all models have as soon as they are created (its hidden, go into bones mode and in the PWS select the model name and you'll see it... of course rarely do you move or mess with it). So, unless you want the sphere to deform and move in some way you would have no reason for more then perhaps one bone at the center so you could manipulate it from the center (the model bone is at the 0/0/0 coordinates or bottom of the model and is used for stuff like telling a path constraint which way the model should face and where the bottom is). Cheers, Rusty
-
Very good point. Thanks! Rusty


