rusty
-
Posts
1,851 -
Joined
-
Last visited
-
Days Won
1
Content Type
Profiles
Forums
Events
Everything posted by rusty
-

Hi Everyone! Old user back from the dead.
rusty replied to rusty's topic in Work In Progress / Sweatbox
If I knew a way to duplicate lighting between AM and reality I would! Rusty -
Hi Everyone! Old user back from the dead.
rusty replied to rusty's topic in Work In Progress / Sweatbox
Hi Zaryin! Thanks for the suggestions. "...but this is all for stills. I don't know what I would do for animations." Is there any particular reason you said this? I appriciate and support forum rules so use rusty@znet.com if needed. Cheers, Rusty -
Hi Everyone! Old user back from the dead.
rusty replied to rusty's topic in Work In Progress / Sweatbox
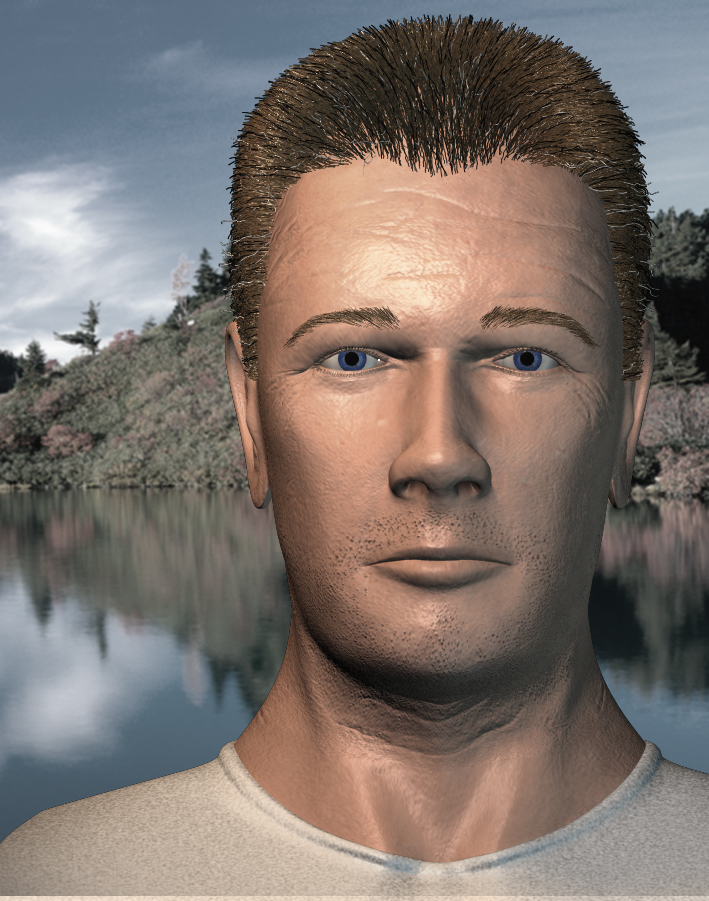
The rubber like look of the skin has always been a problem for me. Hopefully a little SSS and specularity adjustments may help. Also I may have over done the 'softing' bump maps... maybe you don't need this in AM???? Thanks, Rusty -
Hi Everyone! Old user back from the dead.
rusty replied to rusty's topic in Work In Progress / Sweatbox
what do you mean by 'frown lines'? Rusty -
Hi Everyone! Old user back from the dead.
rusty replied to rusty's topic in Work In Progress / Sweatbox
More good feedback!! Thanks! Rusty -
Hi Everyone! Old user back from the dead.
rusty replied to rusty's topic in Work In Progress / Sweatbox
There is a CD on How to Model a face (or really, a head)--can't for the life of me remember the Hash artist who put it out. Without that I too could never model a head or face. Adopting this construction means you can have a flattening template (adjusted for each face) which means you can have standardized decals and haircaps. If that makes sense. Agree with dicky t-shirt (it goes under other wardrobe). Cloth? If you want to call over a thousand manhours 'playing'. :-) Rusty -
Hi, I assembled all the footage (you know what I mean) done for the Spiral Slayer Book Trailer--mostly screen or concept tests--and put all three musical scores behind it. Also added credits--the 5 or 6 Hash artists who helped with the designs, modeling, texturing, etc. In truth it's long and boring, LOL, but perhaps not so much to other Hash animators. Its here! Remember, play it full screen and have your sound on. Also, very few scenes are finished product and no story is really told. Cheers, Rusty
-
Hi Everyone! Old user back from the dead.
rusty replied to rusty's topic in Work In Progress / Sweatbox
Everyone! Thanks for all the awesome suggestions! All everyone of them sounds like great ideas. These will take some time. One thing I forgot to mention was that I'm still back on version 14--I definitely want to upgrade but... can't give up my render farm; too much $$ invested in the PCs. Fortunately, I believe all of your suggestions are possible in v14 however, if you know of anything I might encounter in v14 let me know. Also I have no experience with SSS or AO--tried both out back in the day but I imagine they'll take some playing around with. BTW, are both 'animation' features? I've seen them used in stills but can't recall ever seeing them used in an animation. Really great hearing from all of you!! Cheers, Rusty -
Hi, I hope everyone is well and happy. I'm too close to and involved with the model in the attached image to be a good judge anymore. I'm looking for feedback on what will make it look more realistic. Thanks for any help you can give! Rusty

-
Yves, Thanks for the info! I'm working on replacing the materials with images now. After that I'll have to get all my slaves up and running to do more passes.
-
Exactly what I did just guessing... except for the last step, however I can see the effect so its working (render is 50% done). Thanks! r
-
Ha! How do you use the AM de-noise?? Sat down to try it but chores call and I see no easy 'add denoise'... bummer. I'll have time later... rendering to final (the way I do it) reduced the shimmering by at least 50%. Not much for the strobing. r
-
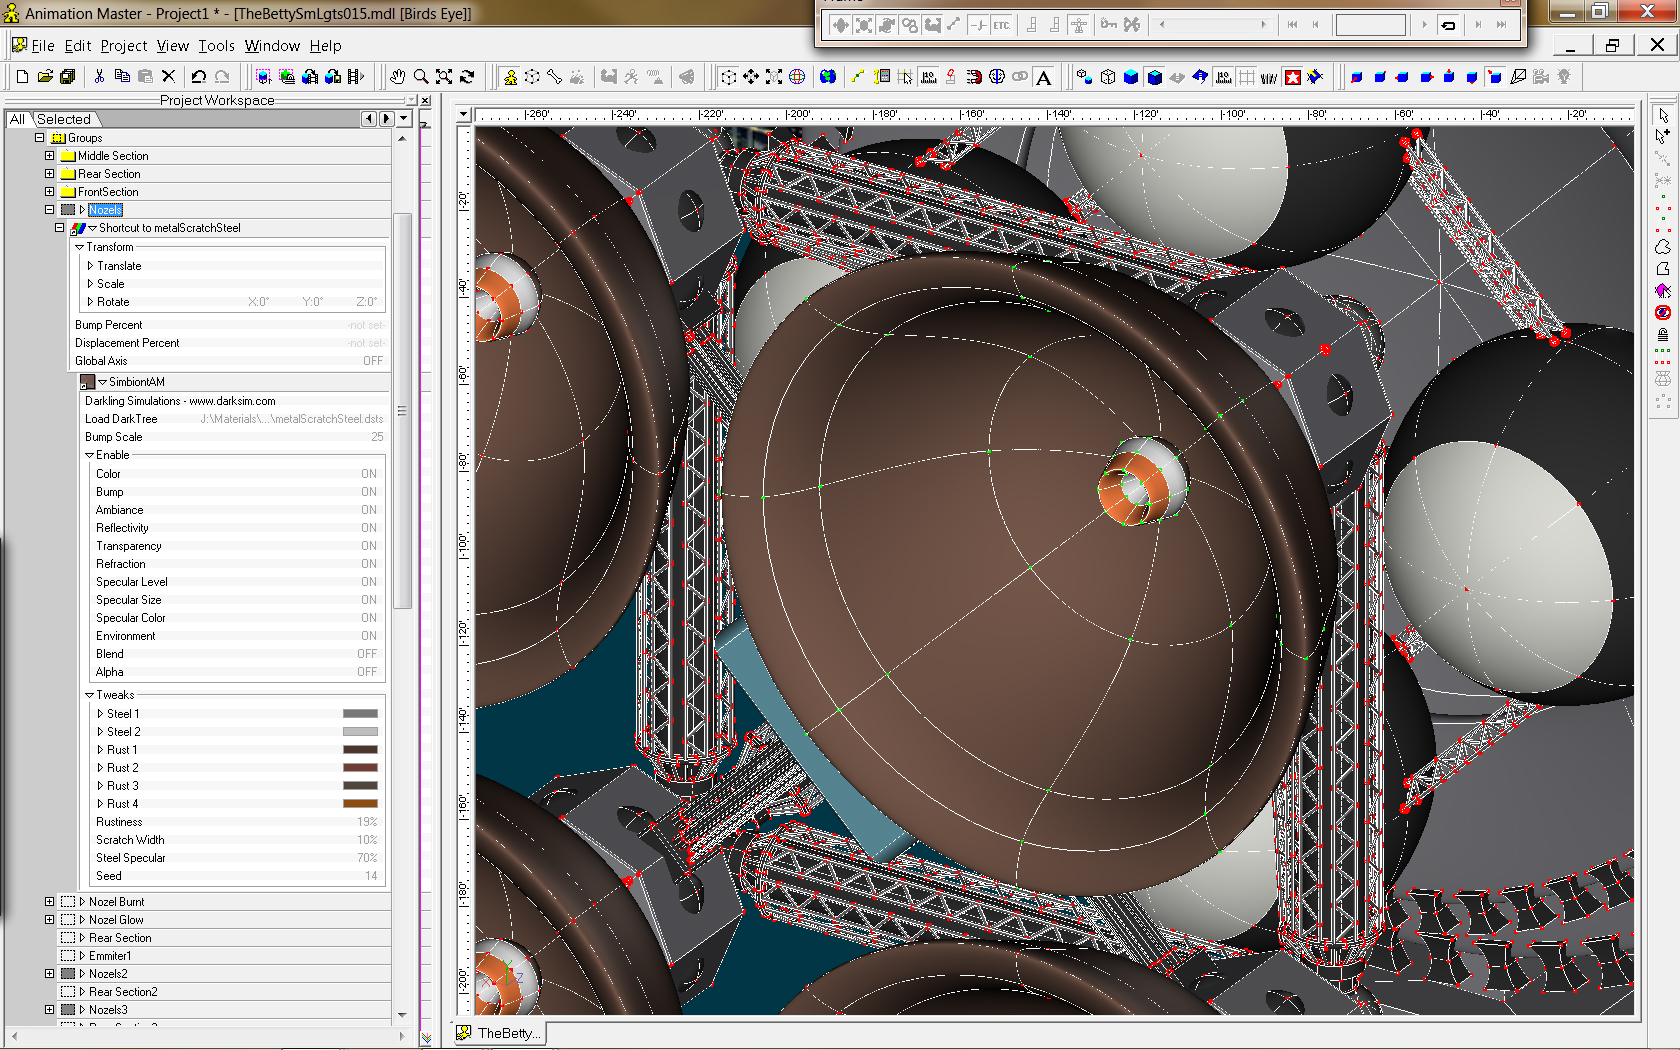
Had to look... that model is old... circa 2006 maybe, with some upgrades a couple of years ago. That is a SimbiontAM material called metalScratchSteel. I'm not a 'material' person. Although I know what can be done with them (from Mastering Materials CDs watched) if I use them at all I just drag and drop and sometimes scale. As far as swapping images for materials, I've been working on several newer models and haven't even considered making changes to that one... in fact, I'll do my best to avoid it. But the question is, why do you ask? Rusty
-
Hi! Well, first thank all of you for the time and effort you've put into helping me. If you find that article Rodney, let me know... sounds counter-intuitive which is why it might just work LOL. And 'good eye' on the shimmering and 'strobing' problem ids. I will try what you've suggested as well as a few ideas I have and will keep you posted. I think simply creating an avi or mov will make the problem vanish! I have a lot going on and haven't even tried this yet! If not, beyond de-noise and blur there's possibilities with over-sampling and even just lighting and staging. I'm already in the process of replacing materials with images. This will help. For many years I just never used materials then... I got lazy... the upshot is; I don't have a lot of experience with them. Cheers, Rusty
-
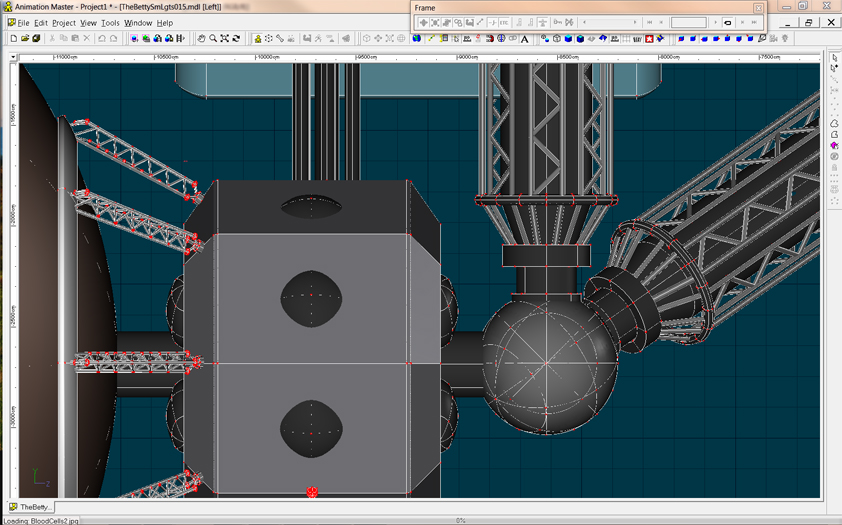
Hi! Darn... I used AE to take the large TGA files from AM and crop out a small part... I am fairly sure I correctly set AE so 'no' processing took place but... I'm not 100% sure. Looks the same to me. I could use PS to reduce the TGAs size but some of the artifacts might vanish. But, the only thing that really makes sense (given that I'm lazy) is to just put the tga output from A:M (220 frames/30fps) on my site. My AE reduction (see 1st paragraph) is already out there if you're interested or want a smaller download or don't want to wait for the above. The URLs for both are: 220 tga frames from AM (file size: 368,050KB) http://www.virtualmediastudios.com/ShimmerTest_TGA.rar Smaller cropped by AE (file size: 119,358KB) http://www.virtualmediastudios.com/ShimmerTest_AE_TGA.rar Please let me know if you encounter any problems with the downloads or compressed files. In the full AM video (ShimmerTest_TGA.rar) you'll see this: The geometry up close looks like this: I'm going to render this same sequence in NetRender but I will probably take me a day to get it going again. Thanks! Rusty
-
Hi, Thanks for all the replies! Lots of good ideas and I will post an example. Something is nagging me at the back of my mind with this problem... I'm almost sure I've hit this before and although I can not remember anything about that time something makes me think that a) it was an obvious problem and, it had something to do with compression or encoding. That may all be horse s__t but that's what keeps coming to mind. Coplanar faces??!!??!!?? I often discover to my horror that a model is all messed up with cps and splines overlaying each other... I usually find it by accident or when trying to texture a model. It makes no sense the way these duplicate overlaying cps and splines are connected either... they are all part of the same model (all connected) but I don't think selecting the model and doing 'e' would produce the crazy stuff I see. Anyway, this really caught my eye as when I discover such a problem I must either delete it (the model) and rebuild and re-texture and re-rig and... (you know the drill), or... slowly and painfully find all 'coplanar' cps/splines and delete them (I know of no easier way to fix the problem I see). I have no idea how such a thing can happen. Oh, I'm pretty sure it's something I'm doing but what I don't know. Any additional information you have would be appreciated!! Sadly, if this is the case, then every part of 4 large and complex models is messed up. I almost don't want to check! :-o Rusty
-
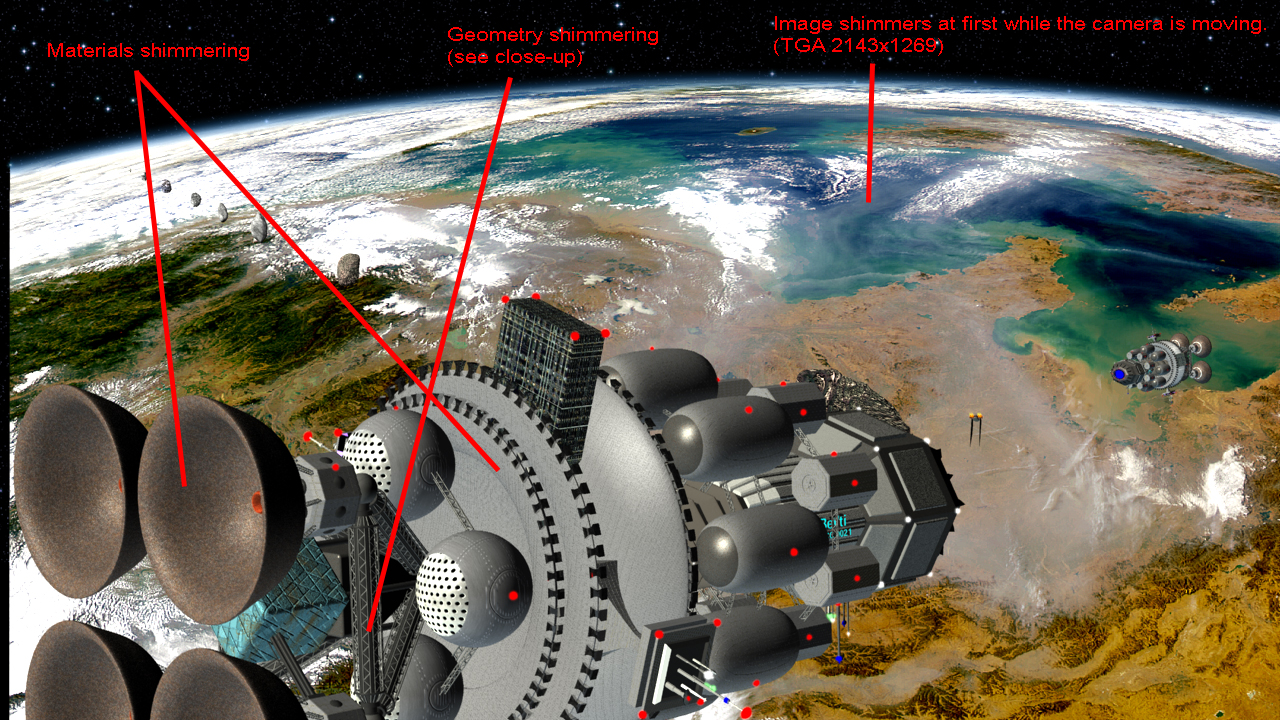
Hi, I'm a 'rusty' old 'old timer' but I'm back and trying to animate and get some video of a bunch of models (space ships for the most part) created for my last AM project (a book trailer for my sci-fi book). To give credit where due, some models were created by AM users from all around the world. I'm using V14 NetRender (I plan to upgrade shortly), however, so far, I've only tried rendering right out of AM. I'm encountering a problem I've not seen before and it's happening on all three of the scenes I've tried to render (so that means 3 different sets of prj files, model files, etc). Things are 'shimmering' on finals renders (this best description I can come up with). As I said, I've just been rendering from AM (not NetRender). I see this 'shimmering' within complex geometry, materials and images used as decals. What I've tried so far: * The ships had to be scaled way up in the Chor so I tried rendering with no scaling but there was no difference. * I tried both multipass off and with 9 passes, softness on. * The render options 'Alpha Buffers' and 'Draw Particles / Hair' make no difference. The target is YouTube, perhaps HD (though honestly I'm not sure what HD really means in technical terms). I've included the render settings below and my systems information is also below. The output is pretty large as is but I can post an example if needed (I'm hoping this is a simple problem everyone knows the answer to!!!). Any suggestions will be greatly appreciated! Rusty Render Settings: 30fps Uncompressed TGA Resolution: 1280x720 Gamma: None Buffers: Alpha Quality: Final Multi-Pass: * Motion Blur: On (defaults) Shadows: On (defaults) Reflections: On (defaults) Draw Particles / Hair: ** All else off. * Original renders had multipass turned off. I tried rendering with 9 passes/softness=on but this made no difference. ** When needed. No difference.
-
Hi, I just bought an Alienware Aurora and it was well worth the money... for myself anyway. Alienware to me is the Rolls Royce of computers. Download my review and unzip it then open it (if it won't open in your browser, open it in MS Word). AlienwareAuroraReview.zip You can run AM with a lot less but it depends on what you're doing and with that system you can do anything! For games, well you know about that. Besides the bells and whistles mentioned in my review, I'm not sure I mentioned the upgradeable -- this system will last twice as long as a regular system. Rusty
-
SMTP time code is HH:MM:SS;FF Where: HH = hours MM= minutes SS = seconds FF = frames The conversion is straight across: frames = SMTP frames 30 frames is 29 = 00:00:01;00 (remember, counting starts at zero so, 0 through 29 is 30 frames) or, put another way a half second at 30 fps is: frames = SMTP frames 14 = 00:00:00:14 a half second at 24 fps is: frames = SMTP frames 11 = 00:00:00:11 A key frame every 10 frames is still a key frame every 10 frames regardless. I hope that answers your question. BTW, I usually render tga sequences from AM then I master (compress) in Cleaner. In Cleaner, the recommended key frame interval for Quicktime Sorrenson (n) is every 5 times fps (i.e. 30 fps -- kf every 150) -- I don't recall for other codec. Also, if you leave it unselected then the codec decides the interval. I'd guess that it's the same in AM but am not certain. Codec settings is a complex topic and varies with content. AM's default is usually good to go with. Cheers, Rusty
-
Very nice! Much lot like my own efforts (http://www.virtualmediastudios.com/wip/) which, now that the book is finished (well, book one of a trilogy), I plan to return to. I feel I know where you're coming from... definitely a kindred spirit. And, I know how much fun you are having -- too cool huh! Look forward to following your efforts. Rusty Edit: You have a very nice effect going on the solar flare... I'm sure you've looked at real ones for reference and know it's going far too fast.
-
There are dozens of good reasons for doing it this way... or perhaps I should say for making the left side the mirrored image of the right side and the above is the absolute best way to accomplish this as it cuts the modeling by 50%. Same with the bones! The main reason beside cutting the work by half is that dozens of cool tools and plug-ins require this (mirror smart skin, mirror bones, mirror splines, mirror mode, paste mirrored, and so on). I routinely delete the left side of my model and then do copy/flip/attach just to make sure the splines/bones are mirrored exactly. There are reasons for making the left side slightly different then the right side -- it has to be this way for some reason, you just don't want the left to be exactly like the right -- however, the advantages of keeping the model mirrored while developing it makes it good sense to make these changes when the model is complete. I love the character you doing! Good luck! Rusty
-
Its a model and a light and it looks like the model uses the light and is probably a sky dome or other lighting rig r
-
There are a host of ways to make the bone visable. You can: a) Temporarily make it visible in the model window (Just select the bone and do J) In the action is a bit harder as the bone is not found in the PWS/action section Just use (a) cause its too hard to explain how to select an invisible bone in the action window. Rusty
-
Malo, Not sure if this works but if you open one bone exposing the option to display the falloff then select all bones in the PWS then change the setting, all might change... it works that way with a lot of other settings. The keyboard keys that control the movement of the CP are 1, 2, 3, 4, 5, and 6. I think it is 4 you want but you can try them all. Rusty
-
Jumbotuna, I've used AM since 2002 -- as a general rule Hash comes through. I think moving forward you'll find that this mishap is the exception to the rule. Rusty