rusty
-
Posts
1,851 -
Joined
-
Last visited
-
Days Won
1
Content Type
Profiles
Forums
Events
Everything posted by rusty
-
If you set a cup in the chor at 000 and then constrain it to a character's hand bone and that character walks off to the side and sets the cup on a table, the moment you deactivate that constraint the cup will jump back to 000. If my guess is correct, checking this one frame before you deactivate the constraint will set a key frame on the cup right were it is so that it doesn't jump back to 000. Rusty
-
My first guess after reading your lengthy reply to Nancy (please review again and check for typos) and seeing no image of the problem is that either... you have a warped computer screen or bad eye glasses. :-)
-
I got some fairly good rain effects using streaks, the 'raineffects' plug-in and particles in the first part of the Horrorthon book-trailer (john3d helped with a lot of this). As you can see there are dozens of small details from upward drop spashes to caustics window and shadow effects to water falling off an umbrella. Streaks did especially well in the 'look down' shots and particles again aced the splash off the top of the car and falloff from the umbrella. This may give you some ideas. Hope this helps, Rusty
-
Yeah, jakerupert is right. I too have a mean machine (well, it was when I bought it) but at certain patch counts things get real slow in the modeling window with certain operations... I'm talking 30 minutes to copy/paste some geometry (the duplication wizard can do the same copy in a second -- that tip from Martin). However, in addition to jakerupert's suggestions make sure you do not have a bunch of windows open in AM. Other then that, I split my models up into 3 or 4 models and I have 'hook' and 'catch' bones that have 'translate like' and 'orient like' constraints on in the chor with nothing else in it but the model. I save out the chor then when I need the model I import the chor. Works okay except for pose sliders which can be on several physical models. This has been reported repeatidly but no fix yet. Cheers, Rusty
-
Yes there is a much better way... search the forum for 'library manager' or 'lib manager'. This is a very flexible program with documentation on how to use it that I helped Glenn Anthofer develop (I helped him with design and documentation, he did all the programming). Because I depend on the old NetRender dongle I'm still back on and use AM V14.0C (which works fine for me) This program has not been tested in any higher version to my knowledge. Basically it takes a folder structure that contains library items (i.e. models, materials, actions, images, sounds, etc.) and creates a lib file for it replicating the folder structure in the AM libraries. In this way you can organize your models, materials, etc. in a folder structure and this is replicated in the AM Library. I added several items to my resource pool and ran this program just the other day so that the AM library contained the new items. Just so you know, in AM's options, the folder tab, the location of the library files is specified (i.e. myresources.lib) -- the physical locations of all your resources is specified in this file and AM reads this file to create the library(s). If there is no valid lib file or AM does not know were to find it then you have no AM libraries. Hope this helps, Rusty
-
What you describe and show is confusing -- when I paint in projection mode I get what I expect to get when I accept the projection mode changes. However, I have seen display errors -- that is, you do not see what is really there until you close and reopen 3DPaint. As an aside, if you lock and/or hide a part of your model (I refer to groups) and believe that this will prevent you from painting on it you'll be wrong if the locked and/or hidden area has the same decal as the visible/unlocked areas. I believe the hide and lock functions are only useful for applying decals from within 3DPaint. Only at the decal level can you control what gets painted and what does not. Rusty
-
Do you mean "Doesn't show up in A:M"? Video for A:M needs to be either a Targa sequence (Premiere can export that) or in Quicktime. Some quicktime codecs do not work well with A:M. PhotoJPEG or "Animation" would be good first tries. Targa sequences are usually best, however. I saved the video as a Targa, and got a bunch of individual frames instead of a single video. Is that how targa's work? How do I use them? I do it this way sometimes when I want to minimize data loss -- be sure to import it into AM as an image sequence so it will 'play'. Usually though I import it as an avi or mov video file. Rusty
-
Either the format that Premiere saved it in (usually avi) is not supported (and avi is... I do this all the time with Premiere Pro captures) or, it's you video card drivers or, computer resources. Sometimes I have to open the video properties and set the first frame to '0' and then the last frame to whatever it should be. Keep playing with it! It works. Good Luck, Rusty
-
If it weren't so perfect I'd suspect a hoax LOL! Real nice! I assume the background is real otherwise that would be more impressive then the truck! rusty
-
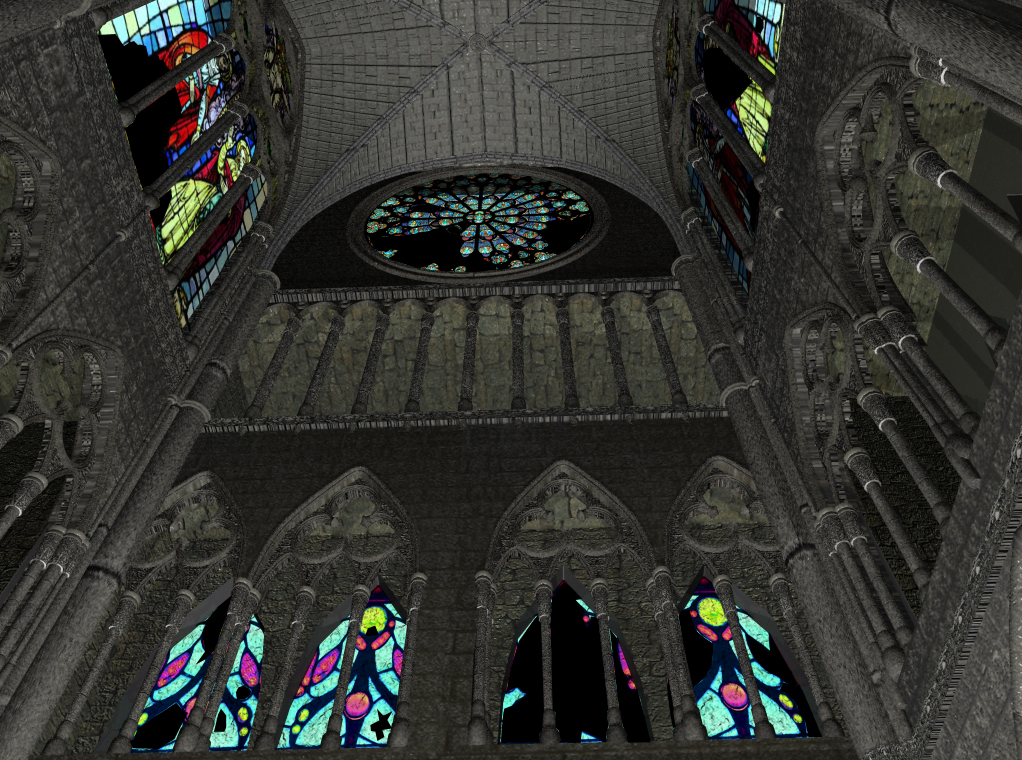
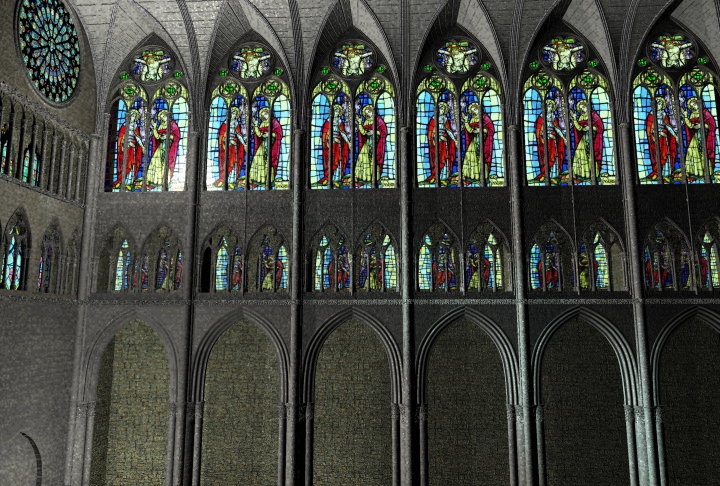
Belated Happy Birthday! And, I have a present for you! Great job on the Cathedral! Doing projects like this will really hone your modeling and texturing skills. When I was talking classes at the Academy of Digital Animation we had a project which I believe was the 'inside' of this Cathedral. It was done in XSI and all I have left it seems are the two pictures below (the first one was used in a project and I broke out some windows). But I also have the class materials which I believe you may find interesting and perhaps even useful. These are in the zip file. amiens_section.zip Happy B-Day! Rusty

-
'We'? A class? Thanks for the links (going to make me look for it huh... well if I have time)! Cheers, Rusty Edit: Despite the fact that my work is realistic, this is more than I need (I think). If going this extra mile bought you a more realistic walk cycle I might get excited but I see no evidence to indicate such a thing and even if it were true, I do 'trailers' and these offer mostly quick glimpses that go by too quick for subtle tweaks to be noticed. BTW, do you have a walk cycle (or straight ahead walk) you can post -- I'd really like to see something.
-
Human walk cycles are usually broken down into several distinct phases, with the top-level division being between when a foot is in contact with the ground and supporting weight, and when a foot is in the air and progressing to the next contact point. We'll label these Stand (or Support) = foot in contact with ground Stride (or Swing) = foot in the air, progressing to next contact. In the process of one complete cycle, each leg progresses from Stand to Stride to Stand and does so in an alternating manner between left and right. All basic stuff - nothing new here. The overlap I was referring to was the point when a leg switches from Stride to Stand, and the heel of the foot makes contact with the ground. At this point the other leg hasn't yet transitioned from Stand to Stride, so you have a section of each half-cycle where both legs are in Stand and neither leg is in Stride. This segment serves to transfer support weight from one side to the other and comprises approximately 10% to 12% of the overall cycle (if memory serves me correctly). The measurement of respective heel strikes gives you the length of the gait. Once the foot contacts the ground on a "normal surface" - we'll ignore ice-covered lakes, sandy beaches, and other slippery or unstable walking surfaces - it does not "slide" along the ground relative to the bottom plane of the foot. Weight transference cause the Stand leg to "rock" from heel-contact to toe-pushoff in progression, but the overall foot position relative to its landing point does not change. Any amount of "slipage" in the foot's "grounded" position which isn't explained by the walking surface or overall circumstances is immediately recognizable and is what gives an animated character that unrealistic "video game glide" appearance. In addition, the human walk is distinctly non-linear in its forward velocity, although inertia of the torso mass tends to dampen the variations to a degree. A:M's cyclic action was designed around repeatable movement with a CLV (constant linear velocity) along the path axis, and determines the current and any interpolated path position by using the primary model bone as a reference point. Since a walk cycle's reference really needs to be the Stand contact point and any interpolation should be performed using NLV motions defined by keyframes, this makes it very dificult - at least for me - to construct a decent walk cycle using the cyclic action. Thanks! I get it. Is there more information anywhere on 'human walk is distinctly non-linear in its forward velocity'. I'm not entirely convinced that AM can't handle this in an action cycle/stride-length that follows a path but I can imagine some potential problems. Anyway I'd like to know where this variation(s) in forward speed takes place and to what degree(s). Of course I can deduce this from video of walks by some number of people (male/female) but I'd rather not take the time right now. Rusty
-
Hi Gaijin, The 10% overlap you mention is not clear to me and I don't think I know about this. Can you elaborate? As far as I know, this is pretty easy to do in AM using the curves editor. Rusty
-
Great job... a few tips to improve it... maybe LOL. When the back foot pushes off it should go up and back (or, if not 'back', just a pause) -- you need to have the 'pushing off'. Also this push off causes the body to start to fall forward. You need a little more -- you're almost falling back in that part. Also, before the forward foot's heel touches the floor, the foot should raise up a little before touching down. Something many people miss is when the forward foot's heel hits the ground, there is no ease -- like the old bouncing ball it doesn't stop or slow down at all until it hits the ground. The shoulders need to come down in the passing pose. Also it sometimes helps if the hand swinging forward moves faster in the last half of the swing. All of this stuff is subtile but needs to be there or at least a little more 'there' then it is now. Finally, your character needs to move up and down a little more; high point is just after the push off and just before the passing pose (the 2nd highest)... low point is where the weight is transferred to the other foot (the knee should bend here as well as it takes the body weight). Rusty
-
mtpeak2, Much better! Do check the zero slope on the first and last key frames in the cycle. There is a little too much jerk somewhere there. Now, I think you've neglected to move the shoulders down and forward from the 'T' modeling pose the character is modeled and rigged in. The shoulders look good for the back swing but look unnatural for the rest of it. Does this make sense? Also, as your foot/lower-leg swings forward, it does so in slow motion. Look at it. Don't you think so? The foot swings forward faster which gives you time for the following. Just after the push off (when the foot is back and which pushes the body forward) the foot/lower-leg rises upward before coming forward... and at the end of the swing, just before the heel touches down, the foot/lower-leg kicks forward. All of this is somewhat subtle and allows you to move the foot/lower-leg forward with more gusto. Along with the above is some toe action which I can't get back to your videos to check on right now... you may or may not have it already. It is logical stuff though... in the back position before the push off the toe is bent lying flat on the ground ready to spring the body forward. As the foot lifts from the ground and rises upward the toe returns to straight again. Likewise in the forward position when the heel hits the ground, as the foot slams down the toe can raise up then flatten upon hitting the ground... this adds to the slam down effect which adds weight to the character. My wife is attempting her first walk cycle right now and, at this point, is very discouraged. She is following the tutorial from the 'Character Performance' CD from Barry Zundel which is very good. I also have the tut on the Angevin CD Animate! also very good. In fact I have and have studied every walk cycle tut in existence (well OK, probably not, but every one I could find)! I've come to believe that I have accumulated too much on the subject LOL. My two cents anyway. Rusty
-
Michel, BTW, I'm using the TS2 rig (but I've also linked the Squetch rig) and I have had very good luck in linking BVH files but this is for another post. Rusty
-
Hi Chris, If you plan on animating this model (and btw it looks great) or have it in an animation, I'd try some quick thrown together tests ASAP. Hair can do funny things (at least in version 14 and below) when moved or... if just the camera moves. This seems to happen where there are 5 or 3 point patches or where there are hooks. By funny things I mean move when it clearly shouldn't, strains or small groups thrusting outward and/or shimmer. I believe all of this can be corrected by taking various steps. Rusty
-
It is not a bad walk cycle -- especially if it is your first attempt (in this case I say A+ too). I believe that a person 'could' walk like that but to me it doesn't look very real. I can see the subtle secondary action -- good work. It's not bad though I can pick it pieces but I wouldn't dare because despite my many years of study on this, I'm lousy at it. In case you haven't noticed, walk cycles are a bitch. I develop mine by trying, tossing, trying, tossing (repeat half a dozen more times) then accidentally getting it right. Okay... I lied. I will pick at it a bit. There's no sense of weight (quickly bringing the foot down after the heel touches helps as well a the knee bending a tad for a frame or two when it takes the weight). The back foot does not 'push off' enough. After it pushes off it speeds up and comes forward a little faster. Right after the push off is the highest point in the cycle (for the character or head), the cross over is the second highest. It doesn't seem to move up and down enough. Walking is basically falling forward and catching yourself over and over... the body should seem to lean forward after the rear push off. I can't see the front but the shoulders and hips move in a figure 8 opposite from each other, that is to say, they both rotate from a top view and also from a front view and do so opposite from each other (I really can't tell if this is happening for sure). The hand moves in a subtle figure 8 as well from a side view. Again I can't see the front (or a birds-eye) but... from the front view... the center of gravity shifts back and forth over the leg supporting the weight and, the foot bends outward as it comes forward... and, the hands come inward when in front and also when in back to a lessor degree. The human walk is a very complex affair... some people can get them right every time in just a few seconds and... I hate each and every one of those people LOL. ;-) Rusty
-
Nice work! I think you will still need more splines in the forehead and eyebrow areas -- one or two (unless this is for a Botox commercial LOL). Rusty
-
Dear Wally, Hello from our cabin at Big Bear Lake where it it 5:45 and I'm baking Cinnamon rolls for breakfast. First off... what you posted was a screen capture of A:M's rendering window... not what actually rendered. It says that the animation was rendered (100% complete) so what happens when you click on Untitled000.mov? Does you animation look okay? This is what really counts. What you sent is just a display glitch which is annoying but not really important in and of itself... if your animation rendered okay. It does mean that something is wrong however. BTW, it is not really a good idea to leave the file name blank which it looks like you have done given the name Untitled000.mov. Lord knows what folder his was saved to. You might have to search your entire disk for Untitled000.mov. You did not post what type of pc you have nor what version of AM you are using so I'll assume Windows Vista and AM V15. I do not think that this has anything directly to do with render settings except that some may use more memory than others. My first guess is that you are running out of memory. I would try rendering 15 frames the way you are currently doing it to insure that you still see the same thing with 15 frames, then render 15 frames at the smallest size possible and see what that looks like. Or just render the entire thing at the smallest resolution (the 15 frames is just to make it faster to do) If it looks okay at the the smallest resolution then this implies that memory is the problem. If it still looks messed up this means that it could still be memory... but we just can prove it. I would make sure nothing else is running when you render and also reboot just before you render (in case something is leaking memory). I would also make sure you have plenty of free disk space -- 10 Gigs or more. Assuming you are on a Window's pc I would increase memory cache to the maximum amount it says you can. Finally I'd render to a Targa (tga) sequence/uncompressed as this may use less memory (however, as I said, your rendered animation may be fine). Hope this helps, Rusty
-
I love it! I think you should disguise the birds a bit... make them more subtile... or maybe they just stood out because the rest was sketch. I guessed that it wasn't about birds before the end because the birds were so 'out there' but perhaps they won't be in the finished product. Or maybe my brain just looks for that kind of thing. Really good no matter what... most short animations don't do as well. Rusty
-
Dear Code D, If you are 'really' looking for help you will have to put in a little more effort on your part. The project file you posted does not have enough data in it for us to see what's happening. As you can see only a few models and a couple of materials are embedded: Plus, we did not get any of the images that are being used. You need to: 1. Right click on the project in the PWS (at the very top) and select 'Embed all' 2. Select Project->Consolidate. This will create a project folder structure containing all of the project parts (we'll get the images) 3. Compress this folder structure using zip 4. Post this zip file. I need to know if you have rendered any frames, if so, can you post one. Please also tell us how long it took to render or, how you know that its taking too long to render. We all face the problem of render time -- there are many tricks to reduce it. It's nothing to see 1 to 2 hours per frame but sometimes its nothing to cut this in half or more. Cheers, Rusty
-
Hello, Well, I have to jump into this topic as it kind of mirrors an effort I have ongoing. With my 'virtual actor' approach (a character model can play many parts so is only a bald, untextured head... all else -- maps and hair -- is 'snap on' and, the neck down is wardrobe) one area of research is an attempt to come up with a flexible morph-able outfit. It would have a 'top' and a 'bottom' (arms or hands and, shoes or feet are add-ons to this). Both 'top' and 'bottom' would have flattening poses and could be textured as needed. Where it gets interesting is... just how many 'kinds' of tops and bottoms are there? So... whether the 'top' is: * a coat and tie or just a shirt; * long or short sleeve; * collar, or none and vneck or round neck or tank top; * pockets or no pockets will be pose controlled. Whether the bottom is: * long or shorts (and how short) * jean type or creased * number of pockets and pocket types * belt/no belt will also be... pose controlled. Yes making parts invisible has problems (even if shadow, specularity and so on is considered) so morphing/hiding is the way I'm going now. I'm convinced it will work -- perhaps it will be somewhat limited. I'd almost certainly have to have a male and female model and, I think female dresses and skirts will need to be left out of this. The problem of course is rigging and weighting but if this is kept limited enough that really shouldn't be a problem either. With one exception I only need one outfit for my current project so this effort is a background effort right now but it looks real promising. Admittedly it takes me for-friggin-ever to rig and weight clothes. I laugh when I think of how I used to believe I'd have a nude model and be able to dress it in cloth simulated mesh! Rusty
-
The only thing I remember about the 2001 rig was that you needed to do something somewhat strange to get it to work. It was a relationship that had to be dragged and dropped on the character before it would work. The name of the relationship was something like 'drag and drop to animate'. Sorry I can't be more help. Rusty PS: I'm not in a place right now were I can dl the model and look at it.
-
Absolutely with Vern... I always watch the material (or hair or decals or particles or surface properties) in a window doing a progressive render while I adjust it... never any problems. You definitely have a 'kick ass' system. Did you say which version of AM you are using? What about the type of video card? In my experience crashes are usually caused by: 1. an older video driver or you've purchased a real high end card which simply does not work with AM (a problem I had) 2. the pc is squeezed in between stuff and is over heating (crashes occur after the pc has been running an hour or more) 3. you're low on disk space 4. defective memory (run one of the free memory checkers) 5. defective disk (run scan disk) 6. you have installed a current version of AM then installed a previous version and things have gotten messed up 7. you are going too fast and trying to do things before AM has finished the previous operation 8. you mesh is screwy or in some way corrupted (try a simple test on simple geometry) If the PC is new (less then 4 months) you can scratch out much of the above. I've had cases where I've used materials created in older versions of AM which caused crashes. I avoid materials... they kill render times and almost always you can use an image instead. We really need a small example of what you are doing... the material and your settings and what else, if anything, is being applied with the material. I feel for you cause I've been there. Presently I crash about once ever 3 months. Rusty Edit: Thinking about this more, you should take the following steps: 1. The first thing to try is creating a single patch in a new project, applying the material and see if it renders 2. Next, in the same simple project file try tweaking the material and see if it crashes. Then save the simple model. 3. Back in your original project file, make a copy then completely remove that property and see if it renders 4. Next, using the project file from step 4, import the model from step 2, insure that the property imported correctly then, try to render. This will tell you a lot about the problem and give you a starting point for troubleshooting.