MMZ_TimeLord
-
Posts
1,495 -
Joined
-
Last visited
Content Type
Profiles
Forums
Events
Everything posted by MMZ_TimeLord
-
Glad you're feeling better... wonderful house! can't wait to see the grounds landscaped and some indoor shots of furnished rooms... Great work!
-
Nice logo 'punch'... I see these kinds of things all the time at the opening of games. Very well done.
-
The storyboards and animation are quite good. I would not worry about the storyboards... they are QUITE good enough for the visualization purpose for which they are intended.
-
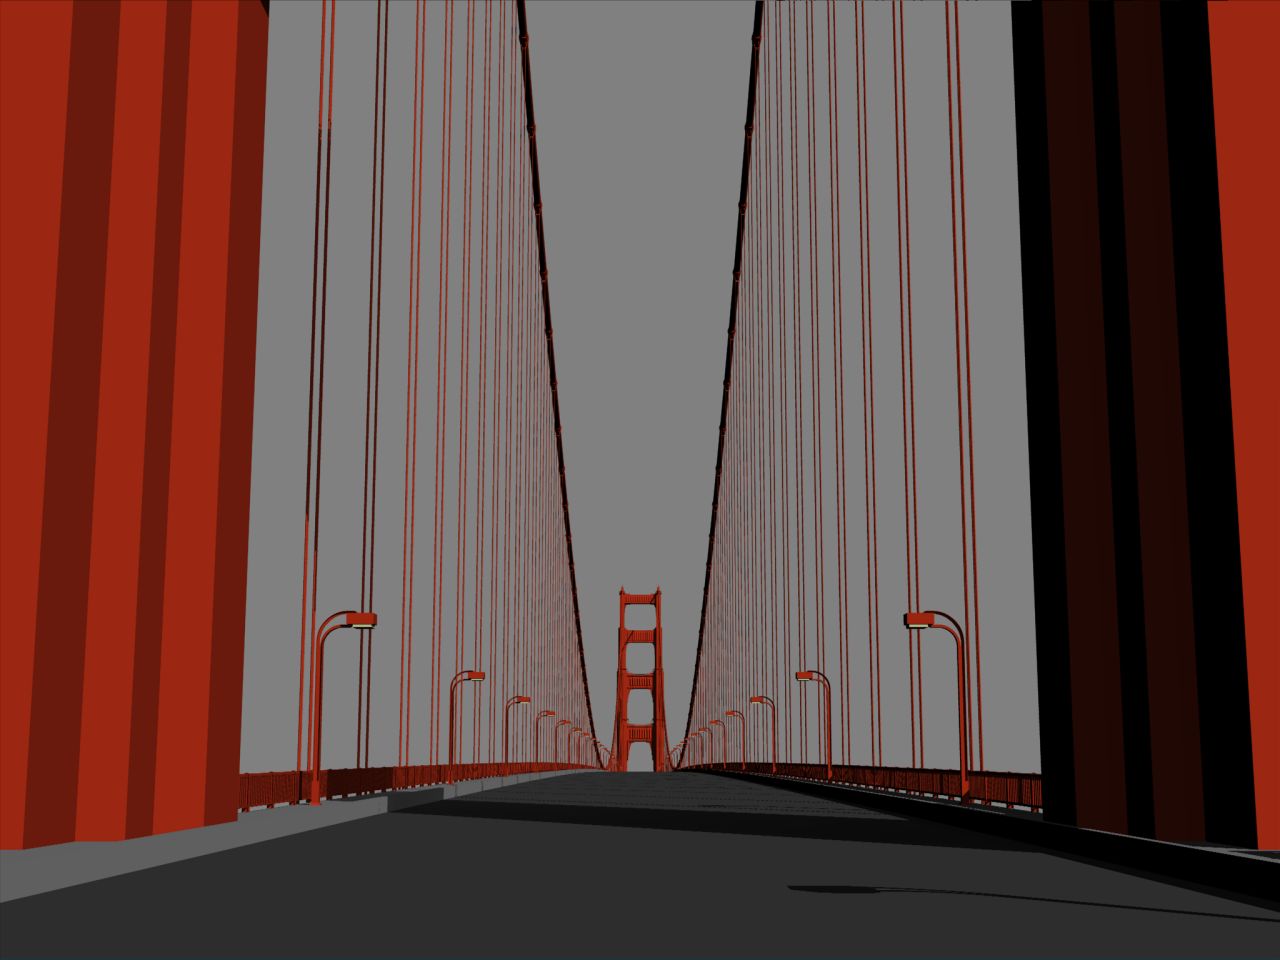
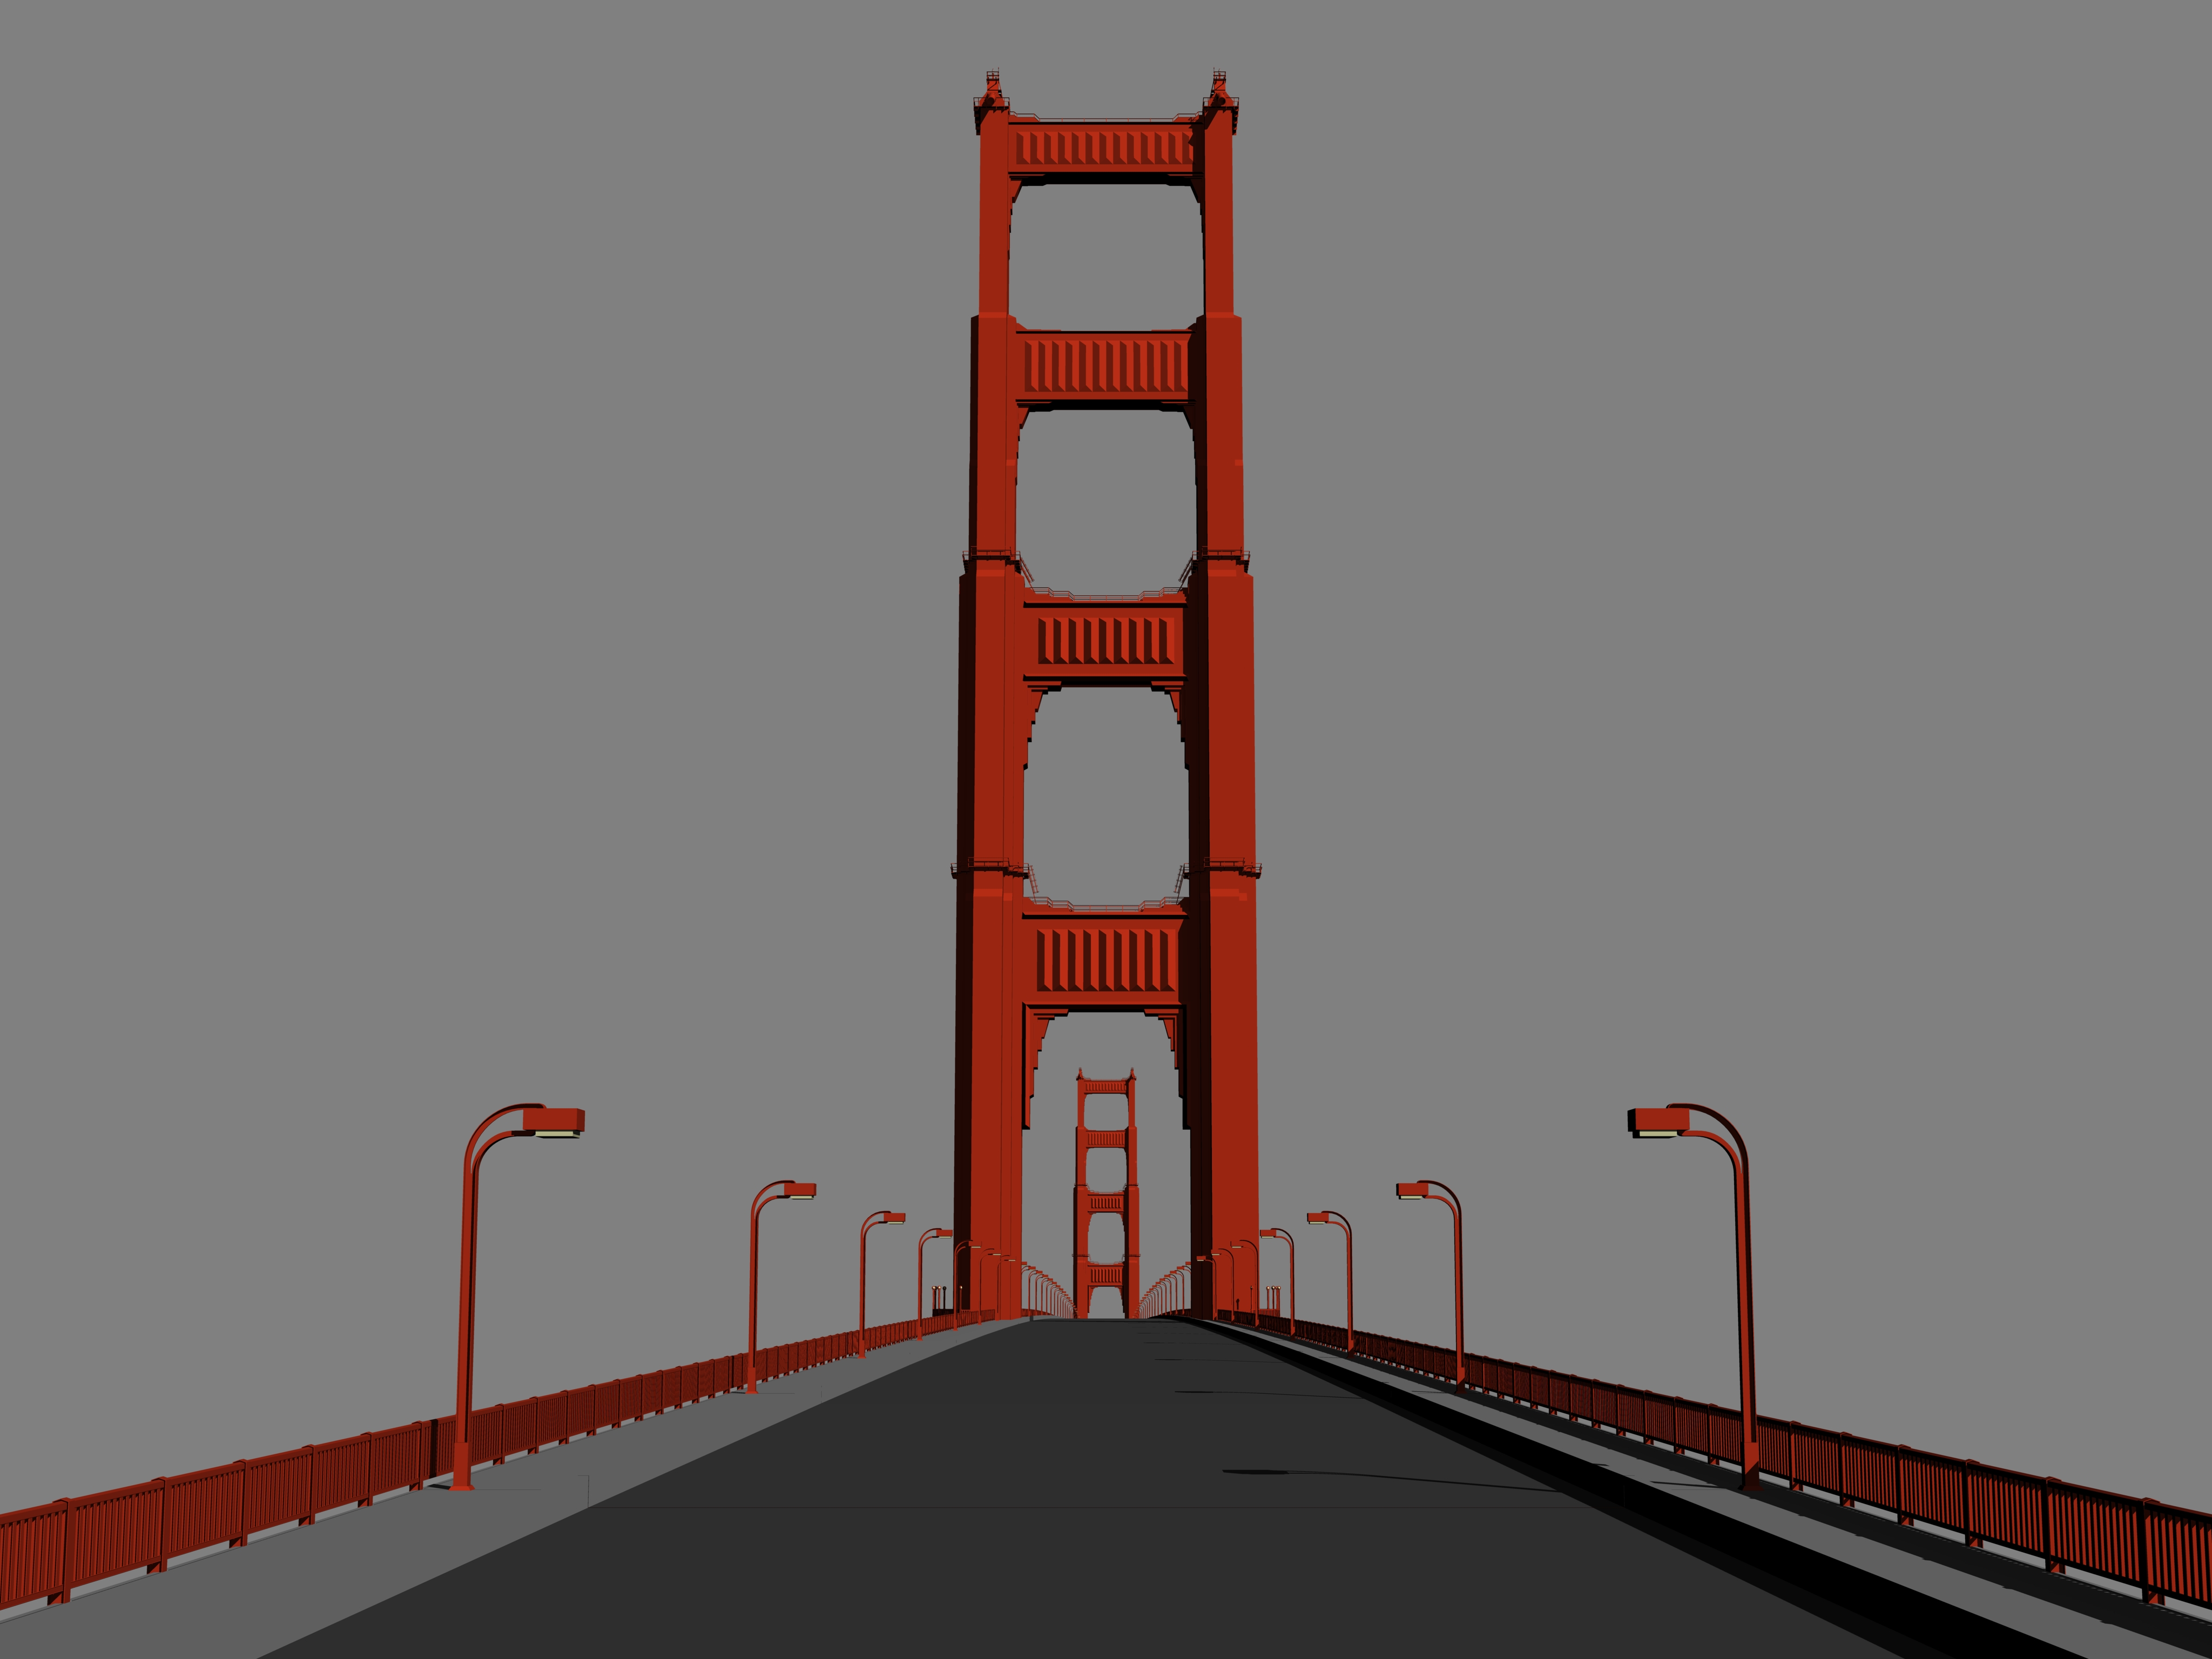
When modeling, if your patch usage goes above 4,000 or 7,000 then A:M will slow down SIGNIFICANTLY. Easy way to check this is to right click on your model in the project workspace (PWS) and select 'info'. It should give you the patch count. If it's over one of the two numbers mentioned above, you may want to break your model up into sections and assemble them with an action. This is what I had to do with the Golden Gate Bridge project (I think it's on the Extras DVD).
-
Easy way to test whether it's decals or not is to turn off decals in your final render and leave everything else alone. If it's decals, then your solution could be as simple as re-decaling or reordering way you stamp the model. Good luck!
-
Beautiful job Rodger! My only comment on the building is the doors of the entry area. Isn't it cusomary for the two doors on the left to have their handles on the other side? Just an observation. Wonderful detail... now get to messing it up so it looks older.
-
Almost needs some 'OZing' up to me. More pipes around it, maybe another couple of pressure valves and guages. But the realism of this steam hammer model is astounding! Great job Rodger!
-
New Short Film Theodore N' Fink (15 minutes)
MMZ_TimeLord replied to dre4mer's topic in Work In Progress / Sweatbox
That was totally awsome... My mom will get a kick out of that. She may contact you for a DVD so she can show it to her sunday school class. -
Keep Akansas Beautiful
MMZ_TimeLord replied to Cartoon Tycoon's topic in Work In Progress / Sweatbox
Excellent work. I'm going to visit my parents in Arkansas in December for the holidays. Lived there for over 12 years. Please keep it clean. -
Way better Rusty! Now I can believe it's truely a 'Battleship'!
-
Golden Gate Bridge High Detail model
MMZ_TimeLord replied to MMZ_TimeLord's topic in Work In Progress / Sweatbox
Dhar, It would appear I only have time to complete the central Main cable spans and the roadway cables on that section. Although still not aligned properly in the choreography, but you can't see it here. Last but not least... current patch count numbers for this 'WIP'. It will be going on the Extras II DVD in this form. I will be updating this throughout the year and hope to have a 'complete' Golden Gate Bridge High Detail model project for the next 'Extras III' DVD with the lighting, approaches, Fort Mason, shores, toll plaza and water. __________________________________________Patch______Model________Total_Patches Sub_Model_Name____________________________Count______Quantity_____in_Action Tower_Top__________________________________2733________4______________10932 Main_Towers_(each)________________________14097________2______________28194 South_Tower_Skirt____________________________42________1_________________42 Road_Deck_Sections_(Standard)______________7179_______41_____________294339 Road_Deck_Sections_(Tower)_________________4711________2_______________9422 Main_Cable_Sections (Central Span)________23544________4______________94176 Overall_WIP_Model_(High_Detail_version)______________________________437105
-
Golden Gate Bridge High Detail model
MMZ_TimeLord replied to MMZ_TimeLord's topic in Work In Progress / Sweatbox
John, Actually earlier in the thread you'll notice that it takes over 20 copies of the roadway section, two towers, four copies of the tower tops (each side of each tower), a special roadway section for the towers, one retainer wall at the base of the north tower and probably will take six cable sections all put together in the action. Sometime later when this is updated for the next DVD, I hope to have the elevated part of the freeway, toll plaza along with both shores and Fort Mason under the soute approach and of course the water added to this project. -
Golden Gate Bridge High Detail model
MMZ_TimeLord replied to MMZ_TimeLord's topic in Work In Progress / Sweatbox
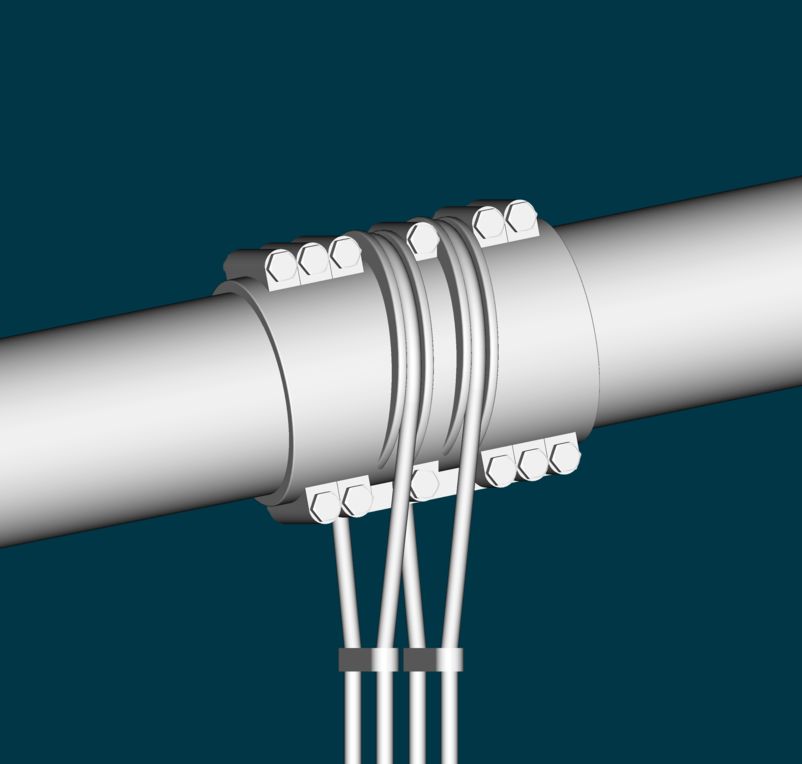
I'm about half way done with one half of the main cable span between the towers. Here's a shot of the last roadbed cable shoulder on the main cable to give you an idea of the detail I'm up against. Each one of these shoulders is at a slightly different angle and so requires each to be unique. I think I'll go get some sleep now...
-
Golden Gate Bridge High Detail model
MMZ_TimeLord replied to MMZ_TimeLord's topic in Work In Progress / Sweatbox
Farther back in the post I was contemplating using either a bump or displacement map to achieve the rivet detail. But alas, I have no time... even though I have the high resolution reference pictures to make the decals from. -
Golden Gate Bridge High Detail model
MMZ_TimeLord replied to MMZ_TimeLord's topic in Work In Progress / Sweatbox
At this point I just want to get the main bridge done for the Extras II DVD... we can then update the project on the website later. The main geometry of the bridge is what I'm concentrating on now... I won't even have time to do the rivet details now... -
Golden Gate Bridge High Detail model
MMZ_TimeLord replied to MMZ_TimeLord's topic in Work In Progress / Sweatbox
Okay, since I'm trying to complete this for the Extras II DVD... here's the current progress. I've removed the main cables as I'm trying to use sweeper to make new and more detailed ones (small bug, so I may have to do it the old fasioned way. ) The main details I've added in the last few days are the walkways around the towers. I've gotten the roadway cables modeled and I'm trying to use sweeper to place them, but it's becoming more time consuming as sweeper keeps slightly rotating the assembly on the guide spline (truncation errors again) as the scale is really huge.
-
Sounds like you are looking for a modeling tutorial only... Is that the case? If so, one of the TAoA:M tutorials that comes with your book... either Exercise 10: FW-190 Fighter or Exercise 11: Giraffe will show you how to model and texture in A:M. If this is not what you are looking for... please be specific about what 'steps' you are looking for tutorials on. Is it Modeling, Texturing, Rigging, Posing, and creating actions... then putting it in a choreography and guides to lighting? Just a simple 'Start to Finish' leaves a lot to the imagination and I have yet to really master reading minds...
-
Please share your insights on the Planet Glow settnigs... It would be real nice to add to my solar system and earth project for the ExtrasDVD. Beautiful renders!
-
Resolution is the number of pixels in height and width of the image. Increased resolution will give the appearance of a higher 'quality' image because it reveals more detail about the scene. In reality the quality is not higher, just the amount of detail in the image. Quality is the amount and type of compression (Codec for movie files) applied to the image. Too high of a compression will lead to artifacts in the image which blur or obscure details and result in lower quality. The best balance is a compression level that keeps 90+% of the image, will little or no artifacts. Motion will greatly affect how good or bad quality is with various compressors. Different compressors will work better with different types of animation. I would recommend staying with quicktime and Sorensen3 codec for animation. Local or personal use, set it to 'Best' or 'Good' quality... for the net, change it to 'Medium' to 'Least'. My personal setting for the net is usually 'Medium' or 'Low'. Hope that halps.
-
Actually in the "Animator's Survival Kit" it recommends for you NOT to listen to music while you work. I've tried both ways and I agree... you will stay MUCH more focused if you don't let anything distract you. The quality of my work has gone up significantly. Maybe some tracks from that group ... 'white noise' ...
-
Two things I can think of David... 1. Are the volumetric lights the same size as the headlights involved? 2. Are the volumetric lights in the same position as the heatdlights on the model? (or are they out in front of them?) My limited experience with volumetric lights shows that (like my flashlight in my TAoA:M exercise here) if you make the light the same size as the modeled source and place it just behind the lens or just in front of it, it should look fine. Here's the flashlight model I used with the lights attached. [attachmentid=20664] Flashlight_w_Lighting.zip
-
I won't give you a hard time... I will say it's a very nice model and includes Exterior, Interior and Interior floors separate. Nicely done. I will post your readme as well as a few renders for folks to get a better idea of the project. The models line up just fine in choreography by simply dragging the exterior model then the assembled interior model and then constraining the interior model to 'translate to' and 'orient like' the exterior model. You would also need to add a 'scale like' constraint if you were going to scale the exterior. First render is simple single light source and AO of just the Exterior model. Second is the same setup, but with the Exterior and Interior together and 80% transparency so you can see the interior somewhat. Below is the ReadMe.txt file contents. [attachmentid=20641][attachmentid=20642]
-
Don't get too discouraged... I've been working with A:M for over 10 years and I'm just now getting to the point where I am not scared to show WIPs to other folks. My animation still needs LOTS of work. But that's the area where I was rough in to begin with. Most of what I've done in the past is modeling. All I can suggest is practice, practice, practice... find simple objects laying around and try to duplicate them. (spoon, fork, coffee cup, pen, pencil, paper clip, etc.) Start small and get comfortable using the modeler. I hope that helps. Good Luck!
-
Two things, you can change the file from a saved location to 'embedded' and then you can modify it and save it either with the project or by itself. You can't save it to the CD-ROM (Read Only Memory). Choose a different folder location in your my documents like 'My Animation Master' or something similar. Hope that helps.
-
I believe the term is "WOW!"... nicely done John! Now we are seeing some SERIOUS use of displacement.