MMZ_TimeLord
-
Posts
1,495 -
Joined
-
Last visited
Content Type
Profiles
Forums
Events
Everything posted by MMZ_TimeLord
-
Could Somebody Build Me Something?
MMZ_TimeLord replied to Darkwing's topic in Work In Progress / Sweatbox
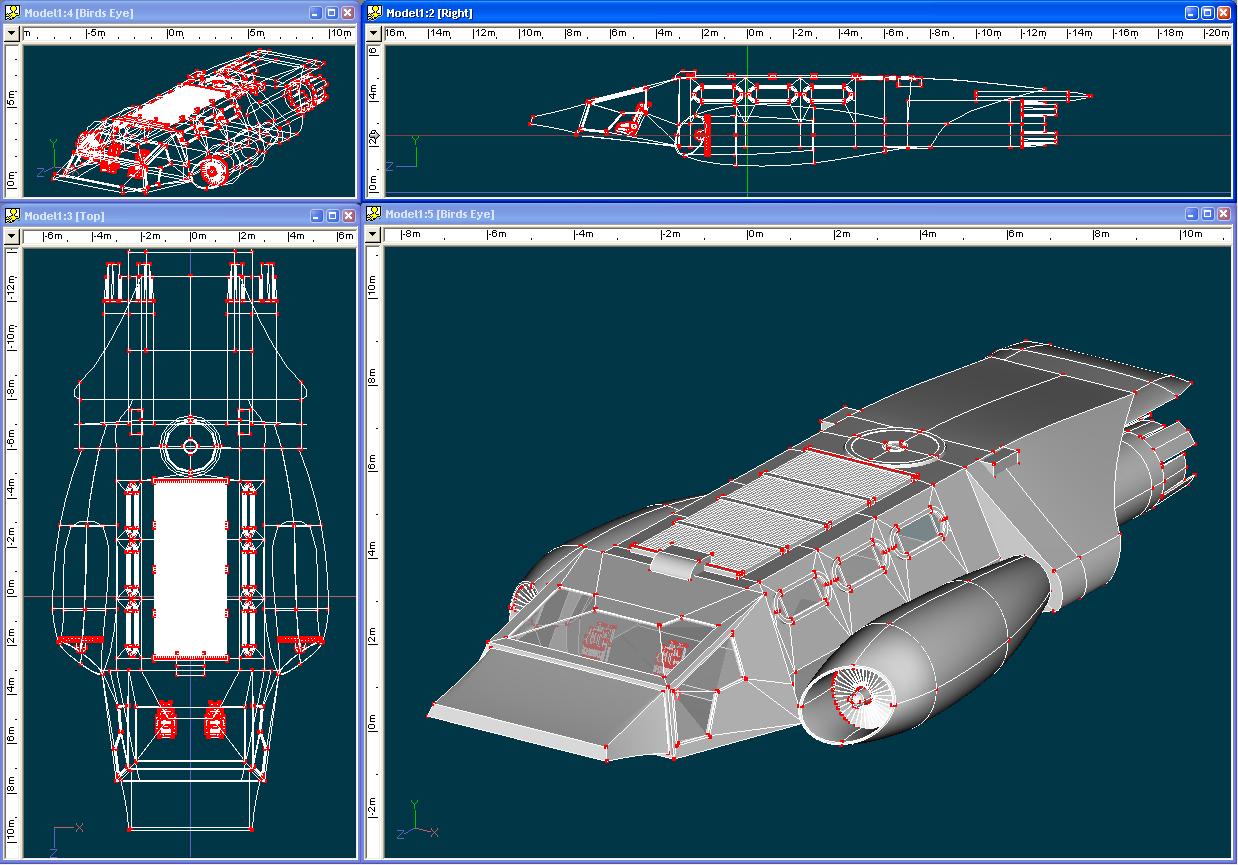
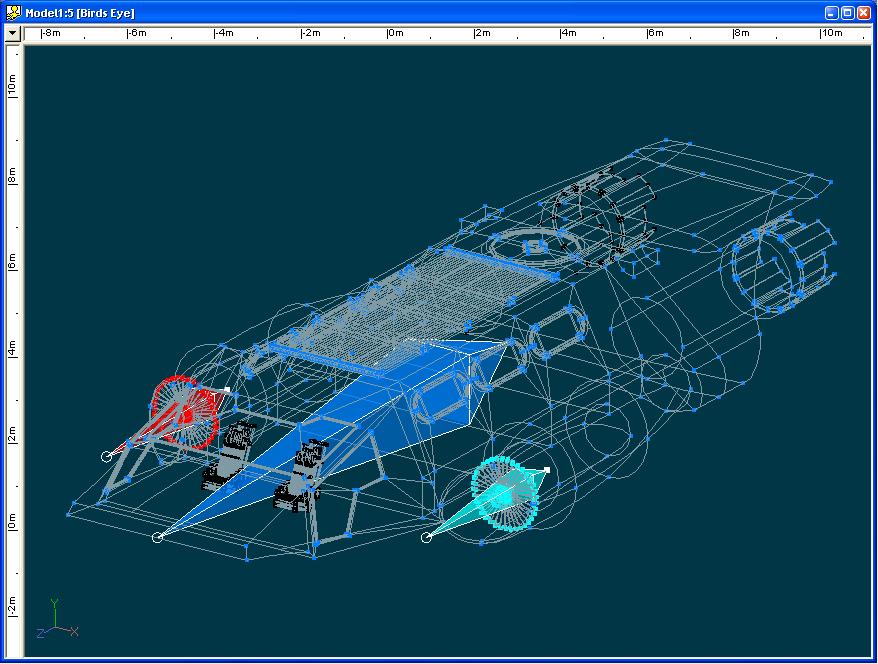
Okay... some more time tonight... Added the rocket/jet nozzle control surfaces, docking hatch and some cockpit ejection seats I had laying around. I also began some of the rigging. Both turbines and the center of gravity for the ship. More to follow... oh yeah, the patch count stands at 4791... EDIT: Oh yeah, I almost forgot, the seats are in scale for a 2 meter tall biped. :cool:
-
Could Somebody Build Me Something?
MMZ_TimeLord replied to Darkwing's topic in Work In Progress / Sweatbox
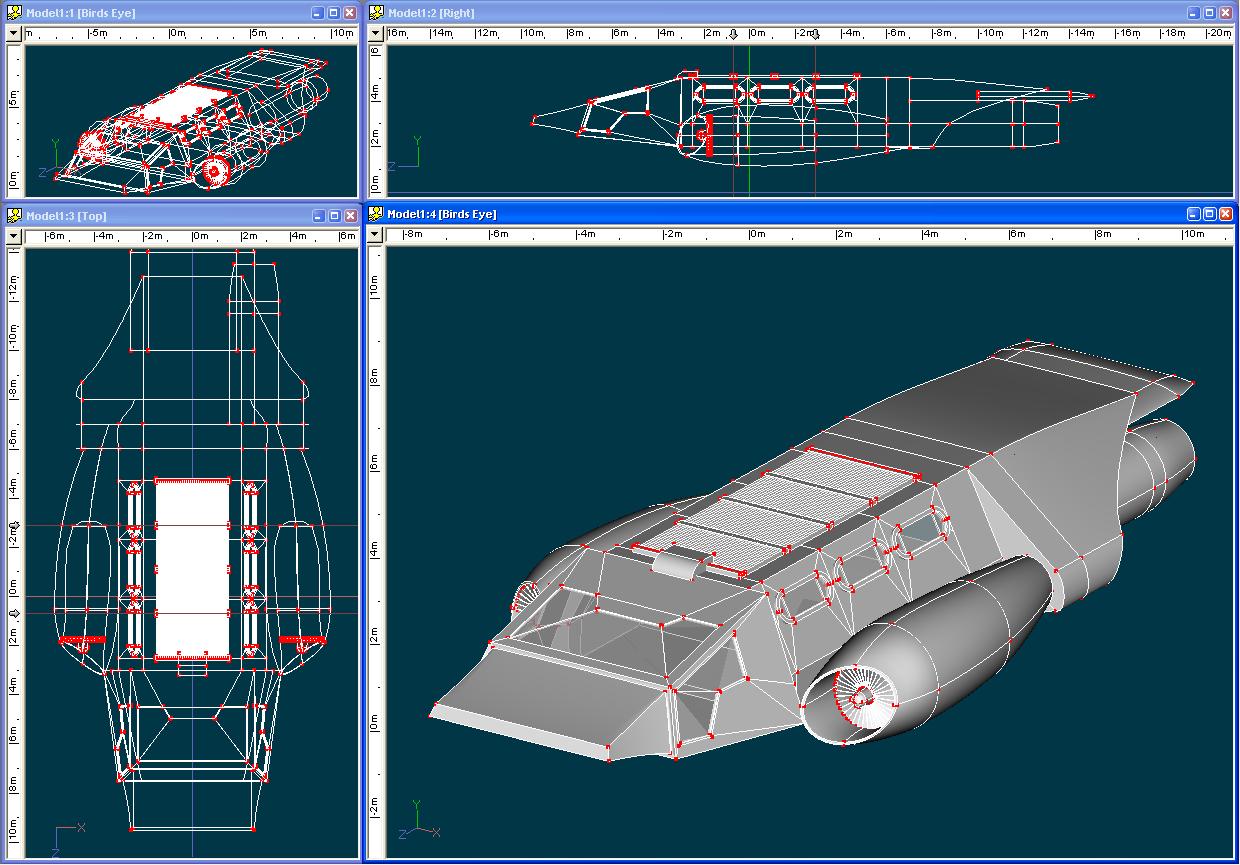
Okay, I think I have the engine intakes pretty much done, including turbines. I also added some detail to the top of the hull. I will work my way toward the back now. Cheers!
-
Could Somebody Build Me Something?
MMZ_TimeLord replied to Darkwing's topic in Work In Progress / Sweatbox
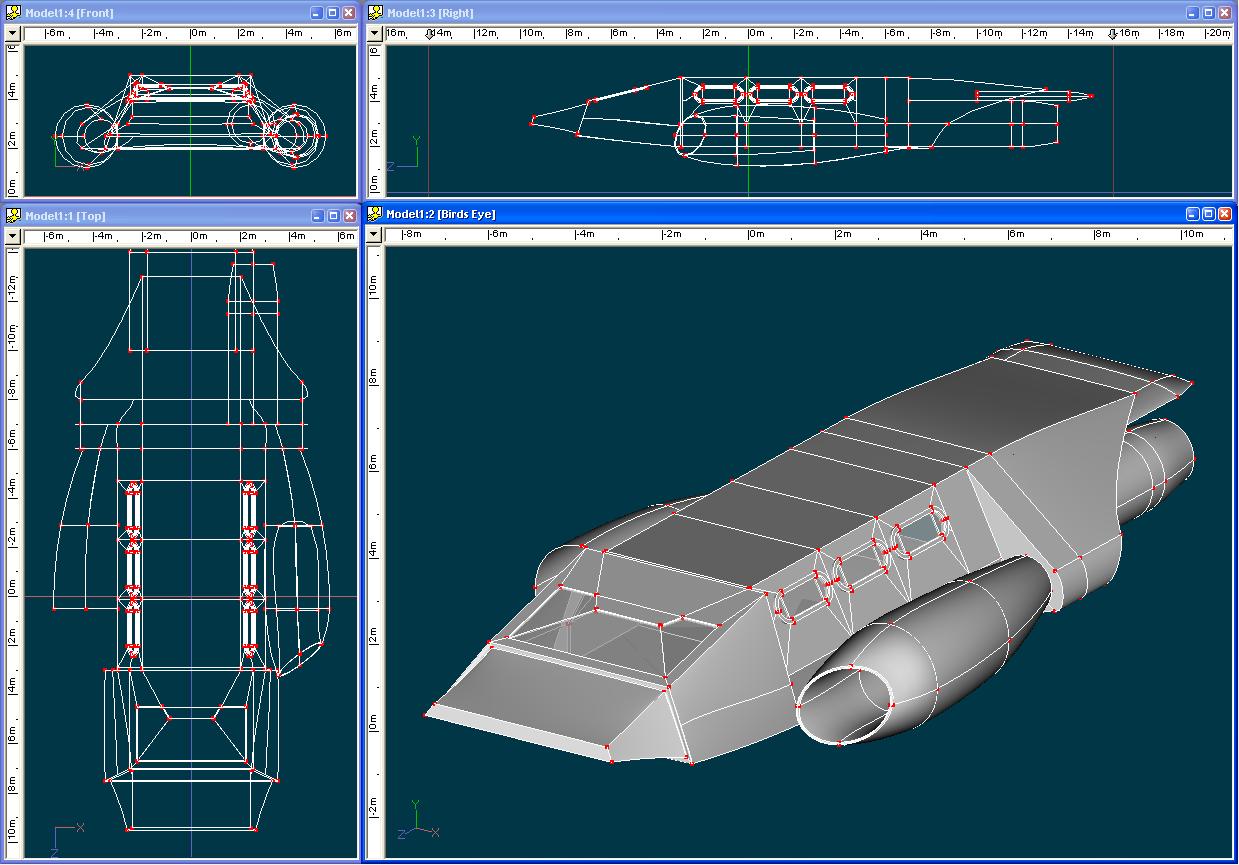
Darkwing, Yet another small update... had an hour or so this evening... Cockpit windows are now done. Cheers!
-
Could Somebody Build Me Something?
MMZ_TimeLord replied to Darkwing's topic in Work In Progress / Sweatbox
That's a really good start! Some smoothing and tweaking as you said. Here's a small update... had some time to add to this at lunch today.
-
Could Somebody Build Me Something?
MMZ_TimeLord replied to Darkwing's topic in Work In Progress / Sweatbox
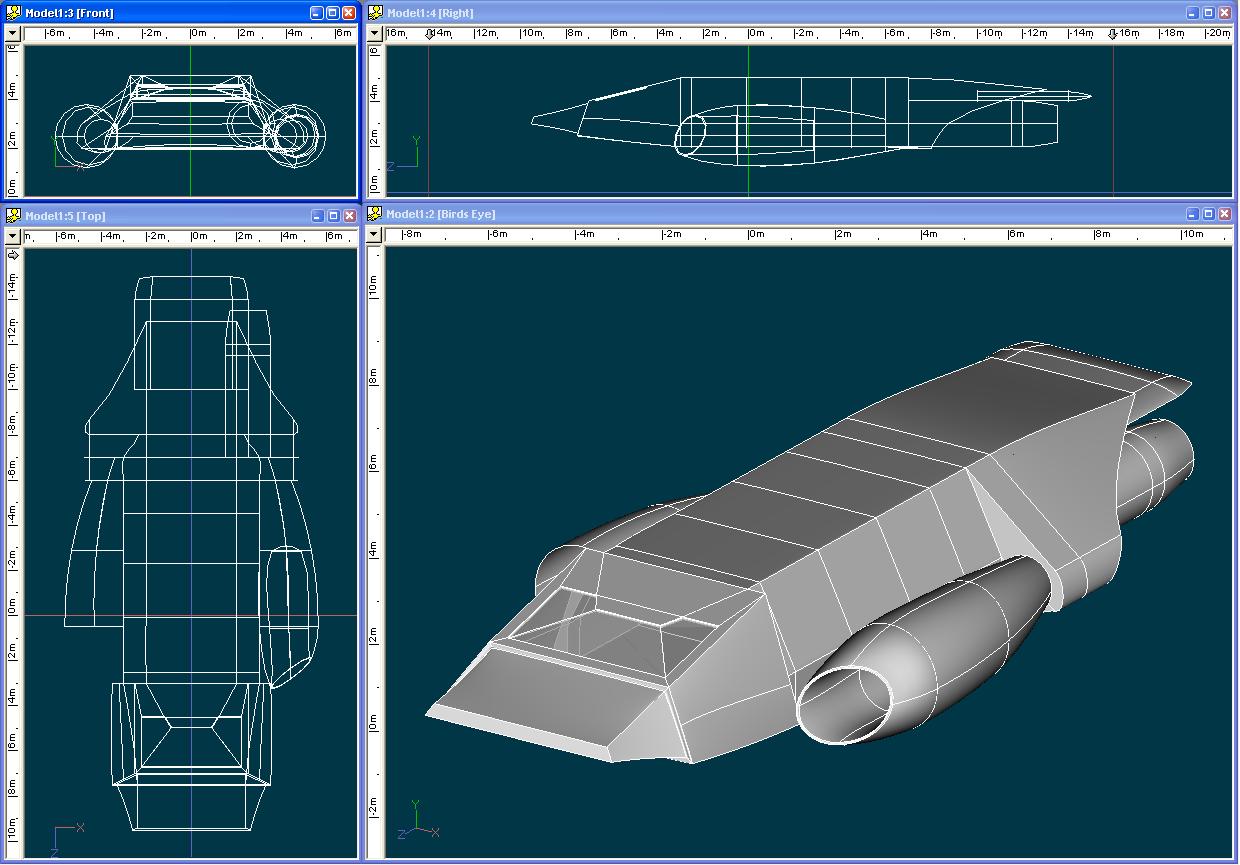
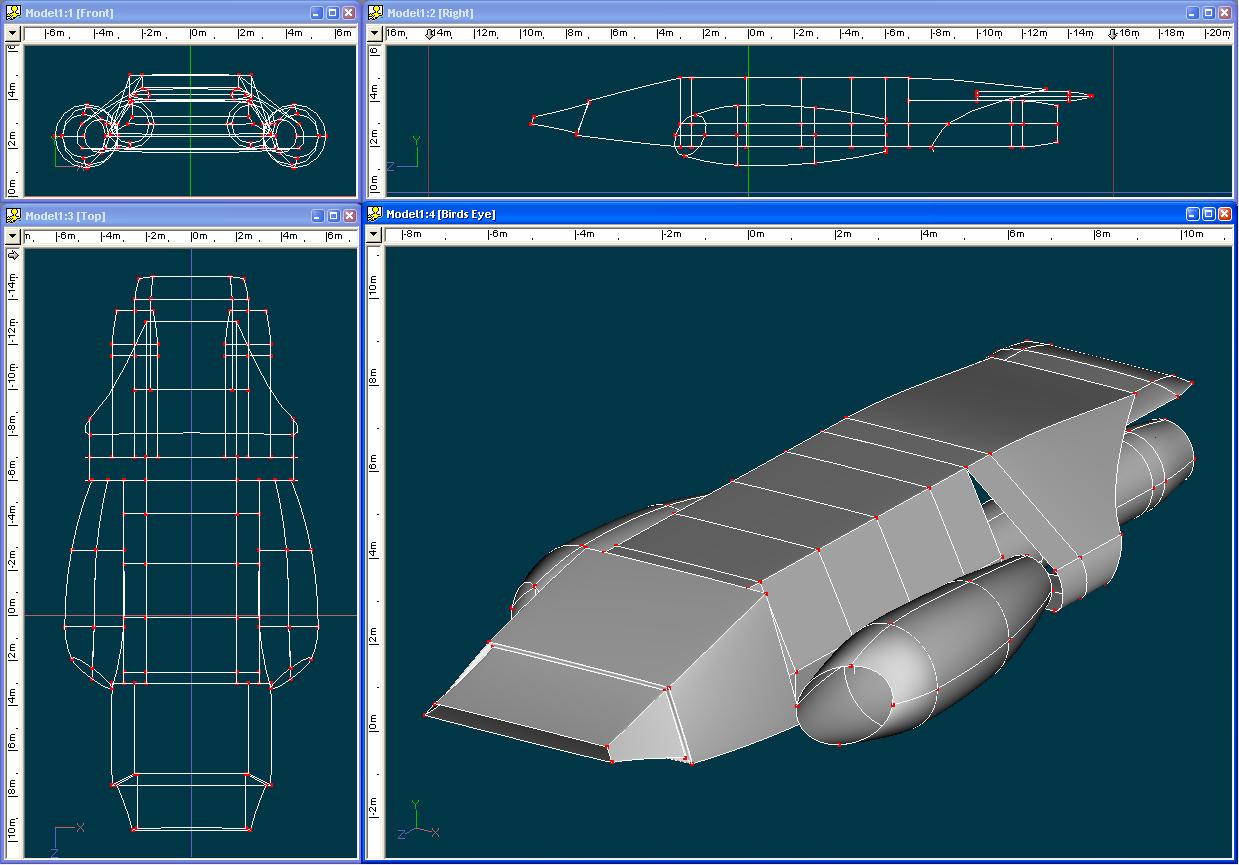
Darkwing, Here's an update. I finished cutting in the front cockpit window, integrating the three pieces into a single hull, integrating the engines with the hull and roughing out the inside of the engines. Next on my list is the side windows of the cockpit and the passenger/cargo area, then it's on to the engine turbines and all the smaller details as well as cutting in the ramp and docking hatch. Cheers!
-
Could Somebody Build Me Something?
MMZ_TimeLord replied to Darkwing's topic in Work In Progress / Sweatbox
Darkwing, Another update... I had about an hour this evening to work on this and I was really stumped about the 'engines' on the sides. I took a little liberty with them and had them flow into the rear of the ship instead of sticking out. Is this okay? Let me know. I'm going to put the main pieces together to form a single hull and then start stitching in the windows and adding other details. One last note: When I was doing my orthographic studies of this, I was perplexed about where people got in and out, so I was thinking of a ramp that drops down from the middle of the ship pointing forward and the landing gear keep it an even meter off the ground. Sound good? Also I thought of an emergency or docking hatch at the rear of the passenger/cargo section just before the main engine area (behind the last side windows). Let me know. I'll have some time to fiddle with this tomorrow.
-
Could Somebody Build Me Something?
MMZ_TimeLord replied to Darkwing's topic in Work In Progress / Sweatbox
Nah, that's cool. I think I have plenty of detail from your existing drawings. I did some orthographic drawings by hand and after I modeled it... it was WAY out of proportion, so I did some adjustments until it matched your initial angle sketch. I'll see if I can get the windows and stuff modeled this weekend. -
Could Somebody Build Me Something?
MMZ_TimeLord replied to Darkwing's topic in Work In Progress / Sweatbox
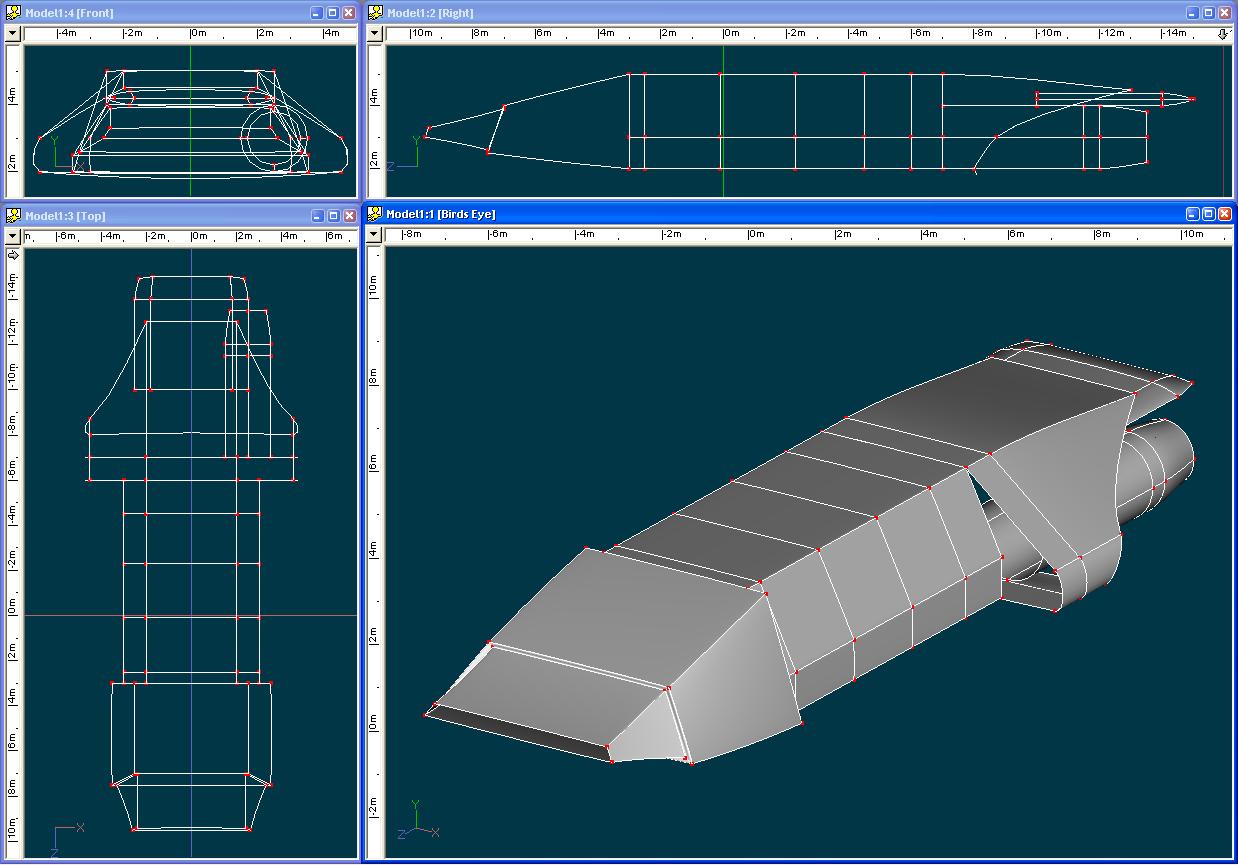
Darkwing, Here is the basic shape. Let me know if the proportions look correct. (It's VERY hard to do without orthographic drawings)
-
I use GIMP... it costs nothing... If you install GIMP and then GIMPShop, it functions almost exactly like Photoshop.
-
Could Somebody Build Me Something?
MMZ_TimeLord replied to Darkwing's topic in Work In Progress / Sweatbox
Darkwing, Quick question... What is the scale of this ship? Looks as if there's a two seat cockpit in the front. Am I correct? As to what I'll request later... it will be ship and or set design... not porn or "tasteless" stuff... My project doesn't even have any guns at this point. -
Could Somebody Build Me Something?
MMZ_TimeLord replied to Darkwing's topic in Work In Progress / Sweatbox
Please send an email to mmz-timelord over at sbcglobal dot net... -
Could Somebody Build Me Something?
MMZ_TimeLord replied to Darkwing's topic in Work In Progress / Sweatbox
Darkwing, I'd be happy to take a shot at your models in exchange for some artwork done for me. I can't come up with designs that are very good and would like some creative assistance. I'll barter models for artwork. Deal? email me through the forums and I can respond and then you can send me good copies of those drawings in the first post... they give an error when clicked on. MMZ_TimeLord -
That's actually what he was talking about eptigo... Within the project workspace tree under your Choreography, you can create folders and keep different models in different folders. Rodney, As to the solution you are using for switching out final/proxy/empty models, KUDOS! A good tool to help you with this would be SyncBack SE. This is freeware. Slightly older version than their current one, but still VERY useful. You can set up different profiles in it to do different jobs. i.e. - A profile called "Final model copy" to copy all the files in the "Final" directory to your 'Active' directory for models. Another could be called "Proxy model copy" and again copy all the files in the "Proxy" directory to your "Active" directory. You can even set it to remove files not found in the source directories. I may start using this technique myself. Thanks for the tip! Cheers!
-
Daemon Tools or any of the tools that create virtual CD/DVD drives can create issues with ANY copy protected media. Although I've had fewer issues with Daemon Tools. If you can't get it to work, uninstall any of these types of tools and then try it. I have gotten away from tools that create virtual drives and only use imgburn (open source) for my CD/DVD imaging needs. I don't mount images virtually any more unless it's on my media library machine. Cheers!
-
WIP... she is a beautiful Thai moview star.
MMZ_TimeLord replied to StormedFX's topic in Work In Progress / Sweatbox
Excellent re-start! Did you ever locate a good side view or even semi-side view of her face? -
Caroline, I think you are doing a great job on the shoulder area. Keep in mind, that the human shoulder has been the bane of not only animation riggers, but people in the motion analysis and physical therapy fields for years. The shoulder is one of the most complex joints and motion systems in the human body. GREAT JOB!
-
Good story so far... I like the style too... Great job!
-
Great job so far... keep going!
-
Why, thank you Rodney... your words are always too kind. Yes, the point of the lesson is that you can easily get caught up in the modeling and forget the production. I am to the point now where I'm creating proxies for just about everything and getting my shots laid out. Then I'll go back and determine what needs details and how much. Some things might easily get by with simple decals and bump maps/displacement maps (render hit) or the like... there are a lot of tricks to use to fool the viewer into seeing more detail than there is. I've gone and added a displacement map to the top decal stamp of Version 4, just for fun. It's kind of a quick attempt, but we'll see how it comes out. Cheers!
-
Stian, Thank you for the compliment... I look forward to your WIP on the circuit board. William, I was trying to relate the same thing you had to come down on your guy about... what is overkill and therefore a waste of time. i.e. - Modeling the head/base and threads on a bolt when the bolt head will be the only thing showing and only two pixels high at that. A small extruded hexagon would suffice in that case. Cheers!
-
William, My primary focus here was actual patch modeling. Version 1 is a simple plane modeled the same shape as the stick of RAM. Only one Decal was applied to the top view. Version 2 is version 1 only extruded and some of the internal patches removed (cleaned up). Top and bottom views were decaled separately. Version 3 has all the geometry of Version 2, but also has the RAM chips, controller chips and all the surface mount components. The SMCs were modeled as simple blocks to lower patch count. The top and bottom board chips and SMCs were all decaled together in each view and then the label decal applied separately. Version 4 has replaced the SMCs with much more detailed versions. Each solder section on the SMCs has been modeled and a 'solder' set of surface properties applied. The SMC bodies were decaled a the same time as the rest of the circuit board and chips. The label was again done separately. You can see the differences between version 3 and version 4 in this shaded wire frame (no decals). Oh and those are not just blocks for solder joints... they are rounded boxes that are 20 patches each. The second picture shows a REALLY close up view of one of the SMCs. Cheers!
-
So, I had an urge to do a simple model that quickly grew into a serious monster... I wanted to model a simple stick of RAM for a computer. The first step was to scan both sides of it so I'd have a good reference. Then I thought, I could make this ultra simple and just made a model the same shape as the main circuit board of the stick of RAM and apply the image of the front for a decal and I'm done. (Patch count at this point 51) Well, when I rendered it, it looked good, but very 'flat' to me. So, I figured, Well, I can extrude it, clean it up some and then apply the image of the front and back to ... well, the front and back and see if that helps. (Patch count: 170) It helped, but it still looked a bit 'flat'. It would hold up for a quick prop, but that's about it. Okay, I've come this far... I figured what the heck. I modeled the various chips and surface mount components at a very basic level and decaled everything. (Patch count: 1,139) It came out pretty good and would be VERY convincing even as a semi-close up. But, what about for a still image? Hmmm... So I modeled MUCH more detail into the surface mount components and the chips that had 'legs' showing. (Patch count: 17,219!!!) When I rendered this one, I thought WOW, that would hold up pretty good on a fairly large resolution close up. I'd just have to scan the decal images higher to make it any better. So, what was the lesson in all this? When you begin to model something for a project, be aware of how much screen time and space it will take up as well as the final format of your work. Version 1: Still Images: Not usable - HD: Not usable - NTSC/PAL: Background prop/Quick Prop - Medium Web Content: Standard Prop excluding close ups Version 2: Still Images: Not usable - HD: Not usable - NTSC/PAL: Background prop/Quick Prop, possibly standard prop excluding close ups - Medium Web Content: ALL Version 3: Still Images: Background prop/Quick Prop - HD: Background prop/Quick Prop, possibly standard prop excluding close ups - NTSC/PAL: ALL - Medium Web Content: Overkill except extreme close ups Version 4: Still Images & HD: ALL with higher DPI scan of the object for a better decal - NTSC/PAL: For primary props or close ups - Medium Web Content: Overkill Sometimes less, is more... or at the very least easier to work with. I've included a BIG render of all four models and the project and decal files in a zip archive for public consumption. Cheers! Parts_Modeling.zip
-
Nice thing about BVH files... once you import them and set up a character with them, you can edit any channel. So, say you have a nice running motion, but you want to change the way the head moves, or change the arm motion, you can do this. You can also reduce the key frames in the channels so that the data is much lighter, but still gives a nice motion. Try importing some of the free BVH files and playing with them yourself. Cheers!
-
Yes, mechanical or organic modeling takes LOTS of practice. You will gain techniques as you work and your work will improve. I suggest picking up small random objects around the house and trying to model them if you wish to improve your mechanical modeling. One reason I suggest small objects you have laying about is that you will have excellent reference as you have the object in front of you and can see every detail. Items to model: floppy disk (3½"), pen (ball point or Sharpie marker), paper clip (don't laugh, not as easy as it sounds), the mouse you use on your PC, etc. Seems like silly exercises until you see the improvement in your models. Hope that helps. Happy splining!
-
As far as I know, right now, there is no way to add new decals to 'props' of imported polygon models. Only way you could do that is to import it into a new model and then peak all the splines and then apply a decal to that. Good luck!