Search the Community
Showing results for 'snap to surface'.
-
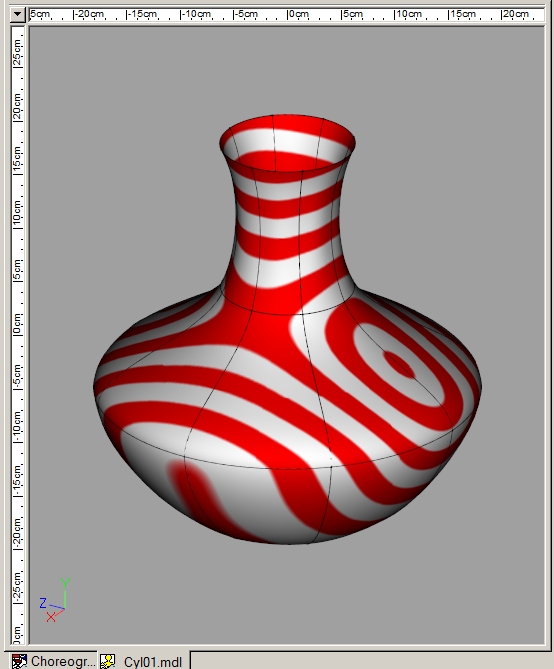
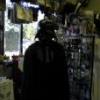
I guess you are stuck. Since no program presents everything you want and since you have to make some accommodation for what it doesn't, you will have to choose the one with the work-arounds you can live with having to do. The grid in the modeler can be set and re-set to any increment you want for precise CP placements with Snap to Grid. The "Measure Distance" menu option finds the distance between any two CPs.
-
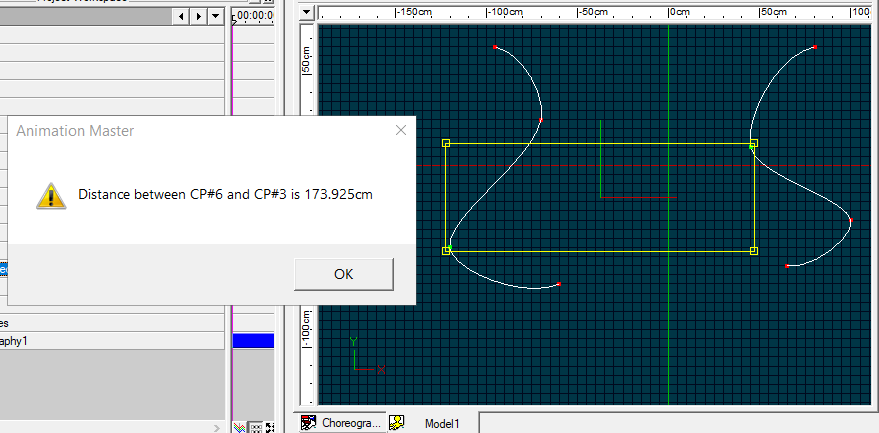
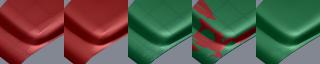
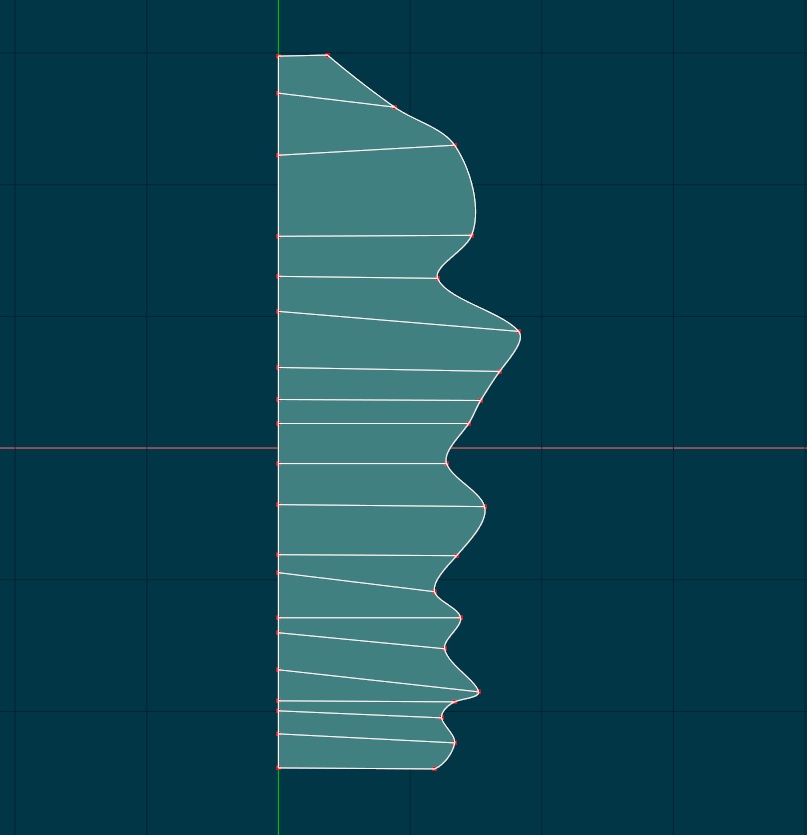
Nothing earth shattering; just a different way to layout patches based on the idea of retopolgy; i.e. using an existing model as a template for a new mesh. The first image shows the original model - the red hood of a 1955 Chevy truck - modeled by Stian and generously lent to me. As you can see he formed the surface in the typical fashion by drawing splines along the major contour lines. But as usual when you have a cylindrical/spherical detail in a rectangular surface you can't avoid generating 3 and/or 5 point patches; which, as you can see in the second image, sometimes are not realistically smooth no matter how much you tweak the bias handles. Believe me I tried. After trying a number of alternate, unsuccessful variations to minimize the 3 and 5 pointers, I realized could likely get the smoothness I wanted if I used only four sided patches. So I made a green copy of the hood in the same location in modeling space as the red original. Next, as shown in the third image, I just did a simple re-arranging and extension of the existing splines to form only four pointers. It was easy to move the new green cp's to lay in the red surface (fourth image). After a little bias tweaking I got the more than acceptable smoothness seen in the fifth image. Granted patch count is a bit higher but it's a small price to pay. Your mileage may vary depending on the desired shape but making a sacrificial template model might be the answer to a particularly vexing surface.
-
All I can find in the Custom keyboard commands that closely relates to moving to the center is "Snap to manipulator grid" I have done a search for the word "Center" and "Snap" both on the html List and visualy and cannot find this option. Please, is there a "Snap to Center" option that allows a selected object to center at X 0 degrees Y 0 degrees and Z 0 degrees?
-
well I'm going deep in this tool and in my tests all bump maps are black .. is there some tip to create it ?
-

HAIR - No specular effects [solved-ish]
robcat2075 replied to Douglas Ferrin's topic in A:M Rendering
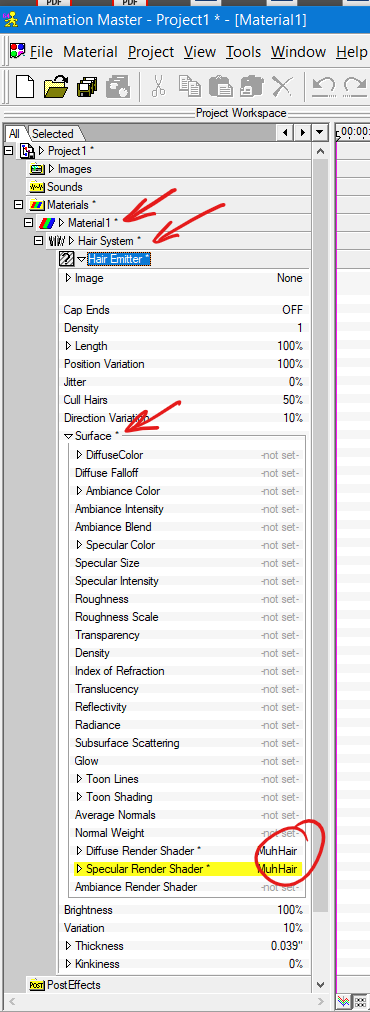
Doug, In the Render settings you just turn "Plug in Shaders" ON, you don't set any particular shader. The two hair shaders only appear as options in the Surface Properties of a Hair Emitter and must be set there.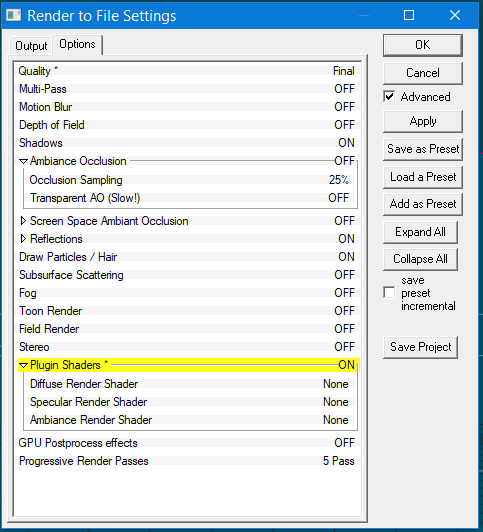
-
Trying to help a coworker struggling with getting transparency in 3DS. He saved out a model as an .obj, I brought it into v.16 and when I dropped it into a chor, I had live surface settings to mess with. this is pretty huge, don't know if this has been in there for awhile but it's great. Oddly, they're available only on the chor shortcut, not on the model itself.
-
HAIR - No specular effects [solved-ish]
robcat2075 replied to Douglas Ferrin's topic in A:M Rendering
It's mentioned in this post... It's something you choose in Surface>Specual Render Shader -
Can't give too many specifics since I'm at work right now but I thought I'd get this out there... I was working on a scene last night (v16.0b 64 bit) and had a model with only one group, with the glow surface property set to on. If I do a screen render in the model window the model glows quite nicely. If I drop that model into a chor and render to an avi file, there is sadly no glowing. Anyone know of a quick workaround? What I'm working on doesn't need fancy dancy solutions,is a quick down and dirty bit for the tech conference I'm attending so I'm perfectly willing to lit it slide, but glowing things look nicer than non-glowing so if I could get it to work, I'd be a happy camper.
-
There are a couple... some might not be useful for you, others are pretty much to everybody if you ask me: - "Virtual desktops" for different working styles with different programs and of cause you can reaccess stuff very easily with the timeline feature (if activated). => press and hold windows + tab to see the timeline and the menu to create other desktops. - for me personally one of the best things is of cause the Mixed Reality Center which enables VR for Windows natively if you own such a headset. => if you connect a Mixed Reality Headset you can use VR in the easiest way possible... it just gets started and you are in the VR-Windows home without even one click. Of cause you need to have a MXR headset for that and not everybody like VR, but for me it is very nice. - the action center is pretty nice too... it is just more advanced then anything of that kind we had before. => button next to the clock on the lower right of the screen which is intelligent too... for instance any alerts/toast message are suspended if you are for instance in a game, etc. - Snap assist is great to move windows around and snap them next to each other in predefined sizes... => press Windows-Button and the Arrow keys to reposition a window in a specific place... especially useful for twin-program use on a single screen system or multiple window position on multiple screen systems. You can do that with the mouse too (move the window with the mouse to different borders of your screen... but I am more of the keyboard guy there...) - Microsoft Store and UWP apps.... => this one isn't extremly used by most people, but the sandbox all the UWP apps/store apps are in (very secure) and the clean uninstalling and reinstalling (no UWP app will alter the registery or leave anything behind on your computer after uninstalling) is very nice and pretty secure. - Clipboard / Copy&Paste-feature with a timeline... so you can copy and access not only one thing but several and reaccess copied stuff again later. => press Windows + V. - If you are gaming: Many games are no longer supporting Windows 7 partly for DirectX 12 and partly for DVR reasons. - a new snipping tool built in with more features is on the way.. pretty nice one too. And there are a lot of other smaller changes... some are pretty great (explorer allows to set up very often used settings like visual extensions and hidden files very quickly and not in a very long menu, even so that one is still there), some are not (settings menu... for now I still often prefer the old system menu and some things have to be switch there anyway... but if you are not that experienced you can not do harm to you computer with the settings menu, so it is maybe a plus there for inexperienced users...) Best regars *Fuchur*
-
Model looks fine in HASH, export to OBJ and everything is wrong!
robcat2075 replied to Mikal's topic in Open Forum
If I export a model that is not a single surface to STL and import that STL as a prop it is definitely not a single surface.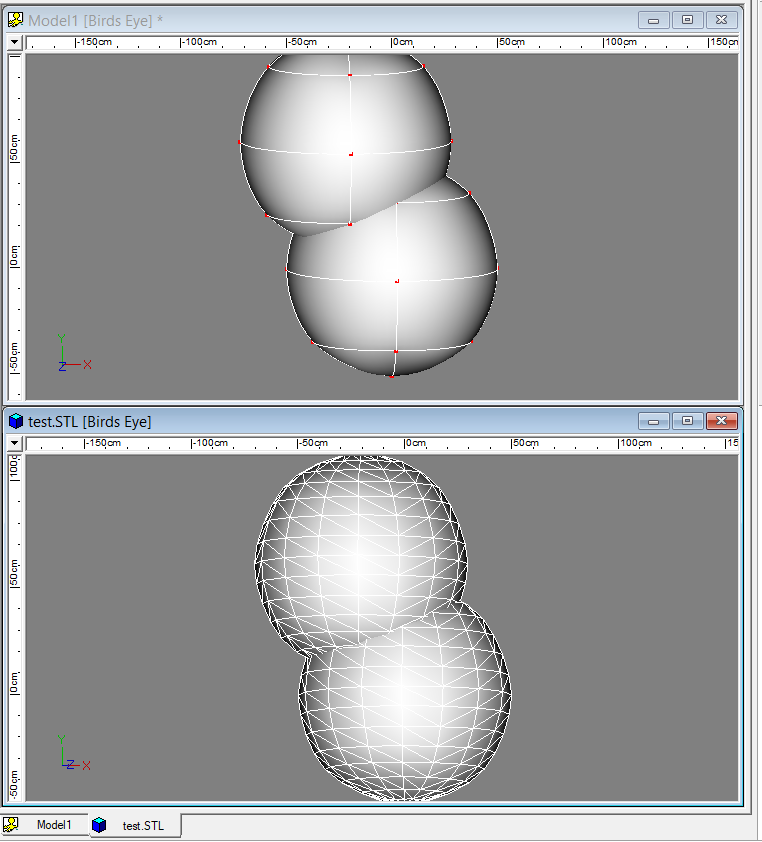
-
How do control where Baked Surface Decals get saved to? Right now it is my "Library" folder and not the folder the model was saved to.
-
ok i have made a gattling gun kinda thing and am riging it to turn 30 degrees play a fireing animation and then keep rolling , what i would like to know is is it posable to play a action for say 1 second then snap it back to its zero second and have it continue on from there
-
glowish.mov left ball glow subsides as right balls glow increases and middle ball uses random expression glowish.zip
-
That's about as basic a tutorial as you are likely to get. At the risk of getting hurt I'll suggest... The Technical Reference. Please turn to page 88. If you follow along you'll see there are several things you need: A Surface (A surface mesh/model) - Open up a Model window - Create a surface either by Extruding, Lathing or Right Clicking and Selecting 'Grid' Two Bones (for that Surface) - One Bone that that has all Control Points you wish to assign as the Surface (Note: In a Choreography you can select a whole model instead) - One Bone to act as an Aimer. Name this something useful like "Aimer" (Note: When you animate this Bone it will move your Object across the Surface of this Models mesh) Drop this Model into a Choreography Another Model (to Constrain to the Surface) Drag and Drop this second Model into your Choreopgraphy (I volunteer Thom... he's used in the skiing example in the Tech Ref) (Note: This is the Model that you will Contrain to the Surface) In the Choreography window select Thom (or whatever other model you want to move across the Surface) - Right Click and select New > Constraint > Surface Select your Surface Model (Note: If you don't want the whole Model's Surface but rather the Surface you've specified by the Bone open up the drop down and Select Bone 1 from your Surface Model. This will Constrain your Object to the Surface) From the Properties of your Constraint you'll then want to identify your Aimer. Use the Drop Down menu to select the Bone you've named 'Aimer'. Now back in the Choreography adjust or animate the Aimer Bone and watch as Thom (or other Object) moves across the surface of the mesh. Note: The need for the Aimer Bone and that it needed to be animated was the part that I didn't understand about Surface Constraints until I read the Tech Ref! It's pretty important. Troubleshooting This is the first time I remember ever using a Surface Constraint and it took reading the Tech Reference to understand the requirements. Everything worked as specified. Give the above (and what is in the Tech Ref) a try and post your results. Then everyone can share this as a tutorial and plus up what they've learned here. We'll adjust as necessary and all learn more about Surface Constraints.
-
thanks! Not with "volumetric" effects Particles. I can't think of an animated movie where that has ever been explicitly shown rather than merely hinted at. It's the kind of thing you only see in heavy metal videos. One problem is that A:M particles can "die on contact" with a surface but otherwise are not affected. A force would have to be somehow on the surface of the surface and forcing the particles out of the way. Here are tests of cigarette smoke with particles which is like a very small mist. You have to full screen it and turn off the lights to see the smoke https://youtu.be/uHHIUwYG5N0 https://youtu.be/Egdd7k5Yr2g https://youtu.be/YgJl2mTNT48
-
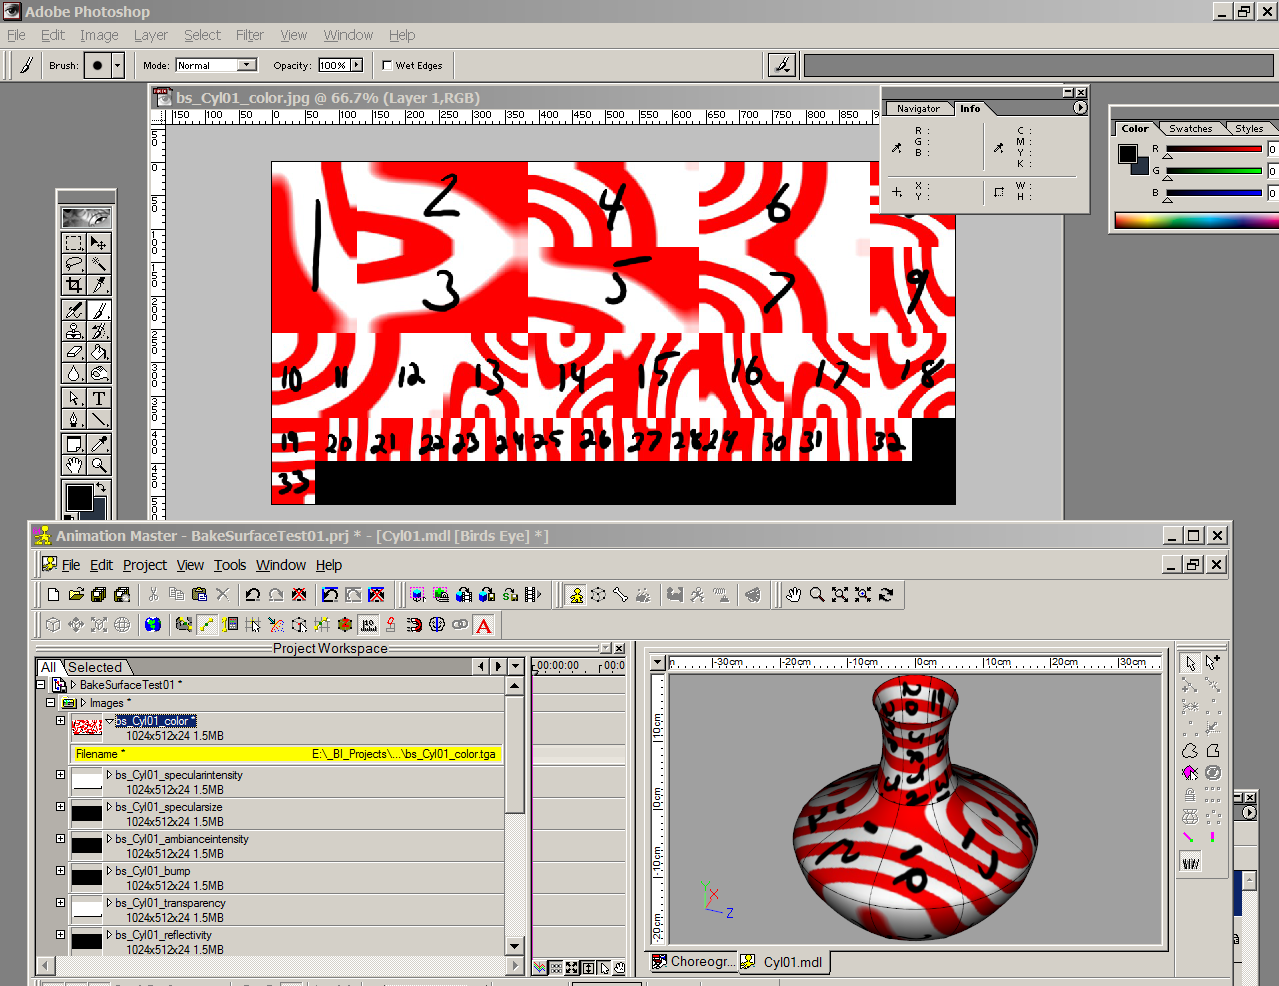
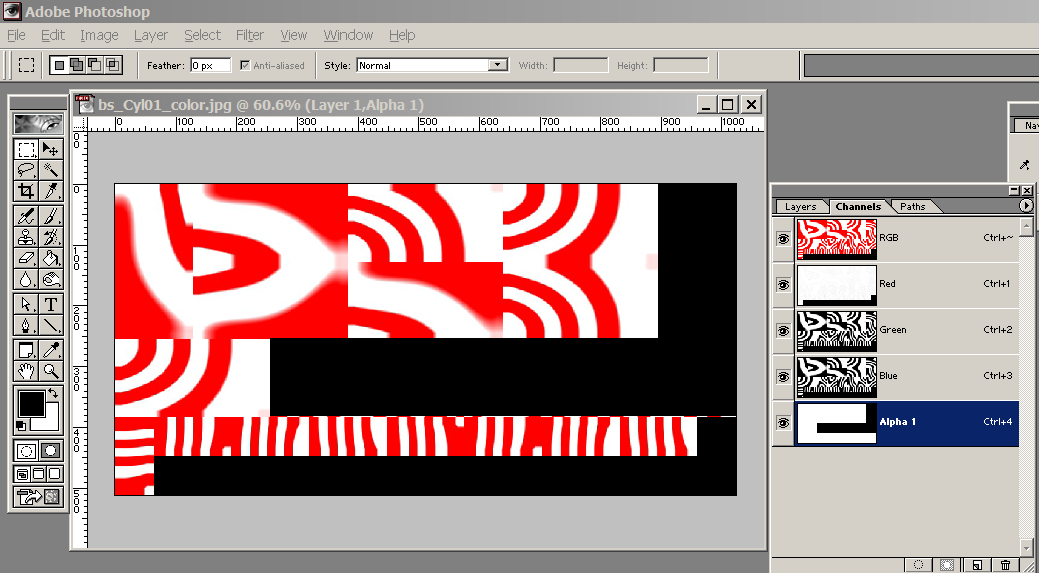
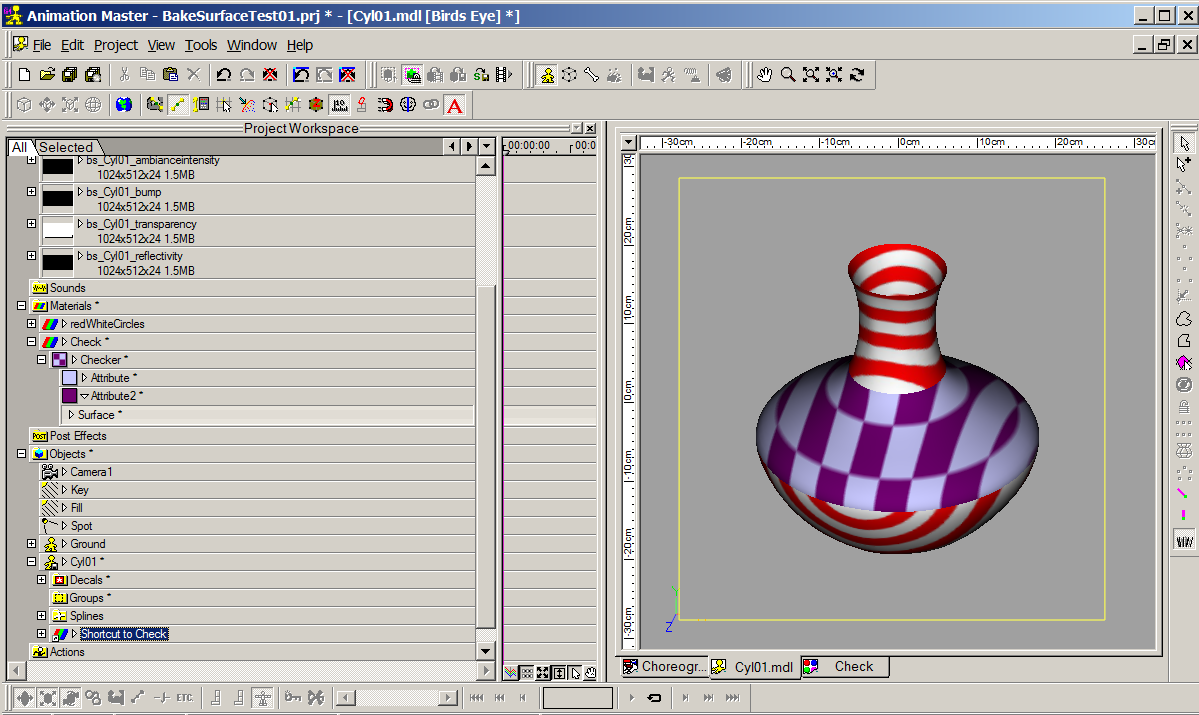
I don't think there is a way to just bake part of a model. Here are some work-around ideas... - If the selection is a self-contained portion of the model, not connected to any other part... cut and paste it into another model window. Bake it there, then copy and paste it back into the original model. -If you don't mind having some wasted bitmap space... bake the whole model like this... and then remove the baked images from from parts of the model by detaching and reattaching CPs that are adjacent to patches you don't want baked. Detaching and reattaching one CP cleared four patches... -An alternative to the above... it might be possible to remove the decal assignments to certain patches by text editing the MDL file rather than manually disabling the patches. I have not investigated that. -Crazy idea... the surface maps are all baked as 24-bit maps. In a paint program you could add an alpha channel to those and paint black on that anywhere you don't want the baked surface to show. If you hold down the SHIFT key when you choose "Bake Surface" you can set "Margins" to some large value like 10 so you don't have to be pixel accurate in the areas where wanted and unwanted patches adjoin I baked the surface, then in PS I temporarily wrote a number on each tile and swapped that new version with the original in A:M so i could see how patches fit to the model... After looking at that I figured that if I wanted to remove the baking from the middle patches, I needed to hide 8,9, and 13-18. I painted black on the alpha channel under those tiles.... ... then saved and swapped again. Here is the model with the edited baked surface on it. I added a new Checker Material on the whole model. It shows that the baked surface is no longer visible on the middle patches.

-
This does show up in final render but haven't tried rendering out a whole sequence. This model is being saved to disk and the spacebar has no effect. This happens only in Action or Chor (haven't seen it in model mode) and seems to happen only after scrubbing/tweaking skeletal movement a lot. Seems ok after AM restart but will re-surface randomly.
-
1-2-3... X-Y-Z 4... current spline tangent direction 5... tangent perpendicular to current spline tangent direction 6... perpendicular to patch surface
-
I need help. I set up the surface properties (color, transparency, etc) on several parts of my model. I then deleted the groups, not realizing what they do. I "Undo'd" and the groups came back but the properties are still gone from the model. Is there any way I can get the properties re-applied easily?
-
Installers: Windows 32Bit Windows 64Bit Intel Mac v18.0 Intel Mac SSE4.2 Change Log New: Interface: Save before Render: saves the project, if it is modified, after hit "OK" in the "Render to File Settings" Dialog can be controlled with the "Save upon Render" checkbox at Tools/Options/Rendering , Default is ON Physic: Bullet Integration into A:M added Bullet Constraint for physic simulation with the bullet physics engine Alpha Documentation Modelling: Scale to X=0 option Before we do a Copy-Flip-Attach it is good practice to select all the CPs we presume to be on the center Y axis, go to their properties, set their pivot point to X=0, then scale them to 0% in the X axis. It would be a convenience if we could select the CPs and then just >"Scale to X=0" to accomplish this frequent task in one step. Interface: Clear Undostack (menu Edit) removes all entries from undo/redo , has also a button Modelling: Fix Internal Patches "Remove internal patches" Tries to break internal patches , detach cp's from detected internal patchesand create a named group with this cp's. for 3 and 5 point patches it works only partially depends on the spline layout Interface: Reset Toolbars (menu Help) Reset all toolbars to their default layout Particlesystem: Hair support for Turbulence on forces Interface Rendersettings [bug]6782[/bug] Render UX 000: Maximize Render Dialog Window [bug]6783[/bug] Render UX 001: Add Render Option to File Menu [bug]6784[/bug] Render UX 002: Allow Render Setting Open/Collapse State to Persist works only in "Advanced mode" Two new buttons here too, "Expand All" and "Collapse All", expand/collapse all possible properties Plugins: [bug]6759[/bug] Feature: update .ai importer to accept other vector formats added a plugin for importing the SVG format Plugin to add bullet constraints to multiple models in a chorRMB on choreographie -> "Add Bullet Constraints to multiple models" Interface View: [bug]6720[/bug] Feature suggestion: Birdseye View Queue undoing/redoing for view position have now a seperate undostack has their own buttons and shortcuts shortcut for view undo Shift+Alt+Z shortcut for view redo Shift+Alt+Y If You don't make a new install or "Reset Toolbars" You must manually add the buttons from Tools->Customize->Commands->Standard Choreographie [bug]6779[/bug] Feature: Right Click/Duplicate Menu entry "Duplicate" for objects in a chor If the Shift key is hold down , while clicking "Duplicate" keys from the source object are not copied. Interface Timeline Constdrivers displaying now their values in the timeline Interface CPweight dialog [bug]6772[/bug] Feature Request: Weight Menu Undo the weight dialog has now a "Cancel" button , which reverts the changes done in the dialog to the state before the dialog was started. Weighting has now also a general Undo/Redo , if the dialog is exited with the "Done" button. Interface Modelling [bug]6773[/bug] Bias Handler Snap to Grid New button for this , Tools->Customize->Commands->Manipulator default key Shift+2 act's like "Snap to Grid" Existing installations needs to add this button manually to the toolbar or "Reset Toolsbars" additional: new menu entry for the menu, if a group of cp's is select "Snap Bias To Grid", snaps the in and outbias for the slected cp's to the nearest grid interval Interface Modelling [bug]6771[/bug] deleting all "Relationships" new menu entry for models "Remove User Properties" , delete all user properties and relationships for this model avaible only for modelcache, not for instances Warning : This action is not undoable Interface Modelling new menu entry for models "Remove unused drivers" , delete all drivers without a key avaible only for modelcache, not for instances Interface Rendersettings [bug]6744[/bug] Feature: Save before Render saves the project, if it is modified, after hit "OK" in the "Render to File Settings" Dialog can be controlled with the "Save upon Render" checkbox at Tools/Options/Rendering , Default is ON Changed: Plugin: Brick it's now possible to add Bullet Constraints for the instanced model z position can be set models can be imported in userfolders save/restore settings documentation Plugin: Simple_Scatter it's now possible to add Bullet Constraints for the instanced model models are now imported into userfolder documentation SDK added Bullet Constraint (HConstra.h) added Userfolder for chor (hhashobj.h HHashObject::InsertUserFolder) (sample how to use both at HXT/Brick) added OpenView for HChor [bug]6687[/bug] SDK missing method for joining splines? (HModel.h BOOL JoinSpline( HCP *cp1, HCP *cp2)) GetObject() is changed to GetHObject due a nameclash with wingdi.h [bug]6689[/bug] No API method for CP detaching (HModel.h void DetachCP( HCP *cp1)) added GetPlayRange and SetPlayRange for HChor, HAction and HActionCache example: BOOL CTestPluginApp::OnChor(HChor *chor) { TimeRange tt = chor->GetPlayRange(); tt.m_end.StepFramesBack(5, GetHProject()->GetFPS()); chor->SetPlayRange(tt); return TRUE; } Help AMAindex.txt rebuild ("Display help for current property") Particlesystem: Hair Forces need not longer high magnitudes to affect hair dynamics groom mode selected guidecp's now drawn with the selected cp color added possibility to select more than one hairguide for operations except the "Brush Mode" operation two new buttons "Select Hairguides" if You press this button you are now in the selection mode, and can select more than one Hairguide Limitation, it's only possible to select one HairguideCP, for the other selected Hairguides the HairguideCP from the first selected Hairguide is used "Deselect Hairguides" deselect all selected Hairguides Distortion Action Objects [bug]6686[/bug] Distortion Action Objects Resolution limited to 10 Has now the same resolution as the modeling window (maximum 1000), and use as initial value now the same settings as for the distortion in the modelling window Bake Surface [bug]6732[/bug] larger border for Baked Surfaces Plugin: Ai import AI import can be find now under "Plugins->Import" (before at "Plugins->Wizards") Interface [bug]6777[/bug] Increase size of Info Properties Description and Notes Fixed [bug]6755[/bug] computation error for normals [bug]6748[/bug] Space Marines project renders differently than original (tweaked darksimbiont materials) [bug]6749[/bug] Flocking birds does not render correctly in Render Lock Mode [bug]6737[/bug] Animated Material loses animation in saved file Particlesystem: Hair Hair dynamics are not updated, if project fps was set to 25 undo/redo now working as expected when some patches hidden , not all hairguides for the visible patches are drawn Distortion Action object changing the resolution for the distort action object after the target is applied works now as expected (distortion box is updated properly) bug fixed , when the Target is set back to the default value (default values for the distortion box was not restored) All Particlesystems redraw error for all Particlesystems fixed , if the model or group is translated,rotated or scaled [bug]6740[/bug] A:M crashes if try to render to file with multipass after reset Decal crash, when a decal has two (or more) images with maptype "Other..." ,the driven properties are the same and one should be deleted [bug]6739[/bug] Hair renders white in netrender Choreographie If a model is scaled and a constraint with transform properties added,scaling is incorrectly chor translate mode broken [bug]6733[/bug] 5-Pointers seem to have a different behaviour for hair particles... [bug]6728[/bug] Bullet Rolling Friction > 1.0 suddenly halts object [bug]6727[/bug] Three-point patches render texture incorrectly [bug]6718[/bug] Mirror Bone not mirroring CP weights correctly [bug]6730[/bug] loading old file causes crash [bug]6729[/bug] Adding CP causes crash [bug]6717[/bug] Slow Paste when DSTS material present [bug]6722[/bug] Smooth Plugin causes crash [bug]6724[/bug] plus key not always working for frame change [bug]6721[/bug] Props view inside-out in shaded-wireframe Note: Normals can be displayed now for Props too [bug]6716[/bug] CP at Bone origin is ignored by Compute Bone weights. [bug]6725[/bug] Using Sweeper on this model brings A:M to a crash [bug]6713[/bug] Changing CPs from Peaked to Smooth doesn't "dirty" PRJ [bug]6714[/bug] PRJ is already "dirty" when loaded [bug]6715[/bug] Can't adjust bias of CPs next to Hooks [bug]6704[/bug] Rotate Manipulator doesn't work on D-box in Action [bug]6712[/bug] Altering hair doesn't add asterisk to PRJ [bug]6711[/bug] Undo not working in Hair Grooming mode [bug]6707[/bug] NetRender ignores Camera Fog Keyframes [bug]6706[/bug] Crash after moving mouse between windows [bug]6703[/bug] Crash after importing Rotoscope... [bug]6710[/bug] "recall view/position" never works the first time. [bug]6708[/bug] STL export doesn't include displacement [bug]6694[/bug] Dragging Groups causes crash [bug]6680[/bug] Crash after dragging Groups [bug]6693[/bug] Dragging Bones causes crash [bug]6679[/bug] ALT for Free Rotate not working on axis [bug]6563[/bug] Add with Shift-Key pressed does not add a new non-continuies spline [bug]6695[/bug] Undo after extrude causes crash [bug]6700[/bug] On-screen renders very slow Bullet if no cp/patch is assigned to a Bone with bullet constraint , crash occured joints hasn't worked correct new behavior, if the constraint is added to a model, which is created from the "Explode Rebuildmodel" plugin. In such a case , bullet constraints are added to each "Explode_" bone with a breaking value off 1, constraint's between the pieces from the model automatic generated most of other settings not avaible in this case see the Fracture example [bug]6691[/bug] Extruder plugin causes crash Force - Type "Cone" falloff not handled correct Type "Cylinder" false result for Kind "Fan" fixed Type "Box" fixed real time view for "Width Softness" [bug]6685[/bug] Decal placement tools do not work correctly in Camera view [bug]6631[/bug] Depth sorting problems in choreography [bug]6643[/bug] Bias-Handler not showing (the line of the bias handlers not visible) Rendering: material on 3 point patches now correct calculated (in some cases a division by zero has occured) [bug]6511[/bug] Menu incomplete with Patch Group Tool [bug]6540[/bug] copy loose decaling on 5 point patch [bug]6645[/bug] Patches render inside-out in shaded mode [bug]6505[/bug] Layers drawn in front Realtime: crash ,when Draw Normals is on, and a other project is loaded , where the shaded mode for a model was not set[/u] [bug]6647[/bug] Grid only shows when an object is selected Interface: deleting RigidBody constraint from popup menu not possible "Constraint to Path" position updated after select a Pathmodel or Spline from combobox or cursorpicker Modelling Chor creating Pathmodel in chor is back now [bug]6657[/bug] Rendering to file: No file saved... [bug]6661[/bug] Screen stops updating after using CTRL-Z [bug]6662[/bug] After closing PRJ and starting New PRJ, crash on drawing new spline. ModellingCrash, when deleting a bunch of cp's and splines, and heavy use of Undo/Redo [bug]6663[/bug] After Deleting a spline, Undo does not restore it. [bug]6664[/bug] Crash upon drawing spline in new PRJ [bug]6666[/bug] Crash after multiple Undos [bug]6667[/bug] Tutorials Splash screen missing background image. [bug]6668[/bug] Axis handles for Scale mode not drawn properly [bug]6660[/bug] Play range do not stick when saving and loading a scene/project [bug]6670[/bug] Patches not completely drawn in in real-time view [bug]6671[/bug] Distortion Box CPs disappear [bug]6672[/bug] Undo doesn't work in Distortion Mode [bug]6673[/bug] Lens flare errors in Net Render [bug]6571[/bug] Net Render slaves cannot load camera from Technocrane [bug]6674[/bug] Prop not visible after Turn [bug]6675[/bug] rop textures not displayed correctly Note: For decaltype "Color" the alpha channel is not used in final render, if You need this, change the decaltype in the chor to "CookieCut" (the obj file format doesn't know such a type) in contrast the realtime render use the alpha channel , even the decaltype is "Color", but I will not change this behavior due heavy sideeffects Decal crash , when the decaltype for a prop decal is changed to Bump or Displacement Decal Combobox for decaltypes displaying now only the usable decal types for props Decal Bump and Displacement maps for Props now working properly Modelling false menu displayed , when selecting cp's with holding the Shift or Ctrl key and no group was selected before [bug]6791[/bug] Crash when doing Move or Zoom [bug]6787[/bug] Much longer rendertime compared to previous version,if reflectivity is != 0 [bug]6786[/bug] Changing preroll from one particle system affects all other too [bug]6781[/bug] No reflections below reflectivity values of 0.501 [bug]6780[/bug] The Modeling Grid turns itself off [bug]6774[/bug] Crash upon Rendering (Texture Size) [bug]6775[/bug] After fresh install, mfc140.dll not found [bug]6776[/bug] Copy/Paste crash [bug]6770[/bug] flockfx model not saved [bug]6741[/bug] shag hair problem rendering [bug]6769[/bug] Channels not displayed properly with N or R [bug]6766[/bug] Unable to correctly select render quality in Net Render [bug]6760[/bug] Snapshot doesn't remember last directory used [bug]6763[/bug](OSX only) JPEGs cannot be loaded into the application [bug]6757[/bug] A:M stops updating display during SimCloth [bug]6753[/bug] Flag does not wave correctly when doing cloth simulation [bug]6756[/bug] SimCloth fails in V19
-
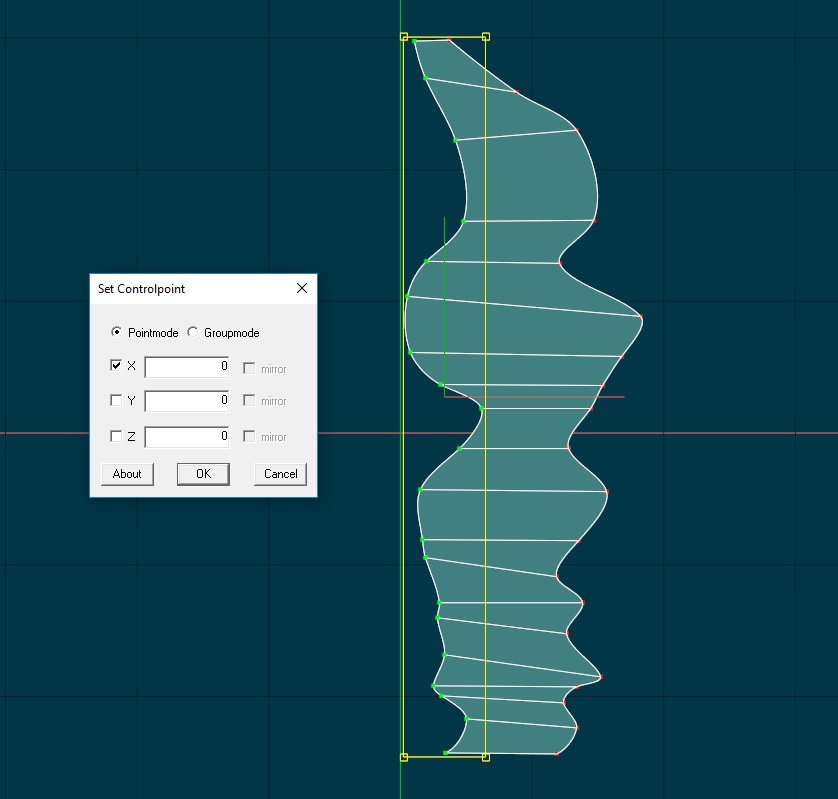
Hey. I selected the splines on the center and then did the steps below. It worked quite nicely. AND THEN CHOOSE THE X plane and keep the number at 000 for X axis. THEN CLICK "OK" and WALLAHHHH!!! ALL THE CPS SNAP TO CENTER.

-
This is a collection of links to various explanatory posts I have made over the years on the forum. Some are full stand-alone tutorial presentations but most are answers to an A:M user's question or sometimes mere interjections in a thread and you may need to read above and below for context. They may be videos, annotated screen capture stills, example projects or just text explanations. Some videos may require installation of the free Ensharpen Codec (bottom of page at link) They are arranged only roughly in broad categories below and not in any particular order beyond that. Some might fit in more than one category but none are listed more than once. I may regroup them in the future. To search them I suggest using ctrl-f in your browser to search on a relevant keyword such as "glow" or "constraint" They are not official Hash, Inc. productions nor are they necessarily endorsed by Hash, Inc. nor are they represented as being error-free. Occasionally, later changes in A:M may make the current interface appear differently than in the tutorial example. However, I hope they are useful and if you find a problem, let me know. This list currently covers activity from January 2009 to 2014. Quick Start introductions for very new users Ultra QuickStart Complete Model-Bones-Animate-Render workflow Quickstart Missile Path. Simple tutorial for new user makes missile follow path. Interface Basic Navigation. Video demonstrates basic views and tools to adjust the view in the Choreography Custom Toolbars, Creating and Editing Text editing. Example cases of editing A:M files for unusual purposes. Image Sequence. How to import an image sequence into a PRJ and add it to a camera as a Rotoscope or apply it to a model surface. Frame channel; Notes on editing the Frame Channel of an image sequence to make the sequence hold or reverse. Stereoscopic Movie editing. Using A:M's non-linear editing powers to edit stereoscopic image streams. Adding Rotoscopes and assigning them to specific views. RAW Camera export format. Some guesses about the meaning of its contents CCD lens flare. Settings to simulate the streaks of a digital camera. Horizon Line. Model that can be dropped into a chor to simulate a horizon line. V17 Default Chor. Explanation of changes made to the default choriography starting with v17 Simulations Cloth Hi-Res option. Explanation of this new option for SimCloth in v17 Newton Object collision. Example PRJ where a ball knocks a spoon around in a bowl. A ball spinning a rotor PRJ appears later in the same thread. Crashing Wing. Newton PRJ that make an airplane wing break up on impact. Parachute. Simple parachute animation made with Simcloth with sample PRJ. Simcloth Parameter comparisons. Movie compares variations of "Stretch Type" and "Bend Type" Modeling Quickstart Missile. Simple tutorial for new users models a missile. Basic Navigation and Splining. An extended introduction to fundamental operation of A:M and first modeling exploits. Spline Continuity. Notes on how splines should and should not intersect. Spline Continuity. Notes on a user's model of a couch. Interior Patches. Video discusses problem of Interior Patches and strategy for eliminating them. Note that since this vid was made the "CutPlane" plugin has been added to A:M. It could have been used to add the spline that i stitch in manually in the video. Lathing a perfect sphere. Use the Lathe tool to create a custom sphere with any number of needed subdivisions. Lathing a wheel. Lathing is easy. Make it work for you when you're modeling. Peaks and Valleys. Brief explanation of why fewer splines is better. Mating two dissimilar meshes. Adding splines makes it easy to bridge gaps Closing a Hole. Extending splines to close the small hole that lathed objects have at top and bottom. Closing a Hole. Yet another topology for closing the hole at the axis of a lathed object. Protrusion. How to connect a protrusion to a mesh. Rerouting Splines. A mesh can be improved by changing the path of some splines Dead End Spline. Locating and fixing a dead end spline in a new user's TAoA:M Giraffe model. Dead End Spline. Video shows three ways to eliminate a dead end spline. Copy/Flip/Attach. How to properly copy/flip/attach across any axis and how to fix splines that do not mirror as expected. Bevels. So you've made a box and then want to add bevels to the edges? Nope. Make the bevel then add the box! Fine modeling is easier in A:M when you think ahead to what you need. Beveled N-Gon. Quick way to make a beveled shape with any number of sides Editing a Dense Cube to add edge bevels. Punching a Hole in a Cylinder. Several people contribute good suggestions in this thread. Bar of Soap. Topology for rectangular shape with rounded corners. Cross Pipe. Topology for intersecting pipes. Drink Can Pull Tab. Demonstration of planning and modeling the tab on the top of an aluminum can. Snail Shells. Example of using Duplicator Wizard to make spiral snail shells. Bending Text. Using distortion Box to bend font wizard text to fit a curve Penguin Beak. Suggestions on splining a penguin beak. More Beak. Sample MDL for another possible beak topology. Beak modeling. Video shows simple techniques make it simple to make a non-simple shape. Glow that shrinks with distance. A solution that uses concentric shells. Adding a Smile Line. Resplining a face to have a proper "smile line" contour. Planning an ear. Attempting to prejudge the flow of splines in human ear model. Ear model in Post#18 Boolan Cutter. Example PRJ shows use of render-time Boolean cutter. Another sample PRJ is found here. Modeled Holes. Example PRJ shows topology for modeling a hole in a surface without a Boolean cutter. Five-Point Patch Closing. Video on how to close a 5-pointer that seems no to be closeable. Biased vs. Perpendicular Normals. Video demonstrates rarely used buttons that set biased/perpendicular normals. Bias Smoothing. Some mesh lumps can be solved by adjusting the bias at spline intersections. Smoothing a Mesh. Some notes on a user's face mesh and suggestions on editing it for a smoother result. Smoothing a mesh. Notes on solving user's "crease" problem. Don't model creases! Smoothing a mesh. Video shows fixing some lumps with bias adjustment. Since making this video I've decided that good meshes with reasonably spaced splines can reduce/eliminate the need for this maneuver. Smoothing a mesh. Tips on adjusting bias to smooth a mesh. Unwarping an image. Example of using A:M Splines to unwarp a poorly scanned image. Splining. Video has corrective suggestions regarding basic splining on a user's face mesh Normal Map. Example PRJ shows how to create a Normal Map representation of a modeled object. Terrain Plugin. Notes on use of Terrain plugin that creates meshes based o grey-scale images. Ragged Edges. Modeling ragged edges on a cone. T-Rex WIP. Example of building a low-splineage Tyranosaurus with screen shots. Triceratops head. Example low splineage wireframe Triceratops head Al Capone WIP. Example of building a low splineage human head. Puppets. Thread follows modeling and development of traditional Punch and Judy style puppet and Sock Puppet. TAoA:M #11 Giraffe. A walk-thru on how to model, not the whole giraffe, but just the legs. I'm thinking of doing a vid for the whole exercise, but right now it's just about the leg. Decals and Materials and Particles and Cloth 3DPainter. A brief introduction on using 3DPainter with A:M Decaling for Painting. A strategy for using Cylindrical Application decals (instead of flattening a model to use Planar application) for "UV mapping" Decaling a Sphere. Video demonstrates results of Cylindrical and Spherical application of a decal to a sphere. Europass Soccer Ball. Example of equirectangular map for spherical application in use. Decals with Alpha Channel. Video shows how to properly use transparency in Photoshop to create decals with irregular outlines or fading/transparency effects WITHOUT a strange halo around them. The Material preview ball is 30cm in diameter Moving Decal. Example PRJ for using a Projection Map Material to move a bitmap image around a surface Glossy plugin shader. Example of settings for harder specular highlight. Glossy Thom. Example PRJ uses an Environment map to create glossy appearance. Whitewall Tire. Example material and model create old-fashioned wide whitewall tire. Wood Rings. Sample PRJ demonstrates use of combiners to make wood ring pattern. Ward Specular shader. Notes and example PRJ on shader for LPs and CD style glints and brushed metal effects. Minnaert plugin shader. Sample PRJs show use of shader for odd shading effects that are peculiar to objects like our Moon. fBm turbulence combiner. Example PRJ uses turbu8lence combiner to create rocky terrain. Brushed Metal. Screencap shows settings to make brushed metal look with a scaled turbulence combiner. Stripes. Combines gradients in a material create RYGB stripes. Union Jack. Material makes British Union Jack Flag. UV map consolidation. Simplifying a UV map captured from a wireframe screen so that decals seams are at teh edge of the UV Map. X-Ray look. Example material Polar Bear Hair. Example of dense, short hair suitable for a large mammal. Hair Comparison. Comparison of render results with different lights on hair. Sample PRJ later in thread. Sample Hair Test. Sample images of hair with different lighting. Note that "Spinning lights" are probably no longer needed as a substitute for Ambient Occlusion since "FakeAO" and "SSAO" effects have been introduced in A:M. Jet Thruster. Sample PRJ and notes on using Streaks to create variable width jet thruster effect. Steam. Example of the Steam volumetric effect with sample PRJ Clouds. Clouds made with sprite particles. Example PRJ in Post #13 Misty Clouds. A fluffy cloud effect created with material. Cumulus Clouds. Sample PRJ has another approach to creating clouds with sprites. Propeller. A procedural material that makes... a propeller! Shamrock. Procedural material makes a three-leaf shamrock. Fireworks. Sample Project creates Chrysanthemum style fireworks explosion. Sparks. Material creates welding torch style sparks. Video higher up in thread. Shower Head. Example PRJ demonstrates Streak particles as water from shower head. Cigarette Smoke. Sample PRJ makes slowly wafting cigarette smoke with streak particles. The rendered movies will appear rather dark on some monitors. Sun Surface. Material made with cellular combiner creates look of Sun surface. Aurora. Example PRJ creates Aurora Borealis effect. Jacob's Ladder. Animation of sparking device commonly found in mad scientist laboratories. Example PRJ and movie. Also, stereoscopic version with better appearance. Fast Glass. Thread offers suggestions on user's need to model faster rendering thick tempered glass. Cracked Glass. Several user suggestions on imitating cracked glass appearance. Iris Out. Sample project for old-fashioned Iris-out camera effect. Dome Panels Retracting. Animated material creates appearance of retracting panels on a dome. Rotating a Material. Example PRJ shows material rotated on object. Gradient Adjusted by Pose. Example PRJ shows gradient material with parameters changed in a Pose. Edge Gradient Demo. I'm not sure what the user's need was but this PRJ demonstrates usage of Edge Gradient. Cloth Rope. Floppy rope made from Sim Cloth Cloth sleeve. Sample PRJ demonstrates simcloth as a sleeve for an arm. Cloth Chain. Example PRJ for chain links made from Sim cloth. Metal cloth. Very stiff cloth used to imitate crunching metal. Shrink Wrap. Sample PRJ uses simcloth to create the look of a shrink wrapped label. Cloth Attach Groups. Jason Hampton's tutorial on using Simcloth Attach Groups to manipulate cloth. Boat Wake simulated with Cloth. Semi-successful attempt to create the look of a boat moving through water. Sample PRJ in post #8. Bump Map AO. Method to create the appearance of Ambient Occlusion in bump-mapped surfaces. Hair Color change. Animating the color of hair to change over time with contributions from several people. Unusual Specular Color. Example drawn from real life case. Dust. Example PRJ for A:M's "Dust" material. mtpeak2 contributes a much better solution later in the thread. Hair. Improving collision detection results with Particle Hair. Post with brief video/sample PRJ and longer Live Answer Time Session. Rigging and Constraints Constraints? What are they good for? In a new user's thread I give some examples and context. Bone Creation and Heirarchy. Video shows creating bones and effect of "heirarchy." Simplest IK Leg. If you want to know more about how the basic leg constraints work, here's a walk thru on the simplest possible IK leg Adding an IK Leg. Video shows process of adding a simple IK leg to a character. Simplest IK Arm. The absolute minimum needed to rig an IK arm. Assigning CPs. Basics of assigning CPs to bones. CP Weighting vs. Fan-Boning. Thread discusses the merits and limitations of ways to create a smooth bend across a joint. Making Poses. This vid covers making both the usual Pose Slider type of Pose and also the mysterious, rarely sighted "draggable and droppable" Pose. Color Pose Slider. Sample PRJ uses pose sliders to vary color property of a group. Enforcement Slider. Comments on editing the enforcement curves of Translate To and Orient Like constraints to vary with a Pose Slide Rotation Limits. Video show how bone posing can be simplified by turning on rotation limits. Thumb Position. Notes on proper placement of thumb bones in a typical hand. Rigging a Penguin. Three videos look at issues of rigging a user's penguin model Penguin Legs. Five videos in this thread step through the challenge of rigging legs that are short and fat on a user's character. Accordian folds. Sample PRJ demonstrates rigging accordion folds, also useful for "Lost in Space" B9 robot arms. Accordian pleats. Sample PRJ shows way to make a chain of bones pile up as one end is moved rather than move in unison or move with evenly distributed motion. Forum member MTPeak offers another solution in the same thread. Rubber band. Several users contribute example PRJs for ball hitting a rubber band. Breaking a Sphere. Easy way to break a sphere into parts. Example PRJ and movie. Lag Constraint. Example PRJ of using a lag constraint to delay the influence of a parent object upon a child object. Surface Constraint creation example. Pivot Point. Video talks about the Model Bone as the default pivot point for a model and how to add a Null to create a different pivot point. Changing pivot point. Earlier example PRJ of adding a null to a chor to change the pivot point of an object. Turning OFF a Translate To constraint. Demo Pose Keyframe Mirror. Silent video shows process of copying a deformation from one side of a mesh and mirroring it to the other side in a Pose. Mirror Bones. Using the Mirror Bones plugin to flip bones. Mirror Smartskin. Demo of standard procedure for mirroring smartskins. Smartskin, manual mirroring. How to manually mirror a specific smartskin rather than "Mirror All" Transfer_AW plugin. Video showing how Steffen Gross' AW_Transfer plugin can simplify weighting complex meshes. Transfer_AW plugin. Live Answer Time session shows using Transfer_AW to weight dense biped mesh. Path Constraint to animate a chain of bones along a path like a snake or worm. Rigging a Spring. A two-bone solution to the problem of rigging a compressible spring. Waving Flag. Cycling Wave motion created with bones Material moves on curvy shape. Animating a material (or a bitmap) and making it appear to move in a non-linear fachion. Read the thread from the top to get a sense of the problem that was posed. Rigging a Book. One approach to rigging a book with pages that need to turn and not look like cardboard. Elephant Trunk. Example of using smartskin to make two bones control a smoothly bending cylinder. Vine growing. Example PRJ demonstrates how to make a vine grow and wrap around something. Rolling Coin. A coin that rolls in faster and faster circles until it falls flat. IK or FK? A:M's unusual ability to FK interpolate a chain of bones that were manipulated in IK Gas Pump Hose. Simple boning solution for a hose that must hang from both ends. With example PRJ. Lego Man Rigged. Lego man model by Marcos Resendez (Xtaz), rigged by me. LED Meter. Using a Pose to move both a knob and an LED meter together. Hiding Bones. Video on creating a Pose that will hide/unhide bones in a model. Glow Pose. Example PRJ has "Glow" varied with a Pose slider Inside-out Cube. Several users contribute ideas on rigging cube that turns inside out. Linking Properties. Video demo that shows a right stereoscopic camera focal length linked to a left camera focal length by an expression. Saving a value. Thread on using expressions to save a randomly generated value for later use. TSM2: Note that TSM2 currently works only on 32-bit Windows versions of A:M, v11-16 TSM2 General notes on the basic geometry bones in TSM2 TSM2 Case study videos of using TSM2 to rig a nonstandard creature, in this case, a fly. TSM2 Rigging a Pentaped. Video shows how to use the Parts Tab of TSM2 to rig an unusual creature with five legs. TSM2 Controls. Video overview of basic controls in a TSM2 rigged character. TSM2 Quadleg Fix. Instructions for how to fix error in how TSM2 rigs a quadruped leg. TSM2 IK Neck. Notes and example on using the TSM2 IK Neck Rule of Thirds Grid. Rotoscope image you can add to your camera to help compose scenes by the Rule of Thirds. TAoA:M #9 Flower Power. Video discusses problems with and solutions for a user's "Flower Power" exercise. Animation Quickstart Missile Path. Simple tutorial for new user makes missile follow path. Keyframe Copy and Paste basics. How to Select, copy and paste Whole Model keyframes and individual bone keyframes. Demonstrated in an Action but works in a Chor also. Forum thread with video. Keyframing Options. Video explains the right way to use the Make Keyframe button and how to control what bones it makes keys on. MPEG-4 video in zip: KeyFrameOptionsMP4.zip Keyframing Basics. Keyframing Basics covers much the same ground as the above "Keyframing Options" but in a slightly less complete way. MPEG-4 video in zip: keyframingbasicsMP4.zip Pose to Pose basics. Basic workflow for doing pose-to-pose keyframe animation. Quicktime video link. Making Bones Stay in Place. New animators are often surprised to see bones moving sooner than they wanted them to. This video shows how to make bones stay put and only move when you want them to move.Quicktime video link Paired Keys. Workflow for blocking animation with "paired keys," a common animator technique Un-paired Keys. Workflow for animating motions like walks that do not have holds as in the "paired key" situation Channel Bias Editing. Video shows how to adjust the bias of splines in animation "channels" much like you can adjust the bias of splines of a model. Keying Shaggy. Explanation of workflow for keyframing characters in A:M Counter animating. This video shows how to raise the heel on a rig that doesn't have an independent heel bone. Why to Force Keys. Video shows simple case of why it is good practice to force keys on bones after making a pose. Basic Pose-to-Pose Walk. Making a Walk cycle as an action that will be put on a path. Generic Walks. Discussion of keyframing essential, standard walking motion. Not finished, but included as it may be useful none-the-less. (These videos may best viewed with VLC Media Player) -----Generic Walks - Blocking GenericWalks-BlockingMP4.zip -----Generic Walks - Part 2 GenericWalks2-MP4.zip -----Generic Walk - Breakdowns GenericWalk-Breakdown1_MP4.zip Five legged walk. Example of creature walking with 5 legs. Keying Multiple Bones. Video shows how to select many specific bones and force a Key on them all at once. Keying Multiple Bones. Video shows special case of keying multiple bones when transitioning from an Action to the Chor Action. Second Chor Keyframing. Ignore this. Only here for my reference. And this. Transition to next Action. Video on using "Transition to Next Action" IK to FK. Video show s a method for changing from IK to FK in the middle of an animation on a character not rigged with a "seamless" IK/FK switch. Path Essentials. A video in which the interplay of paths, actions, action "chor range" and action "Crop range" is introduced. Ease. Example PRJ and notes on editing the Ease channel to adjust speed of an action. Walk Cycle on a Path. A:M's basic drag and drop functionality for putting a model on a path and adding a walk cycle Action to it. Sliding Keyframes. How to re-time events by adjusting the keyframes in the timeline. Curtain. Sample PRJ creates curtain motion with muscle mode animation. Head Turns. Some notes on animating the head and spine. Jumping. Some text comments on animating jumping motions. Jumping. Notes on animating jumping motion. Jumping again. Notes on a user's jumping animation written on the frames of the video. More Jumping. Yet more comments on the mechanics of jumping Jumping Cube. Video aimed at non-A:M users to demonstrate some spline animation in A:M Side-step. Notes on posing a character stepping to the side. Simple Walk. Video shows workflow of posing out a walk with IK legs. Rotating objects. Notes on animating rotating objects and sample PRJ of turning helicopter blades. Robot Turn. Some comments on posing a Giant Robot to animate it turning. Squat. Example PRJ of posing a TSM2 character into a squatting position. Unicycle motion. Sample PRJs and notes on unicycle animation with additional suggetions in thread from actual unicycler. Accenting a Beat. Anticipating motion to accent a musical beat Tentacle. Example of animating a tentacle with bones. Rubber bulb. Example PRJ of a rubber bulb being squeezed. Flying Cards. Example PRJ shows playing cards flying into a predetermined arrangement TAoA:M #3 Notes on posing the arms in the TAoA:M tutorial "Move it" TAoA:M #4 It's a Pitch. Some annotations of problems on a user's Pitch animation. TAoA:M #x Notes on "The Door is stuck", particularly general Shaggy posing workflow and AM2001 Rig circumstances. Adding animation after an Action. This video shows how to add new animation on a character after using a walk-cycle action. In this case, in the context of Shaggy and the "Door is Stuck" exercise. Quicktime video link Appropriate Squetch. Advice on how much squash and stretch to use. Action Precedence. Explanation of how different Actions on the same character have priority over each other. Jog/Run Reference. Footage that compares the mechanics of jogging and running. Setting Default Interpolation for splines in the curve editor. Setting Default Interpolation II. Another explanation of a fast way to set default interpolation on many bones at once Hold Interpolation. Setting Channels to Hold to prevent wander between frames. Flipping a Channel. Video show how to reverse the direction of a motion by flipping a Channel in the curve editor. Setting Post Extrapolation. Using the Curve editor to make an automatic infinite loop. Knee Pops. Managing and preventing knee pops in characters. Random Jitter. Using Expressions to add random movement to a bone. Path Deformer, Example PRJ show Distortion box used as a Path Deformer. Distortion Box. Demonstration of how to put a model through a distortion box in a Chor. Plane intersection. A:M user shows me how to capture the intersection of an object with a plane with Booleans for a water simulation. Two Gravities. There are two settings that can create "gravity" on particles. Decal fading and cross-fading. Demonstration tutorial of how to animate decals to fade in and out. Spiral reveal. Example PRJ shows spiral progressively revealed. Amoeba Split. Example PRJ animates large blobby thing to split in two. Head room and Nose Room Notes and links to advice on properly framing shots with people in them. Note: article link in 1st post is dead, use archived version via Wayback Machine. Lighting and Rendering Jeremy Birn "Digital Lighting and Rendering" Long thread contains annotations and translations from generic terminology in very informative book to equivalent terms in A:M. Note that these comments are on the 2nd Edition. An expanded 3rd edition came out in late 2013. Reducing Render Time. Thread discusses common strategies for reducing render times. Frame Range and Step. For those wondering about the mysteries of "Frame Range" and "step" settings Three Teapots. Benchmark scene PRJ that has become a common way for A:M users to compare the speed of CPUs. Light Lists. How to create and use light lists to limit a light's scope in a scene. Frame Burn. Sample PRJ shows Frame Burn Post effect. Semi-sunny day. Suggestion for quicker rendering daytime look. Night. She said she'd love me forever if I showed her how to make her scene look like nighttime. Penumbral lights. Strategy for using z-buffered lights for penumbral shadows without long render times of ray traced lights. Car headlights. Example PRJ uses volumetric lights as visible lights on a car. Radiosity without radiosity. Tactics on creating the radiosity look without the render times. Flashlight Beam. Example PRJ shows Volumetric Light to appear as a flashlight beam in dusty air. Depth of Field. Settings to use A:M's Depth of Field effect in renders FakeAO as a post-effect. Using Jenpy's FakeAO plugin as to add AO effects in post rather than at render time. Extracting Depth Maps. Using an A":M Composite Project to extract the depth map from an OpenEXR render to an 8-bit grey-scale format. Fake Depth of Field. How to take A:M's OpenEXR renders to a post program like After Effects to use a simulated Depth of Field filter. AE's native DOF effect is very basic. Third Party plugins do a better job. Altering colors in a Composite. Using an A:M Composite Project to alter the color of already rendered footage. Light Attenuation and Intensity. Some comments on setting these light properties. Heat Distortion Effect. Work around for small bug in refraction rendering. Dispersion. Example PRJ creates Dispersion/Chromatic aberration color-fringing in glass. Caustics. Thread has several users contributions and sample PRJs toward creating the distorted clear plastics look. Caustics. Another thread about jewel-appearing caustics. Aerial Perspective. How I created a Chinese Painting-inspired scene with flat planes Shadow Buffer. Example PRJ renders object's shadow in the alpha buffer Shadow Catcher. Example PRJ shows makes shadow of object appear on Front Projection rotoscope. All-Around Drop Shadow. Example PRJ creates hazy, in-all-directions drop shadow around text. Scaling Image Sequence. Video on how to import a rendered image sequence and re-render it to a different size. Phenakistoscope. Instructions and PRJ to put your own animation into the classic toy. Coaching Posts These are not general purpose tutorials but are intended as diagnostic comments on a specific user's project. They may possibly be informative to others, none-the-less. David's Bouncing Ball Bouncing with parabolas Drop test example footage Using Original Fall to calculate later bounces Ball Drop Time visualization of ball parabolas Squash notes Comments on timing and amount of Squash How much Squetch More comments on how much Squetch to use Danf's Bouncing Ball. Several posts in this thread have notes from me on Danf's bouncing ball animations. Simon's Blockheads Simon's Heavy Lift Thejobe's Jumping character. Long thread with comments and crits through out about animating a jump. RS3D's Walk. RS3D Walk Notes Gerry's Reel. Notes on making a character fall over.
-
Wild Sided, I've been doing this for some time now. ONE THING YOU MUST REMEMBER: to get the morph to translate correctly, you need multiple "Inbetweens" If you just go from "Neutral" to "Frown", it will go linearly without curves. So you'll need to have more than one "Mold Plate" So....here is what you want to do. Take your neutral Base Face and open the frown morph model in the same model.(so you have both models within one model.) Then make a new pose. select the cps of the base(within the pose window) and RIGHT CLICK/ Snap to nearest cp. Then it will ask you for a group to snap it to. (You need to have a group for the frown created)....... Choose "Frown"... The cps of the base face will snap to the frown. WARNING.....If the cps have to move a large distance, especially in the lip area......cps will snap to the wrong cps. THIS is why having several(or a bunch) of plates is important so that you can snap in incriments over time. Hope that helps. It does work.
-
Yes, that was always a problem with the exports. What size is your model? Anyway hooks and 5-pointers should be made small and used rarely, which is a good idea anyway. The good thing: If you use something like "UV set smoothing > Full UV Set Smoothing" and the right margins for Bake Surface, it works pretty well anyway, since the surface underneath it is very close to the one covered by the patch. If you might see a small distortion there, but if the 5 pointers are not extremly large, it should not be very visible. But yes, it would be better if that could be fixed. Malo had some nice ideas in that direction but I do not think they ever got fully worked out. Best regards *Fuchur*
-
Installers: Windows 32Bit Windows 64Bit Intel Mac Change Log: New All "Snap to nearest CP" If you select a single cp or a group of cp's, than this new option in the popup menu is avaible. It is snapping the selected cp to the nearest other cp position from the model. If you have a group named "targetgroup" in the model, this group is used as target positions, otherwise a dialog appears, where you must select the target group. Only the cp's from this group are used as possible target cp positions. This option is also avaible in a pose/action/chor, when the muscle mode is selected. The default shortcut is Shift+Ctrl+9. All [bug]6400[/bug] Allow option to invert the functionality of the the "Hide CPs" and "Lock CPs" tool buttons. Holding the Ctrl (for Mac the Command) key down, inverting the affected cp's. All [bug]6410[/bug] Feature suggestion: Tool buttons for Onion Skin Control Toolbar for Onion Skin added All [bug]6347[/bug] Feature idea: Automatic Quad view All [bug]6389[/bug] Please allow deletion of layout presets. All [bug]6390[/bug] Allow seletion of layout presets from "Load Layout" submenu All Tools> Options> Units (additional for #0006374) "Magnet mode"> "Display single manipulator" With checkbox ON, the magnetic field radius is only drawn for the last selected cp, with the checkbox OFF, the magnetic field radius is drawn for each selected cp, but the radius can be only with the maipulators from the last selected cp All [bug]6375[/bug] Allow user definable workspace/window layout presets "View"> "Save Layout" for saving an individual toolbar layout "View"> "Load Layout" for restoring an individual toolbar layout. OpenGL3 driver (had also the possibility to use features from newer OpenGL versions, if detected) This is now the default driver, the other OpenGl driver exists only for backward compatibility if the gpu/driver doesn't support OpenGL 3.0 (for gpu postprocessing OpenGL 3.2 is required as minimum) When you switch the drivers, a restart is highly recommended! This driver works faster in realtime mode (in special with high count patch models/models with transparency) and enables some additional features. It also contains some bugfixes for realtime displaying. Polygonmode (only OpenGL3) Tools->Options->OpenGL In shaded views, the polygon structure is displayed, which will be used when you export the model/chor in a polygon export format like stl/obj and so on. Rendersetting "Screen Space Ambiant Occlusion" This is a posteffect, which is implemented as a GPU Shader, but has also a CPU fallback implementation, for the case that the gpu doesn't support this or opengl3 is not used. The effects also need the depth buffer, if they are not enabled, the effect enables it. additional settingsOn OSX this effect can be computed only on the cpu, due to glTexBuffer and samplerBuffer (gsls) isn't avaible in the compatibility profile, the core profile can't be used (nor supported via AGL) there. "SSAO Effect only" Only the computed SSAO is shown as a greyscale picture (not applied to the original render, overwrite it) "Samples" How many samples are used to compute the ssao around each pixel, available values,when gpu is used are 2-1024, if the cpu is used it is limited to 2-128 (higher values are clamped to 128) it's also a good idea to enable OpenMP, when the fallback to the cpu implementation is used. "Radius" The radius around each pixel, from which the SSAO is computed "Distance" Distance which occlusion reaches "Gamma" Gamma correction for occlusion only "Density" Density for sampling "Softness" Softness of the edge of occlusion "Luminance influence" How much luminance affects occlusion (gpu only, and only when applied to finalrender) "Blur the effect" Enables blurring for the effect itself (not the applied effect) "Radius" The radius for which the blur is calculated (gpu gaussian blur used) "Apply to finalrender" See GPU Postprocess effects when "GPU Postprocess effects" is set to ON and "Applying each pass" is ON and the gpu implementation is used the effect is applied each pass. [*]Rendersetting "GPU Postprocess effects" (only OpenGL3, driver version 3.2 or higher is needed) This implements some posteffects as GPU calculated effects, they are faster than the normal posteffects applied to the camera. An additional logfile (GPUShader.log in the A:M installation directory) is created, when such aa effect is used (for bughunting) if an error occurs, the master.log is also needed for bughunting the order for computing the posteffects is SSAO, Blur, Different Posteffects. Settings for each gpu posteffect "Applying each pass" When You render with multipass ON, the effect is applied at each pass. "Apply to finalresult" If this setting is OFF, the result from the posteffect is saved as a seperate image file (also for every pass in multipass), and not added to the final result image. The imagefile is saved in the directory where the final image is stored and appended with the posteffect name and pass number. "Samples" How often the posteffect is applied. Blur Additional setting, "Radius" which controls the radius for which the blur posteffect is calculated Different Posteffects additional setting "Posteffect Type" Available types are "Greyscale" "Sepia tone" "Negative" "Sharpen" "Dilate" "Erode" "Laplacian" "Prewitt" "Sobel" [*]Snapshot from the active view Directory where the snapshot is saved is configurable at Tools->Options->Backup The toolbar button for this is under Tools->Customize->Commands->Render the snapshot is saved as a targa file [*]All [bug]6358[/bug] Feature suggestion: Option to limit realtime subdivision, new checkbox on global property page "Limit realtime subdivisons" Default On, limits the real time subdivisions to 1,4,16,Adaptive [*]All [bug]6342[/bug] Feature request: update STL exporter to offer higher subdivision avaible subdivs for polygon exporters and realtime view now 1,4,16,64,256,1024,4096,Adaptive. 256 and above require significantly more time in realtime views. [*]All [bug]6332[/bug] CTRL-Save Snapshot to bring up options panel (for macs Shift-Save Snapshot) [*]All [bug]6334[/bug] Feature suggestion: Snapshot automatically applied back to model new menu entry for this "Apply Snapshot", avaible only in the contextmenu from a view filename, extension (tga,jpg,png,exr), save destination configurable. Changed [*]OSX If a dialog hangs, you can now quit it with Cmd+Q [*]All Obj Export Generate Model Maps If "Generate Model Maps" is active, only the model map texture is exported, this texture is like a baked surface and includes other applied textures too. The texture is now written as a 32bit bmp (with alpha channel). Min and Max Size can now be "512" too, it is the min/max size for each patch in the created texture, depends which size is needed (patch fully covered from a texture is using the max size, a patch with only surface changed the min size). Remove degenerated faces at export It no longer breaks the UV mapping, It is useful if you want to create valid obj files and 3/5/Hook patches are in the model. It is simply not possible to create only quad polygons (which are valid) for example for patches with hooks, in this case the exported obj file now has Quads and Triangles (have not seen problems in this case with other polygon based apps). Texture handling Only the first texture for a face is used, because a face can have only one material and uv coordinates assigned, but it can be a multi texture (like the from BakeSurface created one) Copy Textures Dialog This dialog are now only displayed, if the texture files are not in the 8.3 format. "Export normals" If the checkbox isn't checked, normal information is not exported, this information is only a hint for other importers and not needed in general (most of the programs are rebuilding the normals at import), unchecking this option reduces the filesize. [*]All "Save Snapshot" (Button) and "Apply snapshot" (menu entry) If you hold down the Ctrl (Mac Shift) key, while clicking this command a dialog appears, where you can change the size for the created image, the Filename and imageformat [*]All I have changed the behavior for "Snap group to surface", it now also works in a pose/action/chor view without changing the original model. [*]All Relationships the menu command's "Select Spline#" and "Select CP#" in the PWS, selecting now the spline/cp in the relationship window, not longer in the PWS Choraction The menu command's "Select Spline#" and "Select CP#" in the PWS, selecting now the spline/cp in the relationship window, no longer in the PWS, if the current viewmode for the chor is "Modeling" or "Muscle" Action the menu command's "Select Spline#" and "Select CP#" in the PWS, selecting now the spline/cp in the relationship window, no longer in the PWS, if the current viewmode for the action is "Muscle" [*]All "Snap Group To Surface" for grouped cp's they are member of a patch and the reversed normal direction from the patch is used as the direction for finding the goal surface, for all other cp's the pivot for the group is used as a direction special case if only one cp is selected and the cp is not a member of a patch the view direction is used When you hold down the Shift key, a dialog appears, where you can set the offset and the maximum intersection distance [*]All Import -> Prop When you hold the Shift key down, while selecting "Import" -> "Prop" a dialog pops up where you can change the behavior for the imported Prop "Scale the prop at import" Down/Upscaling the prop with the given value(obj files only) "Discard textures" textures for this prop will not loaded and assigned "Don't display information" the information dialog for new imported props is suppressed These settings are saved in the project too, so if you reload the project the same settings given here are reused. The import process can be cancelled with the escape key. [*]All Plugin Amplitude added possibility to use a frequency band as controller, bands 1-10 are predefined bands with the following values Center Low Up 31,5Hz 22Hz 44Hz 63Hz 44Hz 88Hz 125Hz 88Hz 177Hz 250Hz 177Hz 355Hz 500Hz 355Hz 710Hz 1Khz 710Hz 1,42Khz 2Khz 1,42Khz 2,84Khz 4Khz 2,84Khz 5,68Khz 8Khz 5,68Khz 11,36Khz 16Khz 11,36Khz 22,72Khz The low and upper limits can change slighly, depends on the sampling rate from the wav file Band 11 is a user defined band, where you can set the lower and upper frequency yourself. [*]All [bug]6378[/bug] Hide bones with enabled "Prevent assigning cp's" property from list of bones in the "Edit CP Weights" window. [*]All the introduction dialog (Help -> Introduction) now has workable links to the single section (like mouseover effect) [*]All Posteffects added Shadow and Alpha to the list of possible input buffers [*]All changing the Polygonmode now works without closing/reopening the views toolbar button added (Draw Toolbar) [*]All Rendersettingsdialog now sizable Fixed [*]All [bug]6442[/bug] Cannot subdivide splines in Chor mode It's now possible to subdivide a spline with the Shortcut "Y", when you are in a chor or action. Resulting in important change for Springsystems adding a mass has now the keyboard shortcut "Shift + Y" [*]All [bug]6436[/bug] A:M hangs (unrecoverably) when saving over a previously saved layout preset [*]All [bug]6437[/bug] Preset layout inconsistencies [*]All [bug]6438[/bug] No longer possible to resequence constraints in an Action or Choreography window. [*]All [bug]6425[/bug] No longer possible to resequence a relationship's constraints in the PWS [*]All [bug]6412[/bug] Allow the new Snapshot feature to save a snapshop of Stamps [*]All Terrain wizard number of rows and columns now similar to grid wizard orientation similar to grid wizard save and restore changed values now working [*]OSX [bug]06423[/bug] image io plugin missing, it says (decals are not displayed in realtime mode, occurs only with OpenGL3 driver) [*]All [bug]6421[/bug] Export of OBJ with baked surface crashes AM and produces no OBJ [*]All [bug]6414[/bug] Full path of model is file shown in the manipulator properties when "Show CP Weights" toolbar button is enabled. [*]All [bug]6415[/bug] [interface] Proposed defaults for Onion Skin [*]All [bug]6426[/bug] Splash screen image seems a little too large. [*]All [bug]6427[/bug] Splash screen's image is too rough around its edges [*]windows 32bit [bug]6418[/bug] Crash when trying to display the properties or timeline window. [*]windows 32bit [bug]6419[/bug] Crash when trying to create or open a model file. [*]windows 32bit [bug]6420[/bug] Frame/ Timecode display shows gibberish. [*]All [bug]5469[/bug]4 Bones (still) weirdly draggable in PWS Chor [*]All [bug]6406[/bug] difficult selection [*]All false cp are still selected after "Detach Point" [*]All [bug]6404[/bug] A:M crashes or becomes unstable (then crashes) when copying and pasting two or more groups. [*]All [bug]6386[/bug] Object manipulators become obscured when using a rotoscope whose "On Top" property is set to "ON". [*]Windows [bug]6376[/bug] V18 slow at rendering as compared to V17 [*]All [bug]6394[/bug] export obj, 3ds with bad uv added a new checkbox for the obj exporter "Remove degenerated faces at export" if this is checked, the UV datas are not longer valid , should be checked only if You export for 3D printing (solving problems coming from hooks / 5pointers) [*]All obj plugin some memoryleaks are fixed (in special when used as importplugin for props) [*]All [bug]6399[/bug] A:M Crashes when using Clone NullObject plugin [*]All [bug]6402[/bug] Yellow selection box not visible [*]All [bug]6368[/bug] A:M crashes when dragging a model with groups onto another model in PWS [*]All [bug]6369[/bug] Mirror Bones plug-in does not mirror Null color or "prevent assigning cp's" property [*]All [bug]6374[/bug] Magnet Mode's visual boundary does not display consistently when selecting a CP. [*]All [bug]6326[/bug] NetRender format choices is only a blank list. [*]All [bug]6327[/bug] 32 bit Netrender only sees 64 bit renderlsaves [*]All [bug]6324[/bug] Num 3 to cycle through light views not working [*]All Expression "GetWorldPos" and "GetWorldDir" now working as expected [*]All [bug]6333[/bug] to end spline while in "Sticky Mode" [*]All [bug]6362[/bug] Render to File settings window always cropped [*]GPU Posteffects Netrender can now use GPU Posteffects too, if the machine where the slaves are running support this [*]All [bug]6357[/bug] SSAO doesn't look like AO [*]OpenGl3 fixed some display bugs , in special for bones mode [*]All [bug]6341[/bug] "Compute CP weights" is not recognized as change to model or PRJ [*]All [bug]6356[/bug] Crash on in Render To File Dilaog [*]OpenGl3 fixed some memoryleaks [*]Windows display problem fixed when selecting a group and Aero is active [*]All Posteffects are remember now their selected buffers ,has occured when two or more Input buffers are avaible for the posteffect and both of them having a buffer other than Color or Default selected [*]All nested Posteffects (one Posteffect are added to another) are remember now their selected buffer correct [*]All [bug]6312[/bug] Drag a Project from the libraries in the PWS over the Choreographie-Entry > Crash Removed [*]Windows 32bit Direct3D realtime driver removed