bentothemax
-
Posts
651 -
Joined
-
Last visited
Content Type
Profiles
Forums
Events
Everything posted by bentothemax
-
Looks good! I agree about the shadow. It does look too dark. Did you use two layers of patches for the glass? I don't think that is necessary in this case. I also think that you should explore with caustics for this model, those always look cool refracting through glass.
-
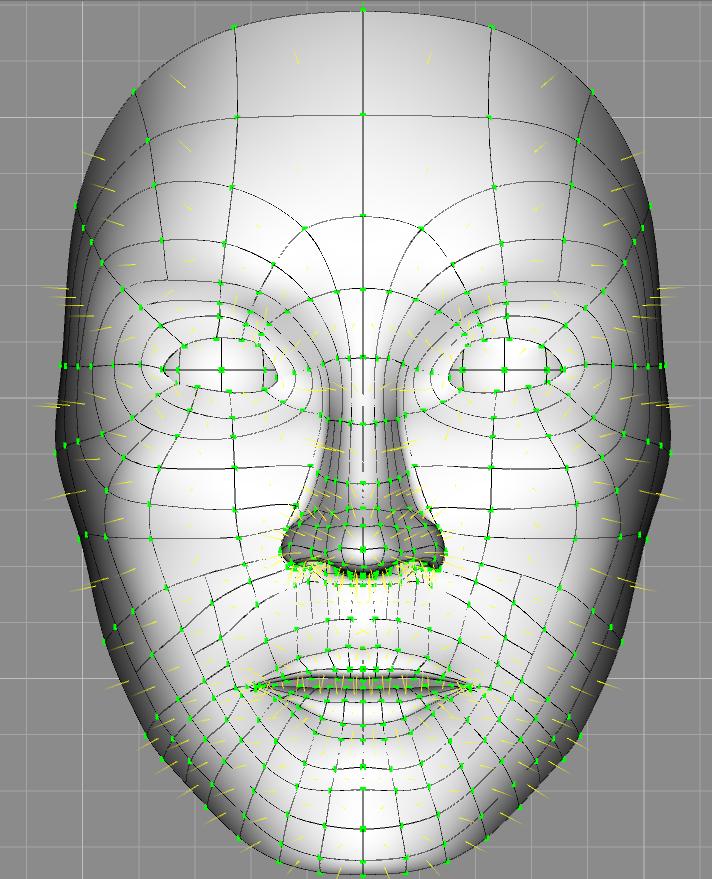
Started this yesterday and finished most of the splining for the face today. Here is a quick render. The decal applied is the reference image used to model it. Rendered with AO and one light using 1 decal and the Skin shader. No SSS because it always comes out black ... I still need to finish modeling the lips and eyelids, and then create eyes that are non-decal. I don't like how the nose looks, and am having trouble finding good reference on how it looks from the side : \ I am going to try to make this the full thing with hair and what not so bear with Comments and Crits welcome on the splinage ... If anyone sees any ways to make it more efficient please point it out, this is my 3rd complete face modeled.

-
Thought I'd post my latest WIP
bentothemax replied to Eric2575's topic in Work In Progress / Sweatbox
I think that the barbed wire would look really good ... but right now it only looks like normal wire. I think a good solution to get it to look more jagged (don't know how it was made back then) but perhaps making the razors a low patch then using sweeper to duplicate them along the wire. They could even be simple 2 patch models if you made them not have any thickness, and I think that would make the wire look much better Other than that .... Great model! It looks really good. I am looking forward to seeing it finished ( or rather destroyed ) when you are done dirtying it up. Ben -
You can increase the bias of the Control points where it looks to sharp. Also if you render it using some type of global ambiance it should look a lot less sharp
-
Nice job! He reminds of Keanu Reeves ... a lot
-
Hi, this is a reintroduction My name is Ben. I am 15 years old and have been using Animation Master for almost 5 years now. I started making simple "flying saucers" and have come as far as to model very intricate models, and render with a great understanding of radiosity. I have even been given the chance to model and animate for NASA on several occasions. I would like to say that buying animation master was one of the most important, and best choices of my life. It has influenced my school courses, and have landed me a co-op job at NASA when i am old enough. To all new users, if it seems hard at first, don't give up, the rewards once you learn AM will be well worth any struggle. To all current users, keep working as i enjoy seeing all of your work. Ben
-
Please spell check and use punctuation, it would make it so much easier to read. lol The coat looks good. For a project like the one you are attempting, I would suggest making a low patch model, much like how the in game model is low poly. Only model the "big" parts of the model. Then you can add lots of detail with texture maps ( IE bump maps, normal maps, color maps, etc). It would be easier modeling, and a good learning experience of texturing. You google The Gimp, which is a great photo editing tool, the great thing about it is that it is free. ben
-
The face rotates 180 degrees, you are looking at the back side of the model when it does this ... but still appears to be the front. carmenrotate.mov
-
for planet glows i would try a few spheres layered on top of each other with gradients from transparent to the glow color.
-
My friend has one of those .... :\ He has it upgraded a bit.... its pretty painful Can't wait to see it finished, as always it looks great ben
-
I did a little test of my own using radiosity. Took about 13 minutes to construct and about 40 minutes to render. I'll post it if you want Ben
-
Material. It's a sine with very very slight change in color (also scaled very large so its almost not noticable) and a bump map and some roughness. Sorry i have not posted anything lately... my football team made playoffs for the first time in school history So we have been practicing really hard and long this week.
-
I fixed it ... but i had to play around with a few settings IE the suns intensity is now 650 percent and the radiosity of the sphere around the scene is 125 percent and it is pretty much back to normal. Now will get back to modeling the rest
-
Well ... I didn't change anything, but now when i render i get these results. Any idea what went wrong. If anyone who has a good understanding of radiosity would want to render it to see what you get, just post and ill email u the project. Thanks, Ben
-
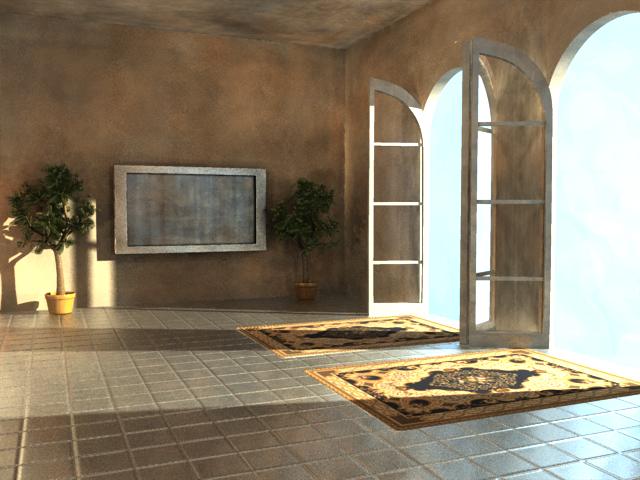
Hey As you can see not quite done, but working on it... if anyone has a good place to get wood floor textures it would be much appreciated if you posted it C and C welcome, more to come this weekend. Ben
-
I think it looks a lot more like something out of the military. My suggestion is that you make the under armor a matte black and the covering armor a color or a chrome, maybe even an odd translucent material. Btw, I am replying via wifi internet on my new ipod. It really is amazing what these things can do. Ben
-
Ambient occlusion is used to simulate radiosity if I'm not mistaken. It shouldn't be needed and your render times should drop considerably.
-
It looks really good! I just noticed that the lightsaber seems to turn purple when it comes across the screen, might just be my eyes but you might want to slow it down and take a look Great job. Ben
-
The only thing i notice is a little bit of stretching at the edges of your maps.. Other than that it looks great !
-
imo it's usually a good idea to read up the manual and try most of the activities before posting on the forum. This probably isn't the best forum for this question either :\ Particles are a material and are controlled in the same way. To answer your problem look at each particle and change the attributes. I have had problems changing the color of the particle materials that came on the CD. You may want to embed your particles before trying to alter them, or even save them to a whole new spot on your hard disk. Good luck Ben
-
Like Eric said it is good to get the basics down before trying anything complicated ( yes, the cockpit will be very complicated ). I think it would be a good idea for you to look up a tutorial or two on bias values... these might be a little ahead of you but once you learn how to use them they can make your modeling jump from "ok" to GREAT. I am pretty sure Yves has one on his website. ( I hope I'm talking about the right thing ) Anyway for your first model it looks pretty good. I think your next step should be to finish the hull and wings... then as you learn more make the cockpit. Everything in Animation Master is a learning process, and once you have learned it, you can create a LOT of great things. Just take your time and experiment, we'll be here to advise and help you, but the trial and error, the learning process, you have to do on your own Best of luck... Ben
-
When MC was 13 he was about 6 feet tall and had the build of an Olympic athlete FYI I have read the halo book series ... IMO it looks good if you are going for a more "toony" look to your characters. Ben
-
Additions to my astronomical gallery
bentothemax replied to Julian's topic in Work In Progress / Sweatbox
I looked at the images in the gallery and I really like how the atmosphere of Earth looks. Could you tell me how you did it ? Thanks Ben -
O.o Looks good. Post a bigger picture maybe? From here though it looks really good :]
-
That looks great Reminds me of the offices in the Incredibles. Would look really cool if the wall broke, maybe using newton physics?