HomeSlice
-
Posts
4,676 -
Joined
-
Last visited
Content Type
Profiles
Forums
Events
Everything posted by HomeSlice
-

Can hair be rendered out separately
HomeSlice replied to Eric2575's topic in Work In Progress / Sweatbox
First, let me address this: "I don't want to wait 16 passes at over an hour a piece to see that I will likely have to change something anyway." This is not an efficient use of your time. For the first few test renders, only render 1 or 2 passes and only large enough to see what's going on. Once you think you have everything like you want it, render a half-size version with only 4 or 5 passes. If that looks good, you can be pretty sure your final render is going to look good. To get render times down. Robcat's suggestion to use Z-Buffered shadows would help. You can render only the hair with an alpha channel, then render a separate shadow pass at only 1 pass (set the wall to "shadow only") - then blur the shadows in Photoshop and composite all the passes together. You can render foreground/middle/background elements separately and composite them in Photoshop. You can turn off "Cast Shadows" for all models where shadows are not really needed or seen. You can delete all your lights except one shadow casting light and a couple of non-shadow casting lights, then use IBL to help light the scene. You can render 30% smaller than the size you need, then scale it up in Photoshop. -
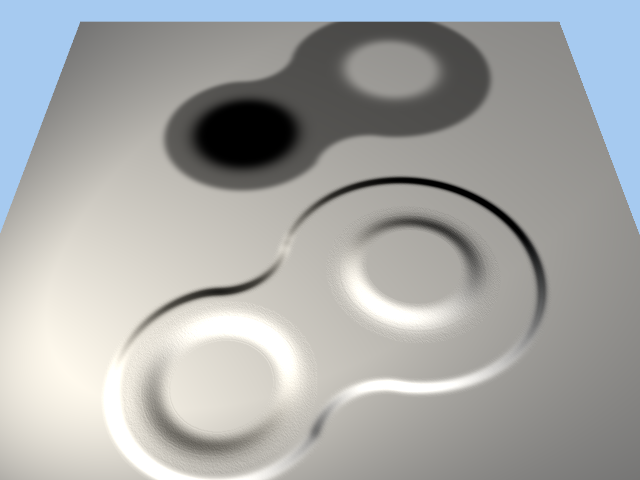
That looks like it worked very well. Is she some kind of molecule?
-
As long as I don't have an alpha channel, my tests agree with yours. The decals don't cover the whole model, so if this statement were true, the displaced area with the black would appear to be lower than the un-decaled edges. But they are all the same, which would lead me to the conclusion that when an alpha channel is present, black is interpreted as "Has no effect whatsoever".
-
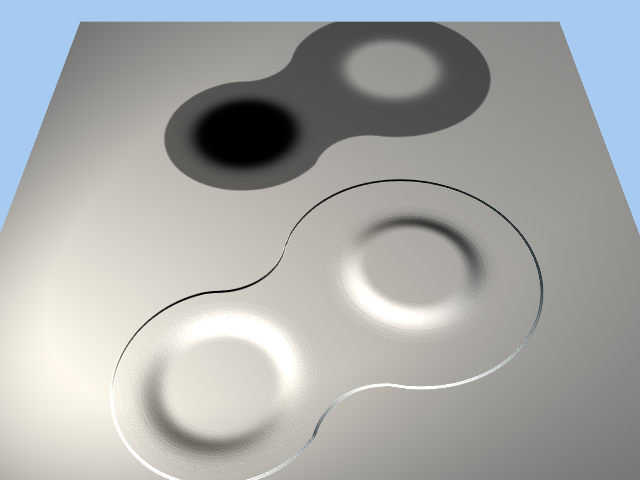
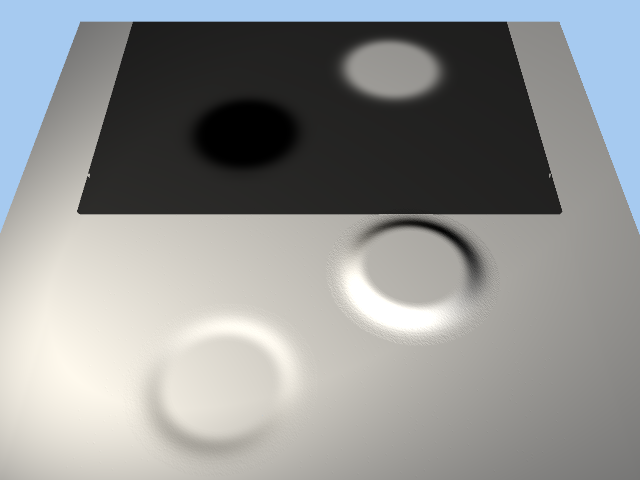
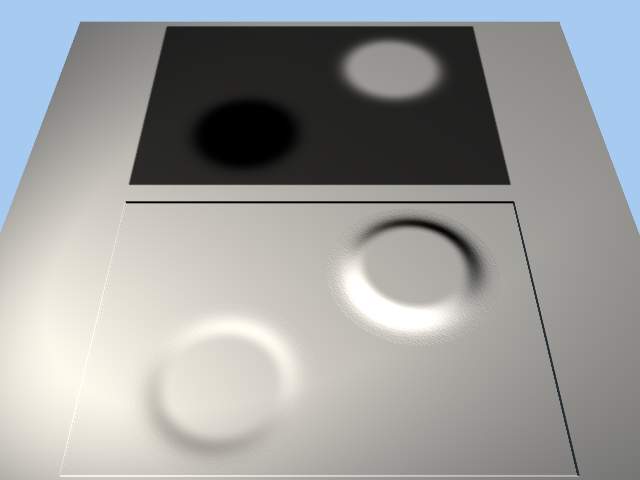
The magic color for Displacement maps with Alpha channels appears to be black (0,0,0). I used a TGA image for these tests. 128,128,128 background with a hard-edged alpha channel 128,128,128 background with blurred alpha channel Black background with hard-edged alpha channel Black background with blurred alpha channel

-
Sorry for hijacking your thread Jason .... I did the displacement tests too. All renders are 3-Pass. Displacement is set to 10,000%. My middle gray in all tests is (128,128,128). I used an 8bit/channel TGA decal with and without an alpha channel, a 16bit/channel PNG decal with and without an alpha channel, and a 32bit/channel exr decal with and without an alpha channel. I'm not sure if "alpha channel" would be the correct term for the PNG and EXR images. In BOTH cases (in Photoshop CS3 anyway) , if you want transparency, you have to delete part of the image (so the default checkered background is visible) because you cannot save a proper alpha channel. But in A:M, the transparent areas work just like an alpha channel would. In every case, there was no displacement in the neutral area when there was no alpha channel. But where an alpha channel was present, the neutral color WAS displaced. 8bits tga decal 8bits tga decal with alpha channel 16bits png decal 16bits png decal with alpha channel 32bits exr decal 32bits exr decal with alpha
-
Yes, that usually works in these types of situations.
-
For this particular issue, make sure the camera's Output Options > Buffers > Alpha is OFF. You set this property in the camera i the container, not in an instance of (shortcut to) that camera. I don't believe the Blur Post effect blurs the Alpha Channel, so turning off the Alpha buffer may fix this issue too.
-
It sounds like you are trying to open the files through the Library panel. Opening the files that came with the program through he Library panel requires that you copy the files from the CD (or download them from the Hash website) to your computer. When you install the CD version of the program, it asks you if you want to copy all that extra data to your hard drive. I think the default location where it copies the files is to a folder in the install directory. If you are on a PC, the is probably c:\Program Files\Hash Inc\*version number*\... If you are installing the subscription version of A:M, then you have not downloaded the extra files yet. I think you can download the extra files from (not totally sure): ftp://ftp.hash.com/pub/misc/Data.zip ftp://ftp.hash.com/pub/misc/LittleData.zip ftp://ftp.hash.com/pub/misc/props.zip
-
If it is not a close-up.... I think the easiest way is to make a new Action with your model. In the Action, import a Klieg light as an Action Object and place it where it needs to go. On frame 0 of the Action, set the color, intensity, cone angle etc... of the light. Also set the Y Rotation of the light to 0. In the light's Properties Panel, drill down to Object's Properties > Transform > Rotate, and right-click on the word "Rotate". In the context menu that pops up, choose "Convert Driver to > Euler". Now on frame 12 (for example), set the light's Y rotation to 360. Save the Action. Drop it onto your model in a Choreography. Set the number of times you want to action to repeat in the Choreography. That's it!
-
I don't see it in the "birthday" section at the bottom of the main page. Is it *really* David's birthday? ... or does someone just want a free piece of cake?
-
Fear not! With the "Compositing - Light Buffers tutorial" - you too will be mashing up buffers from EXR images in A:M Composite in NO TIME! There is Virtually NO LEARNIG CURVE! Just open the professionally prepared tutorial and gaze blankly at the pretty pictures! After a FEW SHORT MINUTES, you will UNDERSTAND LIFE, THE UNIVERSE, AND EVERYTHING. So what are you waiting for? Try it for FREE! There's *almost* NO RISK. Don't wait! CLICK HERE >>> http://www.hash.com/forums/index.php?showtopic=31562
-
Show more than decals? That would be the Show More Than *Drivers* button.
-
Another thing that will help is to add two splines to the track that match up with the splines in the wheel. [EDIT] Oops. Thos aren't splines in the wheel, they are normal markers. Well, add two splines to the track that match up with those normal markers in the wheel...
-
Congratulations Largento. Here's to the next 100!
-
Scarecrow of Oz 2_10 - Draft - Trot Meets Gloria
HomeSlice replied to HomeSlice's topic in Work In Progress / Sweatbox
That's a good idea David. -
That is strange. I don't know why that happens. Maybe post this issue in its own thread and hope Yoda will see it?
-
When doing test renders just to see what is happening, it helps to render at the lowest resolution you can get away with while still being able to see what tis going on. Also, rendering multipass with 1 pass speeds things up to. I think I read this is a new feature Steffen added to that latest A:M (15J+). It is supposed to help speed up fluids in real time I think.
-
9e471f4d180b08d62b00
-
Angelo delivered the Foley for sequence 2_09 and 2_10. Soooooo - here is a new draft edit with foley and sound design Will upload 2_10 shortly. cb43975065399b0d1e48
-
Nice car Can't wait to see the Super Mega Fox cartoon!
-
Happy birthday Robert
-
Properties for most of the default Post Effects are described at the end of this tutorial. http://www.hash.com/forums/index.php?showtopic=30168
-
Can you package up some of your modeling and texturing talent and share it with the rest of us? It's a good thing you weren't boning it. You might have caused a heart attack
-
Or you can use the Nancy method. Set the model to Front Projection Target in the chor. Apply a solid white rotoscope image to the camera. I think this also turns decals white, but bump maps will still render.
-
Beautiful!