HomeSlice
-
Posts
4,676 -
Joined
-
Last visited
Content Type
Profiles
Forums
Events
Everything posted by HomeSlice
-
It looks like the body of water is an ocean, rather than a lake. One of the qualities of the ocean as it interacts with land is that the waves, no matter how small, are always either rolling in, or sweeping out. The water along the shore line is never in a state of rest, like you have in your image. Also David's suggestion of darkening the sand near the water line is a good one. Having said all that, getting a convincing water/land transition is really difficult. What you have already there looks beautiful. I love the colors.
-
Lookin' good Spleen.
-
You can set this up with only bones. You don't need to make any geometry. If there is no geometry, it doesn't matter if it is active or non-transparent. It won't render and there shouldn't be any render hit. If you want to see the rig, just select it in the chor and go into Skeletal Mode. This will also allow you to animate it.
-
cool robot
-
I have no idea. I tried looking for the post that tells you how to completely remove A:M from the computer, including registry entries, but I can't find it. This might be a good one for support@hash.com
-
Very nice Myron. You're our Art Deco "go to" guy!
-
Web subscription or CD version?
-
I haven't tried this, but you should be able to just render with "step" set to 2 or 3 to get that stop motion jerky look.
-
Has someone done this? Or is this yet-to-be-achieved? As far as I know, it is yet to be achieved. I didn't try very hard. But with all the UV tests you have done lately, you could probably get it working.
-
Still have no idea what's going on, but I'm enjoying the episodes.
-
You can get some interesting results that way, but hair leaves are more controllable.
-
The only way I know of is to go into Shaded/Wireframe mode.
-
If you can figure out the UV wrapping/Unwrapping, then xNormal will generate AO maps for your model. I believe you would apply them in AM as Diffuse maps. xNormal imports .X models. http://www.xnormal.net/1.aspx
-
It is actually pretty easy to add little differences like color and minor mesh expanding/contracting in poses. Then you don't have to manage ... a whole barrel of monkeys.
-
Are you talking about the grid? You can turn off the grid in tools > options > modeling (check the box by "Display Grid").
-
Awwww ... they look too cute to be evil monkeys
-
Select the parent bone and hit the Translate Manipulator button, then use the manipulator to move the the parent and all its children around. Use the Rotate Manipulator to rotate them. Use the Scale Manipulator to scale them. For your particular character, since it is pretty simple, you may be better served by learning how to build your own simple rig. Give it a try. Once you are familiar with the basics of building your own simple rig, installing some of the other rigs will be a little easier to understand. Robcat has a couple of video tuts to get you started: http://www.hash.com/forums/index.php?s=&am...st&p=206902 http://www.hash.com/forums/index.php?s=&am...st&p=306495 And here is one on using the various constraints: http://www.hash.com/forums/index.php?s=&am...st&p=249019
-
I've never seen a sexy, voluptuous, naked bird woman before. You might start a whole new paradigm. It's good to see the land of Zandoria is still alive.
-
That's a nice mushroom!
-

Trying to get one project finished
HomeSlice replied to JavierP's topic in Work In Progress / Sweatbox
Ahhh, OK. Thanks for explaining it. -
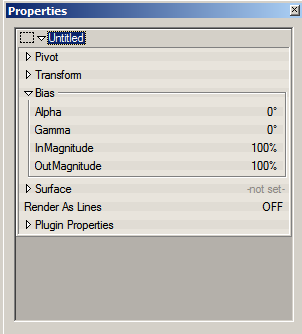
First, make a copy of your original model, so you can go back to it if you need to. Then try reducing by 1/2 (more or less) and see if that helps. Make a copy of that model too. Then reduce further. See how far you can reduce the splines while still keeping the necessary form. Once you can model effectively with the minimum number of splines possible, it is easier to add density while keeping a smooth mesh. I don't know why that is ... it just worked out that way for me. The settings for adjusting the Control Point Bias for each CP are found in the Model's Properties panel, under "Bias". You can drag the mouse horizontally over "Alpha" or "Gamma" to increase or decrease the values. Alternatively, you can click on the "Show Bias Handles" button up in the main toolbar to show a pair of handles for whichever CP is selected. Then you can drag the handles around to change Magnitude/Alpha/Gamma.

-
I guess Germany has something against Queen and John Mayer?
-
Trying to get one project finished
HomeSlice replied to JavierP's topic in Work In Progress / Sweatbox
Is this a new feature I've missed? How are you "auto-mapping" UVs? -
I don't know. I've never had that problem, so I can't guess what the issue is. I'm still on XP, so maybe it is some kind of Vista specific thing?
-
One thing is that there are 2x or 3x more vertical splines in the legs and body than you need. And there are far too many splines in the front of the body, throat and lower lips. The more splines you have, the more careful you have to be about tweaking the CPs to form graceful curves. If you think about it a little, it makes sense why this is so. You may also want to check the biases (alpha and gamma) for the CPs in the problem area. You may be able to tweak either the alpha or gamma to smooth out some of the areas, but first, you should get rid of a bunch of those vertical splines. One thing you can do to accomplish that is to use hooks up near the hair to end some of those at the forehead and side of the head, instead of running those splines all the way down the body.