robcat2075
-
Posts
28,261 -
Joined
-
Last visited
-
Days Won
404
Content Type
Profiles
Forums
Events
Everything posted by robcat2075
-
In the Pose window or in the Properties window under "User Properties" If you do this while you are looking at the model in the model window and then resave, that will be the default for the model If you do this while the model is selected in a chor or action window, that will be the state only for that chor or action.
-
One not-quite-related tip... when you are animating anything with this AM2001 rig, turn off the "balance" and "balance steady" sliders. Auto-balance is a bad feature you don't want.
-
What Spleen said. It looks like there's a small black area on his right leg in that Cp assignment view. That suggests some CPs are still assigned to the model bone. Make sure you have Lock CPs off while you are lassoing CPs
-
There's a few things I'm not sure about. You have two actions runcycle(which uses stride length) and runcycle16(which doesn't use stride length) The one with stride length has the stride length mis set. The stride length should represent the distance from toe to toe or heel to heel rather than from rear heel to front toe. Heel to toe will be too big a value and will make the feet appear to slip if you use the action in a conventional manner on a path. Is that why in runcycletest you use the one without stride length and are manually advancing the character?
-
I remember him making his last post. That was a disappointing loss.
-
In the movie I put up his slipping is small, maybe less than the length of a toe. Is that what you are referring to?
-
scroll? you mean scrub thru the timeline? In "runcycletest1" he looks to be moving forward.
-
Here's what i see in the front view. dblhelixruntestH264.mov I'm not saying Pixar will be calling when they see this, but he does appear to be moving forward and his feet appear to be not slipping very much. Tell me what you mean by "skiing". His feet not lifting much?
-
There are two chors in the one PRJ runcyclebuild has him running in place runcycletest1 has him moving forward.
-
When i load that and play Runcycletest1 he is moving approximately forward, not sliding in place. What part is not what you expected?
-
I was impressed that Rodney's worked because I don't know how he got that to stay all lined up without bones and constraints.
-
Here's a simple bones version SphereandBars.mov Using snap to grid when modeling and boning helps make everything align right. The two bones have "Aim At" constraints to the sphere with "Stretch to Reach, Z-Axis Only" turned on BarAndSphereJoint01.prj
-
Possibility... Each bar is a separate piece, cylinders that have the same diameter as spheres that are placed at each junction. Each bar is boned along its length and "scale to reach" is used to make each one size itself to reach between the spheres. If the bar ends and spheres are aligned exactly they will appear as continuous. The spheres are animated and the bars follow along with them.

-
Yes, you can vary the shape and size and distance from 0,0,0 to get different results
-
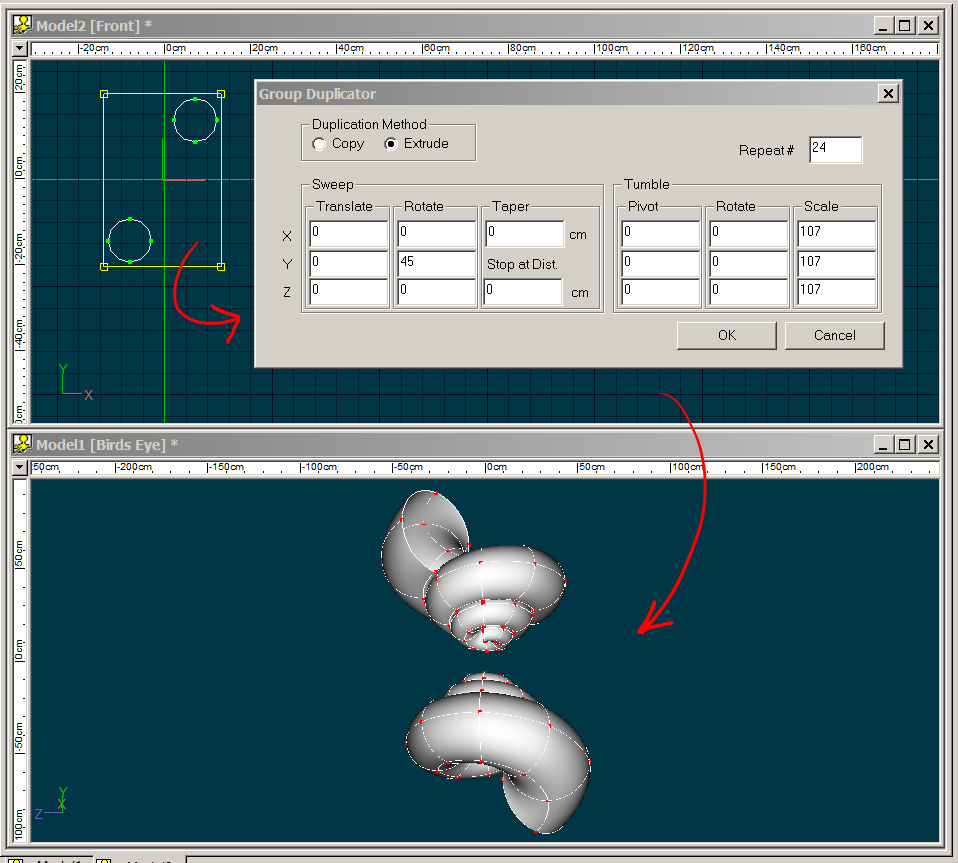
Hey, how about some antennae on that snail? Here's an example of using the dup wiz for a shell. Vary the "scale" values for different shapes.
-
I used to have a tut up somewhere on how to use the dup wizard to spin out a seashell shape but I can't find it .
-
"patch Image"? create a group, and select apply patch image and choose an image you have loaded already
-
In the PWS or the "Timeline" window click on the small red,green,blue icon at the bottom of the right pane. This turns on the curve view. If you have "Show bias" (same icon as for modeling mode) turned on you can manually adjust the slope of a selected CP. you can also group select several CPs and set their slope in the menu or by using the 7 8 9 0 keys at the top of the keyboard. You can also use P or O to peak or unpeak CPs, like in modeling mode my Keyframe basics vid covers a bit of this. See the screencam tuts link in my signature.
-
i won't be able to jump into this on Oct 6 so new deadline October 20 This means if you thought you didn't have enough time to do a segment, you now have 6 weeks to give it a try! Of course you can still turn in your segment on October 6 if you feel you're done.
-
How about if some particle "blobbies" hit a transparent plane in front of the camera?
-
Is he originally a gumball machine?
-
Flash has that power that can align/distribute all the right edges, for example, of several objects simultaneously. But A:M tracks groups by their geometrical center which doesn't lend itself to aligning the edges of dissimilar objects. In any event there is no quick Align/Distribute tool in A:M. I think you're going to have to eyeball it in an orthogonal view.
-
nice shot. Is the landscape imported from a polygon mesh? I see triangles in it, which are causing creases. Are you using materials for the textures on the landscape? If you "baked" those to decals that would probably speed up the render times.
-
It sounds like you've moved onto a different problem, this isn't a use of the duplicator wizard. If you want to snap CPs to the grid exactly, select them, >Snap to grid. That snaps in all grid dimensions however. If you need to align a group to just one coordinate, select the CPs, set its pivot (found in properties window) to the place you wish to move to (say, x=10), then scale on X to 0%
-
Do you mean in other versions it works fine? I'm not sure what you mean by "it only works on the horizontal grid lines" Shoe us what you have after the first row of bricks and what your next dup wiz settings are.