robcat2075
-
Posts
28,261 -
Joined
-
Last visited
-
Days Won
404
Content Type
Profiles
Forums
Events
Everything posted by robcat2075
-
that's not actually the whole A:M window but it will do... The bottom pane is the "Timeline" window (alt-2). It shows keyframes and channels for whatever is selected or whatever you have pinned. It will show properties too if you have "show properties triangle" enabled in your Options and have pressed that triangle. The red-green-blue lines icon you have pressed now and the six dots icon next to it (lower left corner of the Timeline's right pane) choose between the keyframe view and the channel view. The top left pane is the PWS. It's like the Timeline but it shows a line for everything in your PRJ even if they are unselected. I like to detach the PWS and spread it out on my second monitor. The bigger your PWS is the more you can take in about what's going on. That null doesn't look wildly enlarged. You can load another Thom to compare sizes. It looks ok to me. If it's distracting you can switch back to Director mode (F9) while you watch your animation play and go back to Skeleton mode (F8) to animate. I do that frequently. Those modes have buttons at the top as well.
-
there are two properties windows already open, one of them has a headline that says Properties, the other has a pin on the upper left corner and no headline. both say scale values are a uniform 100%. Can you show me a screen cap of the whole A:M window with that stuff showing? Make sure the null is selected.
-
select the null and then look in the properties window (alt-3 brings it up). What values does it have under Transform>Scale? try setting them to 100% if they are not.
-
I'm still not sure what you are describing. Can you make a screen capture movie of it going in opposite direction s?
-
picture?
-
Something is very wrong if it's going in the opposite direction. watch this... clip0004.mov
-
concisely: no comprendre. does non-perspective mean not bird's eye? toggle what and what - non-perspective to bird's eye? i tried but no? the backslash key ( \ ) should be at the end of your QWERTY row of keys Here are two birdseye views from about the same view point. This one is in perspective mode, notice the grid lines converge in the distance: This one is in non-perspective mode. The grid doesn't converge. I often have to zoom back out after a \ toggle. it seems to reset to some arbitrary center point. I find non-perspective mode confusing in birdseye views. I feel like i'm looking at things inside out sometimes. But I prefer non-perspective for the regular box views (the 0 2 4 5 6 8 keys) it is big and 16:9, the screen size is also an issue and yes, after the double monitor-discussion i had a millionth consult with my Techie and and i'm cleared for a 2nd screen. don't remember the specs 'cause i'm still not ready to move on that either, my problems are so-hoooo basic. no point in investing if i'm not able to be happy doing this and you know i'll be grinding teeth for some time to come. I'm glad you're asking questions instead of going away mad. I think if we just clear up some simple mis-steps it will go ok.

-
above comment edited. Just so you don't miss every fabulous word I wrote.
-
7 is the current birdseye view. Whatever you last left it with. 8 is back view by default 0 2 4 5 6 8 shoudl be non-perspective views although they can be toggled with \ 0 2 4 5 6 8 always retain their "angle" i.e. "front" always shows front but the position they view from is remembered. For example if I'm looking thru the front view (2) and use M to scroll to the side about 50 cm (perhaps to re center on a walking character), the next time I hit 2 it will return me to that front view that is 50 cm to the side. It's still a front view that is facing straight back, but it is facing straight back from a point that is 50 cm to the side. The amount of (Z)oom you have in these views is also recalled. It you used (T)urn to spin away from a 0 2 4 5 6 or 8 view, then you are automatically in a birdseye view and the standard view you left remembers its last position before you birdseyed out of it. I think these are even remembered with a PRJ save but I'm not sure. I'm glad you have a number pad. That must be a big lap top! Does your laptop support plugging a second monitor in the back for extra screen space?
-
And that's not even a top-of-the-line CPU anymore , that's a Q6600. I see this ending in tragedy! We'll do it in front of a phony bluescreen background so it just looks fast!
-
I'll just note that in the Tools>Customize>Toolbars window you can turn on a panel of View buttons that can do anything the number pad keys do, but they're on screen so you don't have to reach for a number pad that may not exist on your lap top. Additionally it is possible to construct a new panel of any buttons you want. In this post I show a custom panel I made that imitates the layout of the number pad. I made that when I was experimenting with using my Cintiq pen for A:M. I prefer a mouse for A:M but the custom panel thing is handy. You can drag any button from the Tools>Customize>Commands window to a blank button area and it will start to make a new independent panel.
-
How about TheDifferentViewsWeChooseWithTheNumberpad? I don't know really, except that they are "views". "top view" "front view" "side view" etc.
-
It's promising but that's only 3 steps. Can you do at least 4 (6 would be better) and then we have something to work with. With more steps it's easier to see if something wrong is just a fluke or if you are posing it that way repeatedly. Leave out the "passing pose" And to make it easier to see, pull the light back so his feet are casting shadows for every step. When his feet don't cast shadows it's near impossible to tell if they are contacting the ground. You got the Hold interpolation right! Most people are baffled by that.
-
Heavenly!
-
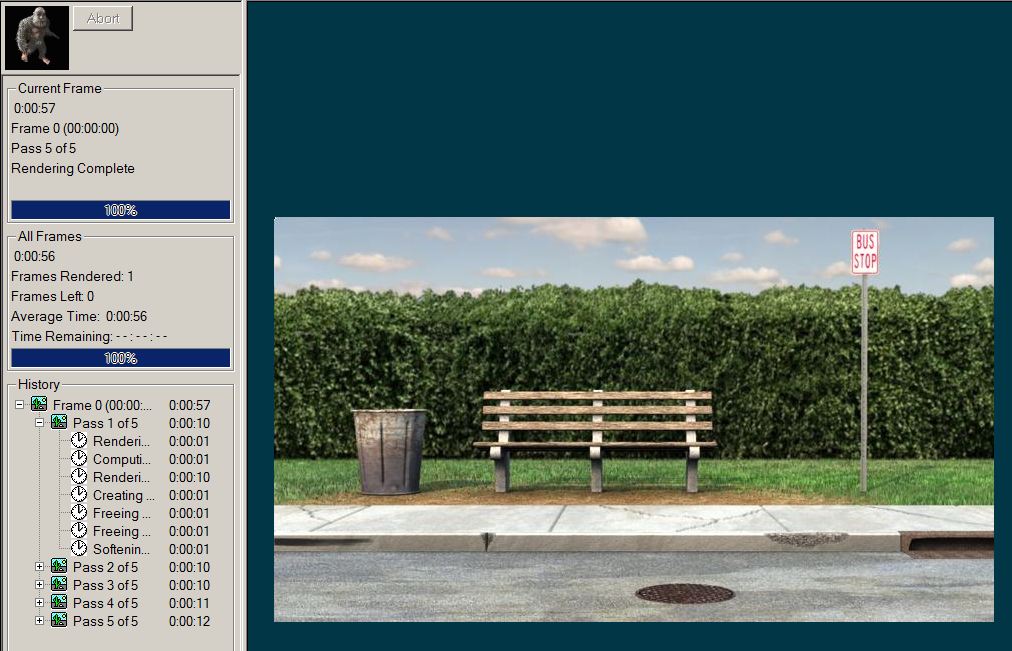
0:57 on my new PC with the v16 beta! That's smoking! v15 comes in at 1:39 which is still dramatically better than the ~6 minutes it got on my old PC.
-
What version of A:M are you using? The small data folder is installed with the regular installer if you have the download A:M If you have the CD the file is on the CD.
-
Very impressive. You should make a "tour" video when you are done.
-
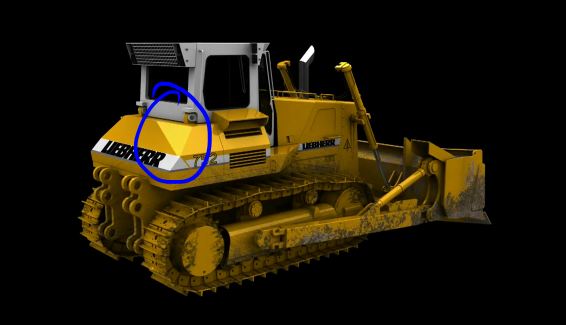
Wonderful model and wonderful texturing! This was my inaugural attempt to watch HD Youtubes on my new computer and it looks great. My suggestion on the render would be to find a way to soften the edge on the highlight reflection. Is that a card you have off camera? Or maybe the highlight needs to be not so straight? Maybe some sort of slight bump map on the larger flat surfaces would give it the waviness of a real sheet metal part.
-
That's looking better. The foot is being lifted higher than is really should. however, lets try an experiment Start a new chor and pose out just the heel contact poses for about 4-6 steps. pose the whole body, arms and torso and everything, but for now just key frames at the moment of the heel contact poses. Like Richard Williams has drawn in his book. Use hold interpolation so the character snap's from one key to the next with no in between. Then post that and we'll look at it.
-

Recent TV spot done in A:M
robcat2075 replied to John Bigboote's topic in Work In Progress / Sweatbox
An A:M success story! I was impressed that the girl seemed to be looking in the right place. That's the sort of thing that can end up very wrong. -
I don't think I've seen that version before. That turned out well!
-
Which nobody can deny! Keep cranking out those tunes!
-
You got at least until Oct 6. Which ever you think is the best of the two. No specific time limit. I was guessing most entries would be around 10 secs. Hold off on sending it. We may need to use some intermediary service like "drop box". And I need to get my new PC going.
-
Render settings update 8) Rendering In your Options Panel set rendering to "use camera Settings". That will load the settings stored with the camera when you go to render. The camera is set to render to a JPG series. An image series was chosen instead of Quicktime so you wouldn't have to render your animation frames all in one stretch. Resolution: The camera is set to render at 720x405. If you prefer you may up the resolution to 854x480 when you go to render. This is 40% more pixels and will take 40% more time to render. I'll edit the video at the larger size and upscale smaller renders to fit. Either size is acceptable and both look fine for most purposes.
-
Ok, i understand. Before you do a final render, find out what is making them appear so bright. i don't think they are supposed to look that way. They my have an ambiance setting on by mistake.