NancyGormezano
-
Posts
7,863 -
Joined
-
Last visited
-
Days Won
15
Content Type
Profiles
Forums
Events
Everything posted by NancyGormezano
-
I believe for the 2008 rig (last I looked) that you will find that the forearm geom bones have euler limits defined in the Basic Setup relationship. (Rig folder). You can change those values or eliminate the limits there.
-
oooo...evil...charming!
-
I like! I like! Nice composition, nice feel, nice cloth, nice dance!
-

"Garrett" selected fro showing at festival
NancyGormezano replied to frosteternal's topic in Showcase
yayyyy!!!! Good for you Jesse! GO GO GO and go see Yellowstone, and that entire area - all wonderful -
Wow! That turned out fabulously! Amazing ! Not a bickus-dickus to be seen anywhere!
-
Employee of the Month award
NancyGormezano replied to robcat2075's topic in Work In Progress / Sweatbox
Perhaps Robert worked at Argoyle the Gargoyling Mouthwash Company? It looks like a Satyr to me (goat man) I too, in my past life, have been named employee of the month (numerous times). Eventually I realized it meant that I was putting in too many extra hours and not being paid for it. -
The flickering bickus-dickus = the scantiscinty sparkly effect as one flies over time (I repeat - amazing job!)
-
Wow Weee. Neat, fabulous, impressive job! Are you going to follow the same "flight path" for the final result? And if so, I am wondering if you plan to do something to minimize the obvious temporal scintillation?
-
Have a wonderful & many more wonderful Birthdays!
-
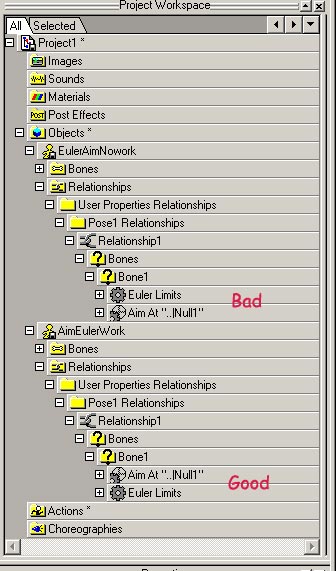
What Robcat was suggesting was that the order in which the constraints are applied is important I found that "aim at" followed by "euler constraint" works, but that "euler constraint" followed by "aim at" doesn't. It is also true that you can reorder the constraints in the "relationship" by dragging them in the PWS. And it is also true that once you've re-ordered the constraints - it is best to save the model, delete it, than re-import it. The changing of constraint order doesn't seem to "take" for me unless I do that. That is why I suggested something different, as I hadn't closed the model, but Robcats way is best. AimEulerWork.mdl EulerAimNowork.mdl

-
Have an explosive, clothy, liquidy, hairy, treezy mayhemilicous safe Birthday, JohnL3d (aka Tinkering LemkeGnome)! EDIT: What could be more appropriate on this auspicious day than a trip down cow memory lane ?
-
You may have better luck if you also use a "translate limit" constraint on your rear center NULL target (eg +/- cm for x,y,z), and have your rear center pad "aim at" the null (with no euler constraints).
-
I am guessing that you didn't delete the material (darktree) from the baked model (the one with the decal) after baking. You were probably rendering with the decal & the material both on your model. I just tried it again. When I rendered 9 pass with AO - the material only model took 2:25, the decal only model took 1:46. When I had both the decal PLUS material on the model, it took 2:32. Here is a project with 2 chor (1 with material model, 1 with decal model) - try rendering both and tell me what you get. If you still get the decal model taking longer then something else is going on. comparebakedecaltomaterial.zip
-
looks terrific!
-
Not Rendering Correct Frame - What am I doing wrong.
NancyGormezano replied to Gorf's topic in New Users
You have keyframes set on your model at frame 29.5 and at frame 30. When you go to render without hair, it seems to render frame 30. When you go to render with hair it is probably rendering frame 29 (or 29.5). Since you didn't include the hair material, can't check to confirm. Doesn't matter why, you will have to make a change. Do you really want a key frame at 29.5? Delete the keyframe you don't want & move the one you want to frame 29 or frame 30.
-
The cylindrical map will always be applied as if you were applying it in front view, and centered in x direction, regardless of how you position the image before hitting apply. The y extents can be varied - but not the horizontal or x extent for the original stamp. It will always have a 3 x 1 repeat. So perhaps you are trying to do it from some other view, and trying to offset it in x in some way? After you apply the image with cylindrical map - you can then change the repeat & how the decal is mapped by using A:M's uv editor. But your best bet is to create the image to be used with the imagery that you want to be on the front centered in the x direction.
-
Techical Help with Decaling Needed
NancyGormezano replied to UNGLAUBLICHUSA's topic in Work In Progress / Sweatbox
I will add my confusion to what I think you might be trying to do: if you are trying to get CLEAN edges along your non-parallel wavy horizontal splines - you may find it easier to apply separate cylindrical decals to separate groups - In my example I've made 3 groups: top, middle, bottom. For each group - I select it, hide the others, then apply a cylindrical map decal - And I end up with 3 decal containers. You can then paint in PS or 3D painter the 3 separate images. I never did understand why you had made some of your horizontal splines wavy. There was no reason to if you were only going to use 1 image to decal it, but now I'm guessing that you probably wanted to use the splines as a guide for decaling?
-
Nice imagery!
-
cute!
-
If you are in front view and have selected the null with the translate manipulator (N) - then you can only move the null using any of the "exterior" handles - you will not be able to move it from the pivot point. And yes you can move it in screen space in birds eye view from any of the handles or from clicking anywhere in the window. It's just the way it is.
-
well done Marcos!
-
Oooo...looks great! Loved the water, lighting, and...the singing!...makes me wannabe a pirate too and sail the ocean...er...orange
-
Looks great ! Well done! & thanks for the description of how you did everything. I for one though, am looking forward to the next scatalogical episode, in which I assume you demonstrate how this litter deals with..um...kitty poo?
-
Fun! well done!
-
Animating an object from wireframe to textured
NancyGormezano replied to pierrotsc's topic in New Users
I took out the background rotoscope, and the background sphere - but left thom ver13 model (I did this in ver16). Hope this helps. wireturn2Cyellowthom.prj