NancyGormezano
-
Posts
7,863 -
Joined
-
Last visited
-
Days Won
15
Content Type
Profiles
Forums
Events
Everything posted by NancyGormezano
-

playing with balls and lights - Newton+Radiosity
NancyGormezano replied to Xtaz's topic in Work In Progress / Sweatbox
I rendered a sequence last night. Here's what I got rendering 1 pass for frames 80-221: No radiosity, No DOF, deleted geometry for the light balls, Flare ON/Fade with distance. 10 secs/pass at 640 x 360 EDIT: I do not see a deformation in the original geometry of the balls. I do see they are NOT centered at 0,0,0. Is this what makes the models move more interestingly when you simulated using Newton? Love it! 80_221h264bestLoop.mov -
playing with balls and lights - Newton+Radiosity
NancyGormezano replied to Xtaz's topic in Work In Progress / Sweatbox
Thanks so so much for the project ! Your results are very interesting looking. Terrific! However, those radiosity settings are a mystery to me. How did you arrive at them? I did notice it would probably take over 10 mins plus/frame (at half size res = 640 x 360) if I used radisosity (frame 0). But I could not get it to render past 1 pass (crash). If I turned off radiosity, all was ok I also noticed that if I deleted the (transparent) geometry for the Light balls (but left the bulb light), and turned off radiosity, DOF, then 1 pass render time (frame 23) went from 43 secs down to 10-13 secs. I did not try to see if then radiosity would render. (I may still) I also noticed that if I set Fade Flare effect based on distance = ON that one could also get interesting effect, different from yours of course, but only took 10 secs (NO radiosity, dof) - see image (1 pass) Thanks again.
-
playing with balls and lights - Newton+Radiosity
NancyGormezano replied to Xtaz's topic in Work In Progress / Sweatbox
pretty, pretty, pretty! love the Twinkle sound as well -
rendering issue with forces
NancyGormezano replied to jason1025's topic in Work In Progress / Sweatbox
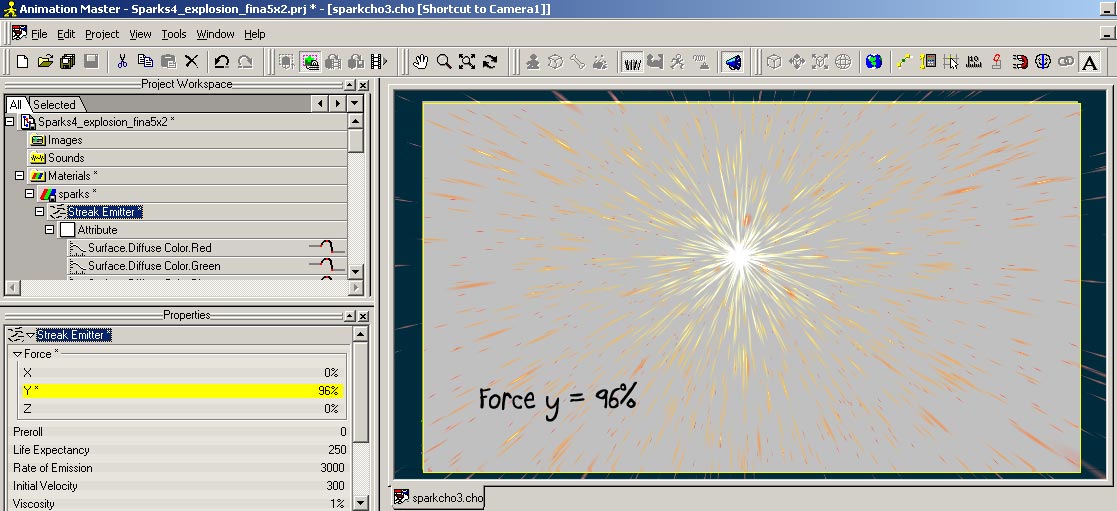
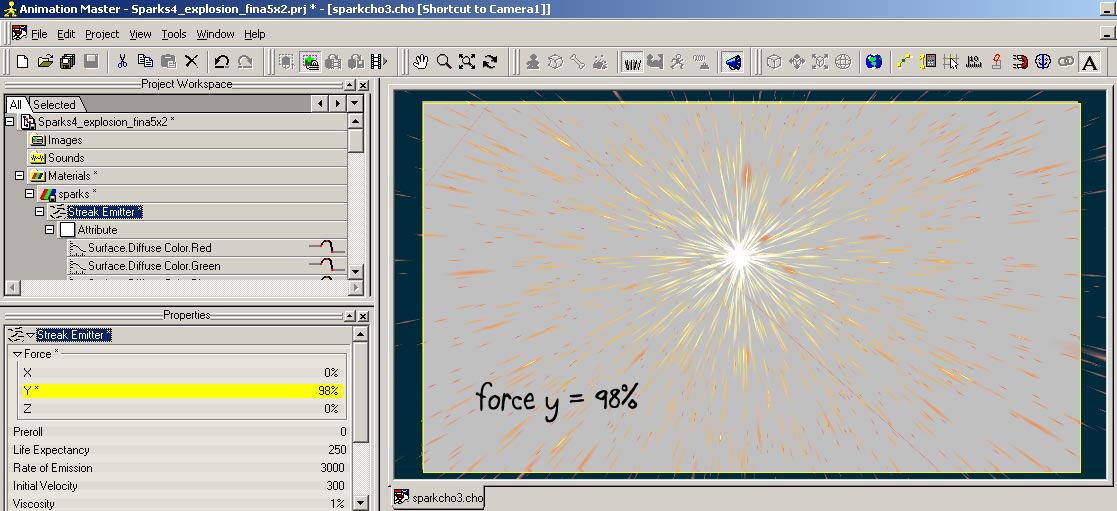
I deleted/simplified most settings, ie, just about everything in your (Robert's?) project except left only the sphere/spark material. I noticed you had force.y = 99.9 % in the spark material I noticed that when I changed that value, the placement, appearance of errant lines would change (frame 23 in my project). In my frame 23, I could make lines go away if I kept force.y less than 97. Play with the force values to see when they disappear for you.
-
I believe there is a Thom with hands (2008 rig), located at this post , in the Example Models zip file
-
Hmmm...almost sounds like you are using outdated cloth method. I didn't look at your chor, nor read the TAOA:M, however Holmes' Tutorial on SIMCLOTH is more up to date. Have a look, this is more likely what you should be using, assuming you are using ver 15 or ver 16 (and even earlier).
-
yayyy! Please tell us what you did, so that it can help someone else someday.
-
Fabulous little town! Coincidently there used to be (probably still is) a "Sue's Kitchen" restaurant relatively close to me in Mountain View.
-
I am not a MAC user - but I believe you might have to monkey with "permissions" as discussed in this thread. I hope that helps. This seems to be a common problem. I wish it were in some readme text or at least pinned somewhere.
-
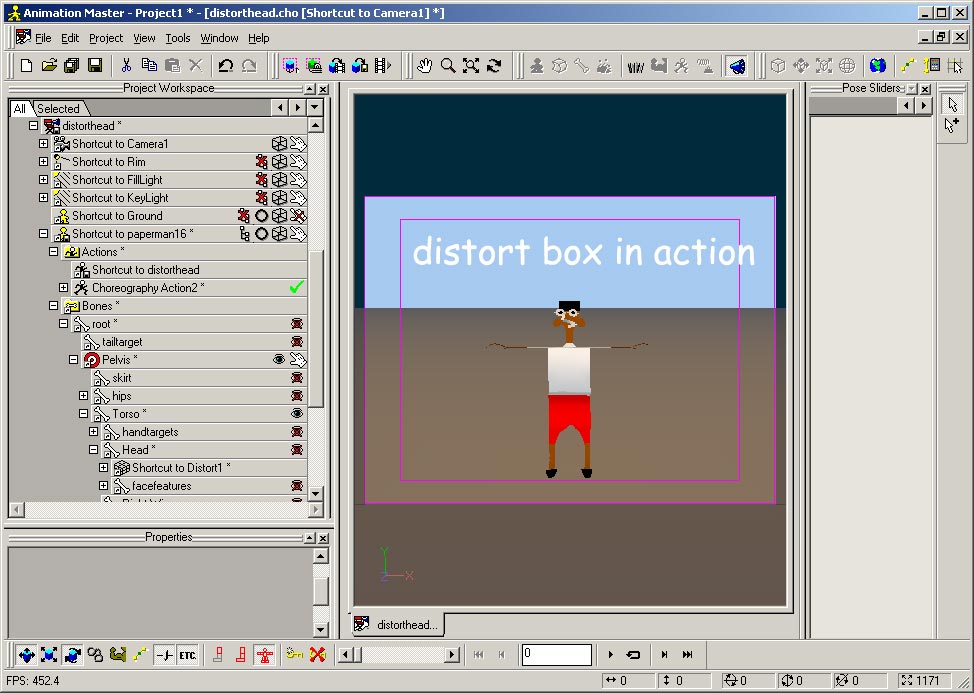
EggBot walking through Distortion Box
NancyGormezano replied to robcat2075's topic in Work In Progress / Sweatbox
That looks terrific -
attempting to model again and now partially rigged
NancyGormezano replied to johnl3d's topic in Tinkering Gnome's Workshop
And also - watch Holmes' video rigging tuts (AMFilms?) - part 1, geometry bones, Part 2 is the control rig part -
Ideas for the Next Community Project
NancyGormezano replied to robcat2075's topic in Rear View Window
Oh yes! that does look terrific! - but unless it's used as a roto, could be too long for rendering? EDIT: 23 secs is impressive - is that with fakeao? -
Here's the project (ver 16) I've played with the hair emitter properties (transparency, thickness, density, transparency, bow, length, emitter image, etc), the surface color of the hair group, as well as the hair grooming (this one is probably too smooth for you). You can turn off spec (in Rim light), or dial down the spec in emitter prop. I only have RIM, and FILL lights active. I also used FakeAO (pay version) post effect - so my settings may not work for you hairshaft3lesswilder2.zip
-
give me a sec...I'm hunting it down
-
Try this displacement test?
NancyGormezano replied to robcat2075's topic in Work In Progress / Sweatbox
Cookie cuts have been around longer than multi-pass so they ought to work. Someone should make an AMReport if it hasn't been done for V16 yet. I did awhile ago: report #5974 -
Try this displacement test?
NancyGormezano replied to robcat2075's topic in Work In Progress / Sweatbox
Cookie cut decals also have a problem when rendered without multi-pass. Unfortunately the default cho is set for Multi = OFF. -
Super GOO to the rescue! Hair shaft under high magnification. Had to try using hair material - hair settings - (sprite surface- 50% transparent, 100% spec, combing differently for different looks)
-
terrific character!
-
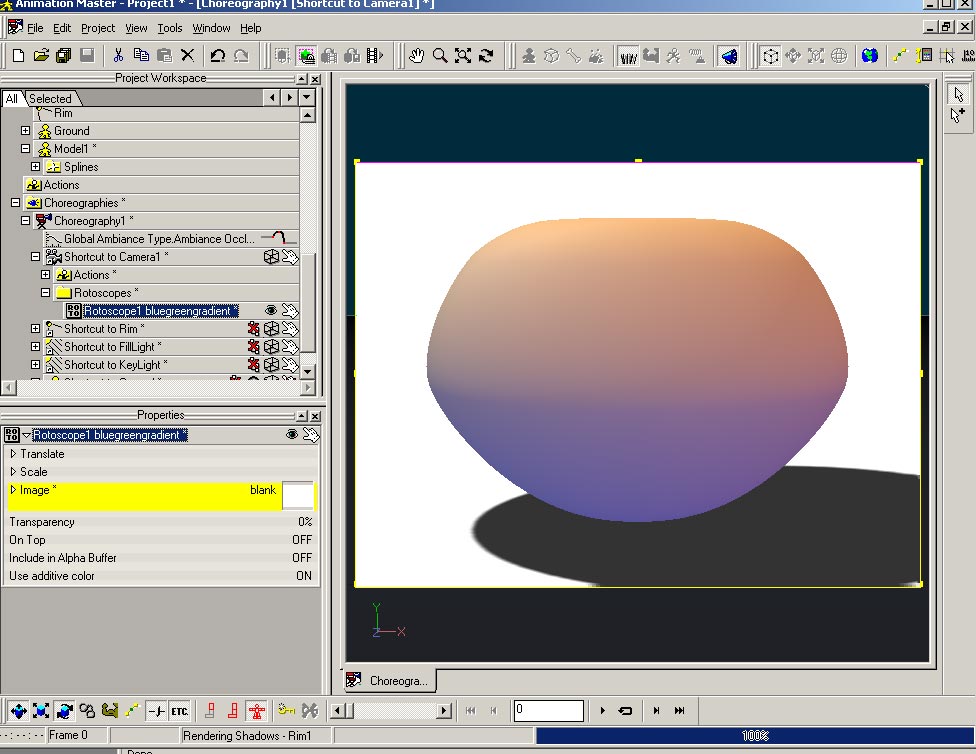
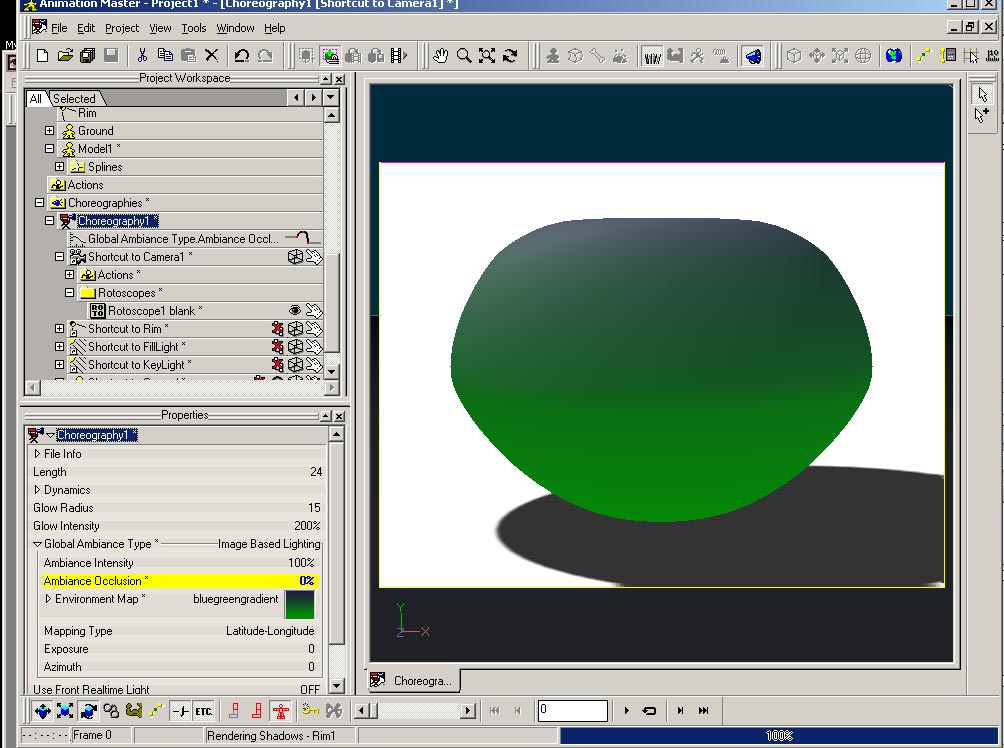
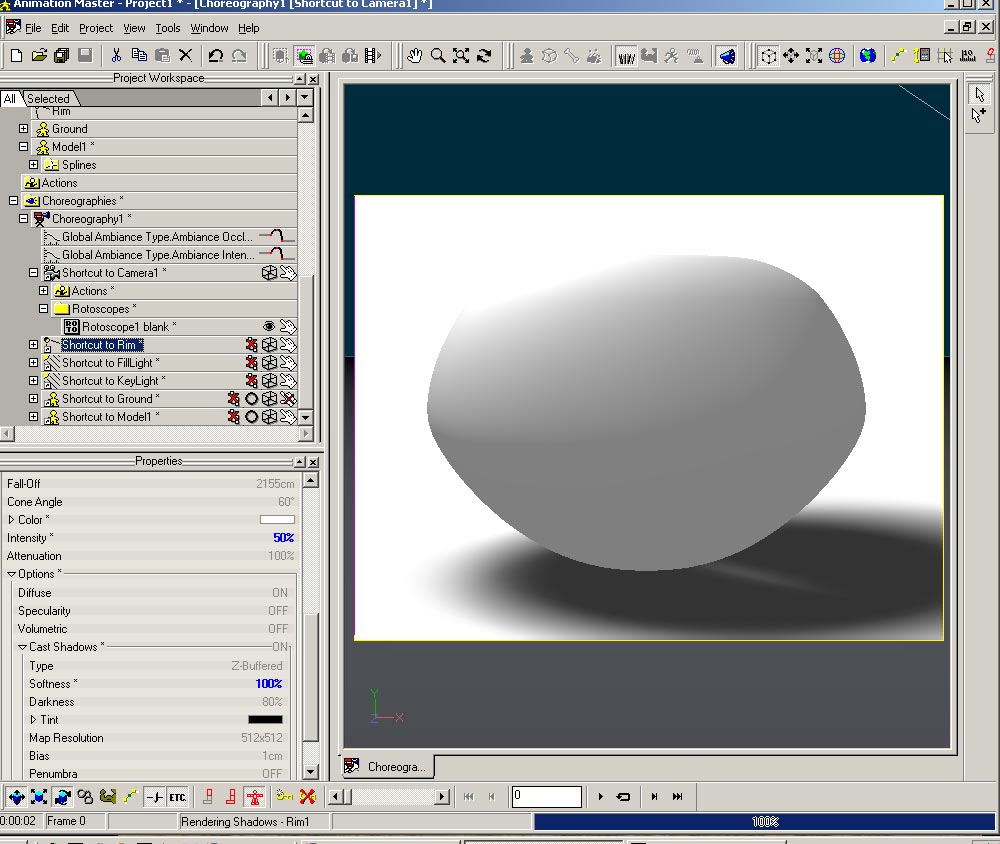
You are confusing front projection and image based lighting. They are separate things. What you have described in the wiki is NOT image based lighting. What you have described is "front projection of the camera rotoscope" - ie. using the camera rotoscope projected on those models that you wish to appear white (overrides the textures). You could use any image. The trick for getting the "clay look" with already textured models is in using a "white image" front projected onto the model. If you want to do "Image Based Lighting", you would have to select the Global Ambiance type to be Image Based Lighting, and then select an image to use as an "environment map", like having multicolored light sources. (In all examples, there is 1 white klieg light as well, some ambient intensity and 0% Ambient occlusion) In my 1st example I'm using IBL with an abstract image to determine the ambient lighting (AI=100%, AO=0%). The sphere has surface color=white, the IBL lighting is what causes it to appear multicolored. I also have a green gradient camera rotoscope front projected on the ground plane. I also made ground flat shaded to show the shadow of the klieg light. On the 2nd image, I used an all white rotoscope front projected onto the ground, but left the IBL environment image the same as first. In 3rd image, I changed the IBL image to a green gradient image (left camera rotoscope white) In 4th image - just to be complete, I made sphere front projected (with white camera roto), changed characteristics of the rim light (intensity, shadow softness) and changed IBL environment map to white, changed ambient intensity = 50%. NOTE: There is problem when changing the environment map for IBL, when experimenting to see the different effects. I find that toggling Ambient occlusion amount (even if not using AO), is one way to get the change to register. For eg if AO=0, I change it to 1, then back to 0, and the new environment map will take effect. If you don't do this you won't see a change when rendering (even to a file)
-
My way as well. But I prefer to render to an image sequence of stills (jpg, png, tga) and have QT pro assemble into a mov, especially if doing longer sequences.
-
wow! that is quite amazing and dizzifying!
-
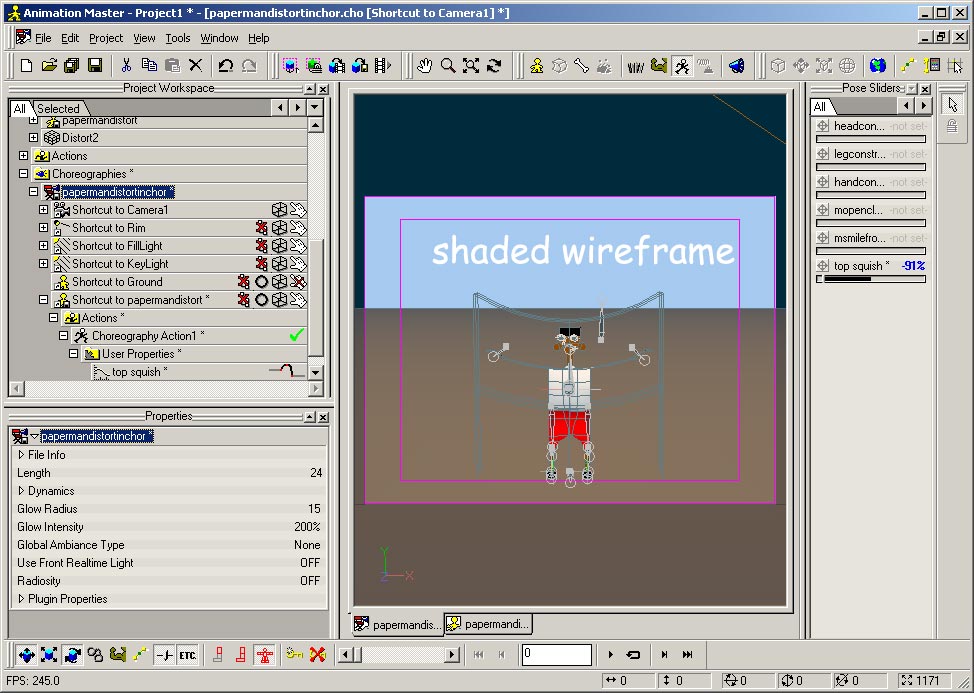
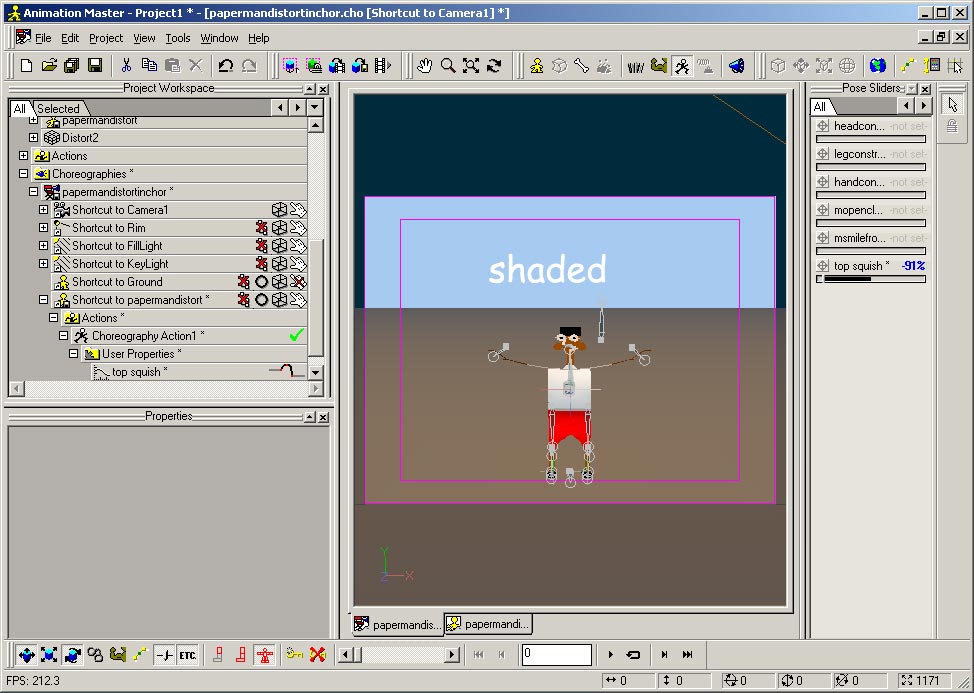
I again found that if I used a DB in an action that at first the DB would be visible in all modes in the chor. If I saved the chor, then started a new project and re-imported chor then DB would not be visible in shaded mode in the chor, but would be visible in shaded/wireframe or wireframe mode (as desired) However I then found if I selected the DB in the chor pws - it would again be hard to make it go away in any mode. However, closing the chor window, and reopening, changing to shaded, made it go away I think if the "refresh" or "re-init" problem was fixed, it could do the trick. But of course a visibility property would be nice. I also think the distort box work flow is a little screwy to deal with. That is where I would prefer to see mods, if any were to be done.
-
Uhhh...now I'm confused...I find that if I am in shaded view mode in the chor, and the model has DB's (controlled via pose sliders), then the DB doesn't show. However if I am in shaded/wireframe, or wireframe then the DB's will show (as expected). I don't know if that helps you. So have you saved your model, saved your chor, and then started new project and re-imported your chor? Not sure if that's your problem.
-
Nice effect!
-
Hmmm...I am assuming you have added the DB's to the chor, and NOT the model(s)? If so then I'm guessing that you might be out of luck, & will have to see the DB's, even if you're done with distorting and unfortunately it is messy. I found I had slightly more control if I added the DB to the model via a relationship, and then made the pose slider control the cp's of the DB. Tricky stuff.