NancyGormezano
-
Posts
7,863 -
Joined
-
Last visited
-
Days Won
15
Content Type
Profiles
Forums
Events
Everything posted by NancyGormezano
-
Ack. Now I'm confused as to what really makes sense to buy. Only reason I thought I might want win7 pro is for compatibility with some very old programs I have (in particular Family tree maker ver 7.5 for one). But I will probably go with home premium anyway. And only 8GB ram And, according to dell it appears that i7 2600 (3.4) is 4 cores with possibility of 4-8 way multi-tasking (is that the same as threads? Hyper threading?), i5 -2500 (2.8) is 4 cores (but only 4 way multi-task). Neither of those can be overclocked but the i7 2600k, and i5 2500k can be. Don't care as I am not an overclocker. I do not like to tempt fate. I was misunderstanding i7, I thought that meant 7 cores (or 8 really with 1 for OS), WELL....a big big duh on me! I don't know what programs I have that can make use of multiple threads? Maybe cs4 After effects? I'm not a gamer, and I only wanted extra cores for extra rendering nodes. But from what I understand now about A:M, the standard is 4 render nodes max with 1 subscription?. I went to ibuypower site - did not see that ibuypower (for same components as the dell) would be cheaper. However, they were offering the ddr3 1600 (instead of 1333), and they were talking about free liquid cooling? There was much to choose, so perhaps I missed it. I'm now wondering about noise levels and heat disipation...And I will probably not be able to use my old old Wacom tablet. (bought 10+ years ago) Yup, me brains are experiencing a major melt down.
-
Thanks again Gerald, Robert. Yes I would just get the 8GB now. And there is a good possibility, given my stellar track record for inertia, might never feel the urgency to go to 16GB.
-
Thanks Gerald for your input, yes the dell ram sounded expensive. I looked up 16GB DDR3 1333 at Frys - $89.99! I'm assuming this would work on the Dell system. Does one have to be careful with respect to manufacturers? or any other form factors to consider for compatibility? I noticed that there is now 1600mhz available, but I assume that wouldn't work with the dell system? EDIT: My husband just told me he doesn't like Fry's (they don't guarantee their RAM, costs extra for them to guarantee it!), nor does he like patriot mfg, so he just told me about Crucial.com, says they are more reliable.
-
Thanks - that's good to know about the OS. Not sure what else my Ram options would be, or if dual channel DDR3, 1333 is anything special. Sounds fast to me, but I am a know nuthin about what's out there currently.
-
Thanks for the links, suggestions Jason, Fuchur. The base system being offered on Dell is $850. - that includes: Base - $849.99 i7-2600(3.4GHz) Win 7 Home premium * 8GB SDRAM ddr3 at 1333Mhz, 4 dimms * 1TB 7200 HD nvidia geforce GT530 (1GB) NO speakers *, NO monitor thx truStudio PC * (16X CD/DVD burner, wireless N, usb 2.0, ethernet, MS Ofice starter, keyboard, mouse, Mcafee 1 yr, 2 yr Limited HDWARE warranty, inhome service, etc) I modified base system, increased price to $1419, now includes: win 7 pro- (added $130.) 16 GB SDRAM dual channel ddr3 at 1333Mhz, 4 dimms (added $360) cheap speakers ($20.) Soundblaster xfi extreme ($60) Not sure I need the win7 Pro ? Only upgraded because I wanted to be able to run some programs in xp mode if necessary (I have old PS, Illustrator, etc software) Definitely want 16GB (maybe this is too expensive?), need speakers. Upgraded sound from integrated sound, to dedicated sound. My current system has integrated, and it is impossible to record voice cleanly Not sure if I care if only has usb 2.0?
-
Seems about right as my current system is about 4 years old, tho I really think processor speeds have stagnated, and will continue to, unless some new technology comes about. The personal dilemma at this stage of life is: do I really feel like finding out what old software of mine won't work on win7, or would I rather plan some more vacations and short trips? Maybe I do both. After all, in the unlikely event that there is any moola left, when I finally "check-out", I'm taking it with me. I suspect I might need some extra pocket money for bribes.
-
Dell 3GHz Intel Core2Duo E6850 1 core 50%? 3GB Ram XP pro sp3 with ver 14c 8:18 ver 15e CD 8:31 with ver 15g CD 9:33 ver 15j+ 9:34 ver 16beta3 32 bit 7:19 Just tried with ver 16b 32 bit 6:01 NICE improvement Steffen! (Wanted to see what bobbesch render times would cost, so I just now configured a Dell xps 8300 with i7-2600, win7 Pro, 16GB DDR3 SDRAM 1333Mhz, 1TB HD, Nvidia geforceGT530, soundblaster - $1419.00...thinking...thinking...beads of sweat forming....)
-
Could not get that "bug" to happen on my system. Perhaps it is a refresh issue? or related to 64 bit version or 16b ?
-
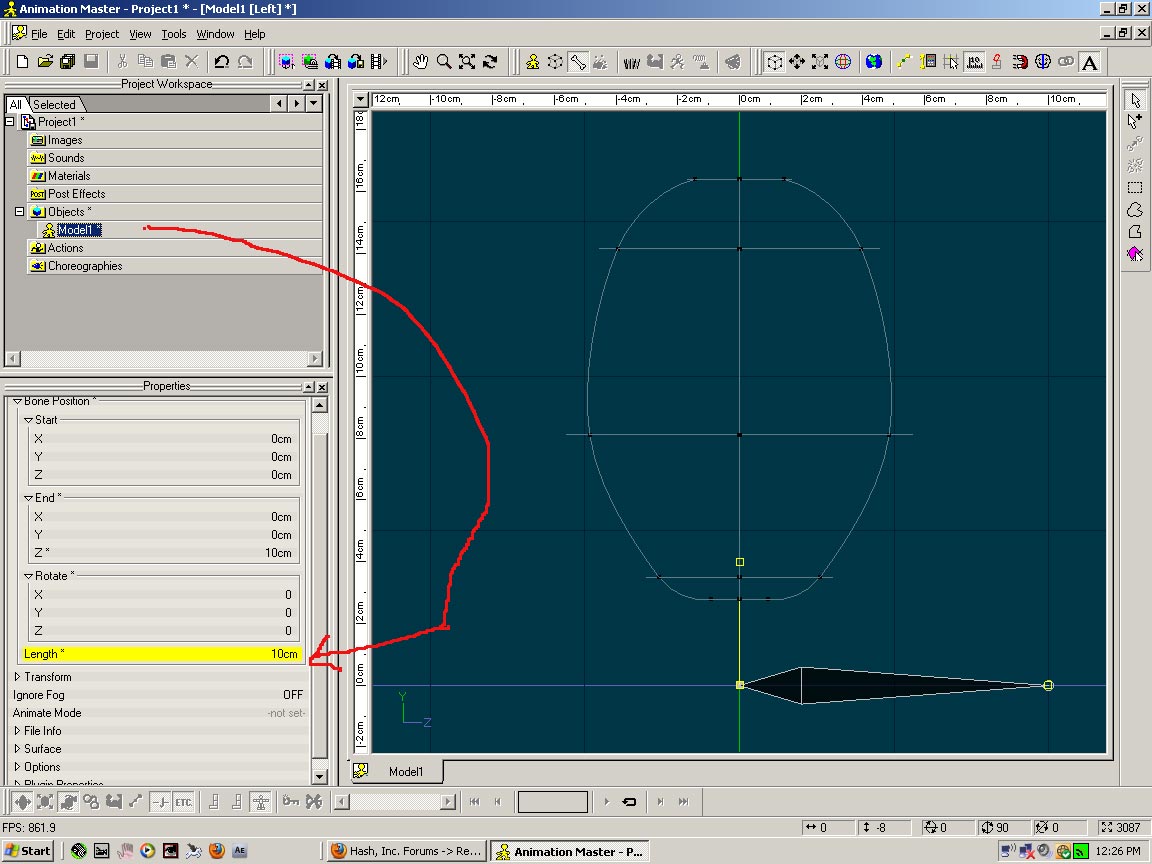
Ok so I don't need to be overly concerned with it. Shouldn't it be larger though? I don't remember scaling it down that small. Also, how do I deselect it so if I start assigning points I'm assigning them to the bones I want and not the model bone? If I click off the model it seems like that bone is automatically selected. You can make the model bone any length you want. I am not sure what/how the default length is determined when one starts a new model. All cps are assigned to the model bone at first, until they get reassigned to some other bone. To correct what you seem to be experiencing (you must have inadvertently monkeyed with it), change the length in the model bone properties. To assign cp's to bones other than the model bone, select the bone you want (eg leg), and then select the cps, using the selection tools shown on my right hand side of the screen grab

-
Ok, that could convince me to get a new computer. I usually jump when I see an almost 3 fold increase in frame rendering time (my last testing was 7:19, and was done with 16beta3, 32bit). I would love to see more specs on your system? eg manufacturer?, graphics card, etc I am guessing that only 1 core was in use, but since I don't have 64bit OS, and haven't tried 16b yet (32 bit), I can't confirm.
-
I like them both. However if the girl has helmet hair, then he should probably be helmeted as well. Helmet hair is faster render, easier control. If you go with helmet, you might want to consider rigging some strands with dynamic constraints for some movement. Particle hair looks nice as well, can be render intensive the denser you make it, and of course is trickier to control with respect to penetration (but can be done).
-
Teerrrriiific! Love the style! EDIT: To what series are you referring?
-
Thanks Chris. Unfortunately I ran into conflicts when trying to tie test sound tracks with a "story". I didn't want to end up with just a dance clip, and I had story ideas that were difficult to blend with existing sound track(s) that I had been trying out. So I put it aside to let it simmer, and I just recently started to look at it again with fresh eyes. I am motivated to finish it. Mainly because it's stopping me from starting anything new! EDIT: Well Lookee here. I did finally finish this, in a serendipitishly-doo-dah-day way Here's the
-
Good looking models!
-
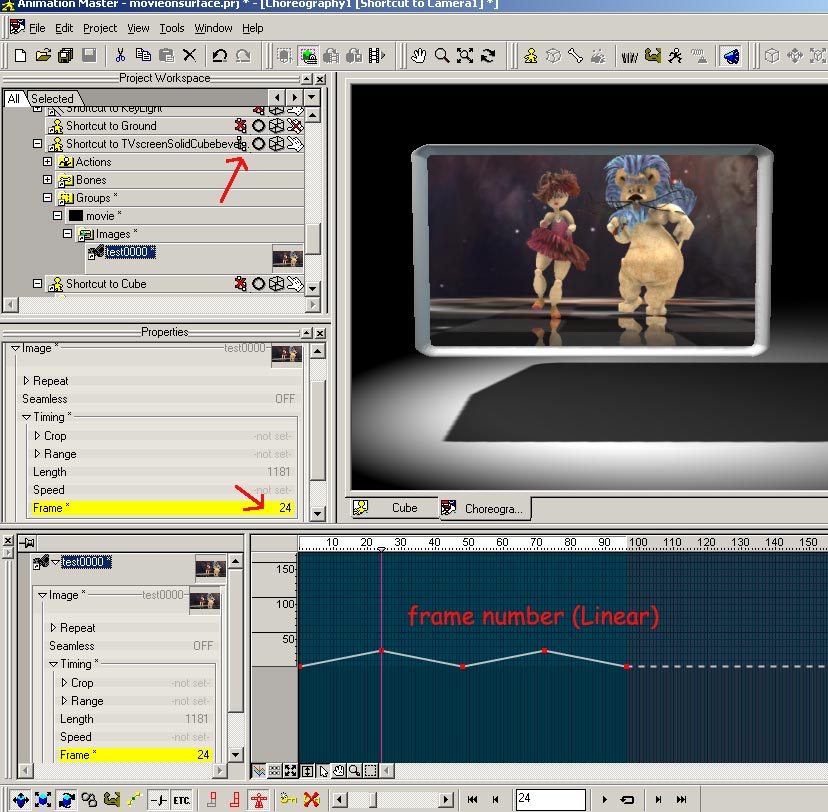
I did something similar using the patch image feature (but should work similarly with decals). Not sure which part didn't work for you. 1) Import image sequence that is to be playing on the "TV screen". My sequence has 1100 png format images, but I will only be playing the first 24, and I will be playing them out of sequence, forwards and backwards 2) create a TV screen model. My TV screen model is 1 group only that has 1 patch. Right click on group/add image/select image sequence. right click on patch and keep selecting "rotate images" until image is oriented correctly, if it doesn't show correctly at first. Rescale patch so that it has same aspect ratio as the image sequence (eg 16:9) 3) Drag TVscreen model to choreography, set options/property/flatshaded = ON of Shortcut to TVscreen, so that image sequence won't be effected by lighting. I've also added another model to chor that is the TV surrounds, and this model will NOT be flat shaded. 4) Click on show more drivers shortcut to TVscreen, open up the group, set the desired frame numbers for the sequence on frames 0,24,48, etc, change curve to linear tv3h264.mov
-

Happy Birthday Rich (vertexspline)
NancyGormezano replied to Shelton's topic in General Announcements
Happy day, oh happy day! -
Thanks Steve
-
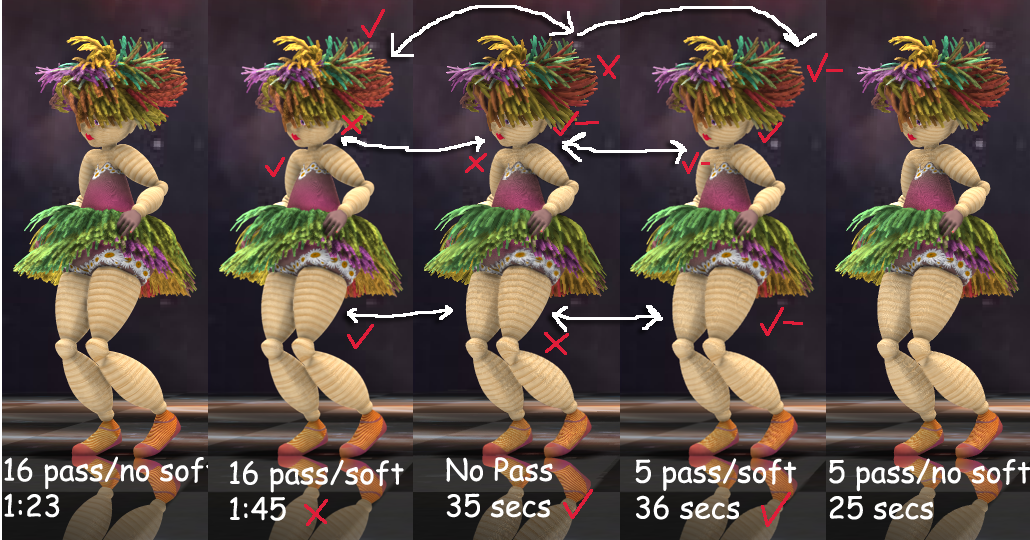
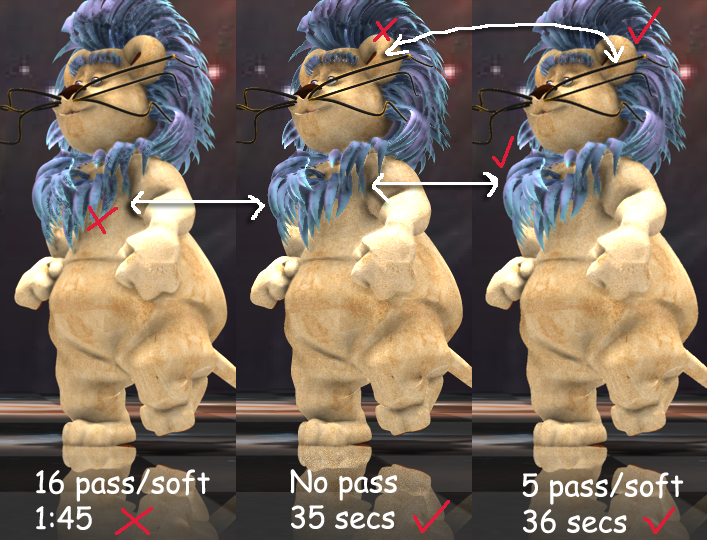
I have found that in general, the best compromise for me (quality versus render time), and in some cases, the better choice is 5 pass/soft=ON, for animation and as well as for stills. Render times for 5 pass/soft seem to equal NO pass. In my case, however: I tend to favor high contrast, high frequency patterns, textures. So I'm always looking for a balance between showing the pattern "noise" and blurring the pattern noise to reduce scintillation, stair stepping caused by movement, that tends to be most noticeable if lines become horizontal/vertical across image. Sometimes I like it to scintillate, as I'm a glitter type of gal. Decals get anti-aliased differently than hair textures, as well as differently than bitmap plus materials or procedural materials with noise or just the geometry edges. If one doesn't have textures, then 3 pass might be good enough, fastest solution for animation. Noise gets introduced by AO and FakeAO as well, looks good in stills, sometimes not as good with movement. I only use klieg's z-buffered shadows, usually with Global ambient intensity (color or Image based) for faster render times. Sun or bulb illumination, ray traced shadows will look different as well, have different kinds of noise. Blurring or softening or extra passes or pixel averaging are about getting rid of the noise, but then compromises sharp detail. In these two images, for example: I prefer how 5 pass looks on the hair (image emitters for both girl and lion) compared to the NO pass. I also prefer the 5 pass face texture (decal) on girl compared to 16 pass - gets washed out, yet her leg texture looks best on the 16 pass (less noise). The lions body texture (bitmap plus material) seems to look the same in all 3, so go with 5 pass. Antialiasing on whisker edges looks better in 5 pass versus NO pass. EDIT: changed images to show differences
-
After you've added an additional camera to your chor, you will most likely want to use an "aim at" constraint on the camera, where the target of the "aim at" is probably the head bone of your model. In bones mode, in the chor window, or PWS, right click on the newly added camera, select new constraint/aim at, then pick the head bone of your model. You may need to adjust the aim after selecting the target if you have compensate off, to center the model's face in the camera
-
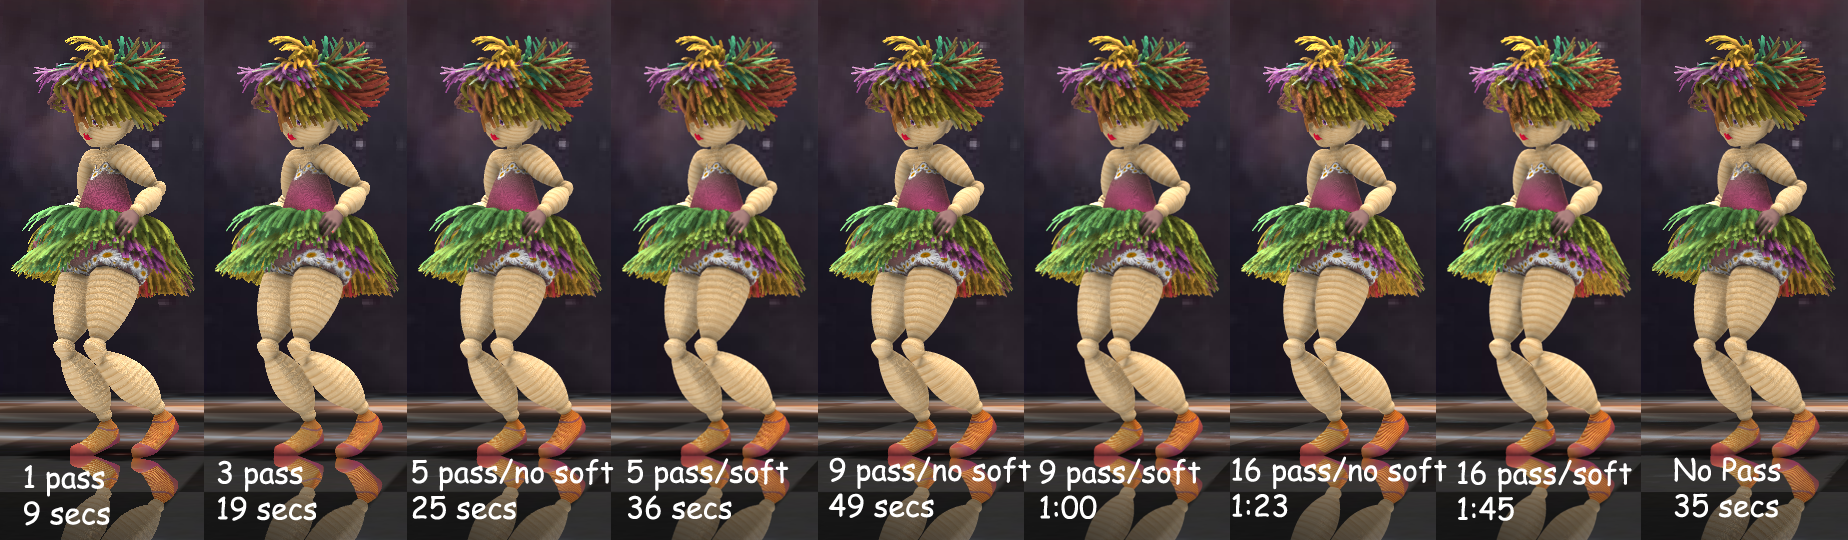
Bump maps in general work with both multipass and without multipass. There had been a specific situation (ver 14) where bump maps wouldn't show up if decals & materials were on the same surface and one was rendering without multipass. I am not aware if this is still the case, nor can I remember exactly what the exact conditions were. It might also have been related to using ray traced, or z buffered kliegs. The option to Soften = ON/OFF kicks in at 5 pass rendering Here's a comparison chart that I did for myself awhile back to evaluate tradeoffs of increasing # passes, using soften feature, and rendering without multipass. My feeling is that there are render situations where 16 pass is overkill. In other situations, maybe not. (rendered in ver 16.0, original frame was 960x540 at 16pass soften=ON)
-
tools/Customize/keyboard/export will get you all the shortcuts in a KeyboardShortcuts.html file in your hash folder on your HD.
-
fabulous!
-
Ooooo...cute...cute...cute...FUN!
-
I believe he has conquered his addiction to Mafia Wars on facebook, and has redeemed himself by becoming a full time? employed nurse. Gotta satisfy that thirst for blood someway, I guess.
-
I like the lensflare, composition! Would prefer the satelite to be more shiny metalically. If going for realism, then I would prefer the earth to look more "blue marbley" I found the larger glow (atmospheric ring) interesting, eye catching, but a bit too large (too deep) relative to the earth size. I found the tighter smaller "atmospheric ring" strange, felt too solid. I will guess that you might have either composited, or used a separate transparent model positioned in front of earth? or used "planet glow" shader (or something like that).