NancyGormezano
-
Posts
7,863 -
Joined
-
Last visited
-
Days Won
15
Content Type
Profiles
Forums
Events
Everything posted by NancyGormezano
-
I've been getting this pretty commonly since v15 (maybe even before that). I have seen that since ver 14, but also don't worry about it, since it renders fine. Noticed it while working on TWO, specifically the hypogyraf.
-
woo hooo - mystery solved!
-

4-6-4 Steam Locomotive & Tender
NancyGormezano replied to R Reynolds's topic in Work In Progress / Sweatbox
right click on the chor - NEW/Folder drag models to folder in chor right click on folder/select children change scale of the first one to 50%, all will have the scale changed -
The file is particular to A:M only. No other program knows about it. Only Martin knows about it. And maybe Steffen, and maybe Holmes. As far as I know: NO OTHER PROGRAM USES IT. You are wasting your time trying to use it. The people who were saying to render to tga sequences, png sequence, avi (uncompressed) were also assuming you understood how to sync sound in some other external non-linear-editing software like QT pro, premiere, aftereffects, etc. Robert's suggestion of going to avi with sound, and then compressing (H264) to mov with QT pro was to give you a path that might be simpler for you for rendering SHORT animations, that you might want to post to this forum. It is not recommended usually for doing any kind of long production. It is always better to render to tga, png, to avoid having to rerender 1000's of frames.
-
4-6-4 Steam Locomotive & Tender
NancyGormezano replied to R Reynolds's topic in Work In Progress / Sweatbox
It's a sickness. No hope. -
4-6-4 Steam Locomotive & Tender
NancyGormezano replied to R Reynolds's topic in Work In Progress / Sweatbox
Ahh, I figured there was something weird about you . Ken models in HO scale, n30, n3, and regular. But mainly he does rolling stock and structures. He also use to manufacture & sell kits (as a hobby-side biz), but is winding down with that. Stevens Creek Models. He's getting much more into photography now. (Sorry Rodger, if this is too distracting. I thought you might also be interested) -
Nancy, I just tried importing a tga sequence into a blank choreography as a rotoscope and it would not play!. I tired it again as a layer and everything was fine. I thought this issue was fixed in the release version of 16? I was not aware it was a problem, as I haven't encountered this problem (PC). Did it not work if you tried to play it in real-time, or did it not work when you tried to render it? EDIT: perhaps you need to set the frame number of the sequence on the first and last frames? If it works as layer for you - then use layer? The easiest for me has always been QT pro.
-
The only one who might have used sinfo files are Homeslice or maybe Martin at one time. I truly believe NO ONE else has considered using them. I could be wrong. If anyone had used them, I suspect they would be chiming in.
-
I am not sure if they were used in production of Scarecrow of Oz, or Tinwoodman of Oz - but since it has the audio file info and the range of frames in which the audio was used for a chor, I am guessing that the info could be manually used (like notes) when editing everything together in a NLE (premier, Aftereffects, qt), and makes the task of syncing the audio easier. I do not have a sinfo file handy to see actually what's in one. There may be a way to use it in A:M, but I am not aware of it currently. It may have been planned, but never implemented for all I know.
-
4-6-4 Steam Locomotive & Tender
NancyGormezano replied to R Reynolds's topic in Work In Progress / Sweatbox
I bring concession message from anal-retentive husband (who models truly microscopic details NO ONE would ever see): "GOOD JOB!" -
Like I said above: there are many solutions. You can work with QT pro and multiple audio tracks, but I won't go into the details. I hesitate to give you any more information. However, here is the all A:M way: Yes, you will have to do extra steps, when you render to a tga (or png) sequence. As you found out, the sinfo file is just a text file. I thought you already knew that. Start with your old chor, delete (or make inactive) all the animation, models, leave just the sound tracks, import your tga sequence as a camera roto, and render to a mov. You will have to set your compression. You were having problems with A:M and compression, and movs, I thought? That is why I use QT pro. Or if you don't like that, you could render just the audio from your A:M chor to a mov file, and use that to copy and paste in QT to the mov of the imported tga sequence. I am sure others can offer you other solutions. All of which will involve extra steps. I do not use the sinfo file. You're welcome.
-
4-6-4 Steam Locomotive & Tender
NancyGormezano replied to R Reynolds's topic in Work In Progress / Sweatbox
Perhaps because you haven't modeled any lubrication nipples is the reason there are no grease spots ? .... it needs oil stains, you crazy man you ! (My wise-ass HOn30 husband made me to say that) Incredible! -
I don't use "spring systems", but I believe you are referring to dynamic constraints? In ver 15, I believe dynamic systems (dynamic constraints) were "baked" using "simulate springs". In ver 16 32 bit (PC) - it appears that it's been replaced by "Bake Dynamic systems". It works for me in 16. Sorta, mostly. There are some funnies however that seem to happen, related to rendering directly after baking dynamics. I find it best to "bake dynamics", save the baked chor, restart A:M and then render for more consistent results.
-
Simplest: If you have Quicktime Pro (you may be able to do this with regular QT, but I can't test): 1) Import your image sequence or QT mov (without sound) into QT Pro in a QT player 2) open up your audio in another QT player. EDIT/Select All/Copy the audio 3) In the QT player with the image sequence, go to first frame - EDIT/Add to movie 4) Save result as QT movie, with compression method of your choice. or All A:M solution (there are other ways probably, but I always use the previous method): 1) import image sequence 2) import sound file 3) start new chor, delete ground 4) right click on camera NEW/Rotoscope/image sequence 5) drag sound file to this chor 6) render to file (1 pass) - not sure about # of passes
-
Very creative but very strange hierarchy you've got in your rig. 1) you've made your left rear foot a child of your right rear foot - so when you move your right foot, the left rear foot will move. Same oddness with your front feet. 2) usually the tail bones are children of the body. The way you have it, the body is a child of the tail bones & when you move the tail - your body, head, etc will move as well. I'm not sure where to send you to find out about very basic rigging concepts, (nor which model would be good to inspect to see a sample suitable rig for a 4 legged creature) - but Holmes has done some great tutorials on building your first rig (human type). here's the first in the series: http://amfilms.hash.com/video/196/Building...irst-Rig-Part-1
-
You probably have the CP's of the left foot assigned to the right foot's bone nice rat
-
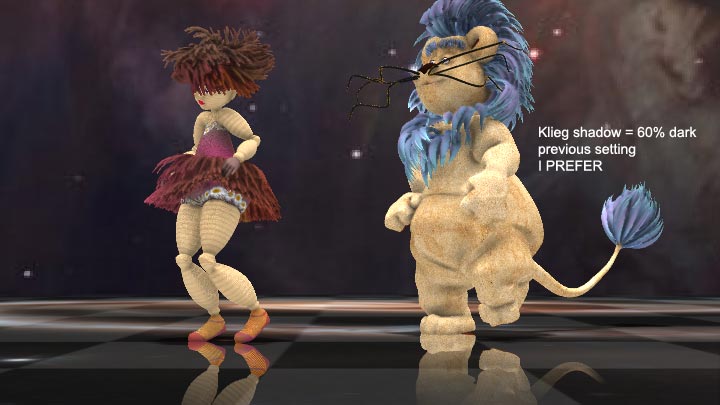
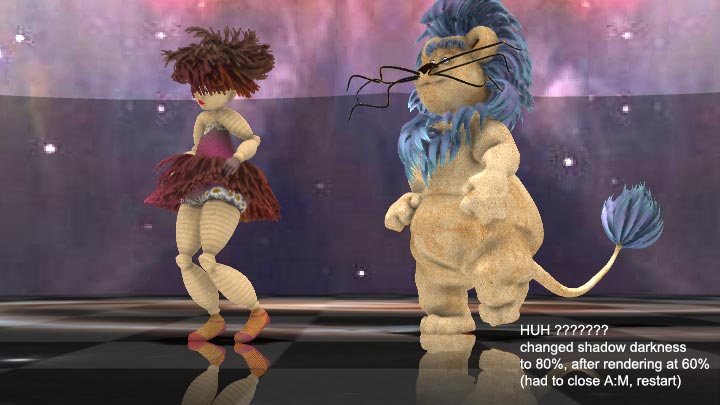
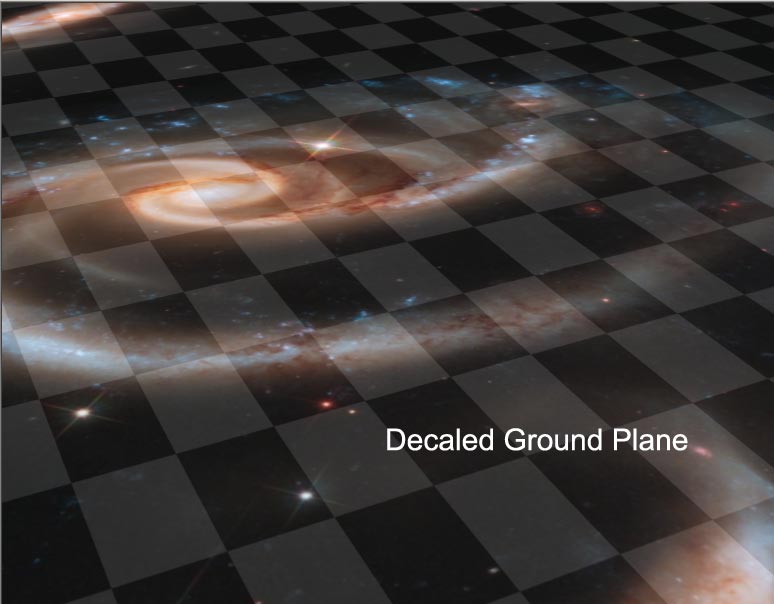
Hoooo Hoooo...Good Call! I had thought it looked darker than previous render, but thought it might have been an illusion. All I had changed lighting wise, was to darken the Klieg shadows from 60% to 80% dark. Somehow that also changed the diffuse illumination intensity??? Did not expect that. I will go back to 60% dark shadows. Thanks for spotting that, which prompted me to investigate further! I also keep running into this problem of making a change and then having the render screw up the properties of my background dome. I rendered 1 frame first with 60% dark shadows - all ok. Changed the darkness to 80% - rerendered - crap results. The dome properties get changed (from flat shaded to NOT flat shaded, and the dome position gets corrupted). I have noticed this before in other situations. Seems to be related to baked dynamics, and/or turning on hair. Seems I have to bake dynamics. Shut down. Reopen, turn on hair from camera view, go to side view, back to camera, then render AND do nothing else. It works most of the time - but makes me shiver each time. The light patterns on the floor are really decaled. Magic. No lights involved. I only have 1 klieg (directly overhead, never moves, nor changes) and Global Ambiance/Ambience = 100%, plus FakeAO. Thanks Holmes, Myron.

-
Finished first pass for dance routine, started playing with floor, preliminary set ideas. Still to do: set, props, other creatures? better sync with music, decide on how long, how much, story. more interesting camera add face expressions fix tail pass thrus (ugh...will be last on list) 12 fps for now - I think I will go to 24 ... maybe... (7 secs/frame at 480 x 270, 3 pass) . Thanks Bruce! Iron Toes? Yes indeedy. The toe shoes probably looked stiff because, most likely they were a new pair for the recital, and hadn't been broken in yet. 12fpstest1179Illgetoveryouh264MED.mov
-
It does look a bit dark...but where are Los Geckos, perhaps that adds contrast? The clip is cute.
-
Thanks dbl for the suggestion, not sure I'm able to visualize what you are describing. I've read it over and over and over, many times. I've still not decided on set, props, story, costume, camera angles, special effects, etc, etc. Still working on first pass to the dance part and I only have about 140 frames (5.8 secs) to go (of the 1179 frames=49.125 secs, dance only). Slow going, as it seems like I can do about 2 secs/day, but since I am in smelling distance of the finish, I suspect I'll speed up today & manana.
-
On my system, it gets saved with whatever the project rate is set to. I set my project rate to 24, so the QT gets saved to 24. If I make the project rate 30, it gets saved to 30. (32bit ver 16 rc01, QT 7.1.6)
-
Animation WIP for a critique
NancyGormezano replied to Bruce Del Porte's topic in Work In Progress / Sweatbox
I would have to ditto Gerry's comments. And add, maybe when you do bring in the devil, you can overshoot the size of him some & then scale back down as well (with some repeated bouncing) Never imagined that Sir Nigel was a hippy in his youth. Made me laugh. -
-
I saw a difference in the resultant movies. The one called "BannerCapCarD30" appeared smoother to me. (as I said in my previous post). However this QT movie had a frame rate of 25 fps (QT movie info). I am guessing that your project rate was 30, but when you compressed with A:M and used the h264 codec, that the frame rate was set to 25 in the QT dialog box?
-
Then I don't know what your problem is. And yes I see from your screen capture that you hadn't baked particles: right click in chor window, choose bake particle systems, note new items (particle file, index, etc) that show up in chor data. I find that I usually have most luck with particles and other tricky things (eg hair, dynamics) if I do not embed anything (save material, models, chor as separate from project), and before I render, I close and restart A:M fresh. I have not played much with fluids, so no help here. Your particular project behaved weirdly on my system. It came up with an empty window for your volcano model that I could not close, so I unembedded everything in order to play with it.