NancyGormezano
-
Posts
7,863 -
Joined
-
Last visited
-
Days Won
15
Content Type
Profiles
Forums
Events
Everything posted by NancyGormezano
-

Five seconds crash / windows seven
NancyGormezano replied to Xtaz's topic in Work In Progress / Sweatbox
I am also running xp pro sp3, and I have my Control panel/system/advanced settings/advanced tab/Performance settings/Visual Effects/ Adjust for best performance. I have never had it be anything else. (ie, no other boxes for "eye candy effects" are checked) -
Five seconds crash / windows seven
NancyGormezano replied to Xtaz's topic in Work In Progress / Sweatbox
I have my PWS on a second monitor as an undocked separate window. I did look at yours in AMreports - that's the scene with lotsa hair, particles - that's an exceptionally taxing chor, and something weird is going on in that chor. And you are using 64 bit? It's marcos render that is more confusing with a simple scene (2 balls) that it gets hung up on so easily (he was doing 16 pass, 64bit also?). And as for Steve - I wonder if his is doing ambiant Occlusion (64 bit?) -
Five seconds crash / windows seven
NancyGormezano replied to Xtaz's topic in Work In Progress / Sweatbox
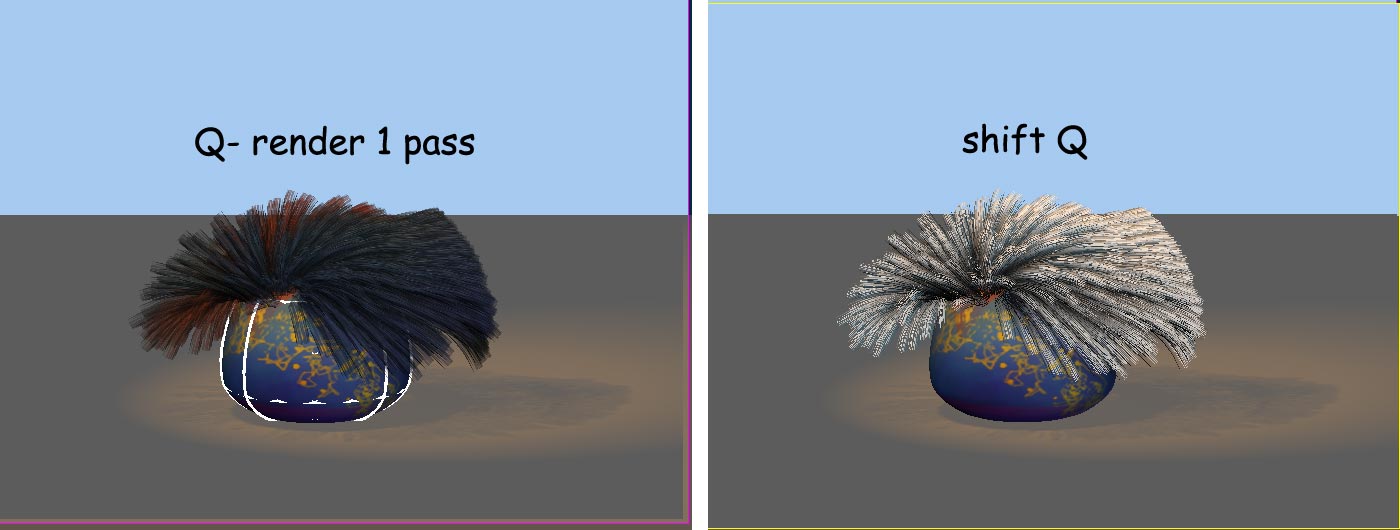
Yes they are, however - Shift-Q renders are "semi-final" renders - some properties, eg hair (depending on settings), "render to line", and others will not look the same as in a final render. The Q render gives a better prediction of the final render.
-
Muppet musician!
-
Five seconds crash / windows seven
NancyGormezano replied to Xtaz's topic in Work In Progress / Sweatbox
I have not really noticed ever hitting a wall like that, but I don't do 16 pass renders. Nor do I close other windows in A:M usually (timeline, properties, pose sliders, pws, model, workbook mode - all open). My A:M windows are all docked, 1 monitor, nvidia 8600gts,256, screen res = 1162x864. You guys probably have a gigantus screen res? I can not get it to happen on my system (16ver32 bit). I have 2 simple decaled balls in scene, default lighting and do a "Q" render - 16 pass. finishes in 25 secs Do you really want to do 16 pass render? I always do something less, especially with complicated scenes, set it to 3 pass, then the Q render won't take so long (same scene took 2 secs), as it uses the camera settings (if you have it set for that) -
great character!
-
Can I get a depth buffer in OpenEXR without multipass?
NancyGormezano replied to robcat2075's topic in A:M Rendering
Ok - as my edit above says - I was able to get a depth buffer when rendering to openexr, using both render methods - multipass (1 pass or more) and non-multipass (antialiased) - which are you not able to do? And I agree - it probably is the openexr type of depth buffer that is being used by fakeao. -
Can I get a depth buffer in OpenEXR without multipass?
NancyGormezano replied to robcat2075's topic in A:M Rendering
I can get a depth buffer if I render to png format, using either 1 pass multipass or just final (no multipass). As far as I know - this is the buffer that fakeao does use. I rendered with alpha OFF, depth ON, save buffers ON, and got 2 files: xxxx-DepthBuffer0.png and xxxx0.png EDIT: nevermind - I see that you want to render to .exr? I think I misunderstood? However, I could also get an openexr file with the depth buffer and the color alpha just rendering with final (no multipass) as well as doing it with just 1 pass. 32bitver16 -
Animating an object from wireframe to textured
NancyGormezano replied to pierrotsc's topic in New Users
Even tho you'll be going with dissolving in some video editor, I wanted to satisfy myself to see if it could be done all in A:M - I tried to get a full wireframe version transitioning into a full color version, using the "render as lines" feature. This could probably also be used with textured model, with a bit of tweaking. wireturn5Nomprenderlinescolorchangeh264sloloop.mov
-
I believe he has 2 complete models (groups) in the thom model - the swept group, and the real group. He varies the transparency of the groups
-
Many, many, happy happies more!
-
Animating an object from wireframe to textured
NancyGormezano replied to pierrotsc's topic in New Users
Select all cps of your model, right click/add image - the image is a solid surrounded by black on all sides. It will give you a wireframe look (except for 5 pointers - will look like triangular faces) For this example, I also decaled the thom model (blue) & then I varied the percent of the decal from 100 to 0 - which then allowed the patch image to show I could have just had a blue thom model (surface color), and then only decreased the color percent for the patch image so that the surface color would show The thom model might have some funny normals (pointing wrong way)? If so, that might account for some of the wireframe patche images having variation in how they rendered in intensity. Otherwise I don't know why that would be. wireturn5NompthickerNoalphahalfspeed.mov
-
Ack. me and my big mouth. I was afraid you were going to ask me that. That is some voodoo setting that I don't play with. Apparently when I start my PC, adobe (photoshop utility) does some sort of screen calibration for my system (don't ask me how) to set my crt gamma to 2.2 (don't ask me why). A:M apparently has knowledge of this - and wants it to be 1 - so it renders it to 1 (whatever that means). So there. Satisfied now? I know I'm not. I don't know what Macs are supposed to be. I also have heard reported by the "cogniscenti" that the adobe utility that calibrates my crt is crapola, and that there are much better, more accurate, more standard? ways to do this. Don't ask. I suspect gamma is some coefficient (exponent?) for some logarithmic curve that sets the brightness (color space?) of the monitor - and that the curve is non-linear EDIT: Ah, yes - Here is the meaning of life, the universe and Gamma Correction
-
You should also be able to see them in the right - even more clearly - maybe your display is not bright enough?, or contrast is funny? or black isn't black? or your gamma is gramma or grampa? EDIT: I use a crt monitor - you are using lcd? mac?
-
Do you see a difference in the images I posted above? Do you see the waves on them? If not, then I would say your monitor might need calibration of some sort. I will look at your new project - but please answer the above first. EDIT: if you are on a MAC, then perhaps there is a difference from ver 16 32 bit PC version.
-
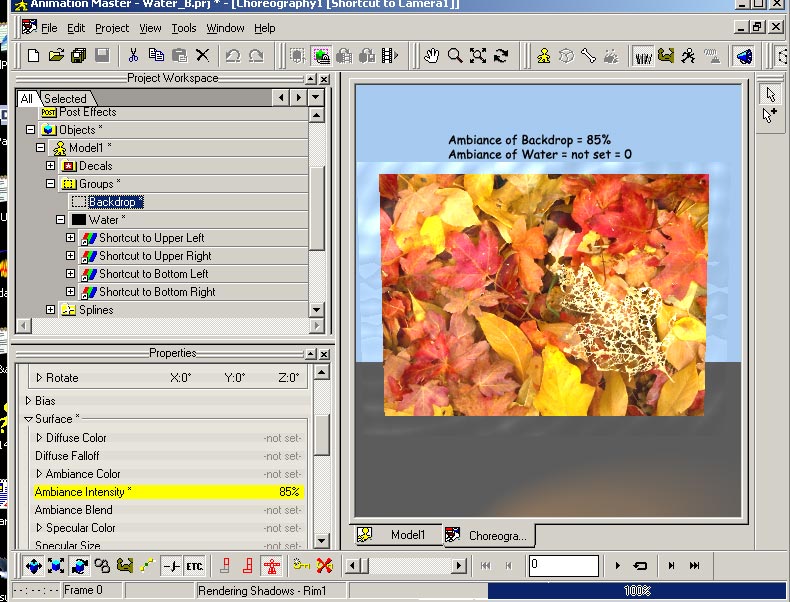
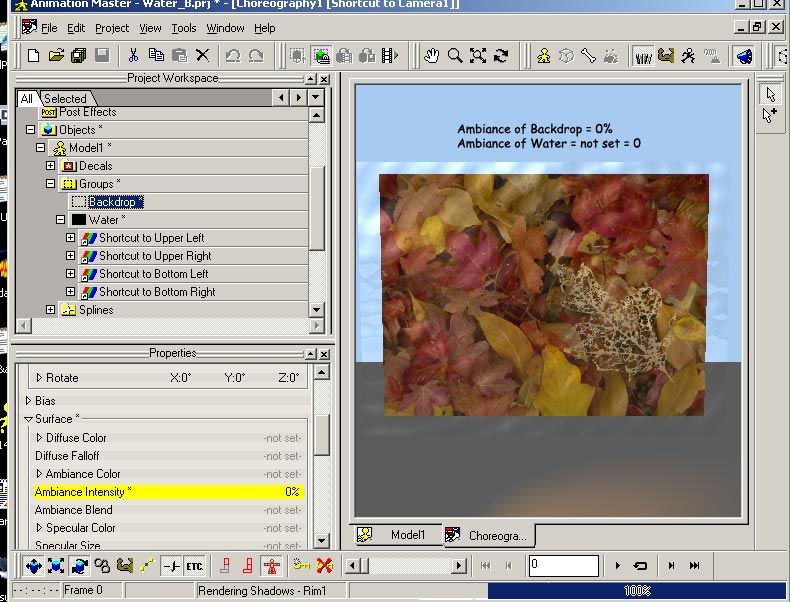
Bubba - I took a look at your original project - And I noticed that the ambiance intensity was set for both the backdrop (85%) and water groups (20%) - those settings are probably preventing you from seeing the effect clearly. A lot of times, old models from previous versions of A:M come in with ambiance set to some value. Probably shouldn't be set if you want to clearly see what is going on and probably should work with general lighting instead. So all I did was change the ambiance settings on the backdrop (0%) and on the water group (not set = 0) I haven't looked at Robert's project - so maybe he has changed those settings already.
-
How long should particle baking take?
NancyGormezano replied to robcat2075's topic in Work In Progress / Sweatbox
I just looked at 1_01_01a - that is the one you are using probably. I also notice that Willow hair has pre-roll 100! frames, straw - 25 frames, tree3 - 4 frames - that is why particle baking takes so long in this chor. That is the answer to your original question. As to why you can't bake it in ver 16 (and can in ver 15) - try baking it without preroll and see if that is the problem with 16? EDIT: those pre-rolls are from what is currently on my harddrive - I do not know if those materials were ever updated/changed since I last downloaded them, and lawd knows what you're using. -
How long should particle baking take?
NancyGormezano replied to robcat2075's topic in Work In Progress / Sweatbox
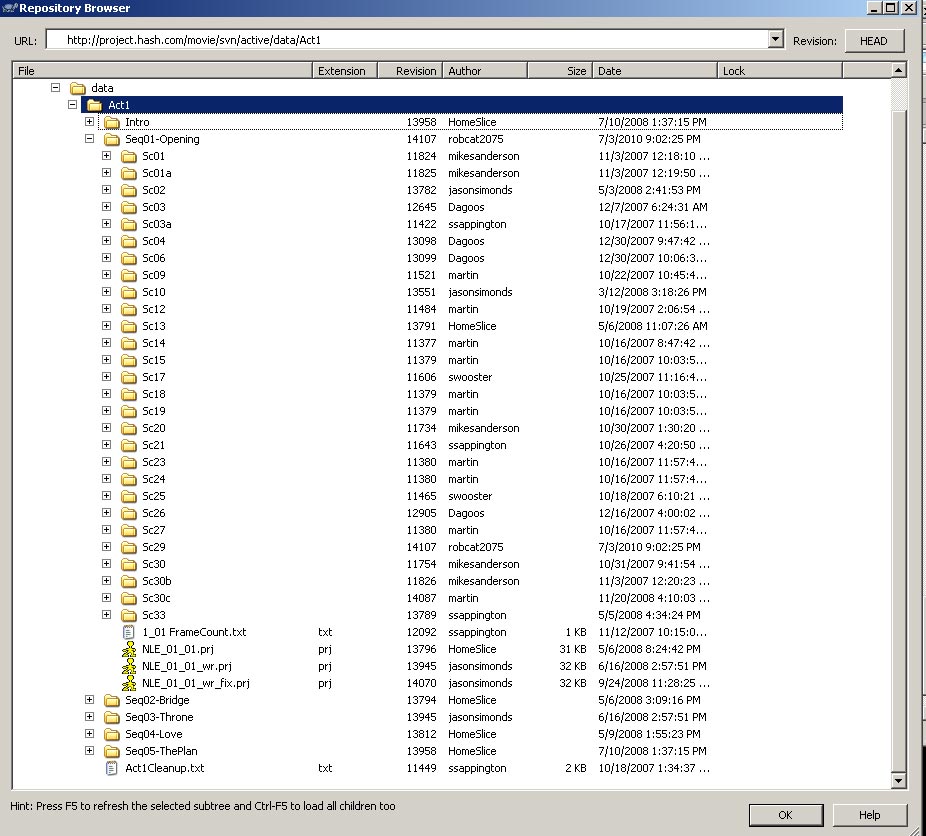
Are you using a different archive than me? Here is what the svn looks like to me with the repo-browser - what does your's look like?
-
How long should particle baking take?
NancyGormezano replied to robcat2075's topic in Work In Progress / Sweatbox
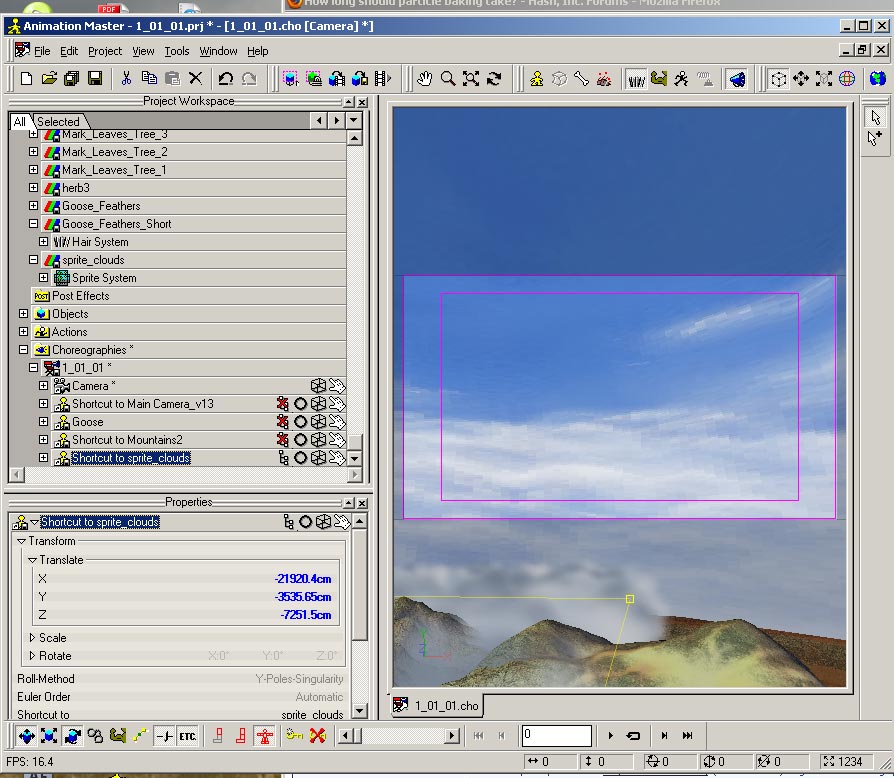
I imported 1_01_01.prj My 1_01_01 (both prj & the cho file that it references) on my harddrive are dated 9/29/2007 (last time I grabbed it). I notice from the SVN log that there were adjustments made to that chor by Ken on 10/24/2007, and Mike Sanderson on 11/03/2007. Did they take out the clouds? I remember that cloud scene when I viewed the TWO movie - however I never did get a final copy dvd (I never asked for one) Be careful of those clouds - their sprite system has a preroll of 100 frames - that makes even frame 0 a bitch to look at. That's probably why it took so long to bake Not necessarily. If you groom the hair, then the hair won't stick out, for NON-dynamic hair. It will look how you groomed it. However what I notice is that some people like to put a pre-roll on dynamic hair. I guess so it will settle? And I guess they groom it in an action? or a pose? I don't know why they use pre-roll. I never set a pre-roll for hair. Instead, I groom the hair as to how I want the dynamic hair default to look when still. AND I always turn the "use gravity" OFF in the hair system/dynamic options, but I leave Use Forces = ON. So it still responds to movement, but doesn't drop, nor need pre-roll. Additionally, when I turn dynamic options OFF, it looks how it was groomed. So for example, I notice that the river_plants hair material in MY 1_01_01 project has a pre-roll. (and has dynamic options ON). For the 1_01_01 cho that I am looking at (I have no idea which one you are looking at? - post a screen shot, and I might be able to tell), I wouldn't know why there would be dynamic river plants (or any of the other dynamic hair materials mentioned above), loaded with the project. HOWEVER - I just now also notice that the 1_01_01 chor references only a camera model (that has dome, lighting, camera), mountain2 model (which doesn't appear to have any trees, hair, etc) - so all those dynamic hair systems loaded with the project are probably not referenced by the chor! - and only the cloud sprite system, and the goose (which has non-dynamic hair feathers) are referenced. EDIT: I also notice that Main Camera_v13 model references the forest_1 hair system (dynamic = OFF) - and has 4 emitters.
-
How long should particle baking take?
NancyGormezano replied to robcat2075's topic in Work In Progress / Sweatbox
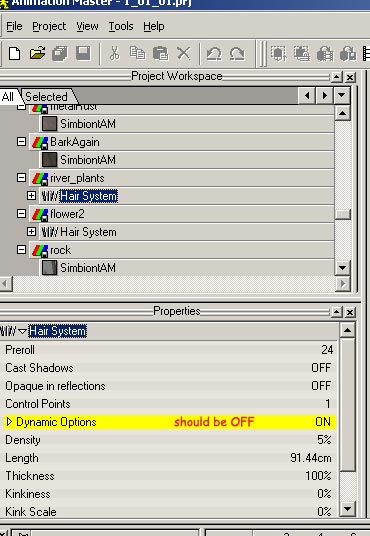
I took a look at 1_01_01.prj - the opening scene, and I notice that the following HAIR material systems have DYNAMIC OPTIONS = ON (when they probably don't need to be): Straw Hair, River Plants, Flowers, Mark Tree Willow Base, Mark leaves Tree3. You could turn them all off in those systems (save them). It would help baking. Not sure about the straw hair - it might need to be ON. There is also a sprite system: Sprite_Clouds - which does need to be ON. That is why you would need to Bake particles. Turning off the display of dynamics, only turns off the real-time display of it and makes it easier to scrub, it does not turn off the dynamic computation for rendering, or baking. I am guessing that there is some conflict between sprite baking and hair baking. If your objective is to just render the scene - then never mind. If your objective is also to help track down why it isn't working in ver 16 - then I would suggest turning off the dynamic option in all the hair material systems mentioned above and just bake with the sprite system and see if you can get it to bake then in ver 16
-
Finally got to have a little fun
NancyGormezano replied to MJL's topic in Work In Progress / Sweatbox
Nice! Like the use of the gradient, & the symbology -
How long should particle baking take?
NancyGormezano replied to robcat2075's topic in Work In Progress / Sweatbox
I would have thought there wasn't a need since the hair won't be moving but I was never able to start a render unless it started a frame 0. I was never able to stop, pick up at some middle frame later and continue. Steffen said it would need to be baked to do that. So that's why I'm baking Uh...so just what is a "dynamic" system in that scene? Are there special effects? Dynamic constraints? If I understand, did you not say that there was something in the scene causing a wait "for computing particles". Does the hair material (hair systems) on the houses (or trees or anything) have the dynamic options = ON? when it doesn't need to be? I notice if I turn OFF all my hair dynamic systems - then I can scrub thru my chor in real-time without baking - there is some short computation that still goes on (probably checking for dynamic = ON), but there is not the extraordinary computational wait when it is set on. -
rebuild breakable vase with hair flowers
NancyGormezano replied to johnl3d's topic in Tinkering Gnome's Workshop
Nice test - Do you have collision detection on for the hair system? -
How long should particle baking take?
NancyGormezano replied to robcat2075's topic in Work In Progress / Sweatbox
I have only been trying 1 chor so far in ver 16 and I am not using netrender. For my particular chor, I hadn't been baking and hair was rendering ok. Then I tried baking, and experienced the hair stretching. So I went back to NOT baking before rendering. However I have recently retried baking (in the same chor that had a stretchy problem) and it appears that I now do have a sucessful baked version. So the problem is elusive. What I did change however in my procedure for baking - was before baking: unhide all models, go to frame 0, bake from there. Save chor, then restart A:M, render. Your particular chor (that set in particular) that you are trying to render for TWO, in my recollection was always a problem for stretchy hair. Baked or not baked (there wasn't any baking in ver 14 iirc). I have found also that funnies happen, if one is using multiple instances of a model in a chor that has hair. I have seen the stretchies when I've used multiple copies of the same plant model. So if those houses are just multiple instances, that might? be contributing to problem. If you can, save the house model under different names house1, house2, etc and substitute those in the chor. The other thing that might? help, is that even tho the models might be unique, is that they are all using the same hair system - and it would be better to have them reference unique hair system. EDIT: I see Matt has also mentioned the stretchies with multiple instances - same name material. I suspect that scene rendered before - only by luck, or magical thinking EDIT2: Are there any dynamic systems in that chor? they should be baked as well, and perhaps before hair is baked. -
How long should particle baking take?
NancyGormezano replied to robcat2075's topic in Work In Progress / Sweatbox
1)How did you discard? - did you unbake particles, and as well delete the chanels that were created in the chor for all systems (references to pai, par files? before consolidating? delete the par, pai files as well? 2) then after consolidating - try resaving the project (in the new consolidated location) - and then rebake. If you haven't done 1) - then delete the channels, files, etc in the consolidated chors, etc. resave project, rebake in the consolidated project. If you still can't do it: restart A:M before rebaking?