MMZ_TimeLord
-
Posts
1,495 -
Joined
-
Last visited
Content Type
Profiles
Forums
Events
Everything posted by MMZ_TimeLord
-
Very nice! I love the layout... kinda like a quick demo reel all at once... Very cool.
-
Very nice! ... can I be white?
-
Welcome to the forums! Just ask and we'll help... it's that easy.
-
Excellent work Noah! Can't wait to see the full story... looks to keep me even more on the edge of my seat!
-
Excellent progress SLIDE! I really like the outfit, very flattering... The head dressing is very nice also, the whole style of her says 'royalty' or 'high class'. Can't wait to see her finished!
-
The overall design from that last angle looks good ... except at the tail... the vertical airfoil (rudder) looks out of place... dragonflys have no such appendage. It's just my opinion, but I would loose the rudder and maybe swoop the elevator wings back some and do a 'V' shape that replaces the rudder. Also, I notice how thin the support structure is for the wings, I'd beef it up some with bracing or make a few more attachement points at the same thickness. The stresses on those single ball joints would be tremendous! Yes, the canopy glass should at least have a second mesh layer so you can utilize refraction properly. All in all a very good start!
-
Don't forget to add the individual strands of wire inside the insulation... just so we know it's there... Great job so far!
-
Robert, The way I know that A:M uses groups is that when a group (of even just two CPs) is changed in any way from the default, i.e. - surface attributes, or plug-in properties, then it will create a group that holds these settings. (bias adjustments and transform locations are the only things stored in the CPs themselves). Groups are therefore used to assign surface attributes and simply allow you to group CPs so you can isolate them in complex models for modeling and rigging. I don't quite understand how you could get 'extra' groups showing up AFTER you save and reopen a project. Or are you just reopening the model and possibly had saved it under a different name? If you can replicate the problem every time, then submit a A:M Report to Hash so they can track down the bug and squash it.
-
When Ken is referring to the 'manual', he means the small book that came with your software titled 'The Art of Animation Master'. It's basically a set of lessons to bring you up to speed on the software. There are also video versions of most of those lessons in the first post of this thread. Read through the manual and view the tutorials (if you have the bandwidth to download them quickly) and it should answer most of your basic quesitions. Then you can start hitting us with ones we will scratch our collective heads at...
-
You can also make a modification 'mod' of the game or full conversion type 'mod' to see the public reaction to your game for free. If the public starts clammoring for more, well, then you can contemplate the quarter million to market a game... remember, if the game sold for even as low as $40, you could still make a million or two.
-
How Do You Cut a Lathe circle in Half and Keep It Straight?
MMZ_TimeLord replied to Technodandy's topic in New Users
Another item of note... I believe I found what way Technodandy was cutting his sphere. If you cut across the 'Y' axis, then you will have a parobolic dish as he said, unless you leave the 'tails' like this. If you cut along the 'Y' axis, as I did in my first example above, you should see no distortion. You are left also with two sides that are not perfect (i.e. - pinch spots). Where in his cut, you will have only the one pinch spot to deal with. There are many ways to get a near perfect half sphere. There are many ways to get a near perfect sphere too. The way I do a near perfect sphere is this. I make a sphere, and cut off the poles. then copy and paste it (with no offset) and rotate it 90 degrees on the 'Z' axis. This results in the appearance of a perfect sphere. The downside is if you have to decal it, you may have to do two 'stamps', one for each partial sphere. I have also attached a wireframe and shaded wireframe of this type of sphere for your info. I made each partial sphere a different color to show what is happening.
-
I wouldn't know if it was incorrect without a reference photo, but it looks really good to me as far as the facial proportions and the jewelry. Good work Fab!
-
How Do You Cut a Lathe circle in Half and Keep It Straight?
MMZ_TimeLord replied to Technodandy's topic in New Users
I usually use the last method that Stuart mentioned. I lathe my circlular object then I remove part of the side I don't want and break the splines so there is one branch of the circle remaining on each side of the half I cut. That way the curve remains unchanged. Edit: Here's a screen shot of a quick 8 lathe sphere. NOTE: on this particular 8 lathe sphere, I could delete the 'tails' that remain without distorting the remaining half. On a 4 copy lathe it will distort unless you leave the 'tails'. Most times if the number of lathe divisions is 8, 12, 18, etc. somthing that allows it to have a seam at the axis you want to cut it on, you should get very little distortion. At least the way I make spheres. The technique I use is to lathe a 2 point spline with 8, 12, 18, etc. and delete the half that is off the axis, rotate it 90 degrees and delete half of it. Move the two points on the axis that remain just one 'nudge' with the arrow keys to the side your half circle is on. THEN lathe this spline... you should get a nearly perfect sphere (minus the ugly pinch points in the north and south poles). This is the type of sphere I have cut in half here. I've attached another screen shot compilation showing how I build the 8 lathe sphere... WARNING: The compilation is nearly 900k in size!
-
Good work Temka! Anything with them moving? Nice spline work on the faces and bodies.
-
Great work so far Zaryin! Can't wait to see her in full armor on that beast! I personally think she is a little 'plain' too, but that's me reflecting what the public wants in a beautiful woman. I personally found a wonderful 'plain' woman with more heart and brains than most women... I mean she's nearly a geek. Go figger
-
Excellent work! nice attention to detail. Now it just needs to be in the space that it is planned for to give the client a true "As built" look.
-
Very nice cory... I like the new neck... much muscles...
-
Golden Gate Bridge High Detail model
MMZ_TimeLord replied to MMZ_TimeLord's topic in Work In Progress / Sweatbox
Okay, basic main cables are in place... all of 16 patches... Here's a render closer to what a human could see from the ground. Now I think I'll take a break from this for a day or two and work on my bootcamp.
-
Golden Gate Bridge High Detail model
MMZ_TimeLord replied to MMZ_TimeLord's topic in Work In Progress / Sweatbox
Matt, I will probably not add all the bolts, as there is just too many. I will probably try and use decals for a lot of the rivet details and bolt details. I'll have to see how slow that makes my system. Right now, it's really not too bad in the action window when I hide the handrails and tower tops, really speeds things up. When I have all the details showing now it gets choppy when rotating the model assembly. Again, this is to test A:M's limits, my machine's limits and maybe mine too... -
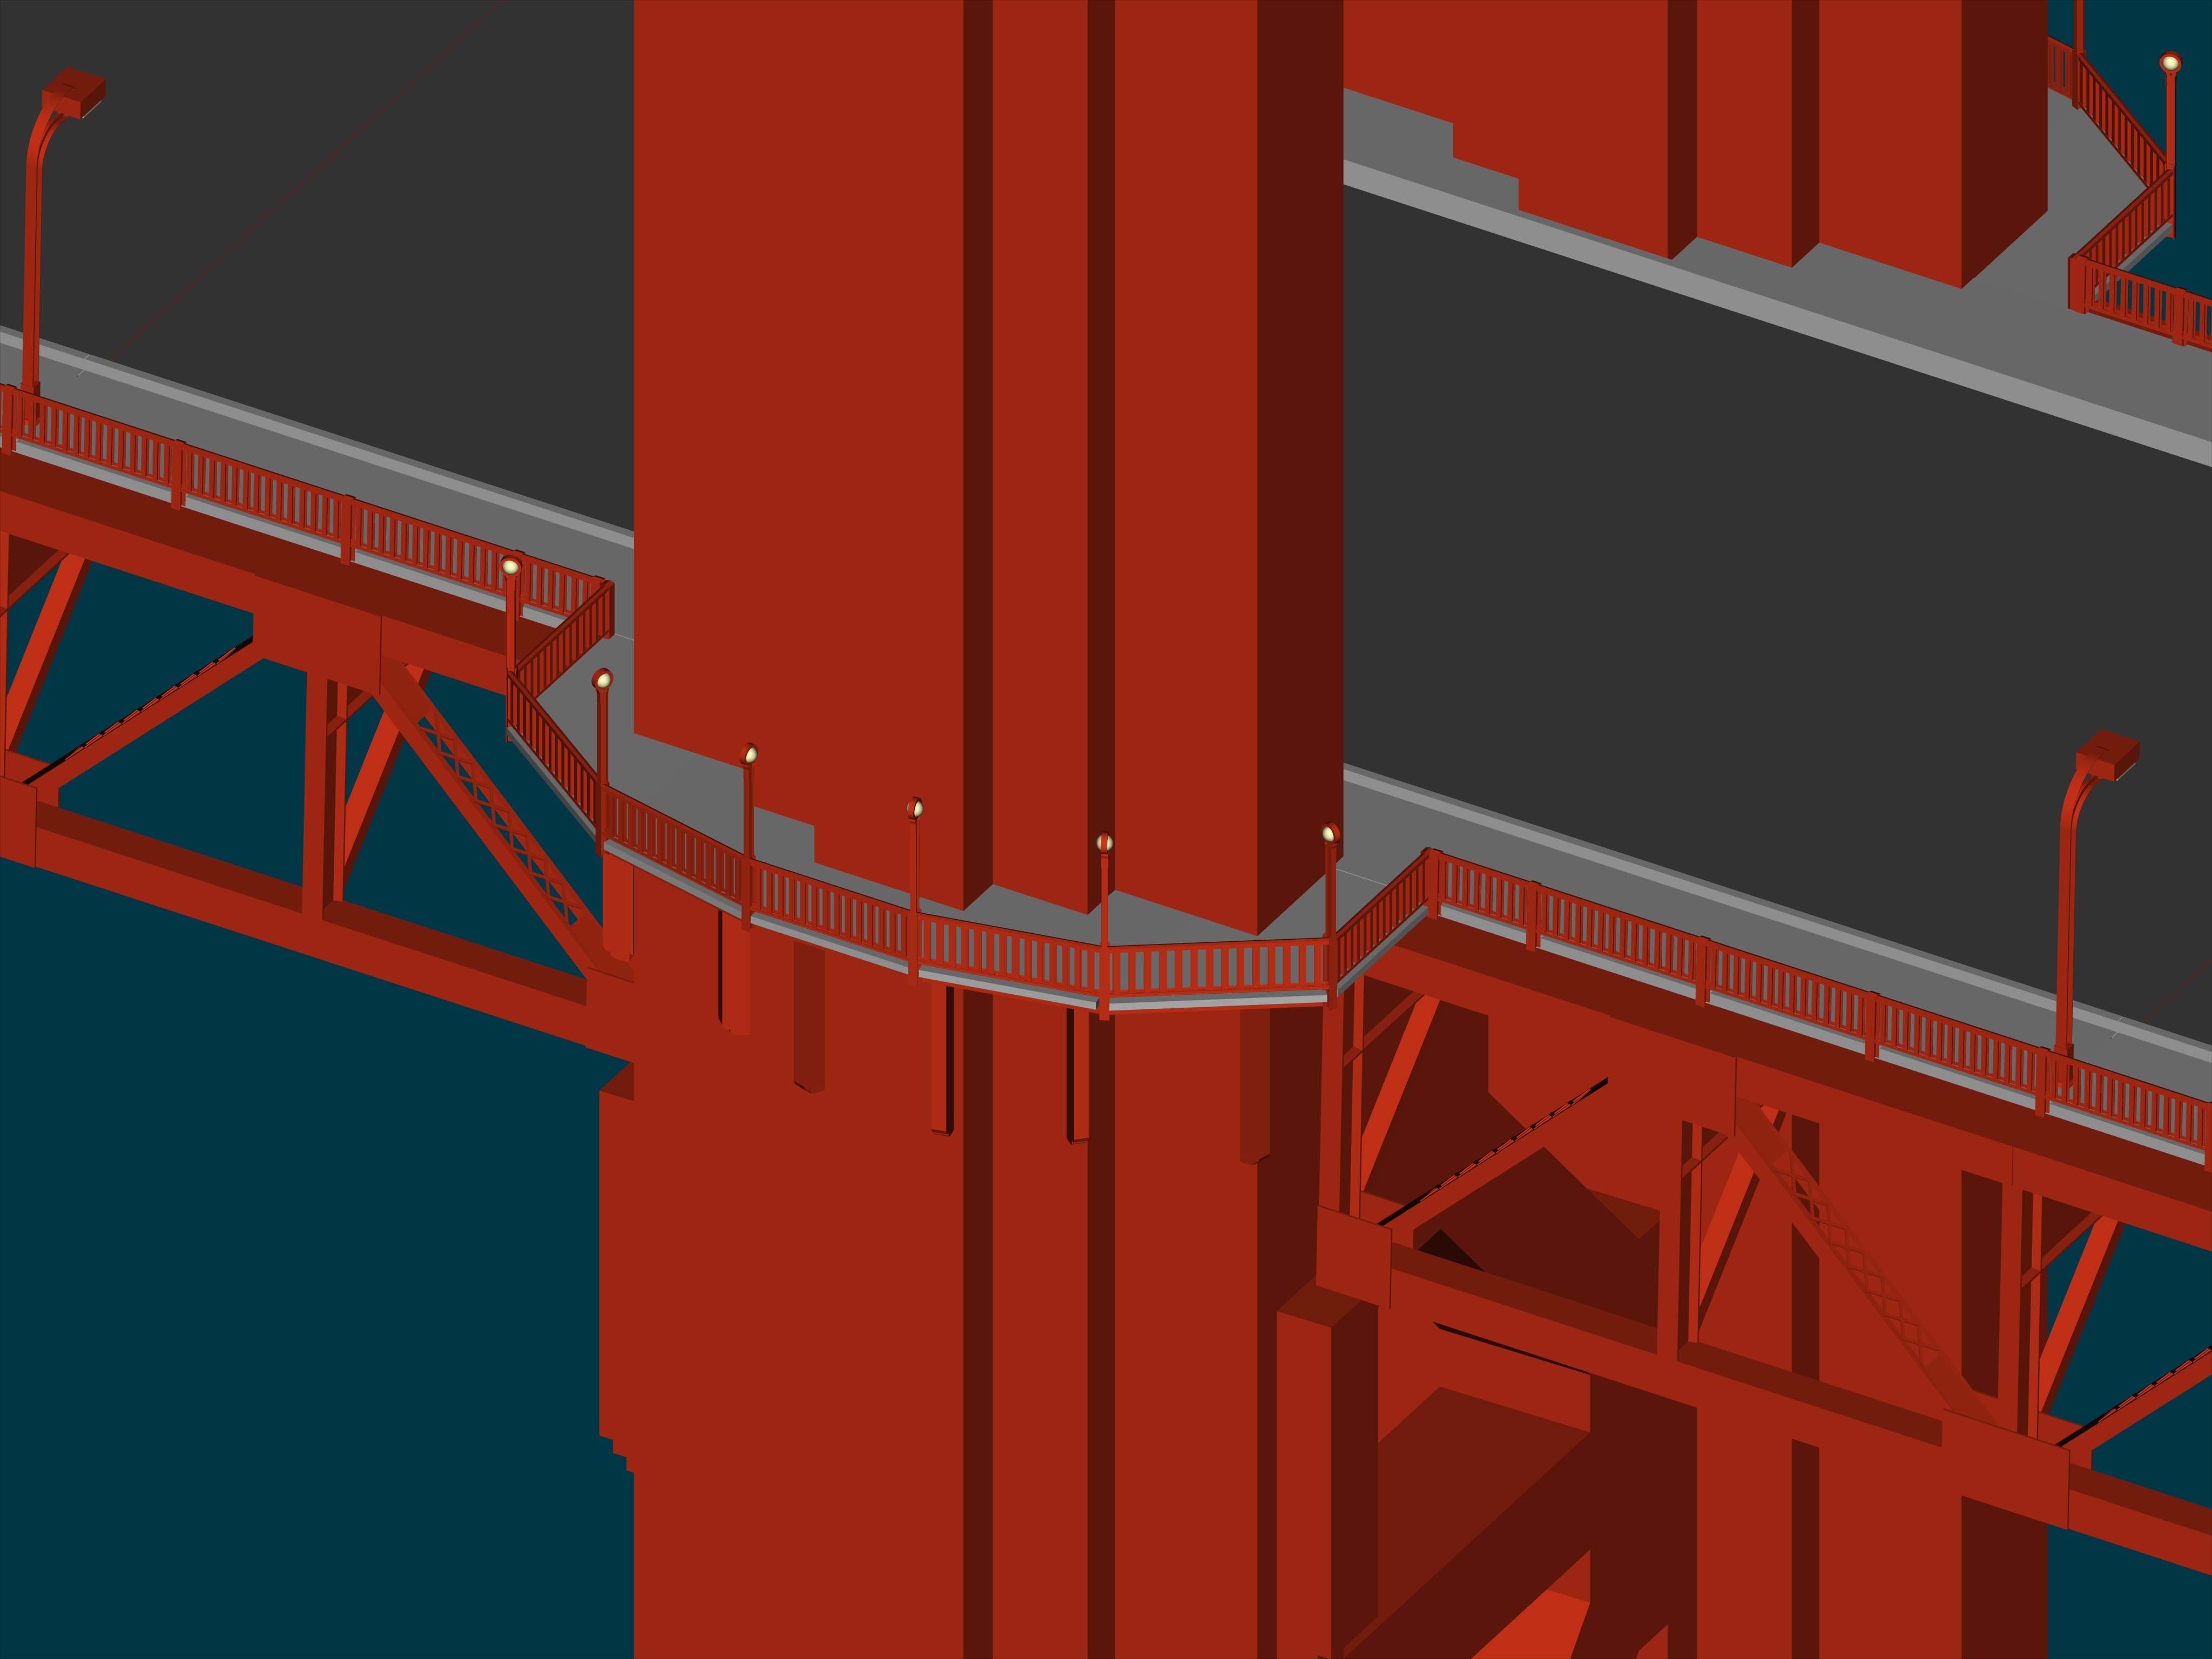
Golden Gate Bridge High Detail model
MMZ_TimeLord replied to MMZ_TimeLord's topic in Work In Progress / Sweatbox
Nice bridge model there John! I've seen that bridge before (in pictures and movies). According to the history I dug up, the Golden Gate Bridge was started in 1933 completed in 1937 and shares quite a lot of details of design with Ambassador Bridge. Nice animation of the vehicles too... your fault, now I'll have to make some vehicles and pedestrians... shame on you! I'll probably pull them from the stock models that came with A:M and the first extra CD for that. -
Golden Gate Bridge High Detail model
MMZ_TimeLord replied to MMZ_TimeLord's topic in Work In Progress / Sweatbox
I don't know about 'need' Dan... this is an exercise for me in large scale high detail modeling. I'm also trying to show off what A:M CAN do in this area. Project Earth was an exercise in LARGE resolution decals, this one is an exercise in large scale models assembled in an action with very few parts that simply repeat a lot (roadway sections, streetlights, etc.). I probably could have gotten away with simply duplicating the hand rail sections in the action as well, but making a single section that was 150 feet long was easier for me. Plus, I didn't have to try and match the arch of the roadway with the handrails. It allowed the placement of the streetlights without additional items added in the action. The downside of doing it that way was that the street lights also start to tilt as the roadway angle changes. I may end up manually placing pairs of streetlights over the bases of the ones already in the action and then delete them from the roadway. That way, I don't have to guess or calculate their location. Anyway... I've rambled on long enough... Back to work... -
Golden Gate Bridge High Detail model
MMZ_TimeLord replied to MMZ_TimeLord's topic in Work In Progress / Sweatbox
Another update with the walkways around the tower adjusted to match the new altered roadway sections. This render is still from the action window. Here are the patch counts I have so far for those interested. __________________________________________Patch______Model________Total_Patches Sub_Model_Name____________________________Count______Quantity_____in_Action Tower_Top__________________________________2908________4______________11632 Main_Towers_(each)_________________________6362________2______________12724 South_Tower_Skirt____________________________42________1_________________42 Road_Deck_Sections_(Standard)______________7179_______41_____________294339 Road_Deck_Sections_(Tower)_________________4711________2_______________9422 Main_Cable_Sections*__________________________8________8_________________64 Road_Deck_Section_Cables_(Standard_Sec.)*___256______250______________64000 Overall_Model_(High_Detail_version)_______21466______________________392223 *-indicates esimated values at this time. CAUTION!: Render is 4096 wide!
-
That's wonderful robcat! I really like that last elbow shaking effort to get that cylinder over the edge of the ramp! Gotta be careful how hard you push... you might go over... ... Too late!
-
I purchased Animation Master back in 1992 and I have been upgrading every year... Animation:Master has been worth every penny to me. I've learned more through using this software than I ever learned from books on the subject of animation or computer modeling. The software comes with a small book called "The Art of Animation Master" and is a series of lessons designed to springboard you into not only the software package, but the world of animation itself. The lessons are tailored to guide you through using the interface of the software so you can easily focus on your own creativeness. There are also video versions of almost all the lessons on Hash's website that you can download before you buy so you can get an early look at the software. I hope that luckbat and i have answered your questions ... if not, I'm sure someone else will come along and add to it. I wish you well in all your future creativity!
-
Golden Gate Bridge High Detail model
MMZ_TimeLord replied to MMZ_TimeLord's topic in Work In Progress / Sweatbox
That's funny Dahr... I LIVE in San Mateo... do you go to the Starbucks on 4th? or the new one on 3rd?