MMZ_TimeLord
-
Posts
1,495 -
Joined
-
Last visited
Content Type
Profiles
Forums
Events
Everything posted by MMZ_TimeLord
-
Congratulations AVI... Nice to see a professional give a rising animation artist kudos and inspiration!
-
See my reply to your first exercise please... Rodney has threads going for these so he can review them and give you credit for your exercises.
-
kanime, You should post your results in the 'Exercise 1' thread. Make sure you read the first post for instructions. Looks good so far!
-
Advice on Sizing in Photoshop for Creating Decals...
MMZ_TimeLord replied to Laconic's topic in New Users
Check this out... Specifically this part ( I realize this is an older FAQ, but it is still relevant. ) And another... JPEG With all of that said, I stand corrected. PNG or TGA would probably be the way to go if you want or need a truely 'lossless' compression. The images I was working with on 'Project Earth' were very high resolution and downsized from even higher resolution TGA images, therefore I felt that maximum quality JPEGs would do just fine. -
Advice on Sizing in Photoshop for Creating Decals...
MMZ_TimeLord replied to Laconic's topic in New Users
You are partially right luckbat. You will only see artifacts on JPEG images that have quality settings on anything but 100%. I always set my quality to the highest when dealing with photoshop or paintshop pro. If you turn the compression up, you will get more artifacts, that's the trade-off with JPEG. It's the same as using a lower quality setting on a codec for a movie file (MOV or AVI). The lower your quality, the worse the artifacts. Again, if you are never close enough to see artifacts a slight compression may be acceptable. All the textures I did for my Project Earth were saved in JPEG, but the compression was set on 100% quality (lossless) so my JPEGs were a bit large but WAY smaller than BMP or TGA files. -
Glad to be of service...
-
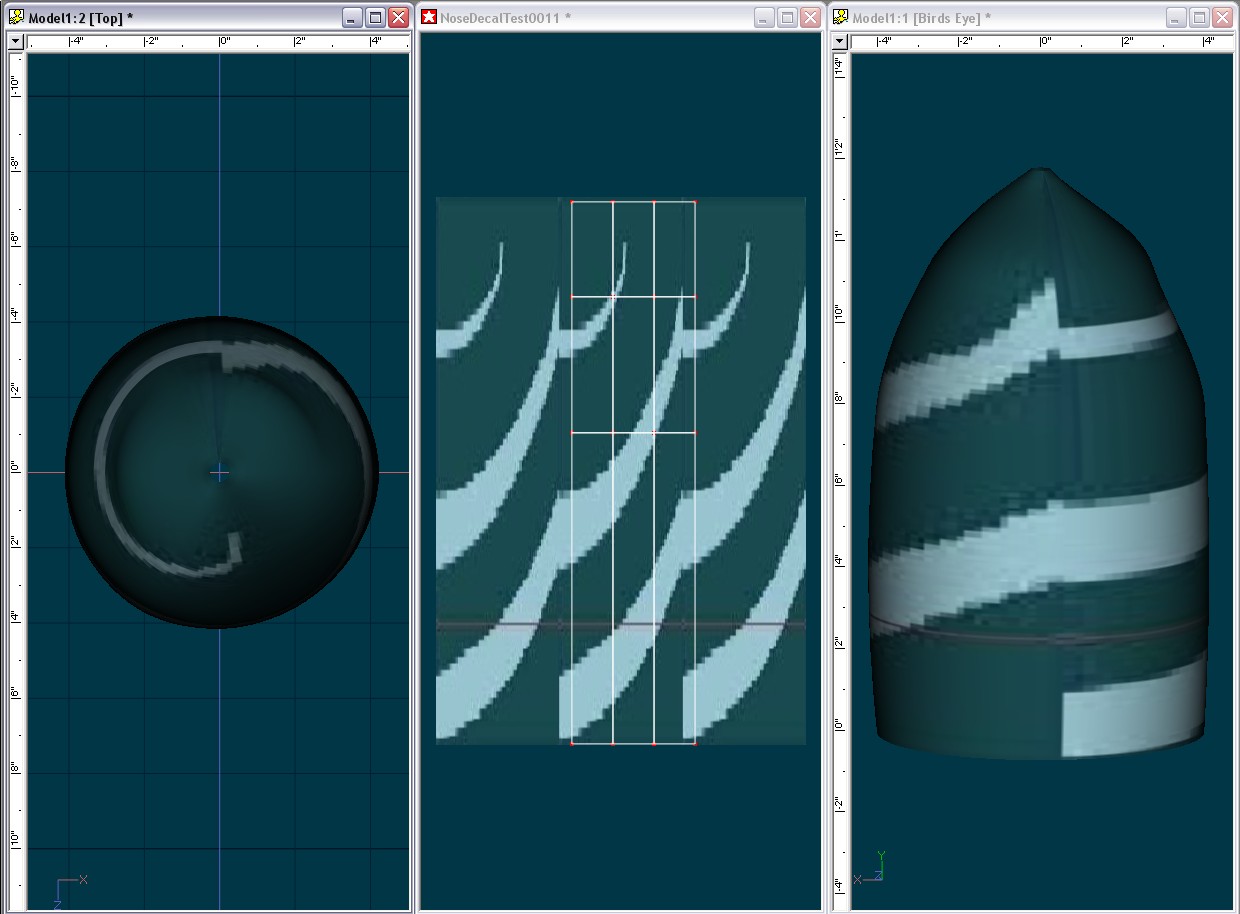
Post your decal here so we can be sure it's not that. I still say if you scale the image to cover your object and make sure the scale percentages are the same in the X AND Y and it just covers the cone in the Y direction, when you apply the decal it should be fine. If you still have trouble, try making a brand new project, create just a quick cone (like I did) and import your image and make a new decal to get the hang of how it works.
-
Two things to remember when you are cylindrical decaling.. 1. Make sure your horizontal and vertical scale are the same and the vertical scale just barely covers the area you want to decal. 2. Make sure that cylindrical mapping is selected and you DO NOT change the repetition. Cylindrical mapping will do this when it is applied so that you get a seamless texture on your object. Last thing to note, if you double click on your 'stamp1' after you have applied your decal, you will see how the model is mapped via the UV editor. When I did this with your texture it mapped properly onto my quick model of a nose, but your map is not seamless and I saw an ugly seam.

-
A set of three bones in between each of the loops on the rod could be your line going through there... with the dynamic chain on it... you can shrink the bones or expand them to make the line tight or loose. As to the line from the tip of the rod, you could do a similar dynamic chain, but it may have to be very long. Vern has good ideas along these lines although I'm not sure the cloth one would work, I've never tried a single spline with cloth applied, although it sounds very possible.
-
Korken mentioned that he needed to get the LED to look more convincing. So this flashlight has no lens, it is an LED flashlight therefore the LED is open. Right Korken?
-
Funny this should come up... one of my fellow MMZ members was working on Futurama at the time of its production... I'll miss that show...
-
GAIL: The City [slight nudity]
MMZ_TimeLord replied to patrick_j_clarke's topic in Work In Progress / Sweatbox
Excellent work... the final render came out beautifully! Way to go Patrick! -
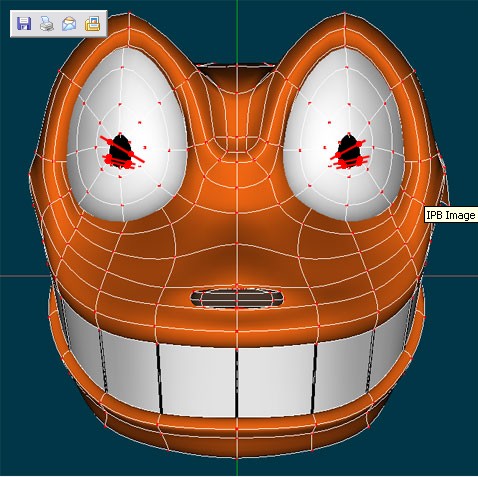
Looks good so far... keep going! One thing of note... on the pupils, if you delete the center CP(s) and draw out a four point spline outside of the model and attach the two middle points to two points on the edge of the pupil that are a total of four CPs apart, you can create a four cp patch and make the front of the pupil flat. Once you have the four CP splines attached, you can delete the outer two CPs and then you have a single indpendent spline that bridges the gap straight across. Like so... [attachmentid=13805]
-
Awww... poor little guy... I'd let him in... Excellent animation! Great work again shaun!
-
That looks really nice! I especially like the way the rocks splash back down. The water looks really like water before the flood too... and looks like raging water when it comes. My only critique is the last rock falls a bit slow... Otherwise EXCELLENT work!
-
Okay John3D... I am officially blown away... again. I really need to start playing with sweeper...
-
That was a problem with the model on a specific A:M CD (I forget which one)... there is a a corrected model in Hash's site. Maybe that should be edited into the first post of the thread so that folks will be aware of it immediately. Other bugs/model discrepencies like this should also be edited into the first post so that beginning students don't have to struggle, thinking it's something they did wrong.
-
Earth with Hi-Res textures
MMZ_TimeLord replied to MMZ_TimeLord's topic in Work In Progress / Sweatbox
Yeah, check the Project Earth thread for further developments... back in 2003 when I originally built this model, I made the mistake of cylindrically mapping the decals... DOH! The fix will be posted in the next release of the models. -
WIP: GAIL Female Android [SLIGHT NUDITY]
MMZ_TimeLord replied to patrick_j_clarke's topic in Work In Progress / Sweatbox
Found this thread (dunno how I missed it) did you get this lovely android to print? If so, do you have a final render to share? -
I think that we could recommend specific codecs (standard ones) that allow for good compression. Resolution recommendations for each project are probably a good idea too. Based on machine specifications of course too. i.e.- I rendered most of my stills in my choreography window and just did a screen capture (Alt+PrtScreen on PC) and pasted into Paint Shop Pro and saved with a high quality setting (Any paint program that can save JPG is fine, GIMP is a freeware Photoshop clone for example). For the animated tutorials I generally went with 320x240 or 640x480 and used QuickTime with Sorensen 3 compression on low. (Had to resample the sound bite for 'Can you say that' so the quicktime would come in at under 1MB. I don't like AVI files as much, so someone else would have to make a recomendation on the codec for that one. If you are running on a slower CPU, say around 1Ghz or slower or you don't have time to wait for renders, then 320x240 stills (size your choreography window down) and 160x120 movie files would be acceptable too. Should be about a quarter of the render time. As to the 'simple' things such as Robert-Jank was mentioning on getting the keyframe. A lot of these little tips are in the video turtorials. Maybe they need to be compiled into a 'quick-tip' list along with the latest and greatest keyboard shortcut list (I know I can never find one when I need it!)
-
my sweeper plugin works in v13 directly
MMZ_TimeLord replied to johnl3d's topic in Work In Progress / Sweatbox
Excellent John! I'll have to start using that again... -
Earth with Hi-Res textures
MMZ_TimeLord replied to MMZ_TimeLord's topic in Work In Progress / Sweatbox
Yeah, but you know some nut (like me) is gonna get close to Mt. Everest or something with the camera and complain that it doesn't have any height. -
Earth with Hi-Res textures
MMZ_TimeLord replied to MMZ_TimeLord's topic in Work In Progress / Sweatbox
Julian, You must have the search gift, I was looking for those images most of the evening last night on visible earth... GEEZ... I'll compile those with the land, ice and sea color original images... for all 12 months of the year in different target resolutions. Thanks again for the links Julian! -
Earth with Hi-Res textures
MMZ_TimeLord replied to MMZ_TimeLord's topic in Work In Progress / Sweatbox
Quick update... I got all the images I need to create the set for the project. I've given up on trying to find totally free images that are ready for putting on a globe at the resolutions I want (up to 4096x1536). So, I'm going to make royalty, license free ones (with the appropriate Terms of Use agreements from NASA and the National Geophysical Data Center, yes I checked they just want credit for the original data) just for all the Hasher's out there... okay everyone else too... but just this once. I've already gotten the displacement/bump map converted from a colored topographical map. Now I've got to color the oceans properly from another image from the Visible Earth site and last, create the specular image. Then, I'll re-render this thing, make multiple projects with different times of the year, and resolution targets and zip it all up and send it to Hash (if they still want it for the next extras CD). -
Earth with Hi-Res textures
MMZ_TimeLord replied to MMZ_TimeLord's topic in Work In Progress / Sweatbox
Thanks for the search on that Julian, I was at work (oops four letter word there! ) and didn't have time to dig into it any further. I'll see about getting the NASA ones to work for the project too... Thanks for the links! EDIT: Funny, after looking over this catalog again, I realized that I have the city lights at 30k and the clouds at 8192 already and that is what was used (although I sized down the city lights some). I'll grab one of the color JPGs (or maybe all of them!) and include those in my project along with a readme to give credit to NASA!