R Reynolds
-
Posts
176 -
Joined
-
Last visited
-
Days Won
47
Content Type
Profiles
Forums
Events
Everything posted by R Reynolds
-
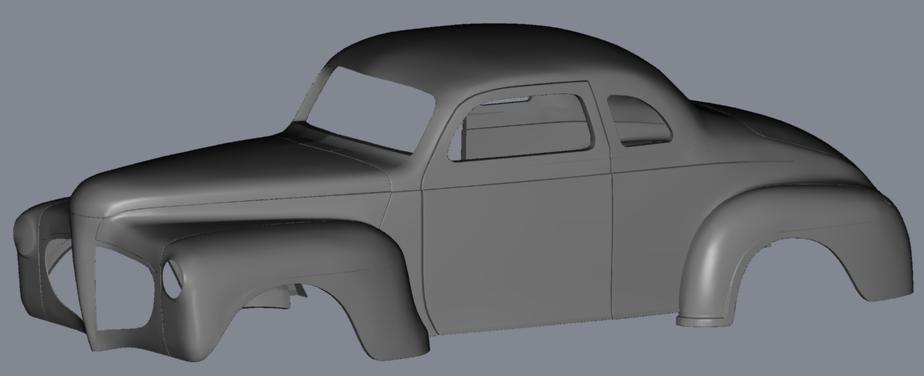
I find it difficult to see details in surfaces that appear to be pure white. It would be more revealing to set the model's attributes to the following values: diffuse color = 128,128,128 specular color = 255, 255, 255 specular size = 50 specular intensity = 50 then re-render and re-post.
-
Right you are. One of the advantages to using scale models as prototypes is you can easily build up reasonably accurate rotos by cutting and pasting sections of sequential images. No kidding. Some of the views at suurland.com are almost cartoonish in their lack of detail. And ortho top views are really rare.
-
No, that's all pure splinage; see first image. No, but I do own a 1/25 scale styrene model that (along with images from the net) serves as my reference prototype and rotoscope source; see second image. The road beside the stadium is a standard route; I couldn't miss it as I was driving by.

-
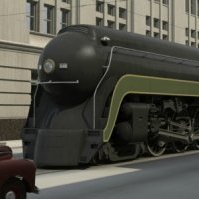
It's also a function of the lighting. The newest key (second from right) has a larger specular intensity value but its position is such that the light it reflects isn't aimed at the camera. The ring's diffuse color is black and has spec. inten. = 100; spec. size = 1; reflectivity = 60. Once again it's more a question of composition. The ring is in the wrong place to reflect the back light and the surrounding environment reflected in the rings' surface is just the camera background color, grayish blue. Yeah, this is a wood material that I never expected to withstand this level of scrutiny. I went back and forth on a logo. Since I want to be able to insert these keys into the ignition of any of my vehicles I thought it best to make it generic. (I would also like to think that in the year my CG railroad set exists (1953) the concept of branding every marketable object was blissfully uncommon). So I went with a brushed aluminum by way of SymbiontAM; not perfect but an acceptable compromise that seems necessary for any texture that tries to mimic ground or brushed metal. It's all a question of personal taste. I probably hurt myself by breaking what I consider a cardinal rule of hardware modeling; I didn't fillet any of the 90 deg. corners. Edges made with a mag of 20 and tweaked gammas don't reflect light in a convincingly realistic way. The attached 360 deg. keyset spin movie makes me think it's time to stop tweaking and move on to other things. See attached images. I've decided to really detail the chassis (springs and drive train) and dashboard (cutouts for the radio and glove compartment) since I can re-use them in other vehicles. If I can get the work visa issue resolved I'll be spending a fair bit of time north of the river. Impressive but the textures on it are too bright and clean. keys_spin.mov
-
Talk about getting sidetracked. I was working on the dashboard for my '41 Plymouth when I had the thought that it would look more authentic with a key in the ignition. Then I realized that a single key would look a bit odd which led to more keys with different shapes on a ring and finally a fob. The keys have no teeth since I didn't want to further complicate the models and this lack of detail would unlikely be noticeable in typical shots of the car's interior. The large unassembled image was the test for the textures (all done with Enhance A:M combiners). Why is it relatively easy to make something look fresh-out-of-the-box new or rusty, dirty and decrepit but it takes many iterations to make an object look slightly used or sort of old? I still don't think I'm there yet but I'm getting close. The small assembled image is one frame out of a 360 deg. spin.
-
There are models of buildings in the Data/Models/Buildings directory on the CD. You may find it useful to open these and inspect how they're assembled.
-
Going down the action objects road is also an advantage if your archtecture has a lot of identical repeated details, elaborate columns for instance. You can build one really high density model and then add multiple copies of it in your assembly.act.
-
There are models of buildings in the Data/Models/Buildings directory on the CD. You may find it useful to open these and inspect how they're assembled.
-
As usual, excellent craftsmanship, Stian! If you're looking for a cargo to haul, I can offer you a lightly detailed, 40 ft. ISO container. parked Freightliner FLD120 with trailer
-
I've listed a few on this page, automotive modeling suggestions, that you may find useful.
-
I don't believe that's true, but I could be wrong. It's been a good long time since I've experimented with this kind of looped animation but I seem to remember (at least many versions ago) a check box that would automatically do what you've just described. I think it was related to stride length.
-
You realize, of course, that in the time it's taken to try to understand and work through relationships optimized for character animation, you could have set up 72 key frames (one every 5 deg.) to produce a completely convincing one_rev.act that would serve all your purposes. I like brute force. Your patience is rewarded with a result that's straightforward and can't fail. I have no access to the tutorial you mentioned but as shown in the attached image of a test I did for the valve gear of a steam locomotive, to ease the alignment of the components I put in multi-spline partial circles to transcribe the paths they are going to follow. Sometimes a graphical solution is the better solution.
-
You also might find something useful here: Modeling Corners and Edges
-
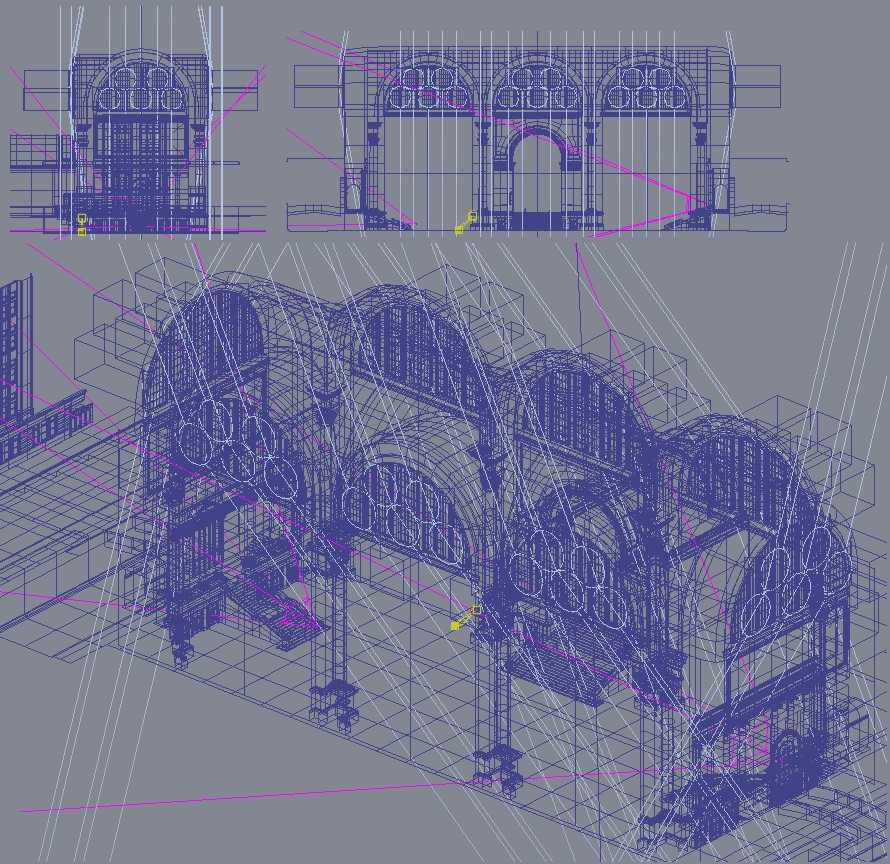
See attached image with a side, end and isometric views. Each of the eight semi-circular windows gets five instances of the same klieg resulting in 40 lights total. It's likely that I could get the same effect by using eight really huge kliegs but I haven't tested that yet. The lights are almost touching the window frames. The farther the lights are from the windows, the more distinct will be the shadows of the frames. Besides the external sun light source there's also a group of four low intensity lights within the room (you can see the selected bone of one of them highlighted in yellow). These shadowless sun style sources are aimed towards the four compass quadrants and upwards at a 45 deg. angle. to simulate light reflected from the floor. No radiosity, I haven't had the motivation to play with it yet and ambient occlusion isn't optimized to work inside closed rooms. I used render values I mentioned in my last post, 5x multi-pass, shadows on, two rays from the kliegs and five rays from the sun.
-
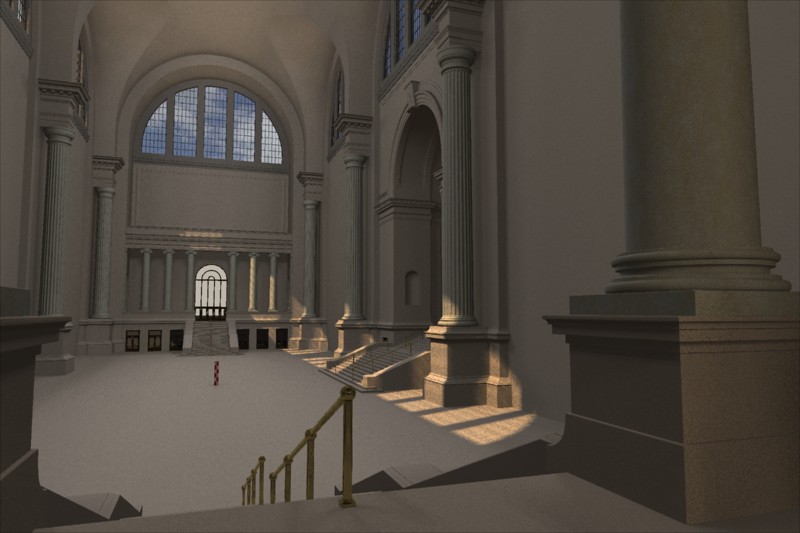
Due to the size and layout of the room your subject is not really inside (good for radiosity) and not really outside (good for ambient occlusion). You might try using multiple instances of a low intensity klieg with a large cone angle (160 -179 deg) to build an array of very large, overlapping lights just outside the window glass to simulate diffuse skylight. Render with at least 5x multi-pass and at least 2 rays per lamp. That's how I lit and rendered the large room in the attached image which has the "look" you might be trying for. You might also want to crank up the brightness of your sky. IMO, it appears overly dark, even for an oncoming thunderstorm.
-
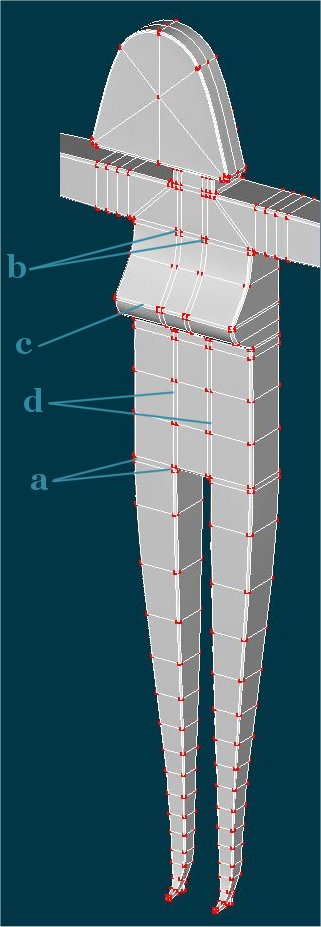
Patches are smoothest when the cp's are evenly spaced. Bunching them up in pairs tends to lead to creasing. Zoom in really tight on any of the short vertical splines marked a or b in the attached image. You'll find that their shapes are causing the creasing. You'll have to adjust their bias to get a smooth transition. You may want to try deleting the second horizontal spline marked c and adjusting the magnitude and bias of the vertical splines in that area to achieve the desired shape. You may also want to try using hooks to reduce the length of the two vertical splines marked d. There's no reason for them to run the length of the torso.
-
Civil War Ironclad Ships
R Reynolds replied to The Bird Man of Alcatraz's topic in Work In Progress / Sweatbox
I'm a strong believer in detailed modeling but I think you could lower the patch count by 50% or even 75% and still achieve the same results, especially in the hull, funnel, and railings. (The patch count in the two flagpoles are more typical). Is it possible that your concept of modeling has been skewed by the "other" animation programs that are polygon based? On the other hand, if your modeling concept is to never adjust a spline bias value, I understand. -
If you say so. I had no idea. Thanks for the tip.
-
Thanks Stian. The sun and it's negative blue shadow "clone" are casting two rays each. 5X multi-pass is on. It took just under 2 hours on a 1.5Ghz Athlon. But of course! It was a contract job for Dustin Productions which accounts for why it's doesn't come from the 1940's or 50's.
-
No sooner said than done; see attached image. The car is a bit too recent a vintage for my tastes but it was a convenient way to test my light levels. Glad to hear those pages are still useful to someone. It's funny how a simple b/w Fractal Sum bump material can add so much realism. And thanks again, Yves, for ambient occlusion. The street looks as good in the shade as it does in the sunshine.
-
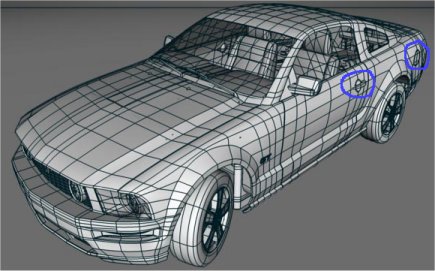
Another fine example of automotive craftsmenship, Stian. Would you please post a render of a side view close-up of the rear half of the Mustang? I'd like to see how even are the reflections through the 5 pointers around the handle pocket and the gas filler cap. Thanks.
-
This is just the ground floor of a multi-story building, the design of which is loosely based on a local building (but it's not called the Brill Building). The sidewalk needs more dirt and clutter. And yes, there is a clone of the building across the street so there's something to reflect in the windows. Next step is the upper floors.
-
You say that like it's a bad thing. But at least the crosses would perfectly scaled. I don't think they'd have any problem with them as long as they were believeably accurate but they wouldn't be a big hit with the magazine's advertising department. A CG railroad is the ultimate scratch building project (especially in A:M) but not one of the hundreds of vendors in MR magazine have anything that's useful to me other than the prototype blueprints and nobody seems to sell those.
-
Thanks for all the kind comments. I couldn't agree more. Except for a few brief diversions, everything I've done in A:M since v1 has been focused on my personal rail empire. Only what you've already seen. It's a slow process. As desktop hardware, A:M's capabilities and my personal standards of realism have improved, I've had to redo (and re-redo) a number of models and sets. If you ever do give it a try, on one of the A:M Extra CD's I donated a generic freight car chassis (frame, wheels, couplers, etc.). So you'd only have to build the bodies. And somewhere there's a diesel locomotive model that Jeff Cantin donated. If you've ever seen antique hand tools or cutlery with the term "drop forged" stamped in them, chances are good that it was made using a similar tool. I think it was Jeff Cantin who said texturing may be more important than modeling when it comes to simulating real objects. I think it's a three way tie; modeling, texturing and lighting. You can't skimp on any one them. This isn't the texture version that's in the workshop since it uses Enhance A:M combiners (on which I've really become dependent). The major difference is that the workshop version has no chipped and rusting paint, mostly metalRustySteel.dsts. Maybe Nancy might take a swing at the hammer. That'd be interesting.
-
My final textured version of the steam hammer. The texturing uses standard A:M combiners, two Darktrees and more than a few Enhance A:M combiners.