R Reynolds
-
Posts
176 -
Joined
-
Last visited
-
Days Won
47
Content Type
Profiles
Forums
Events
Everything posted by R Reynolds
-
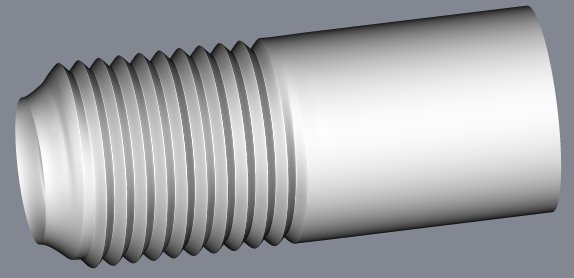
This chunk of threaded rod (1.4 in. diameter) is cut from a larger assembly I'm working on. If it would help anyone, I can make it available for uploading.

-
Excellent work.
-
I don't think you have much choice other than adjusting bias values. And while you're object looks a bit spline heavy for such an apparently simple shape, surely tweaking bias won't take that long. Some of your problem comes from the fact that your patches aren't symmetric. Ideally all cp's should be the same distance from it's neighbours but I think tweaking is faster than rebuilding.
-
Is there some reason it has to be fast? A:M is not optimized to do fast, precise mechanical modeling (character animation doesn't need a special tool to simplify cutting and folding sheet metal type surfaces). So your only option is to cut every spline and stitch along their edges. (I would have made each part individually from the start; but that's just me). I would suggest the following sequence: select the spline to be cut hit the Insert cp button hit the Tab key hit the Insert cp button again hit the Tab key again hit the Break spline button This way you'll end up with a dangling spline from both parts on either side of the new gap. Then the fun begins as you tweak bias values to smooth the surfaces. (Default bias values are calculated to simplify character animation which may not be the optimum bias values to model realistically smooth automotive surfaces). When it comes to forming the rolled edges, I'm aware of two choices: http://www.ypoart.com/tutorials/bevels-intro.htm http://www3.sympatico.ca/rodger.reynolds/f...fillet_tute.htm Obviously I'm biased towards the second choice.
-
You seem to be well along in your modeling but you might find something useful here; http://www3.sympatico.ca/rodger.reynolds/a...e/auto_tute.htm My only suggestion is if you're really serious about splining realistically smooth automotive surfaces, try setting your default material specular size and intensity to 50. You'll see every wave, crease and dimple. Happy tweaking.
-
I'd suggest decals for such things as mud splatters on the landing gear and the surrounding wing and fuselage surfaces; oil streaks along the fuselage with the heaviest density nearest the engine; possibly some hand stitched patches (not Hash patches ) on the rear control surfaces; dirty hand prints and grunge around the cockpit's edge where the pilot hauls himself aboard. I would also suggest you apply some bump maps to break up the unnaturally smooth fuselage to suggest the underlying wooden frame distorting the stretched fabric.
-
Exactly.
-
I would suggest building the bevel the "opposite" way. Don't start with the perimeter spline. Start building the spline in cross-section as shown in the attached image. Extrude it once longitudinally, check for creases and tweak bias values as necessary. Then continue extruding to outline the rectangular shape you're after. BTW 26 cents per gallon; now those were the days
-
Since I don't know the actual shape you're going for this may be a useless nitpick. However I would suggest a little bias driven crease reduction is called for along the areas I've indicated especially around the price indicator where you seem to have a raised edge before dropping into the cut-out. I think industrial design for this era of pump would have gone for a smoother, more streamlined look. But you're the final judge.
-
Most impressive!
-
I wasn't really going for anything that specific. But you're probably right since I was inspired by the look of the welding on the aluminum frame of my bicycle. Nice call!
-
I would be interested to see how smooth your sphere's surface is leading up to the hole. Please, try setting the specular colour of your model to white, the specular intensity and size to 50 and re-render. Thanks.
-
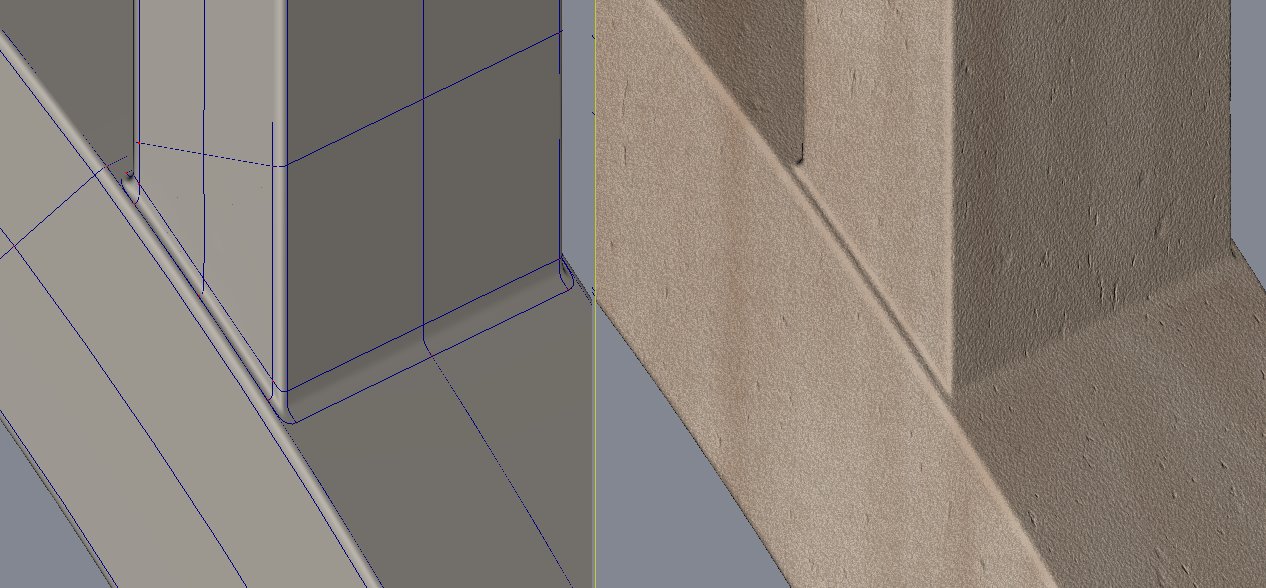
It's rare for one of my modeling brainwaves to work right out of the gate with no rethinks and no tweaks. But lightning does strike occasionally. The image shows the first test renders of a bump decal to simulate the look of a welded joint either butt or fillet. As is usual for me the decal started out as a spline model with a black to white gradient material applied. If anyone's interested I can make the model and material available.
-
Andrew, I have a few suggestions for improving the realism of your model; The external surfaces are much too wavy to be realistic. This is revealed in the uneven reflections of the car's surroundings. It's most severe along the belt line on the passenger door and rear quarter panel and along the roof just above the passenger window but there are examples of waviness all over your model. No assembly plant would ever release a vehicle with this level of sheet metal quality. Unfortunately A:M puts ease of character animation well ahead of easy modeling of smoothly curving surfaces. So your only choice is to go into the model and tweak the bias values along these surfaces to minimize the waves. It appears to me that you are using a bump or displacement decal to build the door pocket and handle. I think such a shortcut can't work on a vehicle that's going to get this close to the camera. Model the door handle and pocket. And put a door liner on the interior so you can't see the door handle from the inside. It looks like you are also using a displacement decal to build the gaps at the edge of the door and a colour decal for the gap around the hood. Once again if you want to cheat like this don't let the car fill the full frame of the camera. Same advice for using a decal for the gas filler cap. And the trailing edge of the gas cap shows an unrealistic bend in the panel. I'm not really sure what's happening with your A pillars (the columns between the trailing edge of the hood and the leading edge of the roof). The passenger pillar seems to be on the outside of the windshield glass but the driver's pillar seems to be in the interior. Time to take another look at your reference images. If your goal is to build a model that will fill the frame of the camera and come under close scrutiny, you've got to be willing to sweat the details. BTW; Turn on anti-aliasing before your next render to smooth the jagged edges in the image.
-
Good architectural rendering. The directions of the shadows from the skylight lattice suggest that the exterior light is coming from a nearby frosted window as opposed to direct sunlight. Is this what you had in mind? Are the four spheres supported by the art deco fixtures on the landing going to be internally illuminated?
-
Distortion in very simple model
R Reynolds replied to Eric2575's topic in Work In Progress / Sweatbox
You seem to be dissatisfied with the slight creasing around the corner. You might try increasing the magnitude of the "circumferential" splines that define that corner. I usually use a mag = 167 but you may be happy with a different value. -
I would suggest that if you're going to give the surfaces a low amplitude random waviness to suggest that they are sheets of metal that you apply those as a material. Make a black and white material with a Fractal Sum turbulence combiner and apply it as a bump material. You'll have to experiment with scale and bump percent to achieve the desired size and severity. You may also want to group the hull plates in alternating sections. Add the same material to each group but in one of them add a significant translation in x, y or z to generate a different pattern. That way you won't have the same wave pattern shared by adjoining plates. As for rivet bump maps you don't necessarily have to flatten as long as you rotate the surface of interest within the window such that you are viewing it othogonally and then apply the decal. You're going to have to be careful about your use of bump maps. In the sample image you're getting very distinct shadows being cast by the rivets. I don't think bump map rivets will give you the same look.
-
Beautiful work but I can't see James Mason through the window playing the pipe organ.
-
Is the handle recess in the door surface a bump map?
-
Excellent work. Compared to the front view, where she's compressing the seat cushion, in the side view she seems to be a bit weightless.
-
It also refers to adjusting the bias values of the splines to obtain realistically smooth surfaces.
-
The motto of anyone who has modelled exterior automotive surfaces in A:M.
-
Unfortunately, you may have to compromise your design to work around A:M's mechanical modelling limitations. If you want to stick with the present scoop design, you can form a hole in the hood using hooks and 5 pointers that is similar in shape to the scoop. Then hide the edge of the hole inside the rolled edge of the scoop which also hides the fact that they don't match exactly. If you want the hood surface to smoothly transition into the scoop I think you're going to have to rethink the scoop shape based on what you can get Hash patches to do.
-
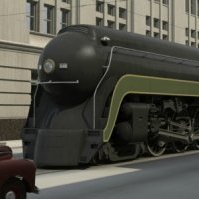
Good first effort. The roof signage looks a bit too large, IMO. Is it an original design? I don't recognize the prototype.
-
To join, or not to join, that is....
R Reynolds replied to Eric2575's topic in Work In Progress / Sweatbox
As an example see attached image. As long as you put in some bias tweaking time to get all splines aligned, after decaling and texturing no one will know that the model is not a single mesh.