MattWBradbury
-
Posts
1,410 -
Joined
-
Last visited
Content Type
Profiles
Forums
Events
Everything posted by MattWBradbury
-
Photoshops a good start. Create a image with deminsions 1000X1000 pixels. Set the foreground color to black, and the background color to white. Go to Filters > Render > Fibers You can adjust some of the settings, but I find that a variance of 15 and a strength of 45 work well. Go to Filters > Polar Coordinates Choose Rectangular to Polar. You should be seeing something like this now: You can do a lot of things with this map including coloring it, Or, you can use it as a bump map for the iris and use gradients for the color on the actual eye. Apply this to your iris so that you get the good part of the image and not the expanded or subspanded parts of the image applied to surfaces.

-
Reflection study-mettaur
MattWBradbury replied to the_black_mage's topic in Work In Progress / Sweatbox
Are you sure that's an HDR image? I only ever found that environment in LDR. Still, a good wack at HDRI. -
Also remember that when you change a variable on a frame, A:M will try to create an accurate transition from the previous key frame for that variable; if you want something to stop in one frame, you'll have to create two key frames (one just before it is to stop with the starting emission level, and one with zero emmissions). Let me know if that needs clarification.
-
If you showed some screen shots or concept art of your plans, more people would be interested in it.
-
Is the planet real, or is that a background image?
-
Well, it depends on the kind of look you're going for. Humans are usually 7.5 to 8 heads tall, but if you want a stylized look, you make them 9 heads tall like the tarzan model. The modle's arms are always as long from the top of the head to the bottom of the feet. I don't know about the drawing man though. His proportions look a little off. Maybe he's leaning forward?
-
Why not make your own IBL images? All you need is two tripods, a reflective sphere, and a digital camera that you can set the exposures with. Could you render out an image in IBL Spline mode with the windows not on the model so we can see the insides? You also might want to do a little bluring on the background if you're going to use that high of a resolution.
-
For dirty carpet, just add a floating patch with the dirty decal on it with an alpha channel as I did in this image:
-
Great! You have a brand new tool to help you create your Lost World.
-
Try building your floor plan first. Then after you've got a good looking room from a design point of view, you can at the verticle elements of your rooms. As for city scapes, sketch out a simple layout for your city. Start by adding some simple roads, and then add buildings.
-
Animation:Master is very easy to use. Its user interface resembles that of Windows, so it shouldn't take much time at all for you or your children to learn how to use the program. A:M also works very well on Windows.
-
You can cut a lot of patch count on the feet. I'm not sure what happened to the venting on the back. It looks like some goemetry got mixed up. Other than that the model looks really good.
-
After you've put some buffers into a new composite, if you want to save the image, go to Save as Animation, then click on the ellipses (...), choose Open EXR as the Image File, and save the file under a different name. This process will combine all of your buffers together, so make sure you keep your backup safe.
-
automotive- AUDI TT car modeling
MattWBradbury replied to Jin-Kazama's topic in Work In Progress / Sweatbox
Have you tried using exr decals on a patch hovering above the car? It's what Stian is using on his truck model. -
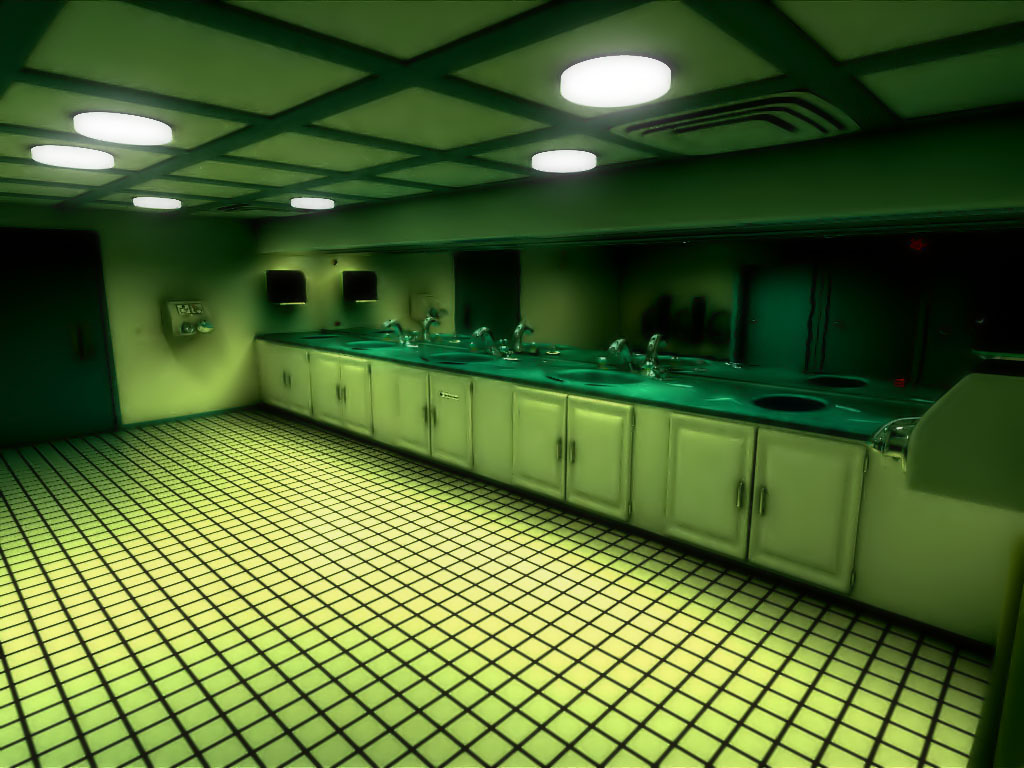
How about a creepy color filter for the bathroom?
-
AO does not penetarte through geometry, so if you have a transparent surface, A:M will render it as if it were completely opaque. A way to get around this is to make any transparent surfaces in another model which does not cast AO. I'm hopping that Yves allows for individual groups to cast AO in a single model, but he's got his hands full as it is. The very bright reflections are not a result of AO. There is a patch with an EXR decal applied to it. This decal has color values much brighter than white so you can get more intense reflections.
-
Chris, I was taking a look at your model and I found a few things a little odd. Your light covers don't seem to be transparent, and the actual bulbs arn't below the cieling line. You've also covered up all of the detailing on the vents. I have no idea what you've done with the cieling model, but I cannot get Ray traced lights to work when that particular model is active; it must be something with the boolean cutters. It appears that you're missing one light in the dead center of the room. I modified the scene a little so I could see what I would look like with Radiosity. I should have done a better render, but this was just a quick test. ------- I did a bit of edditing to get a little better results with photon mapping. I noticed that. For some reason, Lights cannot exsist inside of a boolean cutter.
-
I did the documentation for A:M Features, and some of the writing is not 100% clear.
-
That's Ambiant Occlusion. If you don't have V13.0 or higher, you can use skylights to get the same look.
-
Crafton Hills Art Project
MattWBradbury replied to DanCBradbury's topic in Work In Progress / Sweatbox
In this example, we brought the real world into 3D, and that allowed us to generate the numerous data points we would need inorder to accuratly reporduce the image in the real world. The first day we put it up I would walk by people just staring at the image asking just how we got it so perfectly. -
Crafton Hills Art Project
MattWBradbury replied to DanCBradbury's topic in Work In Progress / Sweatbox
The majority of the demensions were measured by hand with a measuring tape. The only block that we could not measure was the elevated office building, so we used the original blue prints for that. -
realistic water spray
MattWBradbury replied to Erik van Schaaik's topic in Work In Progress / Sweatbox
Someone made a really nice looking fountain a while back. I think they used moving textures as normal maps and moving transparency maps inorder to make it look like the water was flowing. They simply had static patches and the texture applied to them. You can make these textures using a moving material. Make sure to set the index of refraction to 1.33 on all of the water patches so you get a good look. -
I've updated the wiki so that it becomes more apparent that increasing sampling will dramatically increase rendering times.
-
Crafton Hills Art Project
MattWBradbury replied to DanCBradbury's topic in Work In Progress / Sweatbox
Watch the time laps animation and you'll see just how long it took based off of how much the shadows are moving. -
Five hours?!?! Don't set the AO Sampling to 100%, set the Occlusion to 100%. You can get away with a lot if you have textured models like your tank. Set the sampling to 10% and set multipass to 16 passes. Make sure the Key light in the choreography casts 100% dark shadows with 2 ray casts. I would also suggest getting rid of the Yellow klieg and the blue fill light. Set the AO color to the default color of the camera to make your shadows realisticly blue RGB(166, 202, 240); also set the color of the fill light to a yellowish tint RGB(255, 239, 202) and increase it's intensity to 125%; you might want to decrease the width to 10cm on the key light so you don't get very blury shadows. That should make your renders look a lot nicer, more realistic, and not take 5 hours (probably won't take longer than 20 minutes at the resolution you've posted but would be much shorter if you had a lower patch model). ----------------- Here's a render I just did: I just droped the model into the choreography and rendered with these settings: 16 pass multipass w/ Soften Shadows This render is VGA and took 0:53 minutes to render (that's 53 seconds not 53 minutes). I then made the Key Light Cast Shadows: The same settings were used. This render took 1:51 minutes to render. I then deleted both the Rim and Fill light and added AO: The AO Settings were: Sampling 10%, 100% Ambiance, 100% Occlusion with a Blue Global Color. Other than that it was the same settings. This render took 3:54 minutes to render. If you find that the shadows are a bit darker than what you want, you can decrease the occlusion: In this image, I've set the occlusion to 80%. This image took 3:51 minutes to render. Oh, and here's what a render will look like if your Key light has a larger width: The penumbra becomes much larger at shorter distances, which is unatural.