-
Posts
28,396 -
Joined
-
Last visited
-
Days Won
424
Content Type
Profiles
Forums
Events
Everything posted by robcat2075
-

a kids room for a personal animation!!!!!
robcat2075 replied to pelonppp's topic in Work In Progress / Sweatbox
If I had to quibble I'd say the curve on the train track varies too much. But a fine looking image! -
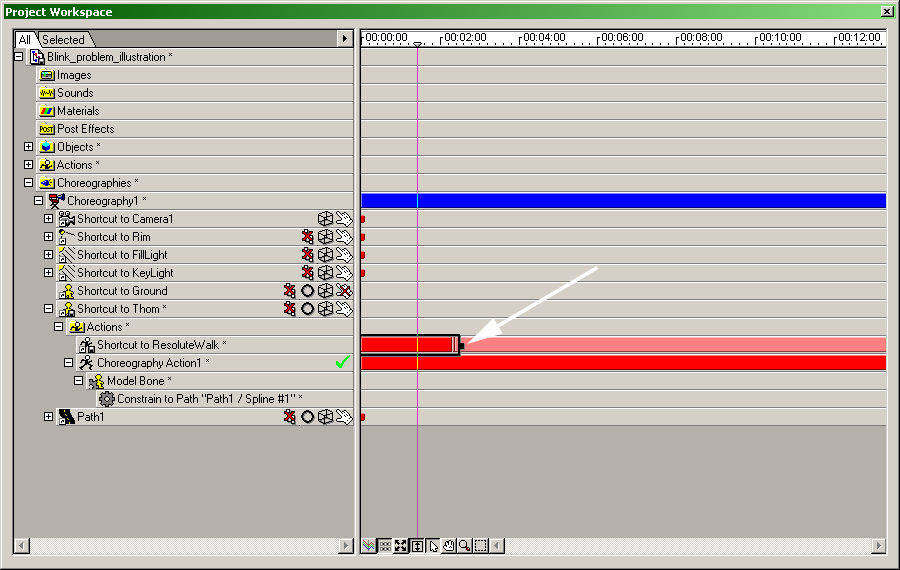
you may have "has stride length" OFF in your action properties. or... in your project workspace check that the redbar for the action is as long as you want the walk to be. [attachmentid=23187] If not click it and drag the end out.
-
You may need to explain that more. Do you have your "key bone" filter on instead of "key model"?
-
what isn't working? In the project workspace window: Sounds>Right-Click>import sound drag that into the chor
-
As long as they are sequentially numbered, and you "Import>Animation or Image sequence" they should come in in one swoop. You may need to set the correct FPS in the image sequence's properties panel afterwards
-
export "Movie to Image Sequence", choose targas. Those will work.
-
In the properties for "Ground" turn Options>cast shadows to ON to single thickness shadows to show up. I forget the explanation about why the ground casting shadows has anything to do with this but it does in some CG way.
-
Congratulations! Of course this means you are now responsible for explaining booleans to the next new user who comes along wondering how they work.
-
that looks cool! suppose you didn't use a force, but moved the car away from the emitted sprites. Then suppose you locked the camera and the scenery to the car so it appeared the sprites were moving and not the car, etc. You could create almost any complex path that way.
-
That's looking very sharp! Rigging it looks like an adventure.
-
Wonderful models, Paul! I'm glad Santa got rid of the reindeer. I understand they were terrible greenhouse gas emitters.
-
Great looking models!
-
That was cute. I must admit I didn't understand the cause of the disagreement between Misters Box and Fridge. It seemed to be an unprovoked altercation.
-
Last I heard, Pixar doesn't use Maya, not for animation anyway. They've been using a program they developed themselves called "Marionette". Internally they call it something else. They have released a version of Renderman for Maya, that may be the cause of confusion. from the Pixar FAQ page My advice would be to find out what app your school will be teaching its courses on. Learn that one. Then if you have a question about it someone onthe faculty will have the responsibility to answer it since it was the school's choice. I'm not guaranteeing they will fulfill that responsibility but at least you're in step with the program. If you were thinking of taking models you made in Maya and using them in A:M, forget that. The nature of the models is very different. Make your models in A:M. If you were having trouble animating in A:M, the bad news is that Maya's interface paradigm is just about identical. The buttons are in different places, they may have different names and different shapes , but basically it's all about bones and key frames and channels just like in animation master except it's not as well thought out. Maya's timeline is a very primitive creature.
-
The ball is just a demonstration of the core concept of the stretching motion blur. You'll need to adapt the technique to your very specific needs. it will take much tinkering, just as the people at who made the original effect had to spend much time getting it just right. Want something to brighten? animate it brightening. change it's color, change it's ambient color... there are different ways. it's in V13. You need V13 to open it.
-
I believe the original star trek warp drive effect was created by moving the motion controlled model in front of the camera while the shutter was open . the computer motion control moved the model precisely over varying distances during each frame to create the streak effect . If you are willing to animate on the sub frame level , you can get similar effects with multipass in animation master . the ball in this animation is moved varying distances forward and back within each frame. [attachmentid=22754] the project with sub-frame animation [attachmentid=22755] however, multi pass averages all the sub frames together resulting in a somewhat darker blur than one would get on film. it's possible that animation master's high dynamic range rendering might enable a more authentic effect with multi pass , but I'm not familiar with HD rendering yet . warpblur3H.mov warpblur.zip
-
ok, that would be a scary ride.
-
you really mean holding shift while you click on a spline while in add mode , right ? just pressing shift-a couldn't possibly know where to put the new CP.
-
Ok, that part was out of date. Add-lock behavior is the normal default mode of the Add tool now. The old simple Add just drew 2 CPs and stopped... I think.
-
Guess which intersection is BAD... [attachmentid=22667] bad spline continuity causes creases and weird shading artifacts . Splines like to cross like an X. they don't like to bounce off each other like two parentheses )( the basic splinesmanship pages are still solid advice. can you point to an example that didn't seem right ?
-
That Skylark tut is a classic. Anyway, I believe "spline direction" refers to how splines "meet". More often called "spline continuity" . [attachmentid=22665] Crossing GOOD... bouncing off each other BAD. They can appear the same, especially if they are peaked at the meeting point. But the bad way is really bad.
-
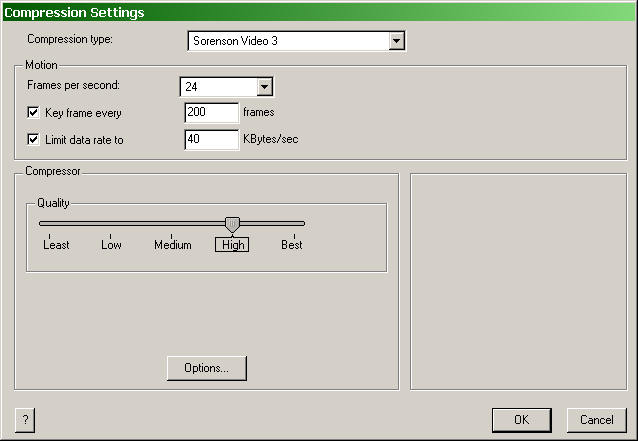
Look's like you've got a good start. A 5-10 second clip ought to fit here easily. try these compression settings. [attachmentid=22619] increase the KB/sec setting if the image is too blurry
-
Maybe your lens is not "focused". Maybe the objects you are looking at aren't the right distance. Maybe your index of refraction is too high. You need three things: -your surface must have reflectivity -Your render settings must have Reflections "ON" -your scene must have something for the object to reflect.
-
What you're saying is that everytime you made a change you saved over the same file? Or hadn't even been saving at all? There's a lesson here Each of the asterisks above would definitely be a time to save a version of your model. model_001 model_002 model_003 Then, you'd be able to go back to the version just before the trouble started instead of having to go back to the very beginning. I'm guessing you altered the heirarchy of the bones accidentally. Or maybe have some CPs mis-assigned. But not knowing how you did it makes it tough to diagnose.
-
The "Show Some Backbone" tutorial shows how to scale the premade rig to fit a character. For most characters it will work well and you don't need know about most constraints. Follw the tut and scale it to match your character instead of Thom. But it doesn't cover constraints. If you want to know more about how the constraints work, here's a walk thru on the simplest possible IK leg Simplest_IK_Leg_H.mov Once you digest that there's a written tut on a more functional IK leg setup David Rogers' Tut


