robcat2075
-
Posts
28,396 -
Joined
-
Last visited
-
Days Won
424
Content Type
Profiles
Forums
Events
Everything posted by robcat2075
-
Failing 7-11, you can get packs of 3D glasses on ebay and then send some to your far-flung friends so they can see your 3D wonders on the web too. ebay search on 3D glasses red cyan
-
Once upona time there was a forum devoted to stereoscopicry Stereo Forum You can make stereoscopic images with A:M
-
Cool Looking Robots!
-

Finally, a working model from me!
robcat2075 replied to cribbidaj's topic in Work In Progress / Sweatbox
Please look at this and see if it's better. Admittedly, I have some work to do in timing and animating in A:M... I'd say I liked the 1-frame slap-down more than the 4-frame. The thing i note most is that the hips are too far back in relation to the feet. It's almost like he's pulling himself forward with his heel; he really should be pushing himself with the rear leg. But congratulations on getting your character working! It was years before I got to that point. -
Congratulations! That's doing quite well. We'll expect top see a frog animation some day. Onward and upward!
-
Welcome Lee! As always the more power the better. 1 gig of ram is pretty decent. a 1.6 gig CPU is on the lower "adequate" range these days graphic cards are not a big factor in speeding up A:M, your CPU is the main element I think your machine is fine to get started with A:M and explore it. You can decide later if your interest warrants a faster machine.
-
First make sure "Show Bias Handles" is selected inthe main A:M window then you can right-clock on a CP and choose "Peak" and be able to set the spline, both before and after the CP to any curve you want. If you don't want to peak the CP you can still adjust the magnitude of the bias on each side separately by holding SHIFT while you drag the handle. The post and pre extrapolation settings are something else entirely.
-
Wonderful effect. For some reason that says "Mother's Day" to me.
-
Noah answers some questions about his film in this thread http://www.hash.com/forums/index.php?s=&am...st&p=175934 But he had been using A:M for a number of years before he embarked on this particular project.
-
lighting, textures, shapes, animation. Those are all decisions you make. If you copy other peoples' looks, you will get work that looks like theirs. If you don't, you won't. It's up to you to be unique. not your graphics card or your program. Really, it seems everyone has answered as best they can on a forum. At this point you need to make the plunge to know more.
-
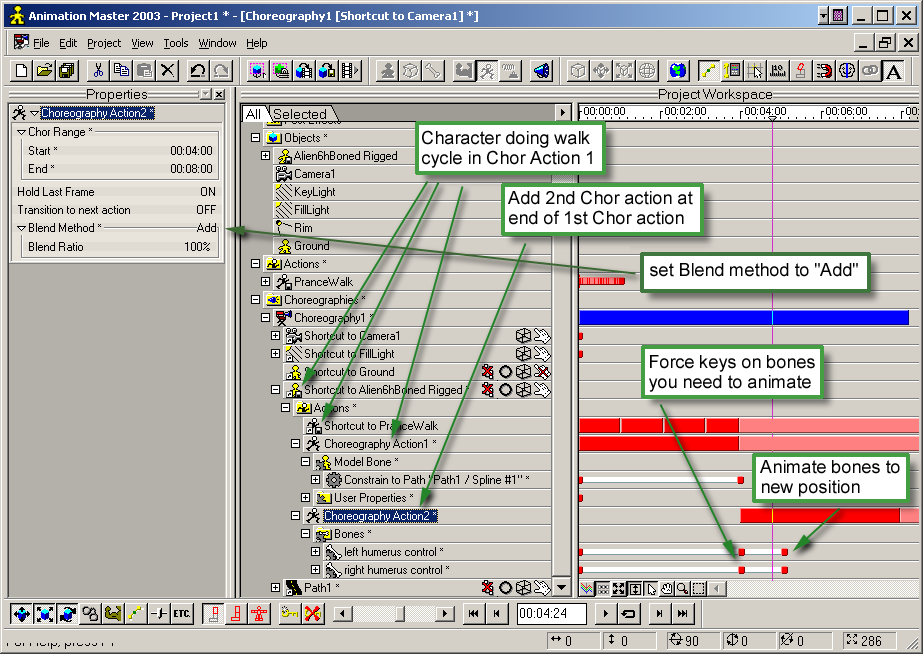
many animation situations are so specific that pre-existing actions won't do; everything is just animated directly in the chor. However, "second chor actions" can help in modifying premade actions. How to add any animation after any action

-
It's not that they couldn't, but given the large number of vertices in a polygonal model, manually selecting them and assigning individual weights would be impractical. I suspect weight maps are the only reasonable solution to refine weighting beyond general bone fall-offs. Even in A:M, individual weighting is tedious.
-
That's a wonderful looking character! Some sort of mad-scientist-time-travel-shrinking-wormhole story seems to be in the works. I have one thought about the glassware... try using a different material on the inside surface of the glass. the gradient on the inside is making it look another layer of glass rather than glass with thickness.
-
How about put it on Youtube instead? (you'll get more views, too)
-
render times... Are your lights all raytraced? Raytraced lights (sun type, lightbulb type) take longer than Kleig lights set to "shadow-map" You seem to have several shadow casting lights. Multiple lights take more time too. A daytime outdoor scene will only have one... the sun. You can make other "fill" lights non-shadow casting. Do you really need the reflection in the window? Make them dirty windows and it won't matter.
-
I'm surprised it works as fast as it does. When I zoom the guitar sample i noticed the "wires" dont' scale like the CPs. Hey, since you're writing model converters, how about a V13 to V11 converter?
-
Global Axis ON is the only way to keep the "reflections" correctly oriented (they're supposed to simulate a white dome above the car, not a dome off to one side.) The light on the ground seems excessive. Yes you could change the environment map to darken the reflections or even change their color. Many variations are possible. When you experiment, just change one thing at a time, so you know why the result is different. Edit: The map doesn't even have to have the dimensions that I used. For this image... http://www.hash.com/stills/displayimage.ph...um=23&pos=2 ... I used a bigger map that was black with a white square in the middle to make the shiny reflection on the red plastic on the front of the controller. As far as the aliasing, i dont think that's the global axis at work. Something else is mis set. You might also look into A:M's new Image Based Lighting for more accurate environmental reflection effects. But don't ask me how to set it up, I haven't used it yet.
-
Remember to turn "Global Axis" ON in the properties for the material in the model, or the reflections will appear painted on the car when you move it.
-
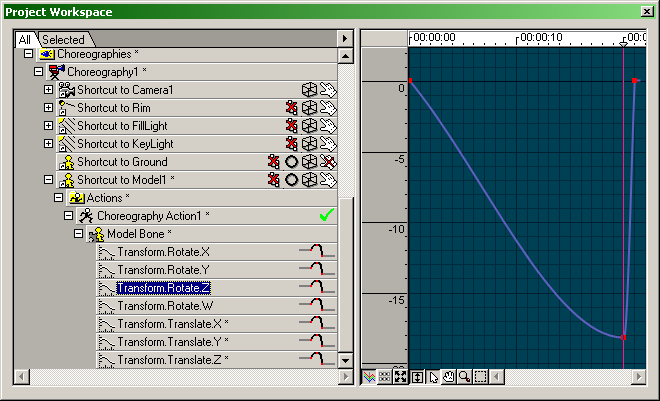
This is not a bug. What happens is that the rotation manipulators as well as the rotation edit boxes all allow the user to do the rotation in Euler because... But even if the bone is using Euler interp, channels are not displayed. The problem with that explanation is that we don't need a 4th D to describe translations, which could also be ambiguous depending on the observer, and when we do rotations on the screen we are able to unambiguously get any angle we want with just 3 dimensions.
-
This is an environment map inside a Gradient material, then the ambient intensity on the objects was cranked up to about 70% [attachmentid=23286] It's just a start but it didnt take 5 hours to render. PRJ: [attachmentid=23293] carpaint.zip
-
1. The behavior you describe seems like a bug. You might report it to www.hash.com/reports In the mean time you can get access to individual rotate channels by expanding your PWS outline and selecting one: [attachmentid=23283] 2. XYZ and W are channels for "Quaternion" interpolation. I've never seen an intelligible explanation of how it works, but you will never get "gymbal lock" on bones that use Quat. You can right click on that "rotate" transform property and choose "vector" or "Euler" interpolation, which use plain old XYand Z, but those can get gymbal lock. "Euler" is quite good for things that need to rotate on one axis only, like propellers. Quat is harder to edit but I've found small changes can be made safely by just moving the XY or Z keys.
-
Copying keyframes from one pose slider's channel to the channel for a different pose slider doesn't seem to be supported. I tried it (yes, I had my pose filter ON and tried both the KeyBone and Whole Model filters) but it doesn't work. It probably prevents unkowledgeable users from creating all manner of chaos by pasting things to they know not where. There aren't many situations in which you can paste keyframes between different named items. You can do it to model bones, you can do it between same-named items in different-named models, and CopyPasteMirror sort of does it among "left" and "right" bones (however, naming my pose sliders "left" and "right" didn't get me much)... that's about it I think.
-
An environment map does almost the same thing. It gets reflected off the model but you don't see the map "around" the model. an "occlusion pass" could be used in compositing to remove the differences between the environment map's simulated reflections and those environment spheres.
-
Same version of A:M on both macs? V12 can't load V13 data. were you trying to load a PRJ? if so, were the models embedded in the PRJ or were they saved separately? maybe you forgot to bring the separate files with you.
-
probably. Try shrinking it. Rule of thumb: if the decal is only going to be x pixels wide on the finished render, it only needs to be x pixels wide in your scan. Or it could be a lack of video card memory. does it show up in a render?