robcat2075
-
Posts
28,191 -
Joined
-
Last visited
-
Days Won
390
Content Type
Profiles
Forums
Events
Everything posted by robcat2075
-
try this... SettingPostExtrap.mov
-
If you turn on "Show more than drivers" on the object in the chor you can use the "Frame" property for the decal to make the value loop and repeat. Key it at 0 at frame 0 and at 23 at frame 23 then select both key frames and choose Post-Extrapolation>repeat
-
I forgot the circle thing

-
try this eh... dont' bother with those other 3D things... twice the buttons for half the result.
-
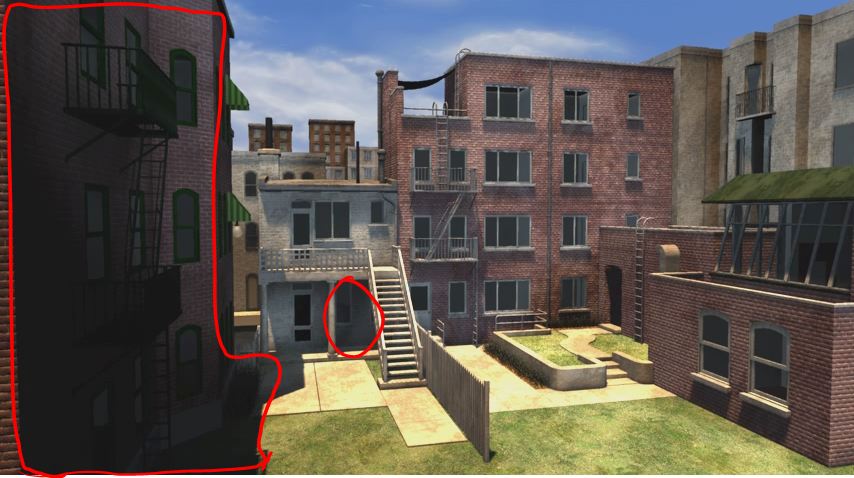
Th set looks great but I don't think we need the extra shadow. It's not motivated by anything the viewer will identify in the scene. On my ostensibly gamma appropriate monitor the areas I've circled are so dark that you couldn't stage any action there. The "night version" is also very very very dark. Too dark to put anything in. A strong moonlight would help a lot. Has someone worked out a plan for bridging the lighting differences between people's shots?
-
to amplify... in general, video clips that have been converted into numbered image sequences ( JPGs ro TGAs) work best in A:M. Many video editing apps or Quicktime Pro can convert video files to image sequences.
-
What does this look like now?
-
We'll make mental note to get started earlier on the 2012 project. We have a backlog of good ideas now so ti shouldn't take so long to get going..
-

Using Illustrator wizard (AI files) for modeling
robcat2075 replied to Vertexspline's topic in Work In Progress / Sweatbox
My thoughts.... It's not cheating. Art is what shows on the screen, how you got it there doesn't matter to the viewer. It's great for the types of things you listed especially if they need bevels. Drawbacks... the splining isn't as thoughtful as person would do. If you need to squash and stretch and bend an object as you might with a character you may need to rethink what it has done or build the object manually. -
May all your vertexes be CPs!
-
I guess i put it here to so it could be a "latest news" item at the top of the forum page. But perhaps our moderator could move it now. No, not yet, I should do that.
-
make sure your v16 test is v16b
-
I think this may be obsolete information or referring to something else. The current multipass "soften " is an ON/OFF setting with no value and does show up in the render without a post effect being used.
-
We should get that taken down and or replaced. That may be a source of major frustration to new users.
-
My own personal observation is that "soften" is a very slight effect. It seems to be most useful for improving the look of tight thin parallel lines such as one might see on radiator fins. My other advice is always go with regular render first for final work, it's faster and looks as good as 16 passes. Multi-pass for those one-pass tests and when some odd item doesn't exist in regualr render like EXR buffers or displacement maps.
-
Or in the model's model window, you can >New>camera to add a camera to the model. it is like a bone and you can drag it in the PWS to be a child of the main head bone if you wish, then aim it at teh face. In the chor you can select it by hitting num 1 until it comes up. Welcome to the forum, JohnP! You're inthe right place to ask questions.
-
Congratulations on your first step to animation! (I looked at that thumbnail image at the top and thought that was a zipper)
-
Projects are made to have things added to them. This should not be a problem. Saving something from a project should not be a problem. Some key element is missing from this description of events. Normally one can import eyeballs all day and not turn one's penguin orange. When something that odd happens, don't save anything. That's like saying you want to odd thing to be permanent. Quit. retrace your steps. As always, we'll need more info.
-
Multi-pass is... many passes! for 16 passes, for example, the camera renders the image at 16 points on a 4x4 grid within the space of one pixel and averages them together. This is to reduce aliasing. Because it does this for all pixels it is slower than the regular renderer which is smart enough to know which pixels need full anti-aliasing or not. A patch of blue sky need no antiialiasing. MP also can show tru motion blur because it can render the object as it moves thru space at slightly different positions within the time of one frame. Regualr renderer calcultes teh direction and velocity of a pixel a just the instant of the frame and adds a quick blur in that direction to simulate motion blur. It is very fast compared to MP. because MP can do more than 16 passes it has the potential for better Anti-aliasing than the regular render if you dont' mind the time expense. And for some, reason some features work only in MP. Not sure why.
-
For you Mr Robert.... Molto fabuloso! Those are very clever and beautiful looking.
-
/ will select all CPs connected to the one you have selected. I bet that was in TAoA:M.
-
I guess i don't understand how going to a different view solves the problem of not being able to see right from the first view if the first view is what you want.
-
If you select a group that has teh color you want, then hold down the shift key while you use the Patch Group Mode tool to select other patches they will be added to that first group. Probably easier to start over.
-
Could you explain more of the fix you found? I didn't quite follow it.
-
I love that! It's like a combination of a Spirograph and an atom smasher.