NancyGormezano
-
Posts
7,863 -
Joined
-
Last visited
-
Days Won
15
Content Type
Profiles
Forums
Events
Everything posted by NancyGormezano
-
nice!
-
I believe Kevin did say he had used the "snap to surface" feature with the imported obj, when laying down new splines. My guess it would be the "snap to surface" that is possibly creating the problem. Hard to tell from his description of his process.
-

grandson had bizarre idea of eyeball thermometer
NancyGormezano replied to johnl3d's topic in Tinkering Gnome's Workshop
smart kid! I would buy one. -
First animation with AM 64bit in windows 10
NancyGormezano replied to johnl3d's topic in Tinkering Gnome's Workshop
QT is only available in 32bit I believe. Render as a sequence in 64, then import sequence into QT pro , or into a:m 32, and save as QT movie. I believe it is because Apple isn't supporting QT 64. -
hoo-hooooo! This, young man, is exactly why I retired from the exciting world of government contracting at an early age. Government spec document writing requirements in engineering would bring me to soft sobs and eventually loud wailing in my regulation sized, windowless cubicle, wondering "what have I done wrong in a previous life, to suffer this anal-retentive drivel?" Soul-sucking conformity in document writing has been around since the "dust ages".
-
Submit your Insect Contest Image - Last Call... Monday!
NancyGormezano replied to robcat2075's topic in Contests/Challenges
Ta da! Just submitted image. Hoping to win inordinate amounts of moola in the Texas lottery ! -
When I was running XP, I could only run the 32bit version - Are you installing the correct version?
-
Your settings for glow? SSAO are? Pics before and after?
-
EDIT: Here is link to a SIMCLOTH tutorial and here is another link to another Cloth tutorial I would try the first link. I am not sure what the difference is between the 2 tutorials, as they were both done by Holmes Bryant. You will have to download a zip file for both - which includes I believe, some sample projects along with a pdf
-
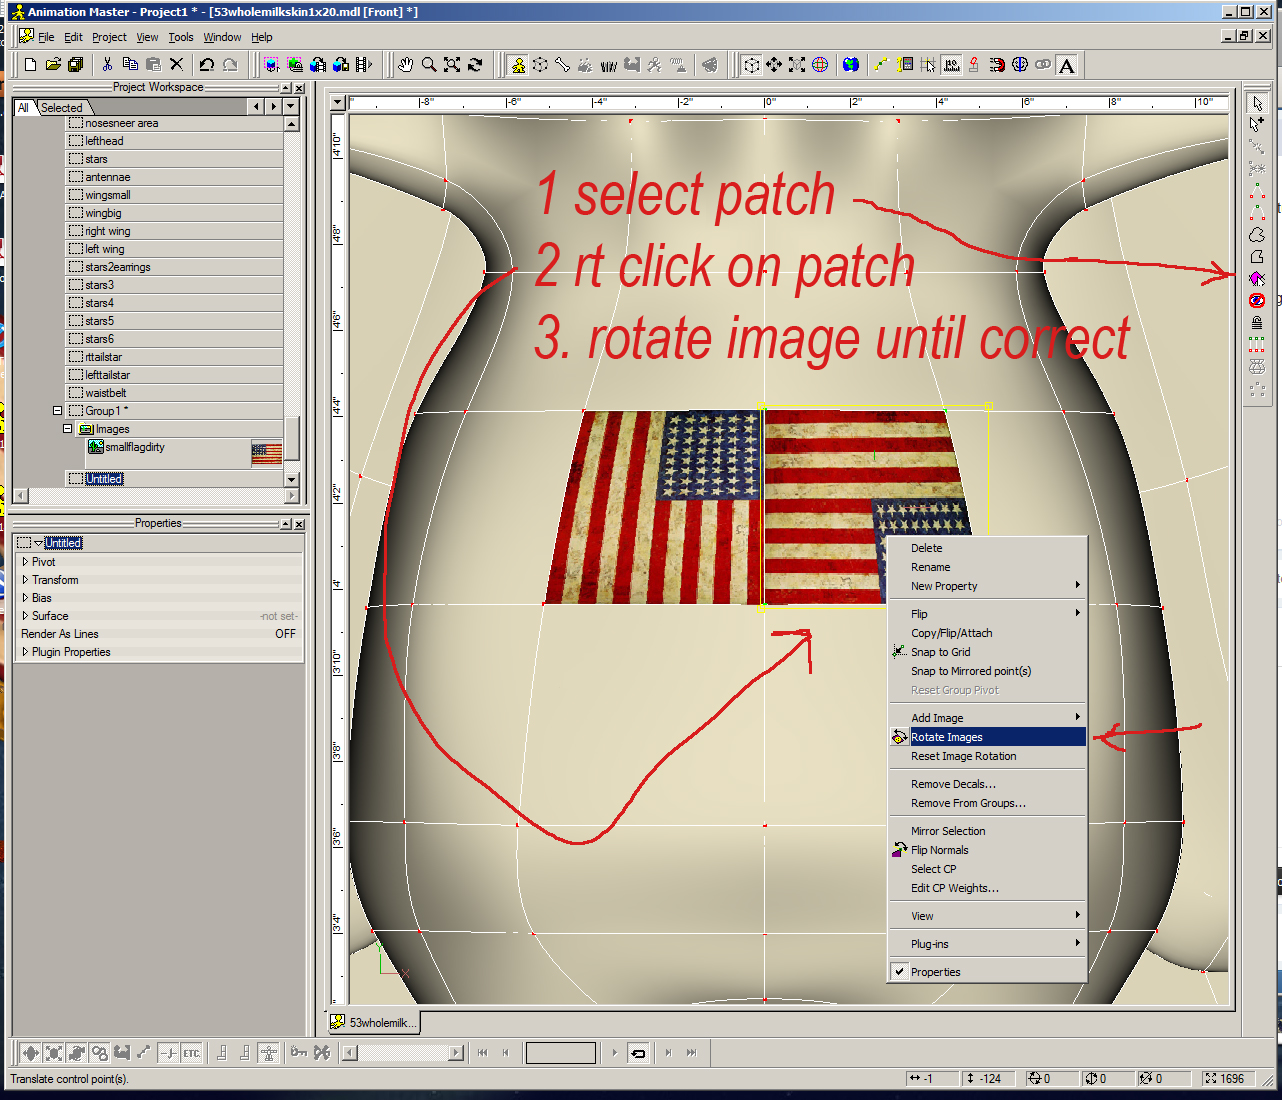
select the patches that need to be adjusted using the "patch group select" tool with patches selected, right click on patch and select rotate image until image is oriented correctly tis a pain if you have many patches that need adjusting. You can also set the repeat count for the image to something other than 1 x 1 if you want more than 1 instance of the image on a patch. Depending on what you need, decals are usually the better route. Patch images will be expanded to fit the size of each patch.

-
Is there a reason why you are rendering in 2 steps? You can render with toon lines AND standard shading in 1 step, no need to composite later.
-
Hair material properties settings to make it look real
NancyGormezano replied to Heiner's topic in Animation:Master
the above is an excerpt from Rick Harrowell in a post in a discussion on "hairy questions" from 2007 (found in archives), perhaps to get you started in what items are best to tweak. http://www.hash.com/forums/index.php?showtopic=26834&p=222085 EDIT - just uploaded a pdf from another thread - describes the properties in more detail (from 2006, by Kevin? Cosmonaut). Scroll down to post #9 in the pdf MUHAIRproperties.pdf -
remove the light from the car model, but constrain (translate like, orient like) it to a bone in the model. Make the light part of the car and the buildings light lists.
-
hmmm...my simple test was not working at first, but then it did...Not sure why. (and yes I got your test to work as well)
-
I just did a simple test case in 18M. Unless my settings were wrong ( I don't understand them, so left them at default), it doesn't look like it mirrors the weighting, unfortunately. That's a whole lotta characters to animate!
-
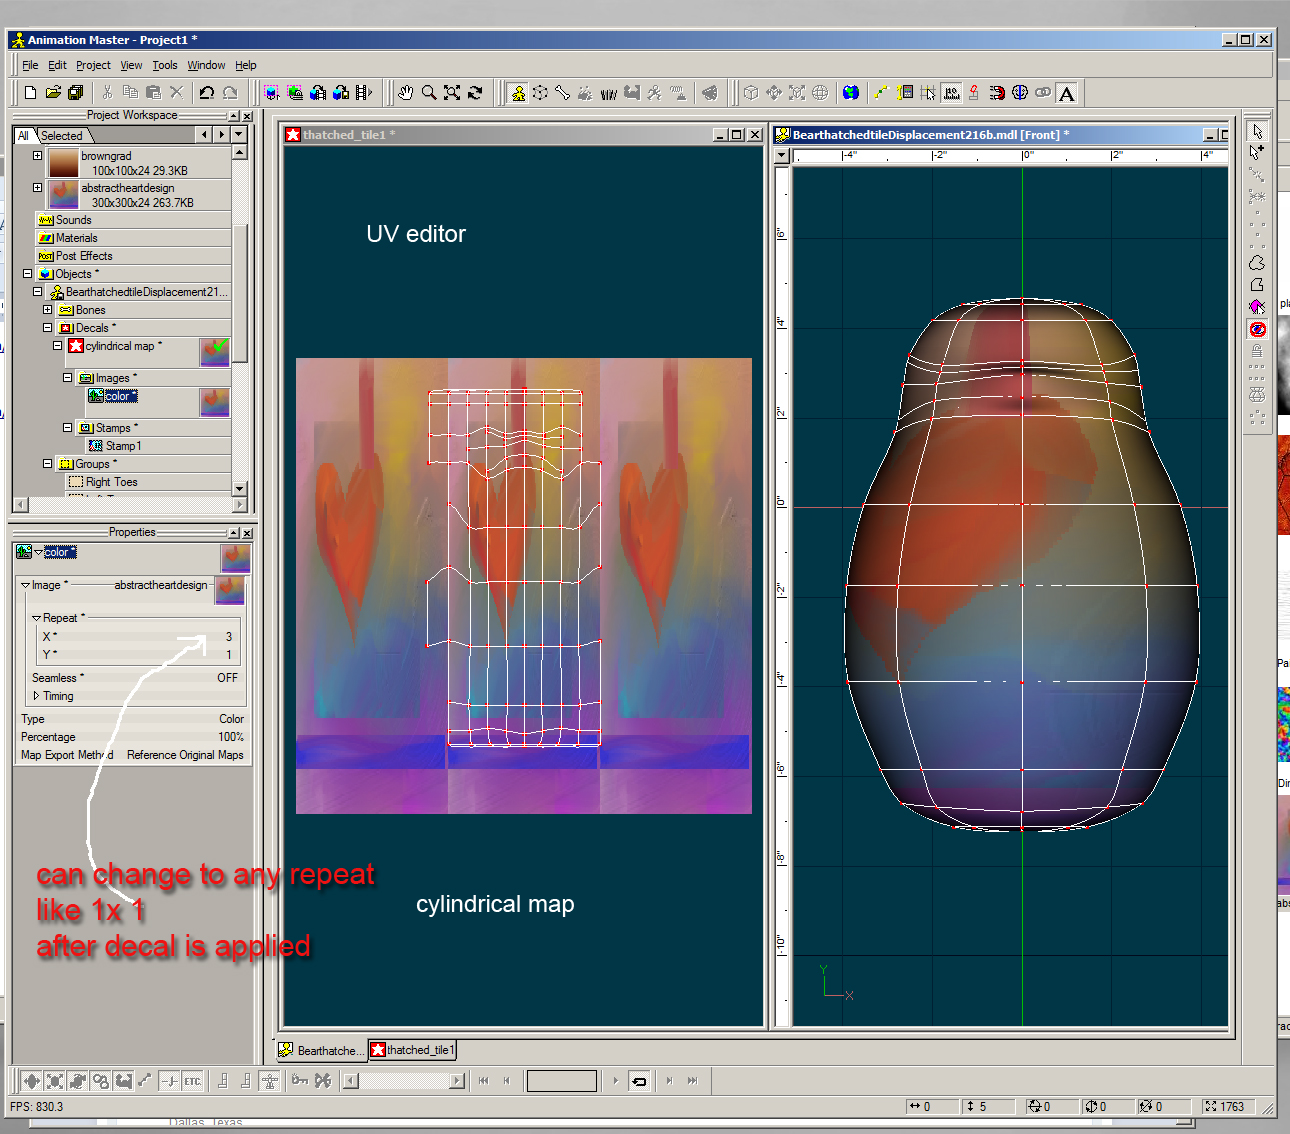
You don't have to use flatten. I prefer not to, because there are easier ways to control how the patches get mapped - but if you insist - here's link to excellent vids by Robcat I prefer to use scaling of the patches (in a pose) as illustrated in this post To see how patches are probably going to end up "flattened" without using flatten command, one can apply a cylindrical map to any group of patches and then observe the patches in the UV editor - SIMPLE. No flattening involved. I will typically do this, then I will usually change the repeat count to 1x1 (from the default 3 x1 for cylindrical) - and then take screen shot and use that image in my "painting program" of choice (photoshop, corel painter, etc). Caveat: not sure that flatten command uses same "flattening agorithm" as cylindrical mapping - but this an alternative way to do flattening.
-
Can either apply another stamp - or apply another decal (could then make color =0%) (BTW, one can also rearrange decals in priority order (last applied takes precedence), by dragging in PWS. But best to do without windows open, and be sure to save, reopen model)
-
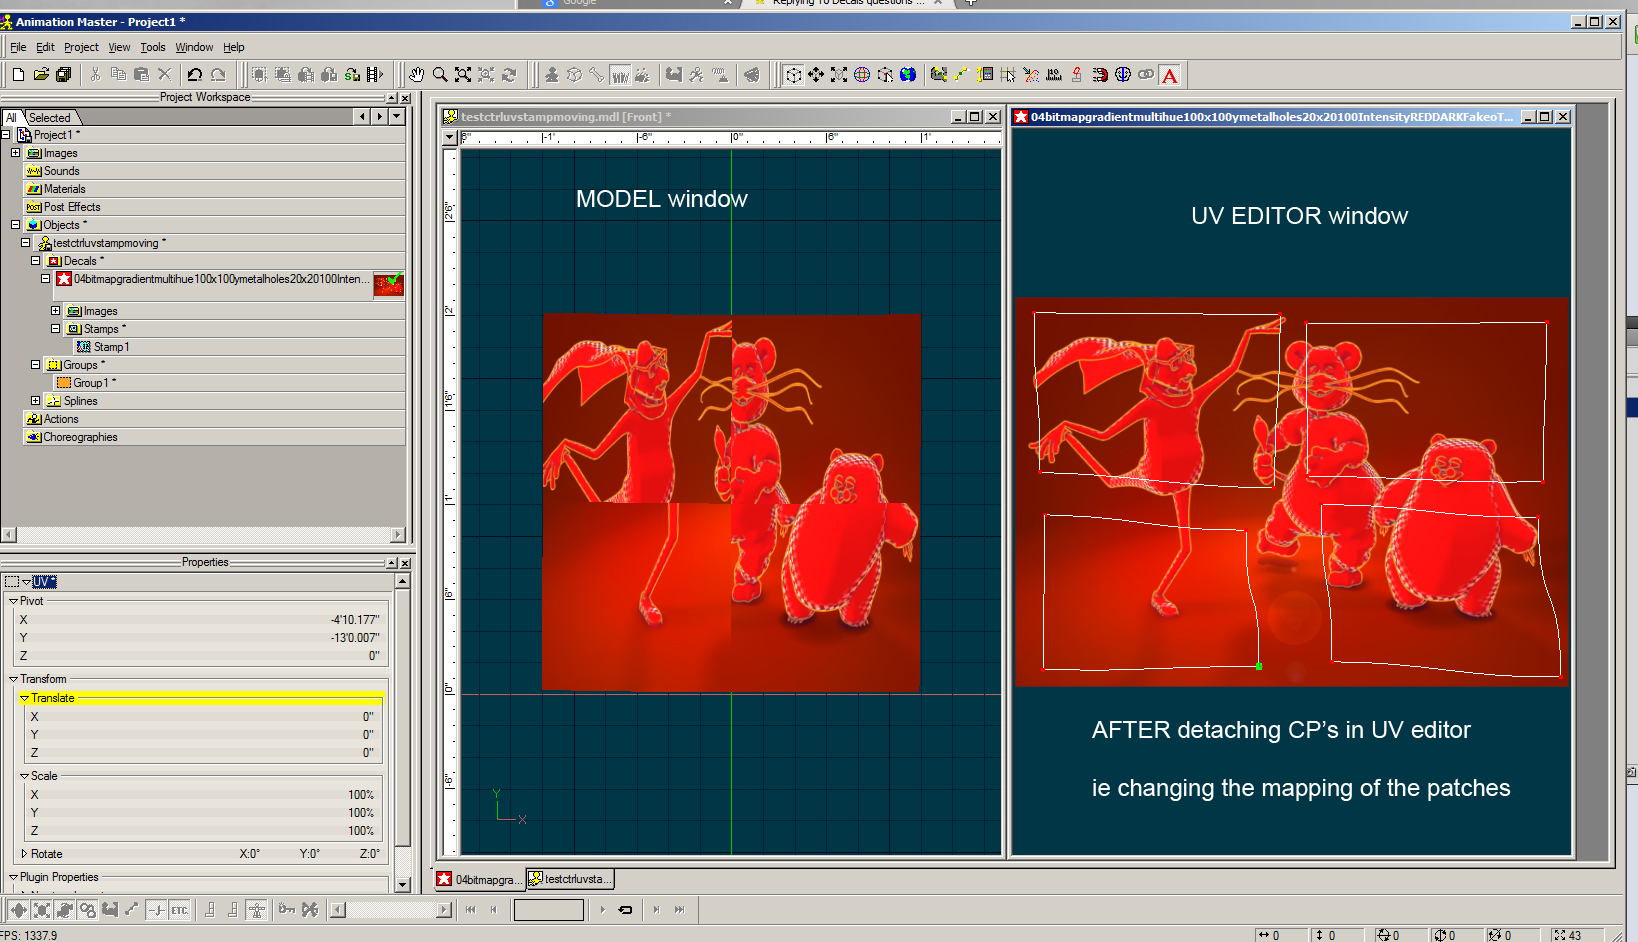
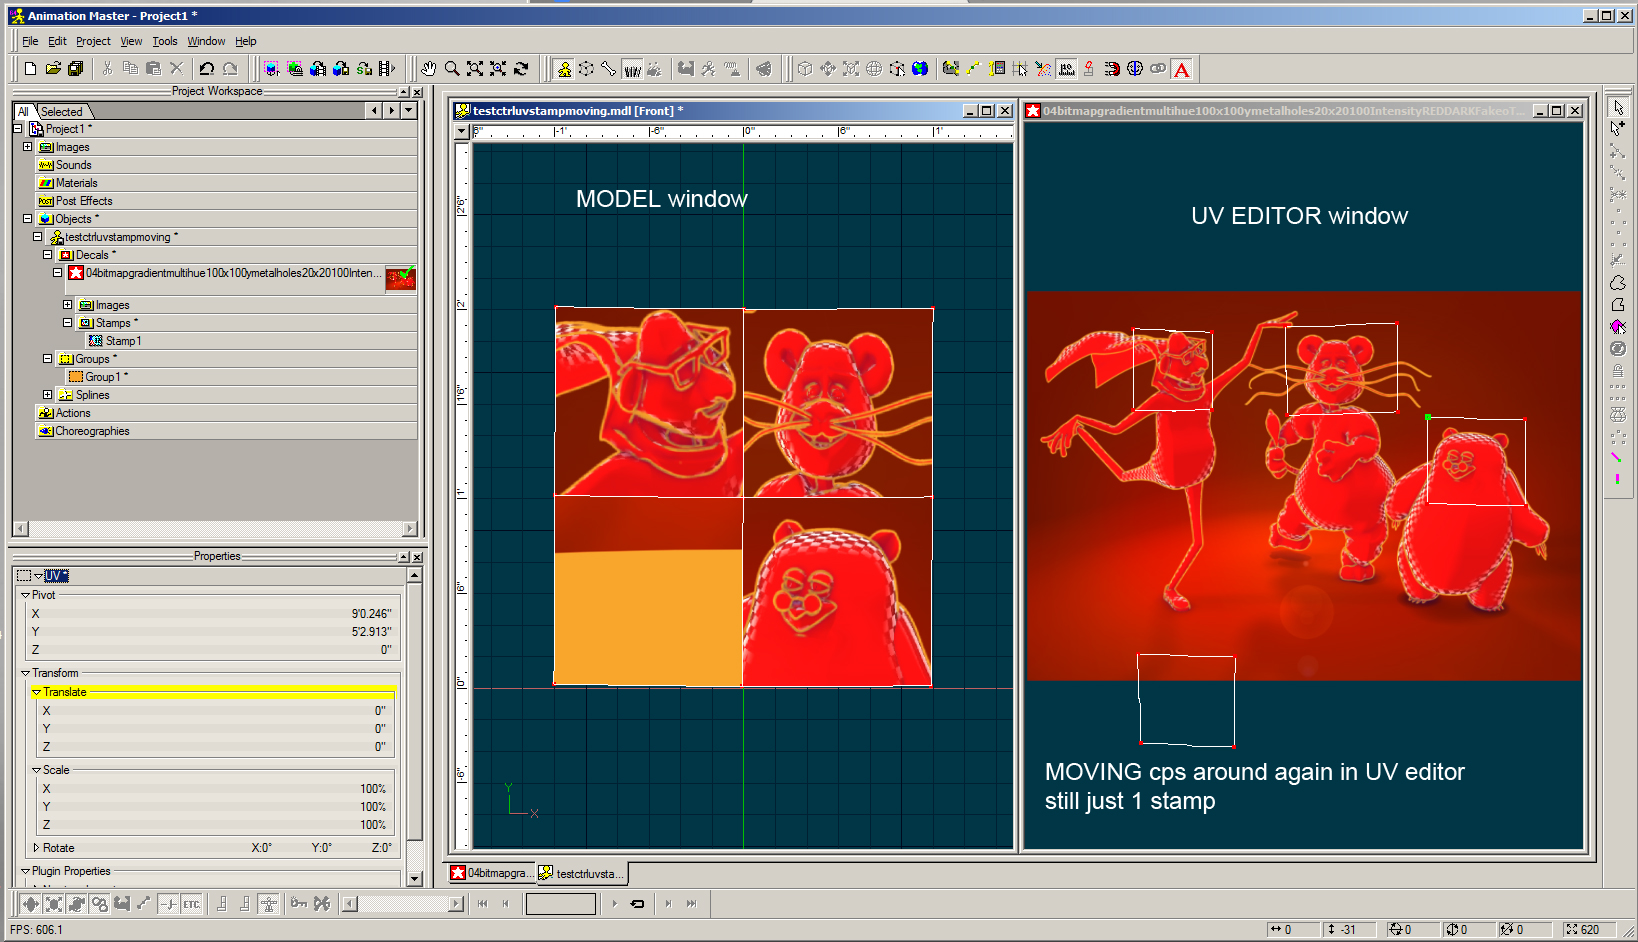
I don't think you should be doing any editing of the mesh in the decal window. You can move CPs around but not changing connections. Malo is talking about the UV assignments for patches, I believe - not detaching cps in the mesh - it's actually quite a wonderful new feature (18M, but appeared in earlier version of 18)
-
I have found it is very tricky to reattach them. BUT sometimes I find that if I zoom in real close in UV editor, and position the detached CP over the other CP and then ctrl click, then let go, and then click on Cp again - it appears that they are reattached (not exactly sure of sequence - because sometimes I get it to work and sometimes not) I would restamp the patch. But I think you are looking for a different answer. Perhaps you can see a way to mimic the original stamp data?
-
"Insect" Image Contest - August 9 deadline
NancyGormezano replied to robcat2075's topic in Contests/Challenges
And if I submit 10 images - It's all mine!!!!...MINE, I tell you! Bwa-hahahahaha... uh...No...should only get 1 chance at the sure-to-be untold wealth (but will probably still submit multiple images) -
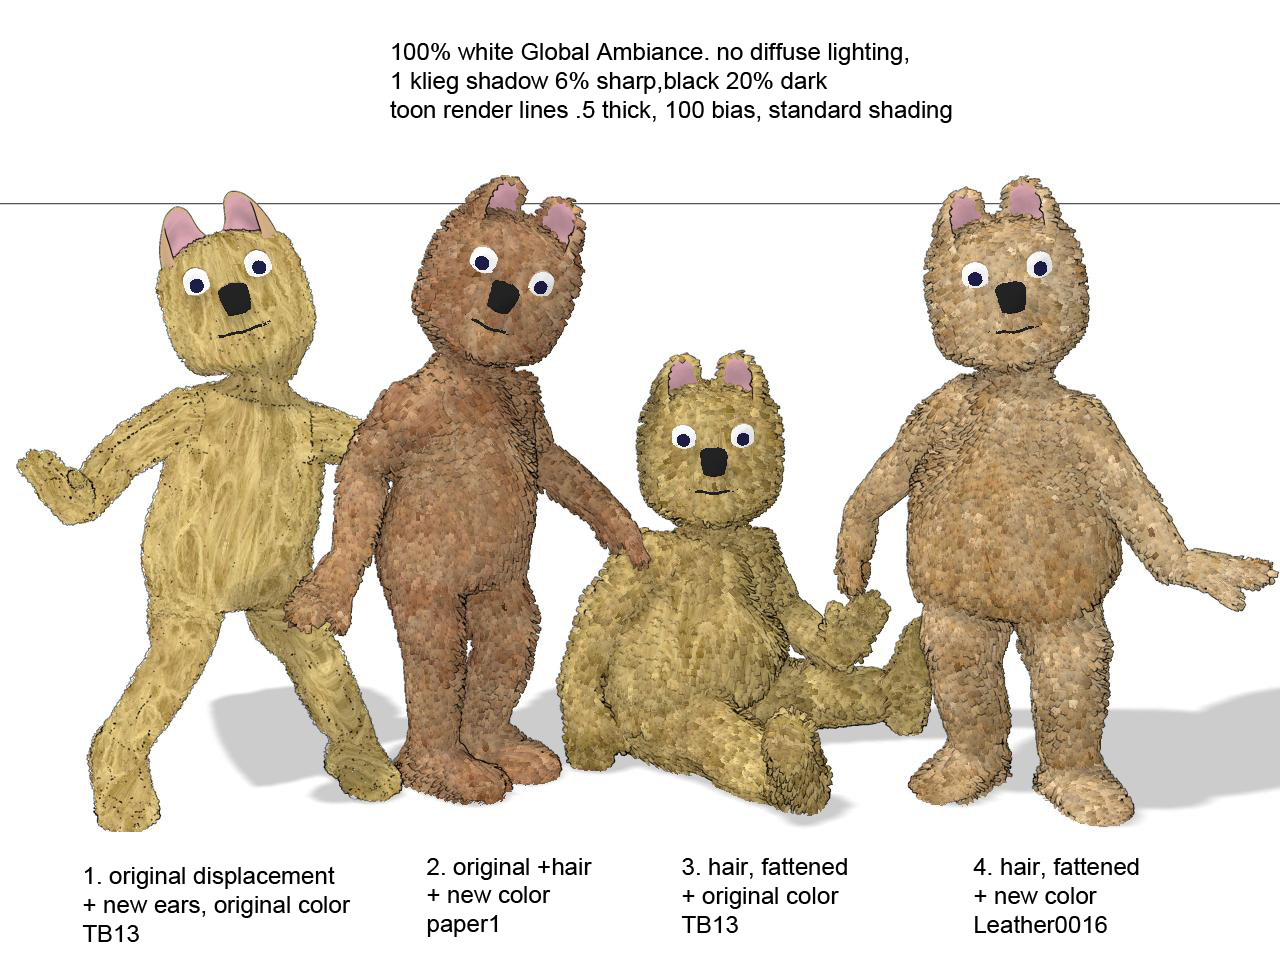
A:M is funny with respect to real time display of hair. It seems to require setting hair ON or OFF in BOTH camera view and any of the front, side, birds eye views. So turn on hair ALSO when in side view (and don't forget to turn off). Just a funny to be aware of. When system seems funny, usually hair is turned on/off in side view and not camera view (or vice versa) As for the render with hair and how it is looking: would need to know ALL your render settings (from camera), in particular multipass?, line width? bias? Please post expanded properties of those settings. I have a feeling your line width or bias might not be right for the bear hair. You have a zillion lights in your scene - so not sure what lighting is actually hitting the bear. I was just using Global Ambiance (100% white, no lights) and toon render. I repeat: NO lights. When I was using lights, there were only 3, and global ambiance was 50%, lights were set as indicated on the images I posted above. Also show me an image of the model in the model window, with hair on. Expand the hair group (furry?) in the model and expand the hair material. Look to see what image is used for the emitter - would need to see all the properties in the model for the hair system, and hair emitter. There were properties that I changed in the model, from the original hair material. Look in both to see the changed properties. Hard to diagnose without seeing what your settings are.
-
Here is a zip of JUST 1 model file (#3, fattened, with original colors), with hair material and image used for hair emitter. Put hair material, and hair image into same folder as model. I tested above chors in 16b/32 (with fakeao, which I don't think is available on MAC). This morning I tested in 18M/64 opengl (toon render), with and without SSAO (which I think is available on MAC). Here's results from 18M/64. I find the real time display of hair in all versions of 18 (that I have) to be screwy. But seems to render ok, pretty close to 16b. If you eventually want more rendering details - you know where to find me! TeddyHair.zip
-
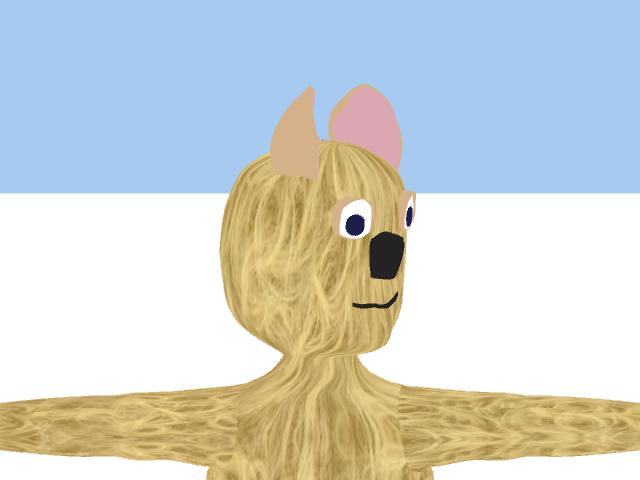
If you are not having problems with the displacement - then ignore what I posted above. And also ignore the following if it is not relevant: As for me, because I couldn't stop myself, and for my own curiousity and amusement, I went on to add stylized hair to bear (deleted displacement), added hair to outer ear and fattened him up some. If you would like a copy of the hair bear version, let me know. Then I tried different rendering methods. In case you are curious what he might look like with hair and different methods - here ya go (toonline rendered in 17 secs, 1 pass for 1280 x 960; 12 secs for 2 pass - without toonlines)
-
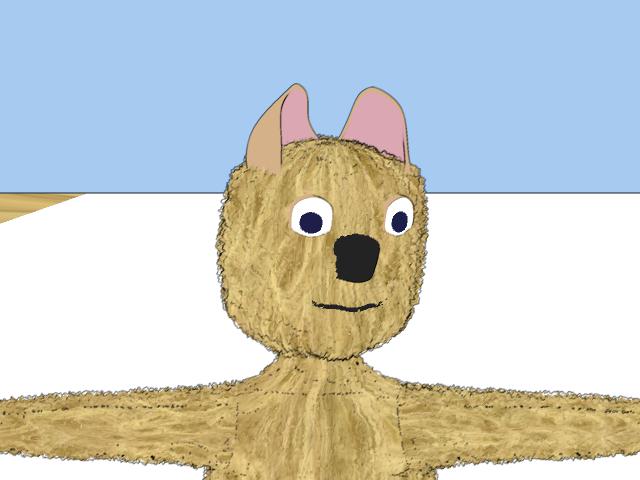
And here is image with BOTH new ears (continuous splines, normals corrected, no internal patches, not attached to body) in 18m/64 opengl, toon with bias20 and toon bias 100. Bias makes the diff, to me, in getting cleaner toon lines
-
ack - I think displacement is just going to give you headaches - and unfortunately it's impossible to tell where it's going to show up.You may be lucky and problems might not show up. I redid right ear ONLY, to be detached, with "good" splining- (can't say that it helped significantly in toon lines, upping bias made more difference) However, I noticed new funnies - in both 17g/64 and 16b/32 EDIT: and 18m/64AVX/opengl and opengl3- with and without toonlines and with displacement. Problems showed up in the ground plane! but disappearred when I eliminated ALL displacement on model (always) UGH (Added toonline pics: Right ear ONLY is remodeled, toonlines - 3rd image is with width .5, bias 20, 4th image - width .5, bias 100