NancyGormezano
-
Posts
7,863 -
Joined
-
Last visited
-
Days Won
15
Content Type
Profiles
Forums
Events
Everything posted by NancyGormezano
-
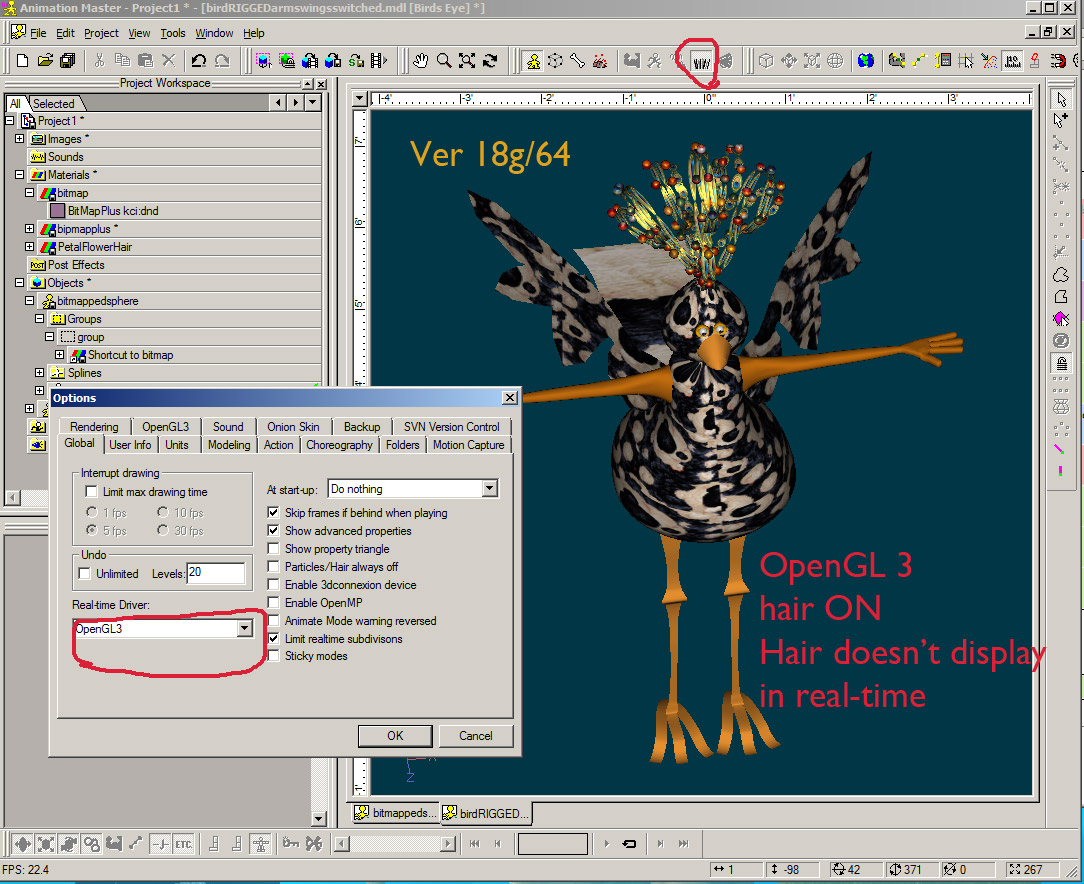
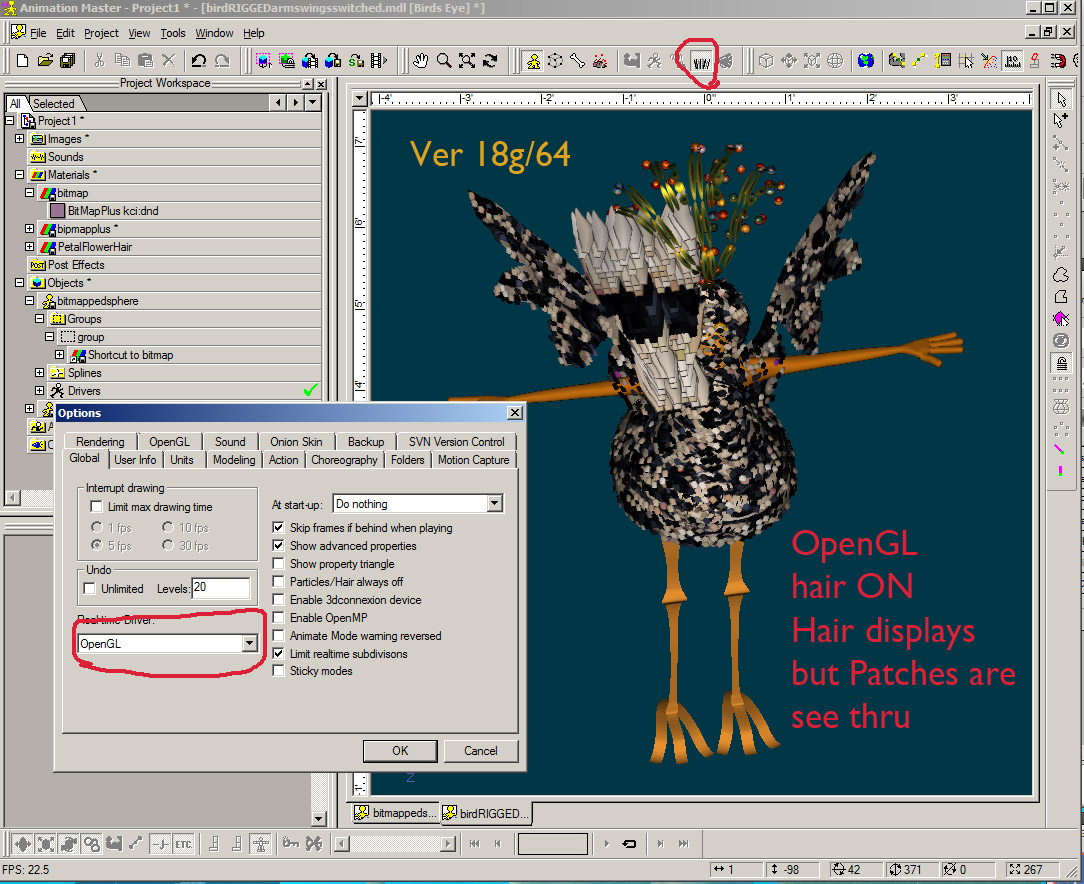
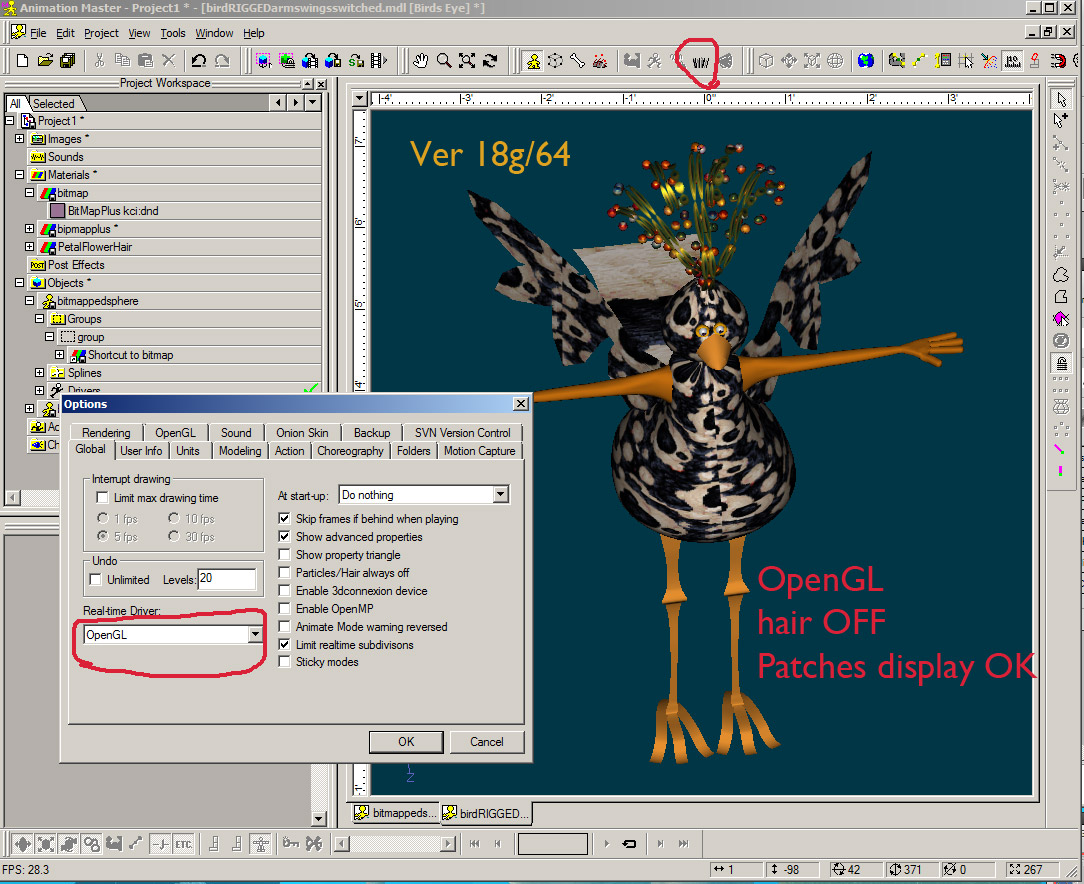
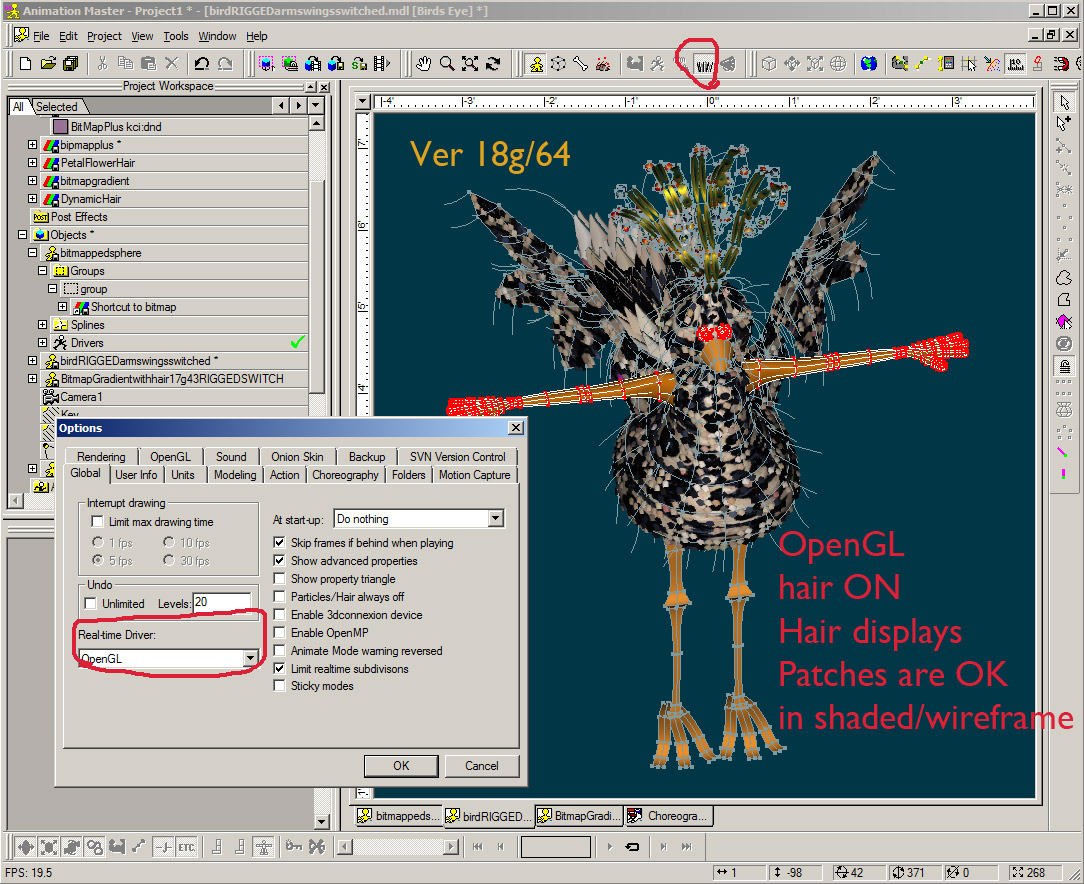
My model works in 18a OpenGL and but NOT in OpenGL3 in 18a. That is: with OpenGL hair displays, in shaded and shaded/wireframe, and the patches are not see thru (like in 18g). Hair does NOT display at all in opengl3 in 18a (same as 18g). I just noticed this, as I had been using OpenGl, and had primarily been using 17g and 16b. The model and hair material were created in ver 16b/32. The hair uses an image emitter, and the hair color is driven by a decal. I have noticed that other old models using opengl, have similar see thru problems in 18g (but do not have problem in 18a ) I have not yet tried to recreate new hair materials on a new model in 18g to see if the problem is caused by using an old model. I have NOT updated my nvidia drivers as I am afraid to disrupt those versions of A:M which already work. But I supppose at some point I should do it. ugh. bleck. EDIT: I just tried creating new model, new hair in 18g - experiencing same problem as with old model created in 16b. Opengl3 does not display hair at all, opengl displays hair, patches ok in shaded/wireframe, but in shaded mode : hair ok, but patches are "see thru" EDIT2: New simple model with hair just NOW (all of a sudden) displays hair with both opengl,gl3. But in both gl, gl3 the patches are see thru in shaded mode. Older model (created in 16b) still does not display hair in opengl3.
-
EDIT: forgot to say - I am NOT experiencing the same problem as Tom. I am able to decal models by dragging images to model window. But something is fishy-wishy. I have tried opengl3 with 18gSSE4/64 and I am having issues with both opengl3 and opengl 1) hair will not display in real-time at all with openGL3, in shaded mode and shaded/wireframe. But will probably render. 2) If I go to Opengl with hair ON, hair displays but the patches are "see thru" in shaded mode (ie can see thru the model). Patches are not see thru with hair on and in shaded/wireframe mode. 3) If I turn hair off with opengl, the patches will display correctly in shaded mode nvidia geforce gtx 650 Ti

-
 Cute! If you weighted the cp's of the nose and the surrounding splines of the nose to the same bone that moves the upper lip, maybe 20-50%, it would look more like the nose was a part of the pumpkin when the mouth moves. Also if you slightly turned the head to one side (rather that front on directly), or moved the camera to slightly off side (for a 3/4 view) then one could see the nose shape and It would be a more interesting angle, animation wise.
 -
very nice. Is the perlin material doing the displacement? or have you modeled the terrain irregularity?
-
I would be suspicious of the "hold" interpolation method (or looks like that's what you are using? not sure) on the camera for those offending frames. Try changing it to linear interpolation? The other thing that might be changing, but can't tell from your screen grab, is that the light NULL position might have changed (the one that light is aimed at) Should the curtain be hiding the actors in one frame (camera viewing them from in front of curtain)? and then the camera is viewing them from above in the next? It is hard to tell what you are wanting to happen.
-
After you've clicked on an image and it pops open, have a look in the bottom right corner of it. There's a 'Save' button down there that I found if I click on it the image then opens in a separate Tab of it's own in my web browser (Firefox) which makes comparing images a lot easier. Ahhhhh hahhh! Much better - thanks! And yes, I just noticed that Simon had already said that his camera was changing, so we really needed to see the properties (with graph) for the spot light for the 2 funny frames (not the camera data)
-
Hard to know without seeing all the data at once - Looks like the rotation of the camera changed from one frame to next. FYI, sometimes it's easier to see timeline data in graph/curve/spline mode rather than keyframe, to see that there is a change in value, rather than just a keyframe. Meanwhile, I really don't like the new forums way of displaying images - can't save them, in order to compare the images side by side to more easily detect what might be different/changing from one frame to other. For future reference, it would better if you composited the images you want to compare into one image (shrink the size so that both fit in one image that we can see together)
-
From the image you showed - it looks like you are still rendering to an AVI (movie.avi), which is not a TGA sequence. However, you are rendering with your resolution set to TGA. You need to change the format to tga (or jpg, or png) for rendering a sequence of images, and make sure your filename says movie.tga or movie.jpg or movie.png.
-
EXCELLENT
-
nice!
-
very neat effect! I'm guessing it took a long time to render because there was a sh...er...boat load of particles to render.
-
looks fabulous!
-
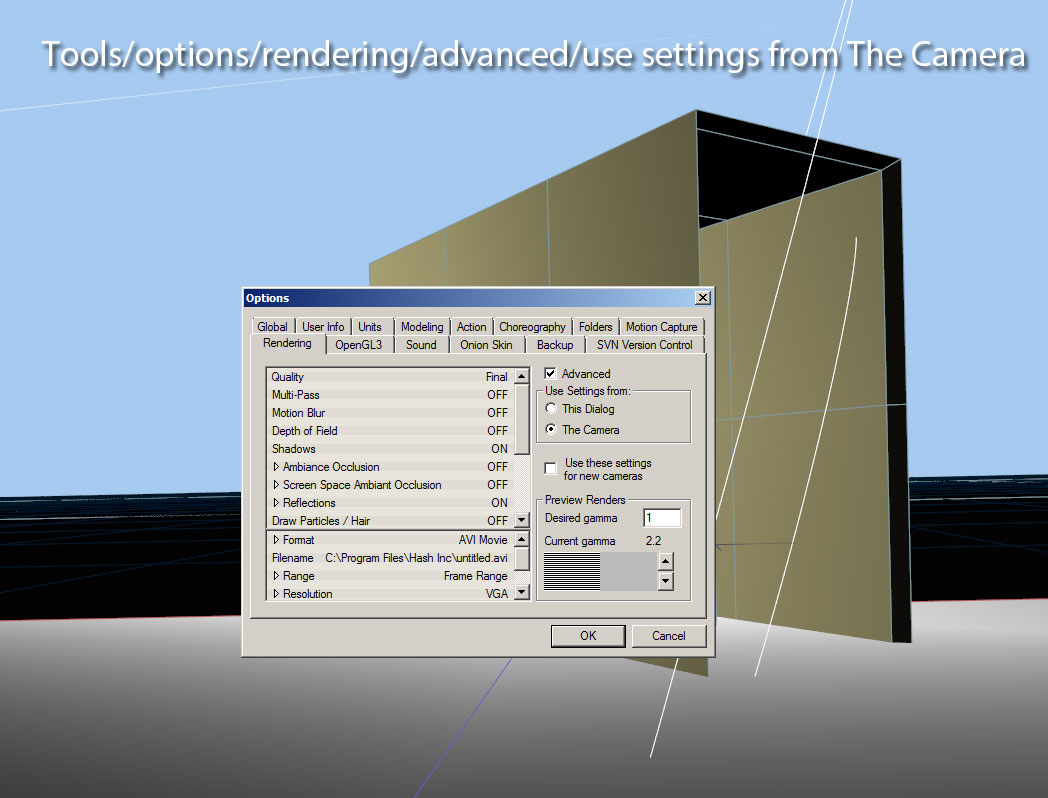
Simon: I get same results as Mark (also changed line width=.5, and resolution =1280 x960) and my render options are also set to "use camera". 18a/64 pc. I suspect yours is not? because it looks like the toon shading override is not applying in your images even when only 1 light is on. EDIT: just tried with toon shading override turned off - and I get same bad results as Simon gets.
-
The original project required as an exercise, to drag the 4 materials to the plane model & manipulating the translate properties of the 4 wave materials to position them at the 4 corners of the plane before rendering. The properties were already set. I've also uploaded a 2nd project (waterB) which I did not look at. From the instructions, it sounded like waterB had 2 planes, and made the water plane transparent. For 2nd project (waterB) the properties for the wave materials was such that all had to be changed to: .25 for amplitude, 100 for damping, 0 for propagate, 3 for cycle. and in bottom left wave length = 97, upper right =95, upper left =93, bottom right =97 I also uploaded the video they had for the result of water B project. meh. Water.prj Water B.prj Clear Water.mov
-
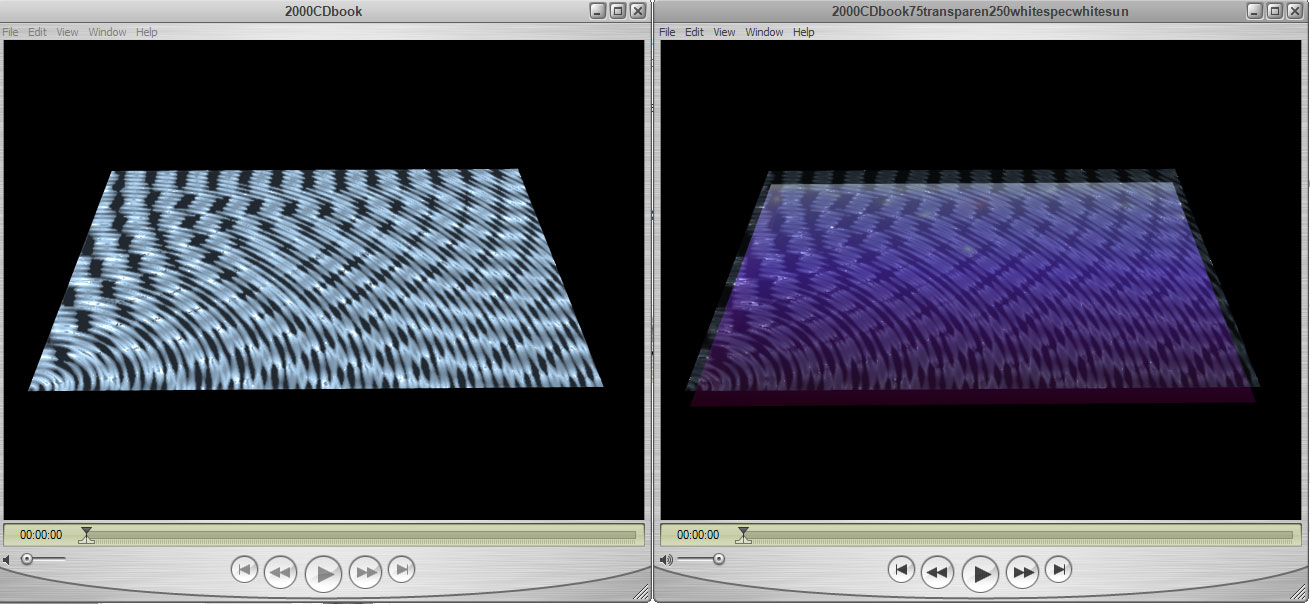
I dug up the water project from the CD that came with the book "the A:M 2000 handbook" by Jeff Paries (page 532 in my copy). I've never played with the wave material before - I rendered this in 17g/64. In the first movie, there is a water plane that has 4 instances of the wave material (each centered at the four corners of the plane), so that interference wave patterns occur. The plane is opaque and has spec set. There is 1 sun light. There was no animation of any of the properties of the wave material - apparently it animates itself! In the 2nd movie - the same water plane is made 75% transparent and there is another plane added underneath (with a decal on it) - it has a more pleasing effect - the decal could be anything. Obviously one can play with the settings, and placement of the wave material to make something mo' purty. the project that I've uploaded should generate the first movie. 2000CDbook.mov 2000CDbook75transparen250whitespecwhitesun.mov WaterAM2000CDbook.prj
-
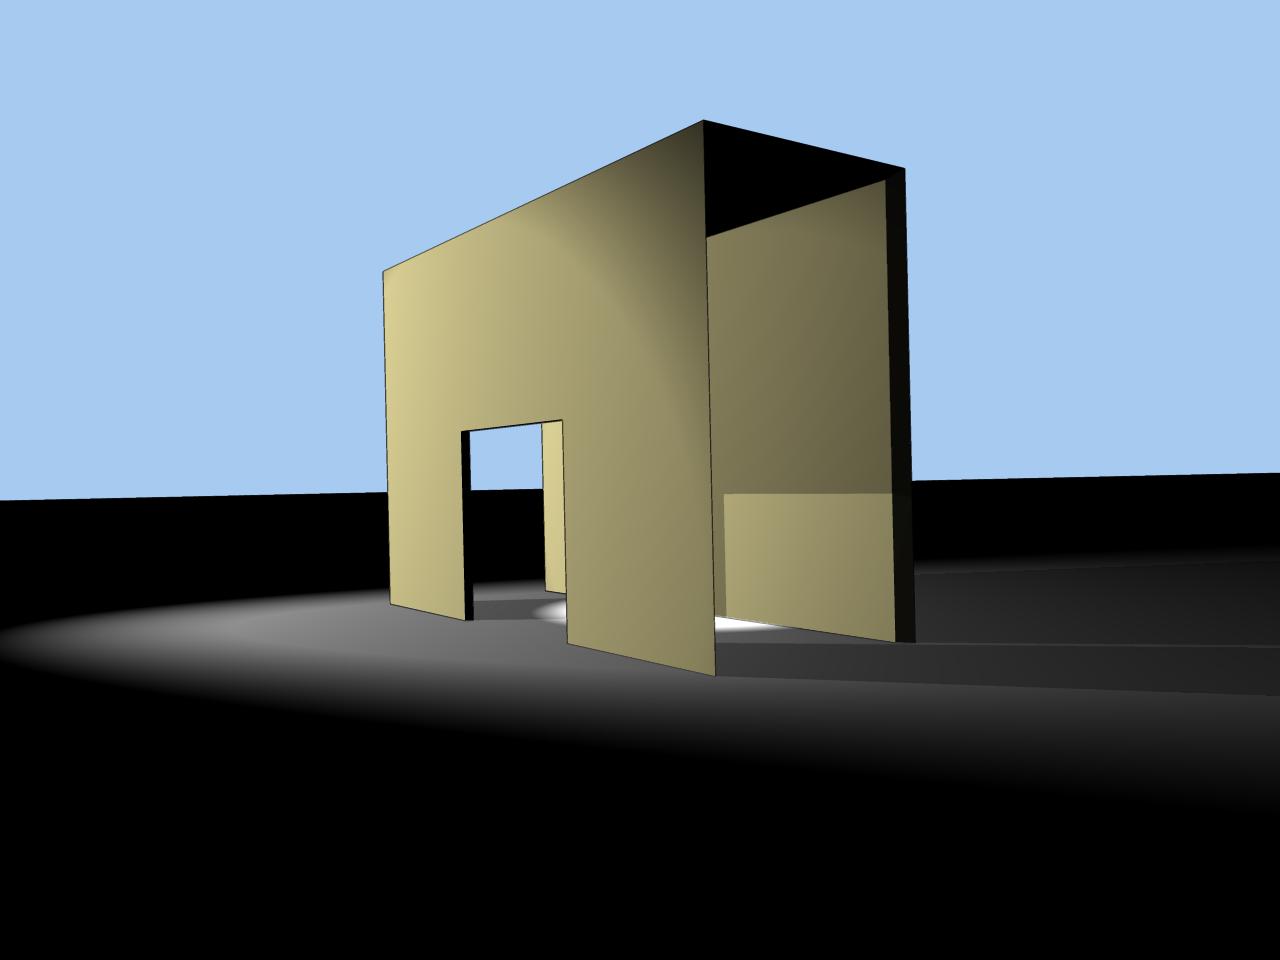
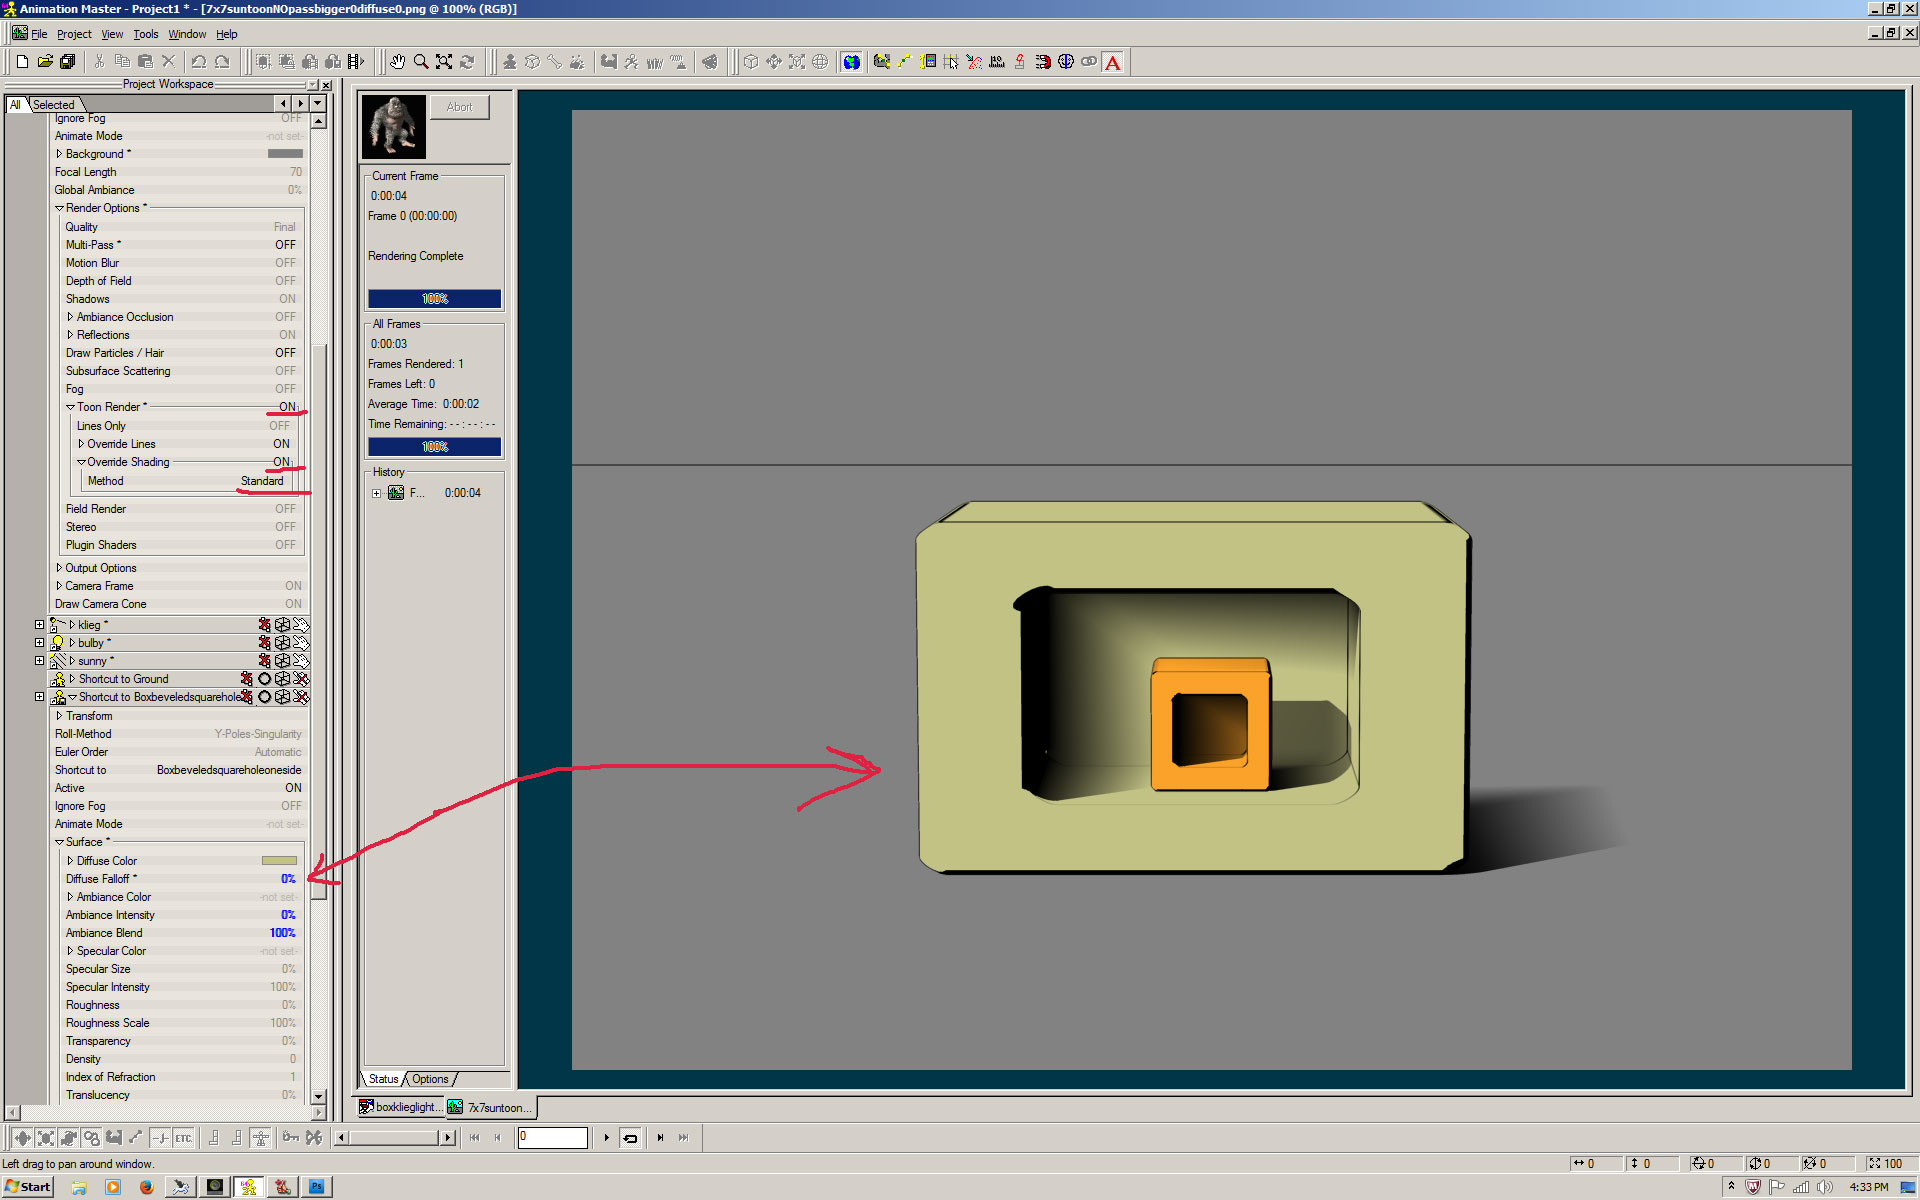
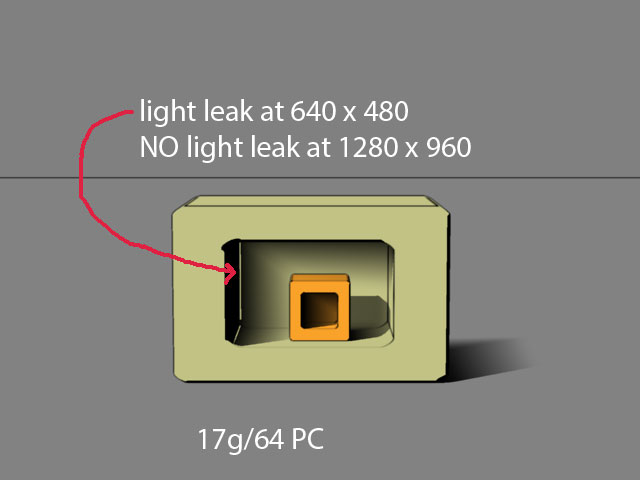
I had a hard time looking at your images and understanding what the layout is. However - I ran some simple tests. All are with 1 light = sun type (7' x7'). No multipass. I also tried with klieg (ray trace only, z buffer was yuck) and bulb types. results here are just with sun type. 17g/64 PC. first image is rendered with override toon shading = off, and the diffuse falloff of the green box = 100% (default) (orange box diffuse falloff = 0%) - bleckoo result. I think these toon settings are similar to what you are using (except you are using klieg light). 2nd image is with override toon shading = ON, shading method = standard, diffuse falloff of green box =100% (orange box = 0%) 3rd image is with override toon shading = ON, shading method = standard, diffuse falloff of green box =0% (orange box = 0%) - I'm guessing that this would suit the style closest to that which you are aiming? I also found out that light leaks would show up if I rendered at 640 x 480 but not at 1280 x 960. Sooooo....test at different res? hope this helps some.
-
What are your toon render settings? Show us what you are using, and would be better able to help. If you set your toon render = ON, and then set override shading =ON, then choose method = STANDARD, you wouldn't have to composite. You would still have the lines. If you don't like the "dimensionality" look of standard shading, you can play with diffuse falloff in the surface properties, as well as ambiance intensity and blend for the models. Light lists work (but not sure how well they work with toon method render for shading). Another possibility (easier) is to turn up the ambiance intensity in just the stair group surface properties (to 20-100%, depending on what looks good) - easier to isolate elements without having to futz with light lists.
-
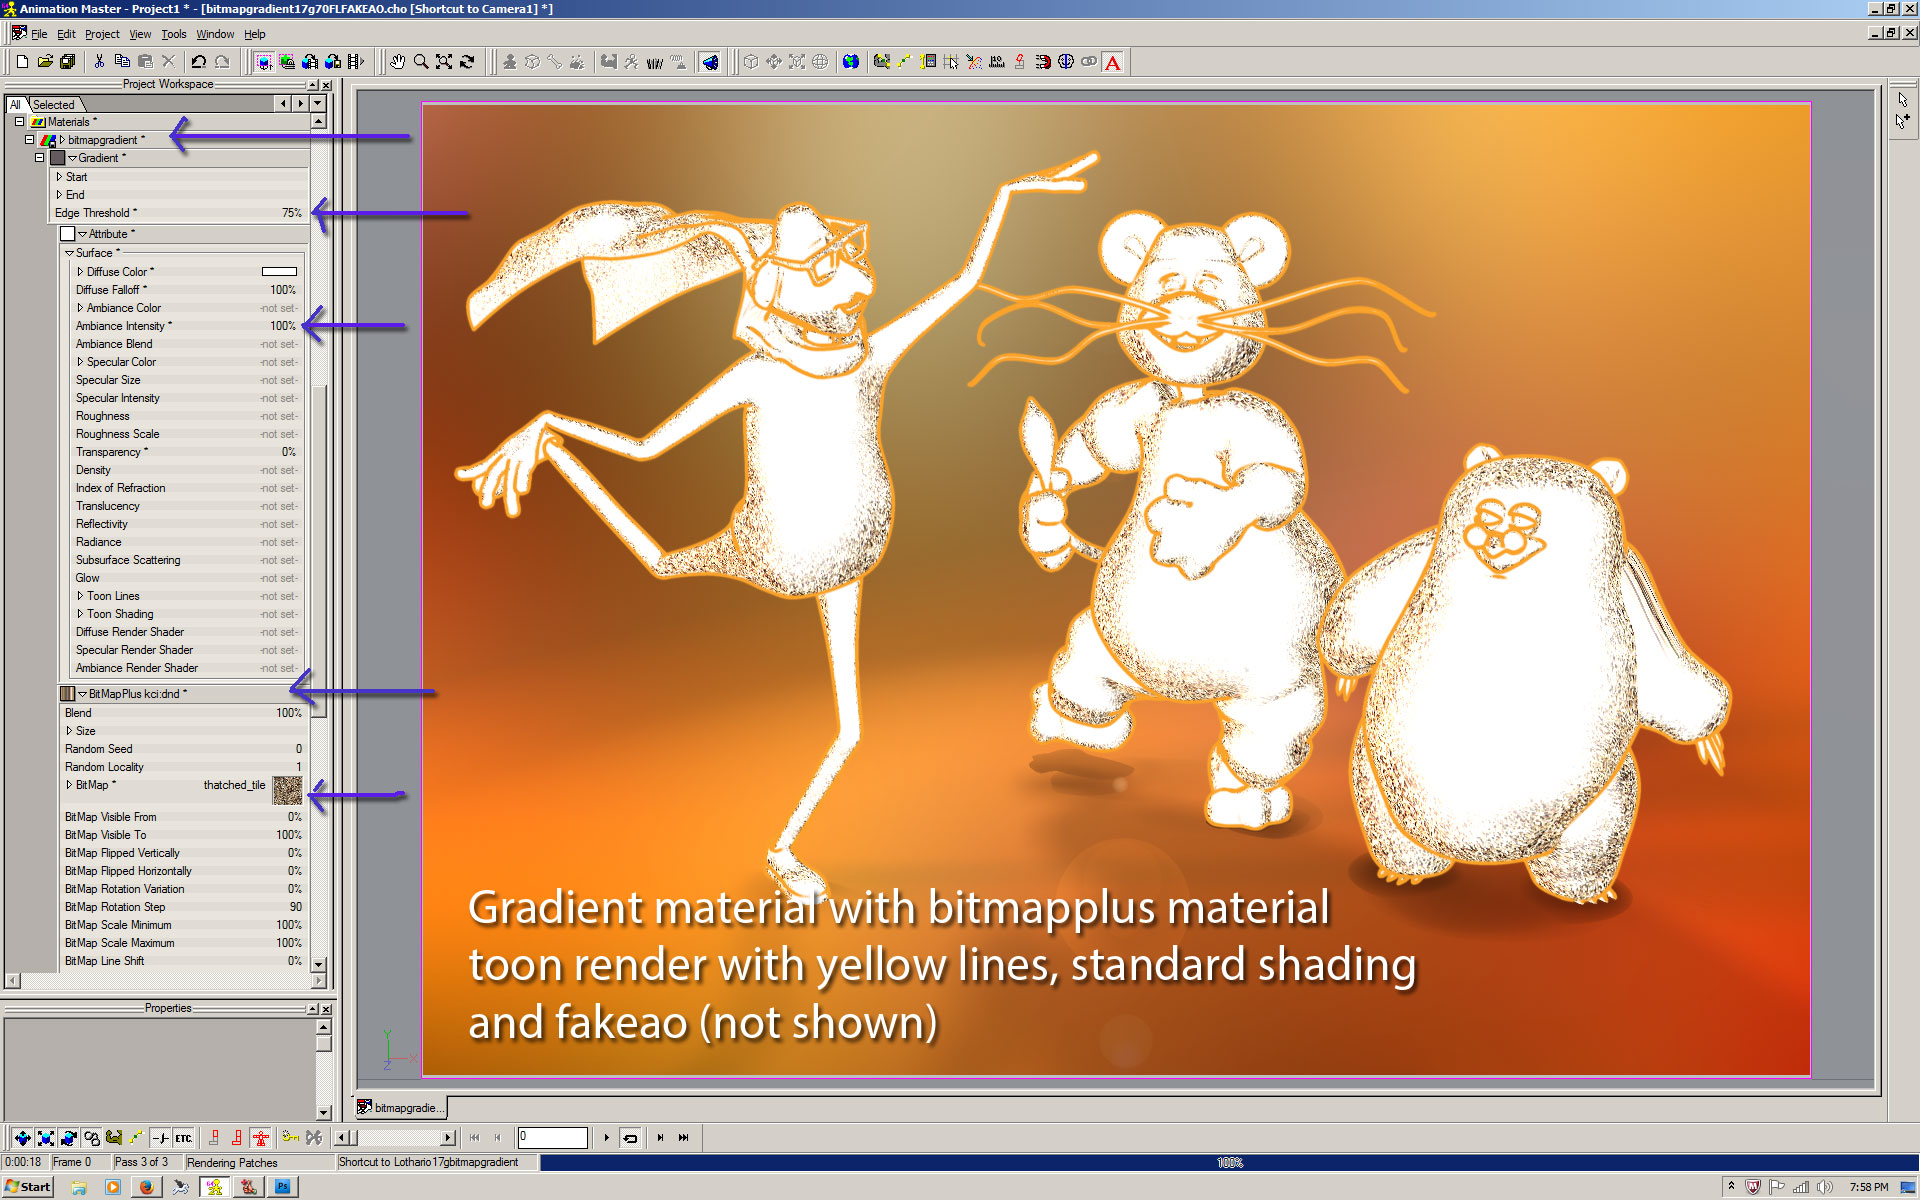
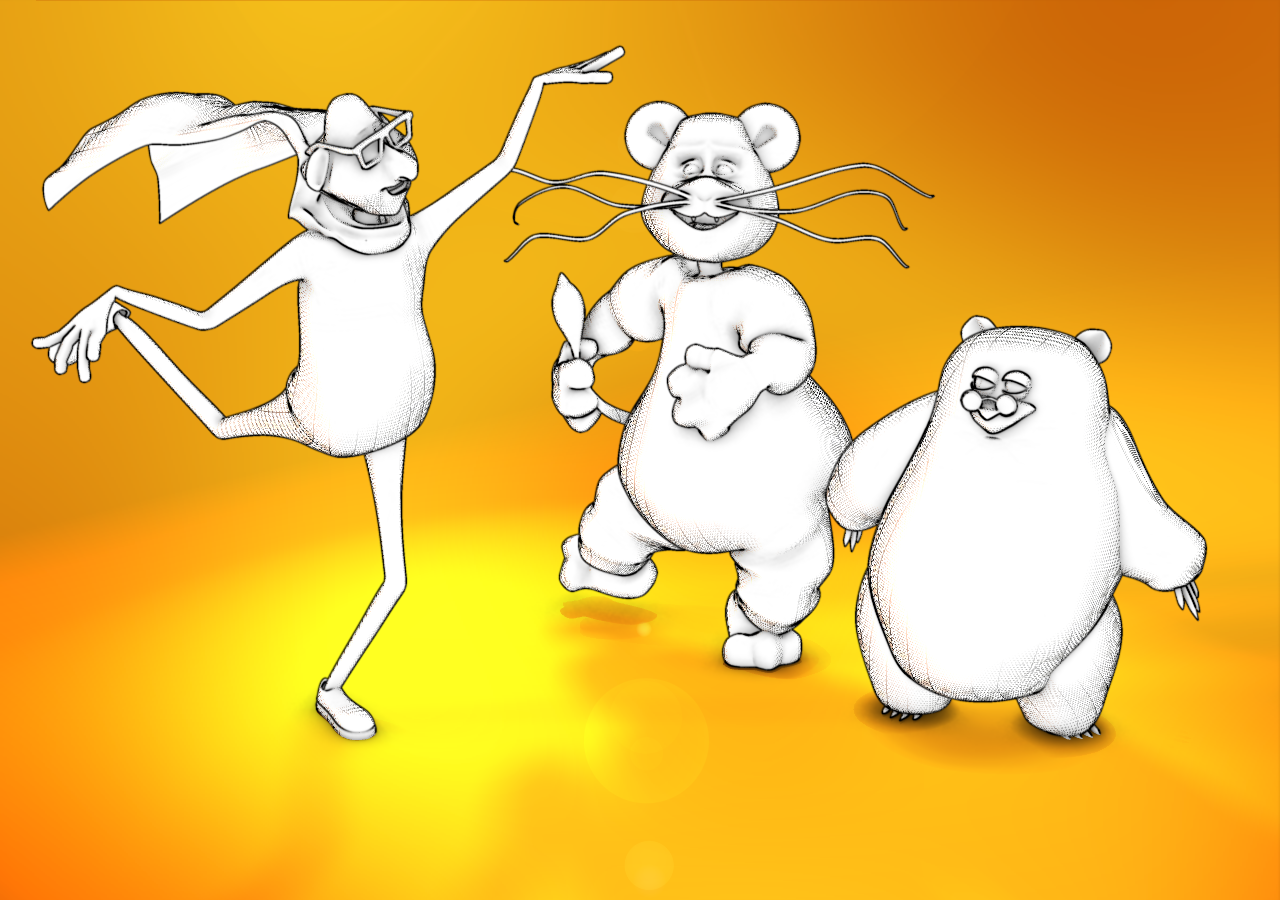
You can definitely mix styles ad nauseum, I made them all the same in the above examples for ease in illustration purposes. You can add the base gradient (with bitmap plus node) material to any group and then change the properties on an instance basis within each model. It just takes time to figure out what works well, and what doesn't. Material starts as a gradient material, where the 2nd attribute node has been changed to be a bitmap plus material. I could have changed it to any kind of material (eg toon nation, environment, checkers, etc etc). Could have also changed the first attribute node to some other material as well, even another bitmap plus. You can also play with the start and end properties of the gradient to get a sharper line. But that start/end stuff confuses me a bit. For this render, I've also rendered everything as a toon render (line width =.5, black, could be any color) with the toon shading = regular. I also used fakeao to give some more interest. Could have been flat shaded. So many possible variations/combos, just not enough time.
-
After doing a search I came up with this post: http://www.hash.com/forums/index.php?showtopic=5544&p=29589 I haven't tried toonation plugin in the recent versions of a:m but that post (by Rodney in 2004) came up with some preliminary info about some of the styles:
-
try this post for matcap http://www.hash.com/forums/index.php?showtopic=39287&p=342984 I do not know if it is available for macs Ack. Sorry Simon - as far as I can tell there aren't any instructions for the toon nation plugin material - it's mainly a matter of experimenting and seeing what happens. I haven't had a lot of luck with some of the options, and it's been a long time since I've played with it - but the "sketchy" one seems to respond if you change some parameters to 100 (like effect amount, or something like that). am assuming you are not looking for instructions for the toon rendering option provided by hash.
-
Hi Tom. Interesting video. We don't have anything like the jot demo (where the contours of the model are changed based on the artist stroke). For non-photo realistic rendering, there are many options. It's up to your imagination. To start, one can play with toon rendering, in combo with a variety of materials. These images are the result of using a gradient material, and changing the 2nd attribute to be a bitmap plus material. Many variations can be obtained by changing the image used in the bitmap plus node (plus changing it's repeat count). Combos are unlimited. Similarly, other non-realistic, sketchy type effects can be approximated by using the matcap shader, some examples shown here Other interesting effects can be obtained by combining matcap & bitmapplus (with or without gradient). Be prepared for hours,...nay....days of experimenting. And there are a variety of plug in materials to experiment with (eg toon nation, etc). And I suspect that even more interesting effects can be obtained with using displacement decals (will modify the model contours) in combo with bitmap plus, and matcap. Haven't tried that yet.
-
wow...very cute!
-
Lotta work! Interesting choreography of the dance, nice to see it all together. Congrats on completing first pass animation. It looks a bit stiff to me. Next pass, you could introduce some head, hand, finger movement to loosen it up. For example, (for both characters) the head looks like it turns/moves in sync with the torso. One could make it move as if it were the end of the upper body torso chain (like a "tail", if you get my drift) by introducing some side to side angled movement, lagging behind the turning of the torso. Or, alternately, one could make the head lead the torso turn, as dancers tend to look first to the direction they are turning, prior to making the turn. As it is now, the head and torso for the most part look like they operate as one unit. I would also suggest that you animate the hands (lagging behind the forearm), and also introduce some finger poses, for looser, more fluid motion. If you have the time, to demonstrate to yourself what lagging, tail like movement might look like, you could quickly experiment with creating a model with 3 bones in a chain, and then apply a dynamic constraint to the last bone on frame 0. Then move the base bone (translate and rotate base bone to another position in a later frame), and watch how the A:M dynamic constraint automatically creates lagging motion for all the bones in a chain, that don't settle until even sometime after the last frame. Note that the bones don't move all together. And based on how loose you want it, the lag can be set differently (by tweaking properties of the dynamic constraint) to make it stiffer or looser. You've come a long way! Congrats again.
-
Still hasn't loaded. I gave up first time. How long is it supposed to take? Trying again That's not what I would label "real-time" rendering. (still waiting for it) EDIT - gave up 2nd time - going on 12 minutes - is it my connection? perhaps someone could post screen capture?
-
Techwatch: Recovering sound from silent film/video
NancyGormezano replied to Rodney's topic in Open Forum
Fascinating! Nice find.