NancyGormezano
-
Posts
7,863 -
Joined
-
Last visited
-
Days Won
15
Content Type
Profiles
Forums
Events
Everything posted by NancyGormezano
-
cute!...er...I mean....manly! NICE.
-
yay!!!! clap clap clap!
-
After you have the cookie cutter decal applied in A:M, are you rendering back out to an image sequence from A:M (either tga or png) or to a QT mov? I will state the obvious: Going back out to a sequence is better. And then making a QT mov - using QT pro is better. After you have this all figured out - I would love to know more detail, for my own education: 1) more detail on how did you eventually create the alpha channel (ie eliminate the background)? what program? QTpro? PS? 2) how/what did you use PS for in the batch process - script? manually frame by frame? with video timeline? (I haven't used PS in video editing mode)
-
bleck. One can do it...but it will be tedious, and perhaps fiddly. Not sure how to do it with batch processing in PS I suspect your green background of your jpgs, raw is not uniform (ie all one value). Might preprocess your resultant images from the jpgs - e.g., posterize the images with a filter (so you would end up with red, green, blue). Then use some batch process to obtain an alpha channel (everything but the green) and then batch process by combining resultant alpha channel with the original unposterized images and then save those as tgas (with the alpha channels). If you have access to Adobe after effects (or some other video editor?) - you could do it more easily. Not sure if that could be done in A:M using composite ( I don't really think so) I'm not up on using PS in a batch mode, nor Dragonframe for doing the above. Sorry.
-
best bet to generate images with an alpha channel is to output from A:M to tga format (output options/format/tga sequence) & and make sure you have alpha channel turned on (output options/buffers/alpha = on) You can also turn on alpha buffer with png sequences - but I seem to remember there might be funnies with pngs/alphas and Photoshop - in dif versions of A:M and dif versions of PS I wouldn't use key color to generate the cookie cutter shape. Alpha is the better way to go.
-
There were goals from day 1 (which might have changed along the way) But as they were last recorded, go see post #1 in Work Contract for TWO: https://www.hash.com/forums/index.php?showtopic=20519&p=163568
-

The Saucy Rig (Version 1.5)
NancyGormezano replied to Mechadelphia's topic in Saucy (S.o.S.S.C.) Rig
Just went back & viewed all the Overview videos - EXCELLENT! - thanks again. And as a credit to you, even without viewing them, the rig is intuitive and easy to use. The videos help explain some nuances and the nice set of "tailoring features" for animation controls. -
The Saucy Rig (Version 1.5)
NancyGormezano replied to Mechadelphia's topic in Saucy (S.o.S.S.C.) Rig
Aha! Ok that works ! Thanks (I thought I watched the overview videos - but apparently not) -
The Saucy Rig (Version 1.5)
NancyGormezano replied to Mechadelphia's topic in Saucy (S.o.S.S.C.) Rig
I took a quick look - Very Nice - Thanks! I love the philosophy of keeping the controls & geom bones separate! I tried a fast installation - and yes it went very quick (did not do CP weighting) and I forgot (and will forget again) which poses needed to be unset in the action & then reset in the rigged model. I will probably make a quick cheat sheet for myself - and will post when I do. I also have my concerns as to exporting models from actions - as in the past - textures intermittently might get messed up, and sometimes hair grooming got lost. So it is best to do those after the rigging step. However It may not be a problem anymore. That was sometimes a problem with 2008 rig as well as literig, in certain versions of A:M. I too, think too many options and controls can be a hindrance - but, I think the problem Rodney was referring to was that the curler controls for the fingers appear only to influence the tip of the finger and do not seem to rotate (curl) the middle section of the finger. That's not the way a humanoid finger works & It's very hard (almost impossible) to use the current curler to make a fist - one would have to unhide the finger geometry bones to rotate the middle bone to animate. Is that what you intended? One solution (as the literig did) is to make a pose for the curling for each finger (going from -100 to 100%) and manipulate (rotate) the finger geometry bones (tips AND middles) in the pose. And then the curler null could control the pose. It would have the same UI control structure as you have now. And/or actually the curler null wouldn't be necessary - one could use one of the axis (blue -z) of the finger control bone to control the curling pose. Perhaps we are not understanding the use of your curling constraint poses? I could not figure out what they were to do. Thanks again for posting this rig and great instruction videos! -
Beautiful as always - Have a Happy & a Merry!
-
Nice! Thanks Jason I was amazed at how much of the dialog/imagery was still embedded in my brain - after all it's been 8? years
-
here's another link to all of Bob's credits on IMDb
-
Indeed, very sad to hear...I was honored to have had many, but not enough, interactions and virtual conversations, in the too short time frame that I knew him. Rest in peace dear one. Thank you for your many unsolicited, spontaneous and very welcome encouragements. I was deeply touched and always amazed by Bob's far ranging talents in the visual arts, including his lightning quick storyboarding feats, animation, directing skills, and always his wonderful, heartfelt music.
-
hah! looks great!
-
here's some more food for thought about Cintiqs (again - not sure of your model, but if I recall, it was an old one gotten off ebay some time ago). The following was excerpted from article located at http://www.studiodaily.com/2012/05/review-wacom-cintiq-24hd/
-
If anything, I would guess it's either interpolating or more likely extrapolating the position...but perhaps the interrupt handler for the pen could be a lower priority task? and/or the graphics driver for the cintiq display could be the cause for lag, ie output to display is lagging, not the input handler of pen position.
-
I don't know which OS you are using, nor which Cintiq, nor which driver, nor what settings ...and I will assume you already googled for a solution?... but just in case, because I am curious, I googled "cursor lag on cintiq" and came up with this youtube video. Yes it's for wacom tablets, but it might provide some insight as to which settings might also be worrisome for cintiq and perhaps AND here is thread on wacom site for lag pen delay for cintiq (21) from 2010 http://forum.wacom.eu/viewtopic.php?f=3&t=4927
-
wonderfully delightful
-
Yup - neat! Soft 3d-ish printing with yarn layers
-
Good that it's not just related to nvidia, or drivers - makes it easier to find I hope.
-
hmmm..could probably use the resultant images with bitmap plus - however bitmapplus does create seams when tiling on model - and it is hard to control where the seams are, even if the images are tileable. Also Bitmap plus can be used only for diffuse, bump, displacement types (doesn't always work in all versions of A:M). It would be great to use the AO image somehow. But one only gets to play with percentages if using multiple diffuse color on same surface. Last one applied would take precedence. Would be better to try to use resultant images for decals. Might be more easy to use AO image as "diffuse type" decal, or bump, or displacement, or ambiance intensity. And any image used for decals (as well as bitmap plus) can be made tileable, by modifying repeat count, and setting seamless = ON. No need to use other software. I am assuming each of the images generated (diffuse, ao, height, base color, specular, etc) is stored in a separate file.
-
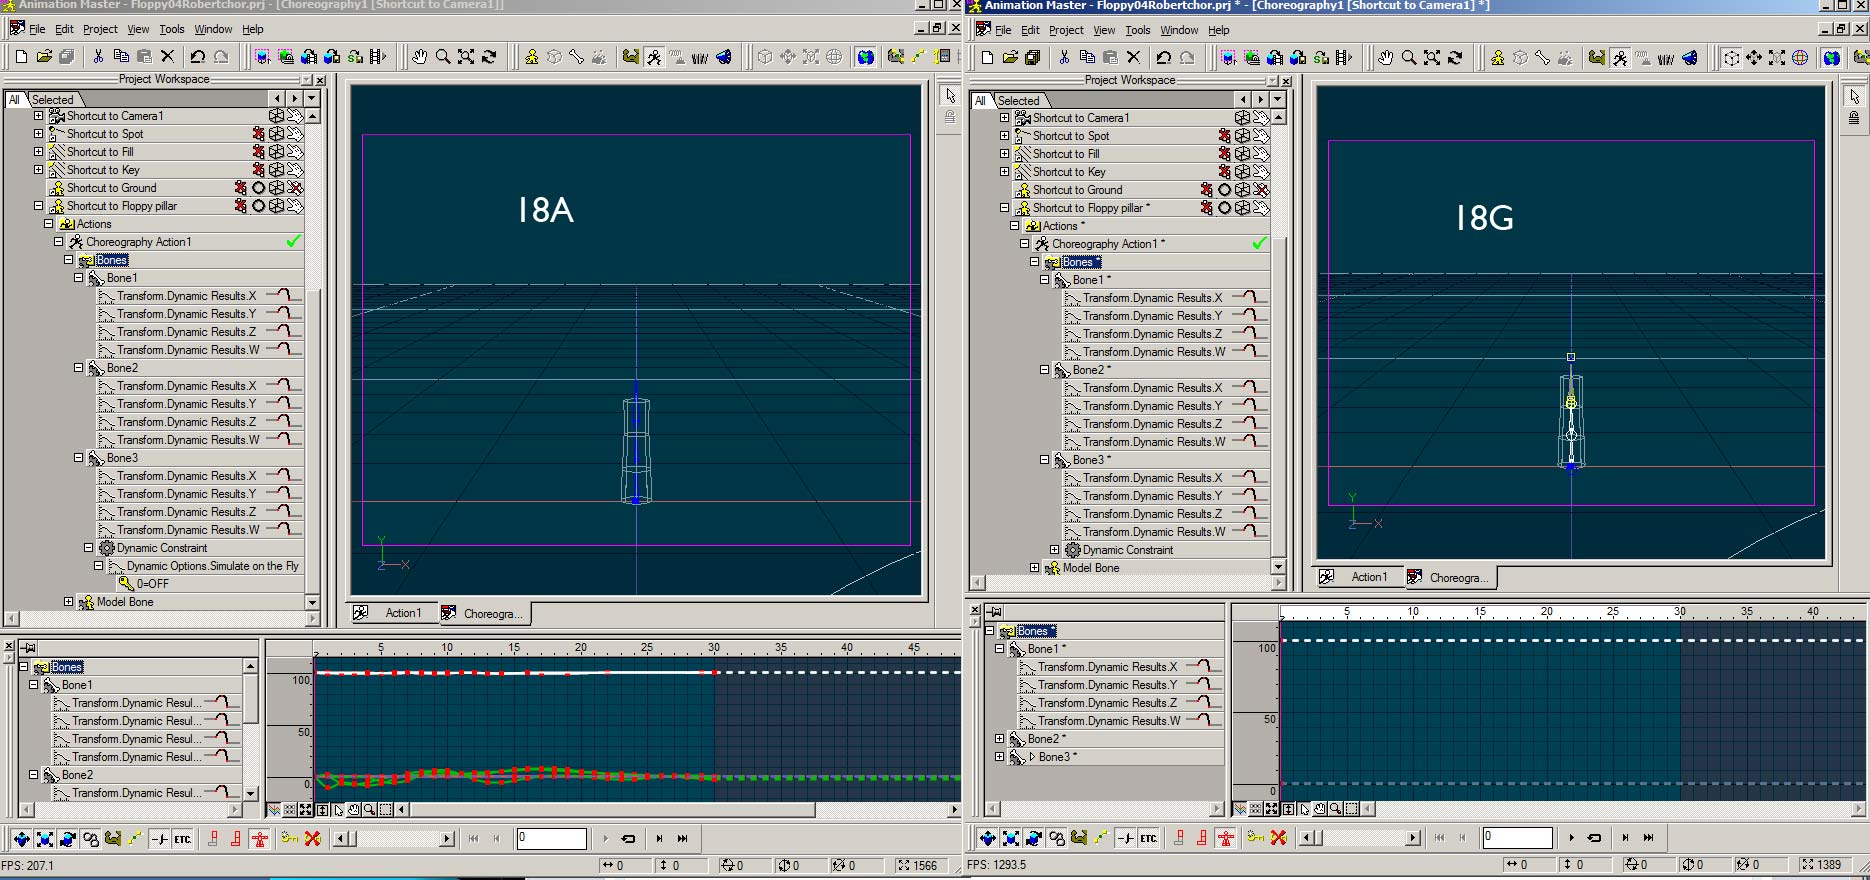
I tested a simple 3 bone chain with the dynamic constraint applied to last bone in chain (on 1st frame in 30 frame chor) and "bake dynamic" works as expected in 18a, ie - produces keyframes for "transform.dynamic results". tested the same in 18g, and does NOT produce keyframes past frame 0, but does create channels for the transform.dynamic results. However it appears that the "baking" process never ends, goes on forever, have to stop it with escape. Tried with OGL, OGL3 - no difference. (

-
That is also the same for me. Thanks for trying. And I believe you have an ATI card? or Nvidia?
-
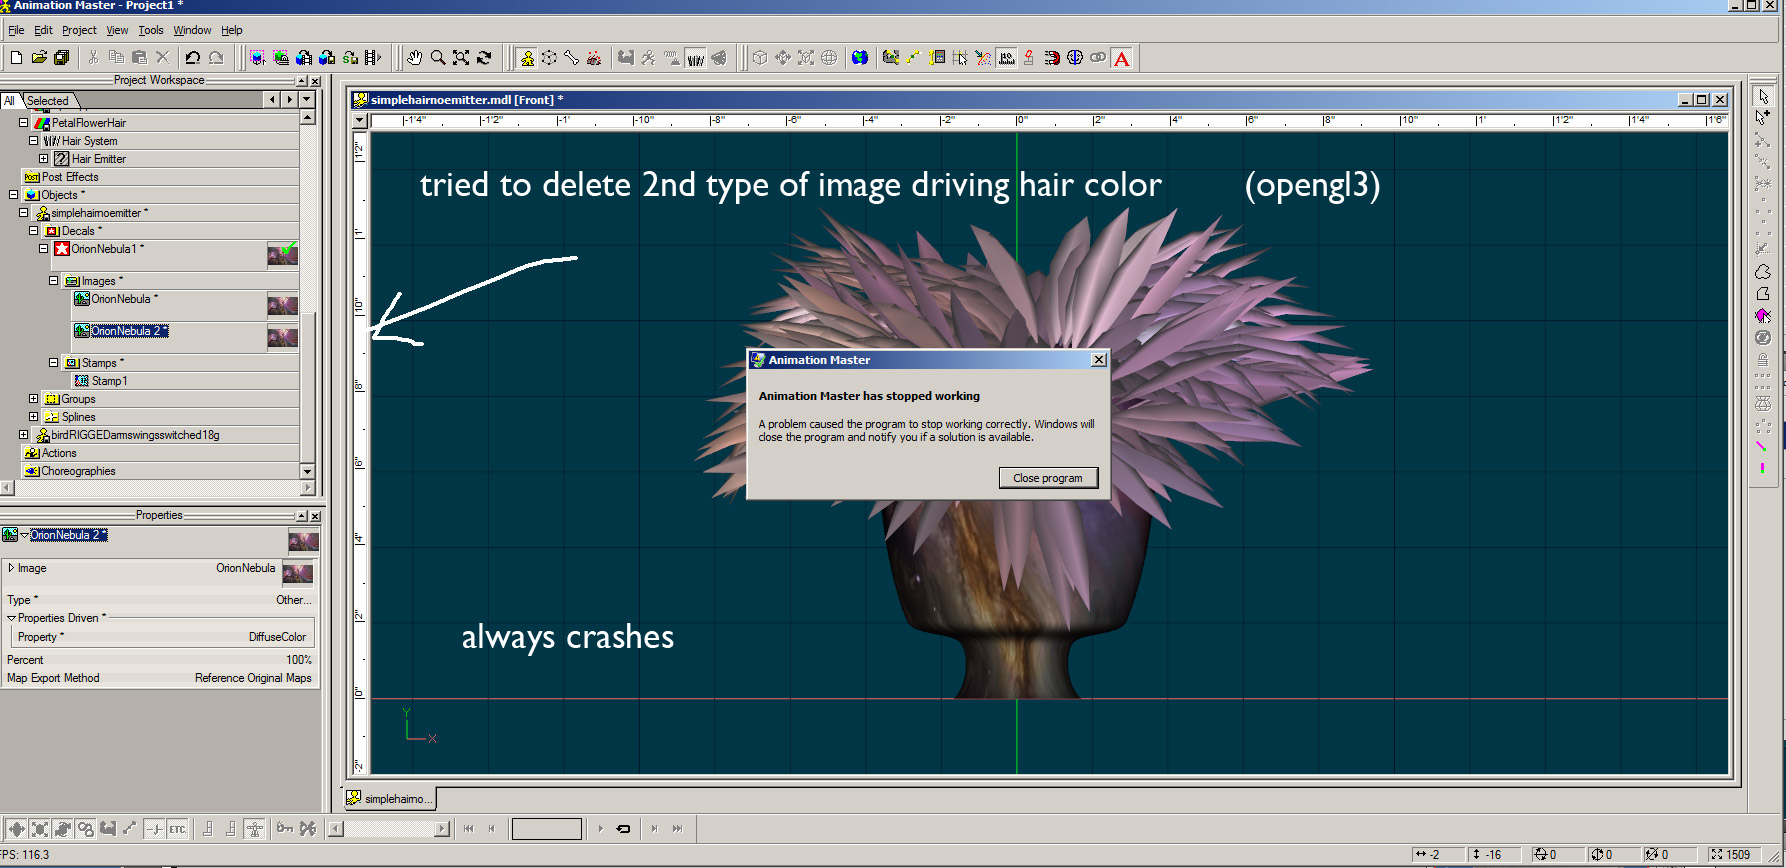
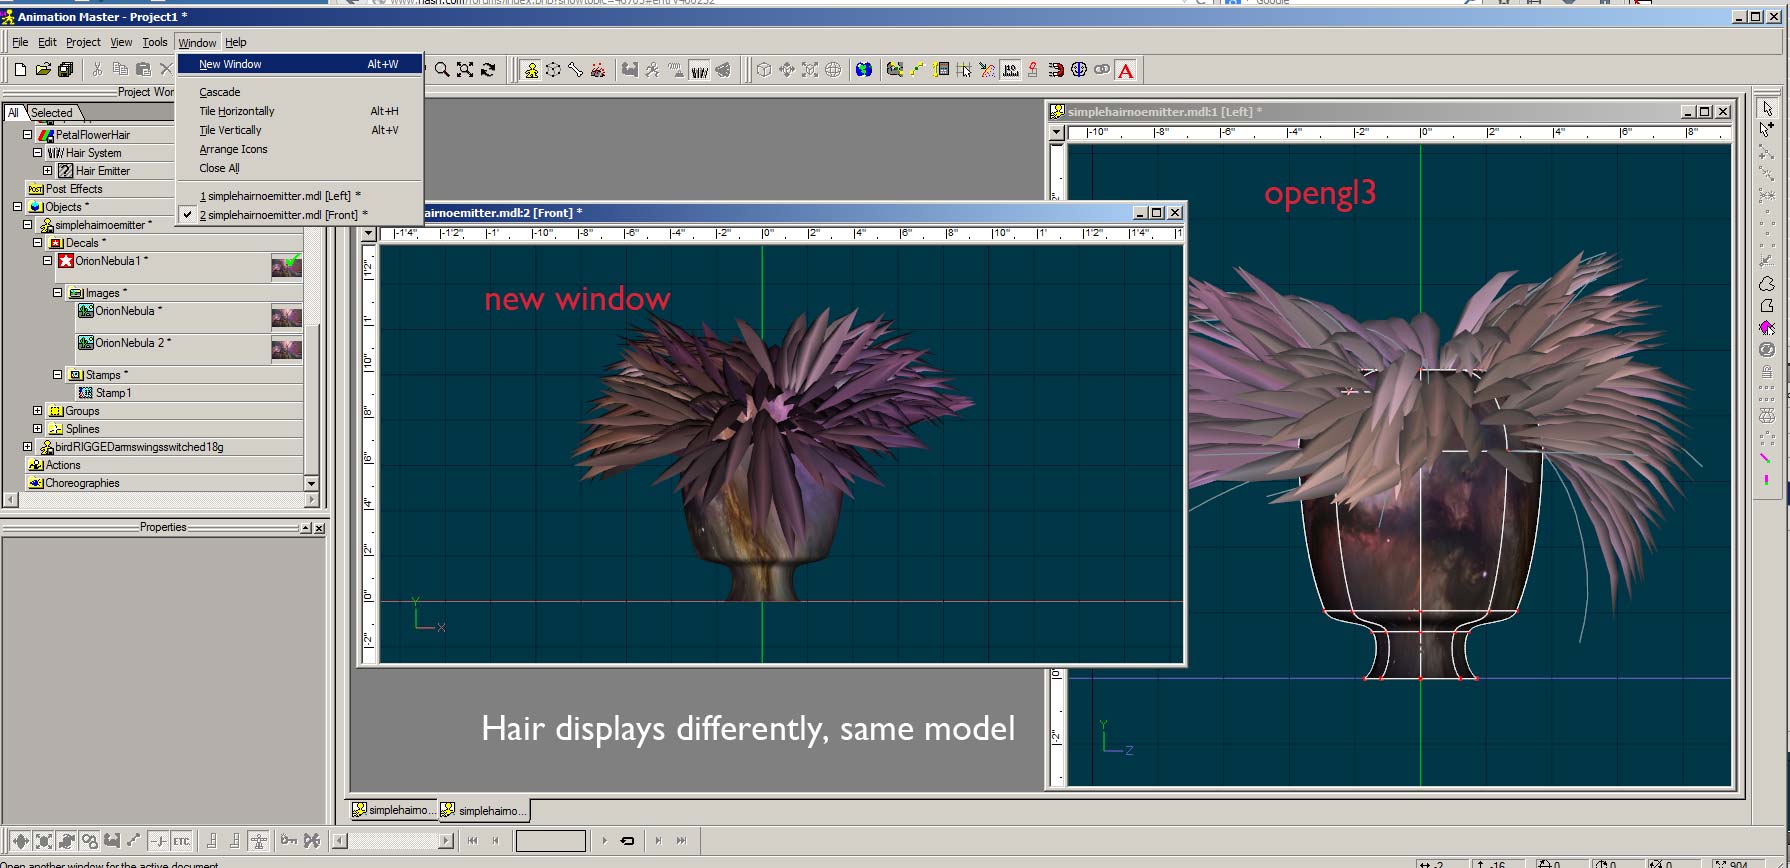
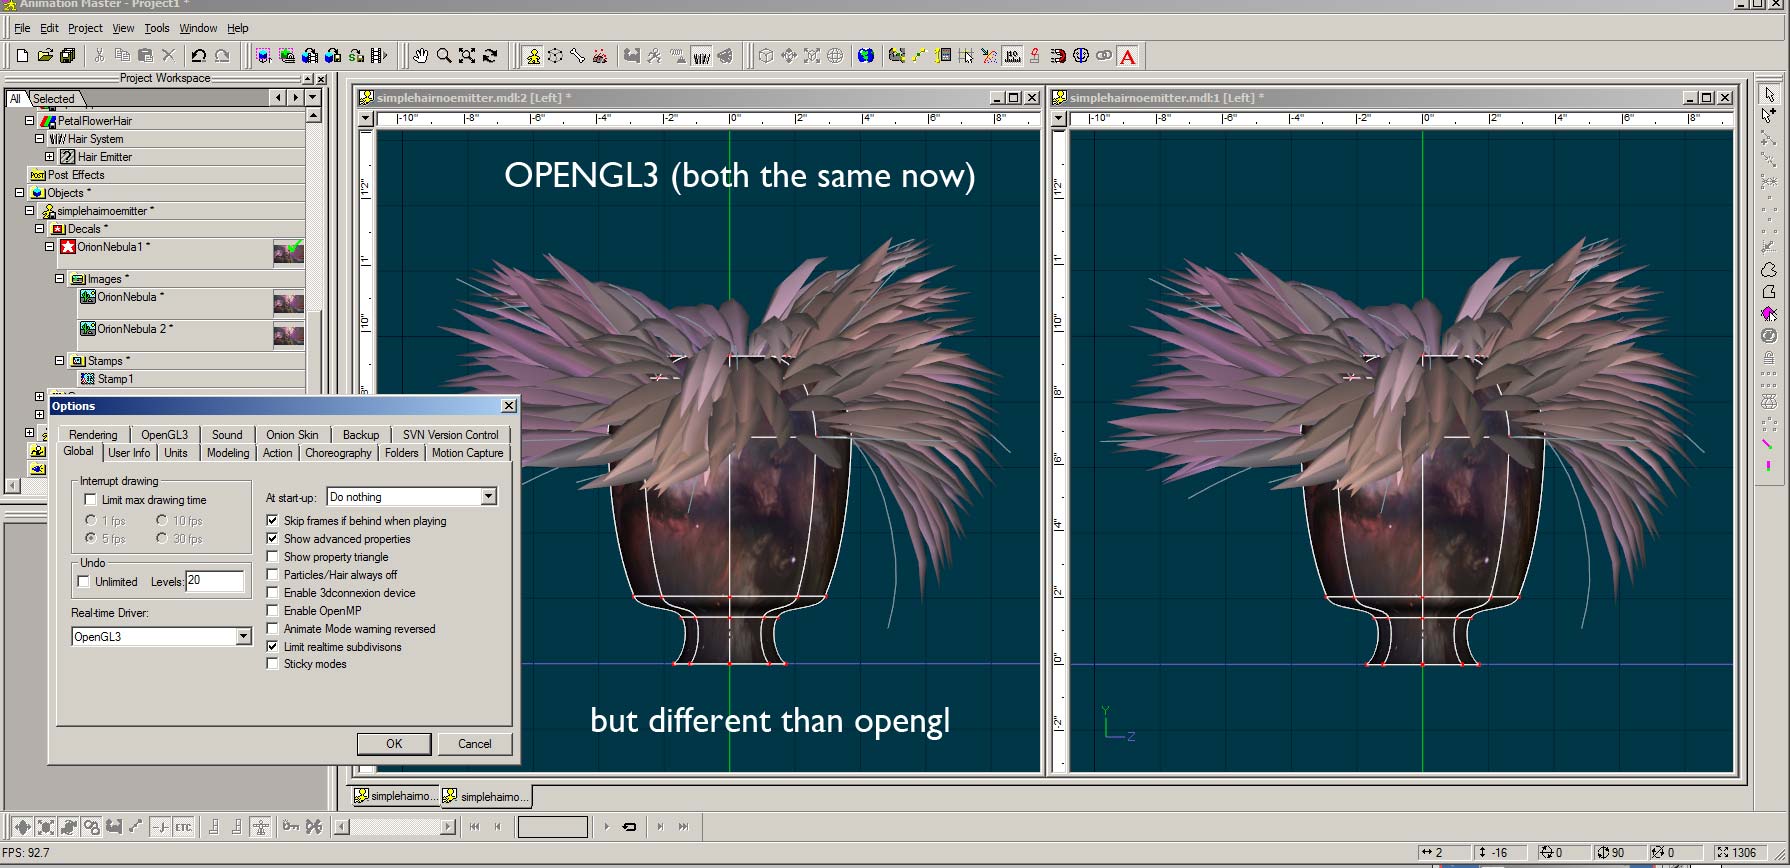
Not sure if you are referring to Tom or I, but I have nvidia, I believe Tom has Intel card. So our problems may or may not be related. I have noticed new problems, when I created new hair material and new simple model in 18g/64. (slightly different problem from display of older model, as hair does not display at all in OGL3 for older model) When hair does display with OGL or OGL3 - the rt display looks different. The OGL version looks more like what I would expect. In both OGL and OGL3, the model patches appear see-thru in shaded mode, but not in shaded/wireframe.. I also experience a crash everytime when I try to delete the image type "other" which drives the diffuse hair color I do have a test project, and would appreciate anyone trying it (see down below after images) 1) switch between OGL and OGL3 to see if you see a difference in display of hair. 2) change from shaded to shaded/wireframe in both OGL and OGL3 to notice see thru effect. Will have to go into birdseye view (T), rotate around to notice weirdness or view from bottom 2) try deleting the image type other 18gsimplehairdecaled.zip
-
Yes I am also able to decal simple new model in opengl & opengl3