Fuchur
-
Posts
5,412 -
Joined
-
Last visited
-
Days Won
89
Content Type
Profiles
Forums
Events
Everything posted by Fuchur
-
Easy: An normal image containts of 3 Channels: R (Red-Channel) G (Green-Channel) and B (Blue-Channel). But you can add an A (Alpha-Channel) to it. It wont define the Color of the image (like RGB does) but will define the transparency of parts of the image. Black stands for 100% transparency, white for 0%. You can use grey-values too, if you need to. *Fuchur* PS: To create it in Photoshop: 1.) Create a new layer and paint something on it. (Make sure that it is not the backgroundlayer). 2.) Press CTRL and click on the same time on the layer. That will select the shape of the layer. 3.) Go to "Selection -> Save Selection" and call the new channel for example "Alpha". 4.) Save the image as an TGA with 32-bit. If you now open it in A:M, you will only see the selection you defined in the Alpha-Channel, not the rest of the texture. There are other ways to create and save alpha-channels... search on google and you will find some of them.
-
Is there a difference between the PWS- and the real timeline-window? I thought they were the same? But I didnt know the one with the "1" key (x-axis key in modellingwindow) neighter, so maybe there is? I usally just jumped back to the keyframe-mode to move keys and the "channel"- or better spline-mode (didnt remember the name at the time) to manipulate the interpolation. Thanks for letting me know. *Fuchur*
-
You have to be in the keyframe, not the channel-mode to move keyframes. *Fuchur*
-
Have a look at Cookie Cut-Maps... maybe that is what you are asking for. If that it is not what you are asking for, make a screenshot and show us what you mean. I didnt play World Of Warcraft (or any other PAYED online-game... I just dont like that...) *Fuchur*
-
Chris Roy did... available at my website too. *Fuchur*
-
V13 and newer should be able to use the exporter (available at my website for free). So model, texture and animate in A:M and everything is fine. It is not as good as the newer collada-formats, but it will do the job. Have a look at my hp... you can find a link in my signature. *Fuchur*
-
A:M can export to the DirectX-Format... this is very well suited. The problem is the import, if you plan to only edited already existing models. I used A:M in combination with Quest3d to create Realtimecontent. It was working well. *Fuchur*
-
"Please look at the Models Surface properties- under the Ambiance Shader you should have a Environment option. This Environment Shader works similar as Environment material, except it shows over the decals and doesn't fade out with transparency (which means it could be usefull for faking reflections in glass)." Anyone found this shader? I cant seem to find it under v15. Anyone got it? *Fuchur*
-
Damn, you really put us others to shame... Very very very well done... I like everything about it *Fuchur*
-
Did you accidently turn off cast shadow under the objectproperties? Or is it a pose where you accidently used that property? *Fuchur*
-
AE isnt bad, it is just not needed for many 3d-animations. A:Ms built-in-tools are made for that and especially the composite-feature will do most things you can do in AE. The biggest advantage is, that 2d-effects which are blended with a 3d-rendering (lets say a lightening, a fire, etc.) are faster to render in 2d-space than in 3d-space... AE is meant for 2d-animations and has some features included which are nice there too... it is a little bit like comparing photoshop with a video-camera. It is not meant for the same thing. So: Use A:M whereever you can (it will do 99,8% of everything you ever need connected to 3d-animations). You have to ask yourself if 0,02% are worse 1.500 Dollars... I would say: No, it isnt worth it. If you are after 2d-animations or text-animations and some videoeffects, it may be worth it so. See you *Fuchur*
-
There is of course the porcelain-material, but you will have to get rig of the creases anyway. *Fuchur*
-

WIP... she is a beautiful Thai moview star.
Fuchur replied to StormedFX's topic in Work In Progress / Sweatbox
Still quite many Splines... but you handled them well. *Fuchur* -
Just to mention it: A folder can be created by Rightclicking on the chor in the PWS, going to New -> Folder. If you created a folder, just drag and drop on it what you want to be placed in it. *Fuchur*
-
Initial Velocity should be low, if you want it to come out slow. It's defaultvalue is 100 go down to 10 or even less and see if it is what you want. You can although try to play with the tension and pressure-force. This should bring your near to what you want. *Fuchur*
-
WIP... she is a beautiful Thai moview star.
Fuchur replied to StormedFX's topic in Work In Progress / Sweatbox
You will never need that many spline... that is enough if you would do a polymodelling You have to consider that you will have to position each cp on all 3 axis in a very smooth way to get a smooth surface... so I would recomment to use much less splines! *Fuchur* -
You are talking about my tutorial at PatchWork3d.de if I am not wrong. I am using AM v15 for the tutorial, so you properly got the old version of the plugin. You need to download the plugin for v13, not the other one: http://www.kci-group.com/z/zevel-v13.zip (Delete the old Zevel.hxt-plugin from the plugin-directory and copy the file "Z-Zevel.hxt" into it. "zevel.hxt" is the old one!) v13 is for the newer versions. The Zevel-Plugin can be a little bit buggy so. If it isnt working well, you can easily do the beveling by hand. Just have a look at the beveled spline in the video-tut and add it with the "Add"-Tool. It will be the same thing. *Fuchur* PS: I wrote it into the material-file for the tutorial, so in future I hope this wont be a problem.
-
First I would create the walkcycle without the hands moving. Save this one to an external file, rename it to "action_no_hands" (for example) and reimport it again. (By this you can copy the action). Now embed all by rightclicking in the PWS at the project (first entry at the top) -> embedd all. Now animate the hands in the second action (name it "action_with_hands"). Now you should be able to blend these two actions without problems. *Fuchur*
-
A:M is more like drawing than sculpting, but it is inbetween. You dont need any real artist-background, but it can help to draw a little. You dont have to be perfect so. I think Patch-Modelling is not easier to learn than polygonmodelling, but it is more efficient and especially if it comes to handleing and animation your models it is much better suited for most things... there is nothing that can not be modelled, it is only you who sets limits here. But to come back to your question: I never sculpted before. I did draw very often so, but only with a pencil and not really realistical or near to perfect. Semirealistic, anime-style-models are even easier to model than for example a real, anatomic correct human (that is a task that is really hard... no matter what you use... a 3d-program or a pencil...) So I would say: Just give it a try. If you got any questions, let us know... we will try to help if we can.. *Fuchur*
-
Looks very well built. Keep us updated! *Fuchur*
-
[OFFTOPIC ON] Did you notice? Nowhere Road could be read like: "No where" or "Now here"? [OFFTOPIC OFF] (Sorry... but that just came to my mind... dont know why... ) *Fuchur*
-
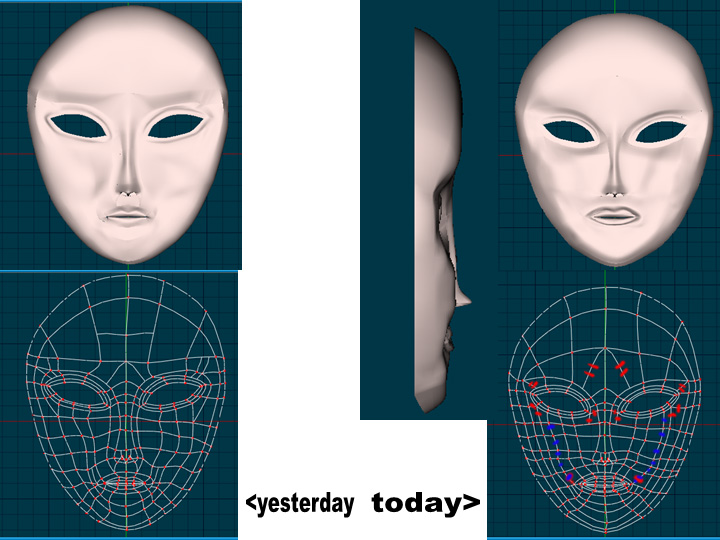
You need to have a look at the marked parts. It is most often okay to use a 5-point-patch if you want to combine a round form with a more edgy one. (for example if you want to create a mouth / eyes in a face. *Fuchur*

-
You can easily get all the shortcuts of your version... Just go to "Tools"->"Customize", klick on the Keyboard-Tab and search for the "Export"-Button. That will generate an HTML-page with all the shortcuts. And if you want to change them, you can do it there too. *Fuchur*
-
We cant predict how long excatly, I wouldnt say 2-3 days but a few hours isnt unusual. I would just try it out. But as other said: You will run into problems by importing into a model. If the model is static, you can import it as a polymodel, but if you need to animate it, you cant import it as poly. What we are all saying is: It is most often just not worth it. You can see the creases in the model from stormedfx. it will very likely look the same. *Fuchur*