Fuchur
-
Posts
5,412 -
Joined
-
Last visited
-
Days Won
89
Content Type
Profiles
Forums
Events
Everything posted by Fuchur
-
I think he doesnt have to, if it is a game like earth of empire, etc. Than the images will be enough. *Fuchur*
-
At this point it got 4900 patches Till now, eh? Will you model it in one peace or do you split it? *Fuchur*
-
Looks like you got fun there michel Nice test... *Fuchur*
-
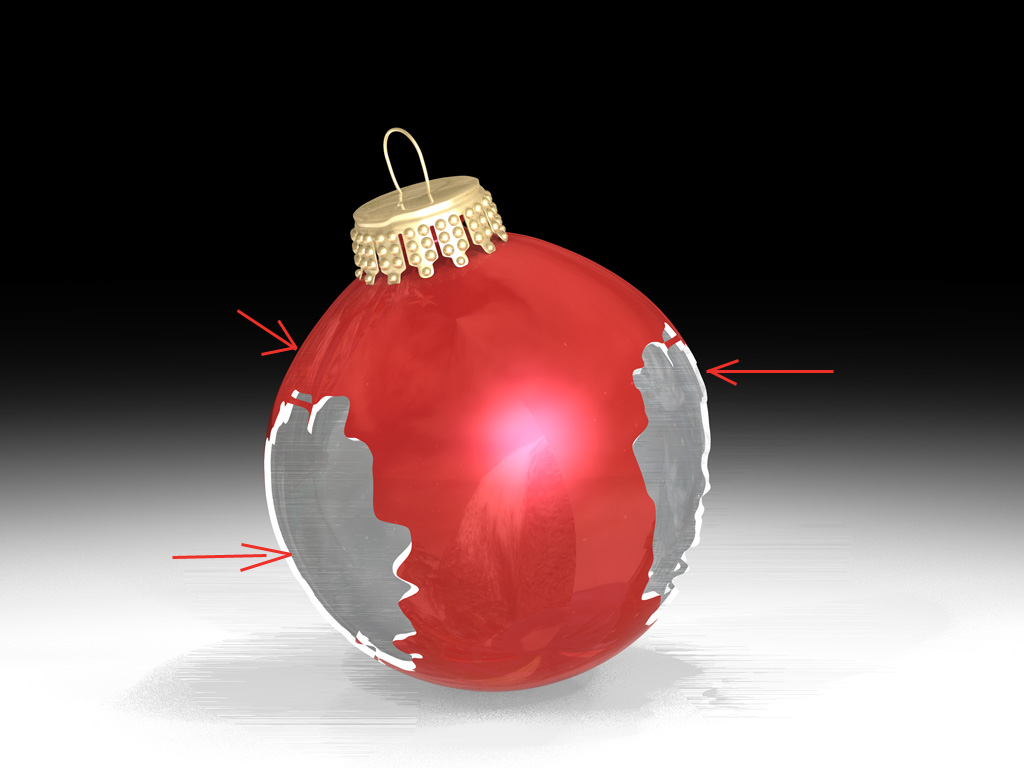
I am talking about the straight lines. Have a look at the grey-material inside the sphere. They are not supposed to be there. It is hard to see in the low-resolution-image in the red-part in the upper left corner but I cropped the area out. Have a look at this area. *Fuchur*

-
I've got a problem with a rendering... hopfully someone knows the artifacts and can tell me why they are happening. I am rendering a image of a christmas tree ball. So I took another road: Now it uses a lighteningtechnique quite similar to yves skylight-rig (so many lights placed in a sphere around my object. I am although using a reflectionmap (using a material) and more important a boolean cutter. As you can see, in the sphere, there are the artifacts (and if you look very precisly although at the left top of the ball itself. Any ideas how to get them away? Thanks in advance *Fuchur*
-
Textures give you the abillity to create very realistic models if oyu know how to handle them. But they are the possibility which is most troublesome. If you are after a manga-style you dont need too many of them so. Well place materials with surfaceproperties will do the job as well *Fuchur*
-
There are (I think) four positions along a spline where the hooks can take place... It will jump to the nearest to your mousepointer when you create it. Other than that, there is no possiblity to make place the hook more precisly. But in general you dont have to think much about it. If it changes a lot where the hook is connected to on the spline, a hook is very likley not suited... You should best use it on even surfaces or at least on surfaces where it will not have to bend too much. *Fuchur*
-
You will have to do it by hand... I have a German keyboard (so z and y are changed) but I think this is something that isn't too bad. It's much worth that for example the slash isnt available that fast, etc. But in the end it is a change of 6 shortcuts or something like that... so there is no real need for a special threatment here. So I would suggested: Take the time (it cant be longer than 10 minutes) and change whatever you want. *Fuchur*
-
Did you move the mainbone in any way? Seems very odd to me. You can try to save your action out, reimport it and delete the old one. Maybe it is fixed then? *Fuchur*
-
It has been changed in v13 (it got a better export-algorithm at this time), but Arthur already rebuilt his plugin for v13 and up. Go to: Arthur Walasek's Webpage Be sure you get the right plugins for your version (v13 and up should use v13-plugins) It is working well for me. And yes: It should even be included in A:M as a standard, if I am not wrong. But if it didnt transfert to your installation (why ever) get the plugins from his webpage. See you *Fuchur*
-
I hate those guys who just take a photo and then claim to did it by a 3d-pr... damn, there is a wireframe? Holy... just a wonderful, very very photorealistic work. *Fuchur*
-
That wont work... you need a quad-poly-model at least to be able to use it. The only thing I can imagine is, that it could work as prop OR you could try to use the toon-renderer. But everything else is to much work to do. *Fuchur*
-
Could you provide one of the models? I'd like to have a look on one of them. *Fuchur*
-
A painting, eh? Are you sure the sitting cat in exactly that position is possible? So can properly scaled bones do it that way? The easiest way is to deform the cat in the way you need it (for example in a pose) and while standing up bringing it in the right shape to animate it properly again. I dont know much about the TSM-rig, but are you sure you cant archieve the pose? Switching between FK / IK could help much. The more complex way is: Rig it yourself so you get the accuracy you need. You are after a logo-animation or something right? Maybe you could although get to the sittingposition in a 2d-blend? *Fuchur*
-
On a floor you can easily just use a decal with a repeat-value for the image. BitMap Plus can do the job too, but I would suggest to use it for uneven-surfaces where a decal would be very hard to apply correct. BitMapPlus is less controlable than a decal and cant be viewed in realtime. So, just get a texture of a ceramic flag (should be tileable) and use it as decal. At the decal, go to the image-folder in the PWS. You will find a "repeat"-property. Set it as high as you want and apply the decal. Done. (You can even manipulate the repeat-value after applying the decal. *Fuchur*
-
"Both candidates could run this country without a hitch. I am sure of that. My concern is HOW they will do it. What will happen in the long term? One has a status quo philosophy. The other wants to try a new approach. Neither idea will destroy America. We're to strong for that. A single president couldn't destroy America, although Bush has made a good start. We need some CHANGE. And that word is not some "catch phrase" made up by advertising consultants... it means what it says... CHANGE. We need a new different direction." Hitler made from one of the most freeminded and liberal democracies a dictatorship within a few years. Before Nazis, the Weimar Republik was a very liberal democracy. He used this liberaly against itself and in the end killed millions of peoples. So dont be too confident that one couldnt get the US down... it only needs many people with an attitude like "We are unbeatable and nothing bad can happen to us..." and an evil minded, clever person. Just leave your eyes open and learn from other peoples failure. Many people here use the term sozialism like it was the same as comunism - as it would be the most evil thing on earth or something. Germany for example has penson-system, basic healthcare for everyone, helps people to get a new jobs and while they are trying that they get a small monthly pay for a certain while. I dont think that that is evil but it is social. Some people abuse the system, but most are really trying to take the chance and if you abuse it, you will be loosing the help and have to pay everything back with a penaltiy. It is not about getting the money away from the big guys... it is about helping people who are willing to get a job and work hard who just had misfortune. See it like that: If you would for example buy with very much of your money shares from some oil-company and tomorrow the cold fusion would be invented or you disable a person WITHOUT ANY PURPOSE by accident with your car... wouldnt you be happy to get a small restartup-help? It means that the (really) rich people get a thousand dollars less, but it although means that people wont have to die or be starving because of misfortune and that the rich people if they ever have a problem wont end on the streets neighter. It is a second chance. If you can do great things or you got a great idea or you are working harder than others, you will gain more money than others. That is the way it should be. But it is although nice to know, that you wont loose everything if you cant do that whyever. Think of this: Your child becomes ill. The threatment costs too much. You cant get that much money but your child will die even so it is unfair that your little girl has to. What would you say... "bad luck... more luck the next time?" In Germany, if it is absolutly necessary you would get the threatment for free or at least very cheap, if it really needs to be done. I think a state is there too support his citizens... I dont know enough about the american-healthcaresystem so. I only know what comes from the movies. There was one with denzel washington about that topic, where he had to take hostages in a hospital because he couldnt get enough money but his child needed a very expensive medical threatmeant (I think it was a heart-transplantation or something like that... if it is really like that in the US... I only can shake my head about that. For me, a life is more worthy than money. "Financial support to come back on your feet." - This is especially useful in a country where a hot coffee on someones trousers can cost millions... (in Germany nobody would get millions for such a thing... I consider that as totally mad and here many people make fun of the incredible high penalties for not that important things in the US, but maybe you consider it as totally mad that you dont get that much money for such thing...) And so on... Our social system is not perfect and there are some black sheeps here and there, but overall I think it is not a bad system. It means that every person has a last "save all" if it is really necessary. *Fuchur*
-
Okay... so we just have two very different points of views here. You are seeing enemys behind each single tree, I dont see them. And it is NOT easier to catch up with poverty or health care or other problems of a country... military is much easier. You just have to capture other peoples devices to get informations about it. It is hard to research military technology, but it is much harder to solve society problems. Ever tried to capture a social problem? Countries all over the world try to eleminate those factors and none really got these things solved. Because there is no simple answer to it and the problems differ from country to country, city to city, village to village, minute to minute. Hundreds and thousands of factors which are all interacting with eachother in a society are competing against each other and you have to find a way to combine all of them to solve these issues. Many different lobbies want to be adressed, many different people think different things and every single one of them think s/he would have a slightly better plan than all of the others. And lets face it: There is no other country on the whole planet which is spending so much money for military research! Why is the cold war over? Because no other country could spend that much money for the weapons anymore. So there are two possibilities: Out there are very, VERY intelligent none-us-people who can develope better weapons than the US military with 1/100 or less of the eta of the US military (very, very, very unlikely...) or we are talking about paranoia here. It is not about military, it is about civil technology if you are talking about other countries which develope better things than the US. Asia is coming and they will kick the western countries ases if we can't produce better high-tec products like they do. 10 years ago, we were far ahead technologywise, but today the US is not (with the exception of military equipment) better than them today. They can produce much cheaper and in 5 years their products will be better. Have a look at the car-sector. Germany was always very popular for its great cars. Today Toyotas, Nissans and such manufactors are leading in Emergency Road Service statistics. We are still slightly better in some areas like comfort and new inventions, but that can change in a minute. Mobilephones are created by Sony and Nokia, a few my Motorola today and Nokia and Motorola are losing ground. And so on. So what will you do if the only thing you can do better than others are weapons? Will you go and be a pirate? Because another job isnt available anymore? So it is very wise to invest more money in civil research and try to save your jobs by being a small step ahead ALL the time. Oh and just to mention it: You need to kill every other person other than you to get totally rid of the possibility to get attacked... and that wont be a nice christmas eve if only one person is lightening the candles... *Fuchur*
-
I dont say to stop it, but do you really have to spend THAT much money on it? I mean, the military eta is one of the largest or the largest in the US. Poverty, no real healthcare-system, high illegal imigration, many different other problems but what gets addressed most? The thing that is already the most advanced and could easily be supported with a bit less without loosing any advantages... For what? The US wont be attack by any country directly anyway. It would be suicide without any possible success and there is no country which will try that. The only thing that is possible to happen is, that the US is doing a agression war or that terrorists will come and try to attack a city in america. Where do you need a new tank for, if the real danger is a guy with a bomb in his suitcase in New York or a airplane? The new tank is just useless in such situations... It is about being able to defend your country, but even more important is to have something that is worth defending, dont you think? *Fuchur*
-
No it doesnt, but they may be dangerous, but they are not stupid. They although know, that nuclear weapons will effect them too and that this will be a reason to fight them. I cant say what is going on exactly, only future will tell us, but dont believe everything that is told to you on the TV. Republicanic governments are often ruling the country by rising the fear in the people. Second thing: You are talking about the terroristic cells, not a state. If the state would have been acting like a real terrorist, it would long be in war with the NATO. You cant set any state on the world at the same level as Al Qaida, ETA or the Hamas. They may have other opinions but you cant say that a state who has another opinion is automaticly evil. And the common number is 42 virigins, not 24. And this is more like a joke by the western countries. What really motivates the terrorists to do what they do is, that their families will gain some sort of a rent from the terror-organisation. It is more or less about money and to help their families out. Yes they may have the motivation to get something in heaven, but it is not the only motivation for them. But again: Mc Cain is not the only person who can fight a war. Obama can although do that, if it is necessary. The US has the largest military eta of ALL the countries in the world since many many years. The US already got such a high level there, that no other country can stand up with the US there. And you have to see it in another way: Every dollar which is given to the army is always a dollar less for the rest. That means: Education will suffer, infrastructure will suffer, economics will suffer and so on. So even while the US has more weapons especially more advanced weapons than any other nations, the us is still spending SO much money on it. *Fuchur*
-
Easy: You unwrap your model (that means you apply decals to it), you go to your model-window, you activate the plugin, the model is automatically transfered to 3dPainter and you can paint it. Now you can save the texturemaps and just click save and go back to A:M. 3dPainter will be closed and you will have the model with the textures. Another possibility is to use the autounwrap-feature of 3dPainter, but this wont work as well as a good manually unwrapped model. There are some other features too. Anyhow: You will need time and talent to be able to create nice models, no matter which software you will use. There is no other way. *Fuchur*
-
You are too certain that all people wanna harm the US. Even if the Iran had the bomb, it wouldnt be clear that they are trying to use it. And the argument of cheap energy is although there. Why should only the strong western states today have cheap energy? Energy means a better way for the future and ANY nation wants that. It however is a risk and I am not really for the nulcear-powerstations in Iran (even without the bomb it is quite a risk to have those in a country without a high educationlevel) but sooner or later we will have to handle the risk... and in this discussions, there is ALWAYS the oil-factor involved till the fusion-plants are totally invented (they are already on their way). And as vern said: Wise, intelligent and moderate doesnt mean weak. It means, that you are not only driven by your own fears and that you are only using weapons, if there is no other way out of the problem. I dont like a world were wars ("wars" - in Iraq about 30.000 iraqis were killed while the real war. About 30 (I think it where even less) US-soldiers lost their life there. About 30. 30.000 / 30. And many of them by friendly fire. Can you honestly say this is a war? This is like a fight between a heavyweight boxer and a 3 year old. And Bush said: "Hey, be careful Mister Klitschko. Don't wonder too much about the diapers: He has got quite a punch..." Iran isn't a bigger problem too. Even if they got the bomb, they would be damn stupid to try to use it. The whole world would connect there and they had even problems to stop the Iraqis. What should they do against the Nato? They are just like most nations: They think the bomb will protect them because they are frightend that something like the iraqi-war could happen to them too. Despite of that: Till now they are only talking about a non-military use of the cheap energy. I am not certain what they really want, but I am although not certain about statements of a hardliner-government about a country which has easy accessible oil-reserves. The problems are not the countries today, the problems are caused by terrorists... small groups of people which were anyhow pissed off or which are just damn stupid and/or fatuous. And back to the rocket-shield... it will not be half that efficient like it was said and it will raise the need of itself by being itself. Do you really want a rocketshield which is only necessary because its construction offended other nations? There are not many countries which have the technical knowhow to built long-range-rockets. So Iran wouldnt even be able to bomb the US if they had such intentions. The bigger problem is China and Russia but they are stronger and as that a war against them wouldnt be half that "funny" as one against a small country would be. The best way to save yourself is to not give other people a real reason to be fighted if it is not really necessary. Every security system is breakeable if someone just wants to do it. You could built thousands of anti-missle-launchers, etc. and while you do, a small boat with a suitcasebomb passes next to you and waves at you. (This is a metaphor, not a real situation...) Before you get your gun out: Think about the problems you will cause and think about if it is really necessary to fight or if a "small boquet of flowers" wouldnt be enough to prevent a war with thousands and tenthousands of dieing and suffering people. Maybe the counterpart isn't trying to get his Colt out... maybe he is only looking for his cigaretts. You will see it after you shot him, but can you really live with it if it wasnt a gun but only his lighter he was trying to get out of the pocket? Not only american soldiers have families which will be very sad about his/her dead. So if it is really necessary: Fight with all you got! Get the attackers down and defend your way, your family, your house. But only if it is really necessary!!! It is about asking questions, being fair and thinking before shooting. That is all that is asked for. In more than one situation Bush didnt do that and I would be happy if the next president of the US would be better at this. If you think Mc Cain is better, elect him. I am not that involved that I can say everything about the situation in the US... I only see that for example Bill Clinton was more of a thinker too me than Bush is. And dont forget: Clinton had its crises too and he had to fight too (Battle of Kosovo, for example). And I think he did better. He got the world on his site, he tried to really handle it without weapons, and when he saw that it didnt work out, he fighted. War is always dirty and not "funny", but this one was necessary. If Obama is in anyway a bit less like bush and a bit more like Clinton and Mc Cain is more like Bush, I would be very certain where I would put my cross on the votingpaper. *Fuchur*
-
I think the best way to handle that is to cut their supplies... if people are no longer that angry about the US, there will be less people going this route. The problem will not be totally solved with that, but it can be alleviated. The problem: It will need some time... *Fuchur*
-
Okay... lets face it: It is more than implausible, that due to his entired life, his political career and his fight against clinton (this time hillary ), noone found out about any direct or indirect connections to a terrorist. The democratic camp would be damn stupid if they really would have overseen something like that. I highly highly doubt that. So it is very likley that this statement was one of those "If I say it, and demand it afterwards, the damage is still done..." once. That means: Even if something is not true or at least very very overinterpreted, people will remember it anyway. You will stand at the electionoffice with a pencil (or any kind of electronic voting-sytem... dont know what is used in the US this time) and you will have some short phrases in your mind... and for many it will be one of these half-truthes. So it is just another manipulating comment from one or the other lobby or camp to harm the other one. If someone would say: "He recently found a pocket on the street and only gave back half the money which was in it." it would be much more believeable than something like that. If you ask me, that is much more relevant than any of these kinds of statements above. Oh, just for the record: I dont like Medwedew/Putin. I think they are establishing a dictatorship there for Putin (at least offically Putin isnt the president at the moment) and he is too much of a hardliner for me despite the fact that democracies are at ANY circumstances the better choice. The problems at Georgia werent their fault alone (or their strategy, depending of which point of view you have) but they were responsibile for a large part of the conflict... and if I am not wrong, there will be more problems with it again. But lets face it: The rockets in Poland werent nice of the US-government too. They are not very effective, won't give much of a protection against attacks and they were a open provocation against Russia, which isn't very intelligent with a hardliner on the top. So George and Vladimir may cause new crises in the short future, because both are more or less hardliners. McCain is the sequel of Bush... so may the force be with us all if McCain is elected... I highly hope that a democrate will win the elections... we all need a moderate, thoughtful person for such conflicts and someone who can politically stand up against a very clever (evil, but clever) guy like Putin. And dont say something like "But the terrorism..." I dont think anyone still thinks, that millitary power can handle terrorism... it is about thinking and understanding. Think about it: Someone thinks, there is a terrorist in a village. There is no terrorist there, but because someone moves too fast, an soldier shoots a young boy. The young boy has 3 other brothers... so you created from no terrorist 3 once and a whole village with people who will tell their children, that they have to be careful about the soldiers or that they are evil. Nicely done. And exactly that is happening. People get angry if you harm their family or friends... and even people who didnt have anything against the soldiers will hate them. Because a friend, a brother or sister or the parents got killed. And it will never end... people will be killed and other will be angry about it. The same is happening on both sides. In the end, noone knows why they started fighting... they will only know that the friend was killed and that this has to be repayed. It is a bit like the fight in Ireland. Over a decade people shot eachothers, fighted against each other and killed manymany people in a civil war without any chances to succeed. Today, after manymany years people understood what happend and like that there was no future. They are now trying to talk to each other and it seems to work out. See you *Fuchur*
-
*lol* It is really funny... you must have more fun than we when you are electing someone... at out place it is only about: "Is he able to do what he claims and is what he claims something that is near your own wishes..." At your place it is about every single person in his bloodline, if he drinks the right coffee from the right brand and if he really likes fruitloops better than Brahms... And it could be so easy: The only question is - Will this man/woman fight for my wishes or at least is s/he claiming to be closer to my opinions than the other guys? -> if so: Vote for him, if not dont. We can't do anything else. I never understood why Clinton (Bill, not Hillary) was more or less thrown out of the house in shame. I mean, Monica had nothing to do with his ability to rule the country. America was economically (and military, but that didnt change much) strong, he and therefore America had good relations with other nations in the world and he was much more liked and lets face it: he was much smarter than bush jr. But he did something bad, which if I am not guessing wrong at least 33% of the people who were most pissed off because of his sexual mistakes, did themselfs, and than he wasnt anything of that anymore? What happend here? Was he another person from one day to the other? No. He was the exact same guy many people liked and many people applauded one day before. The only difference was, that people had found out about his private life, which had nothing to do with his skills for which he was elected to be the president of the US. *Fuchur*
-
I have bookmarked your site and will look at it all, Thank you. Splines arent that hard. They are somehow even more logical than polys. You have to follow certain rules, but you gain a much less dense "mesh" with it which will help in many circumstances, especially while animating. (not in all, but in most...) To fully understand everything about splines you will need your time, but beginning with it will be fast. And as a cartoony-artist you should be used to animation and working "logical", so I am certain that you will get the hang of it quite fast. If you got Illustrator, FreeHand or Flash-Expierences it will although help a bit. *Fuchur*