Fuchur
-
Posts
5,409 -
Joined
-
Last visited
-
Days Won
88
Content Type
Profiles
Forums
Events
Everything posted by Fuchur
-
I think that the Animate-Button (big "A" in the right upper corner) can do something like that... but be sure to make a backup before you try it out... the Animate-Button is very powerful but can be very destructive too. The better way would be to use a pose and do it again from that position. Anyway: If you use the A-Button, be sure to turn it on again after you made your default-changes. *Fuchur*
-
The backside of the coin: Your Graphic-card will have to work more. So if you feel that your system is slowing down, you should turn the subdivision-level down again (Page down)... It will anyway only effect the realtimeviews, not the final rendering. *Fuchur*
-
The Extra-DVD will give you access to many hundreds of models, actionfiles, etc. . It is not free, but it doesn't cost the world (can be found here. Another place for A:M - Stuff is here at EggProps. There is although a free area at eggprops which can be found here. *Fuchur*
-
I would use the *.obj or the *.x-format to import / export from other packages... you cant import *.max-files anyway. *.max is not a open format so it is not possible to write a plugin for it... Polytrans and Deep Exploration for example can convert it, but only if you although have Max installed. 3ds-format is the open format of max, but that isnt very good if you ask me... *.x or *.obj are better supported by A:M. BUT that doesn't mean that it will give you perfekt results... The problematic between patches and polys is still there. *Fuchur* PS: The *.x-Import/Exporter can be found here.
-
If you really want hard edges (your way is most likly better looking) you can peak the splines. To do that, you first should reset your changes. So give it a Magnitude of 100% and Alpha and Gamma to 0%. Now just select all of the CPs you want to be hard edged and click on the icon on the right side of the modelling-screen(below the Add-Spline-Tool) which looks like a hard-edge-spline(or press P). After that you can use the bias-handlers to give it some sort of curve where you need it but the edges will be more or less hard (depending on your bias-settings). *Fuchur*
-
Can't answer that... but this thread will maybe be used for the FAQ-section and someone at hash thought this would be better to find this way. *Fuchur*
-
Not a readmedoc or something like that, but the new features can be found here: http://www.hash.com/am2001/ http://www.hash.com/am2002/ http://www.hash.com/am2003/ http://www.hash.com/am2004/ http://www.hash.com/am2005/ http://www.hash.com/am2006/ http://www.hash.com/am2007/ Some of them are discussed in the Tech-Talk-Video-Tutorials which can be found here: Tech-Talks Feature Focus Hope that helps! *Fuchur*
-
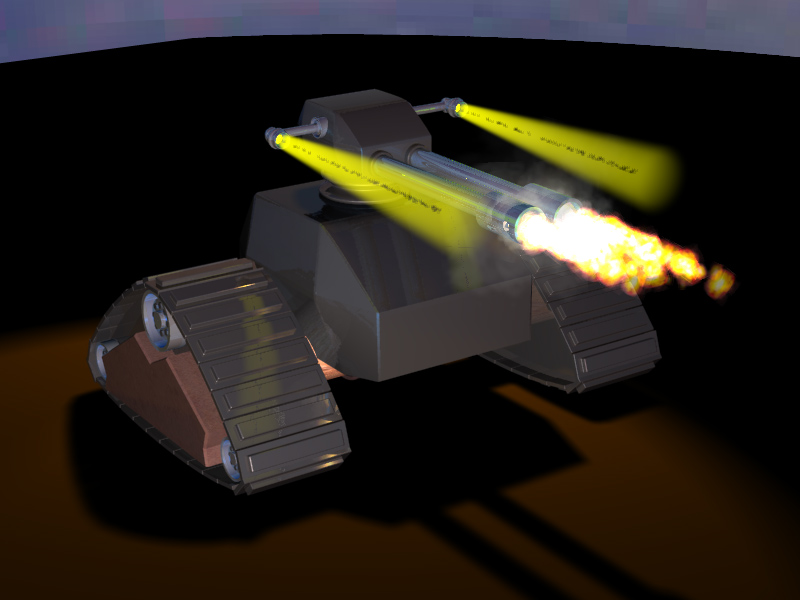
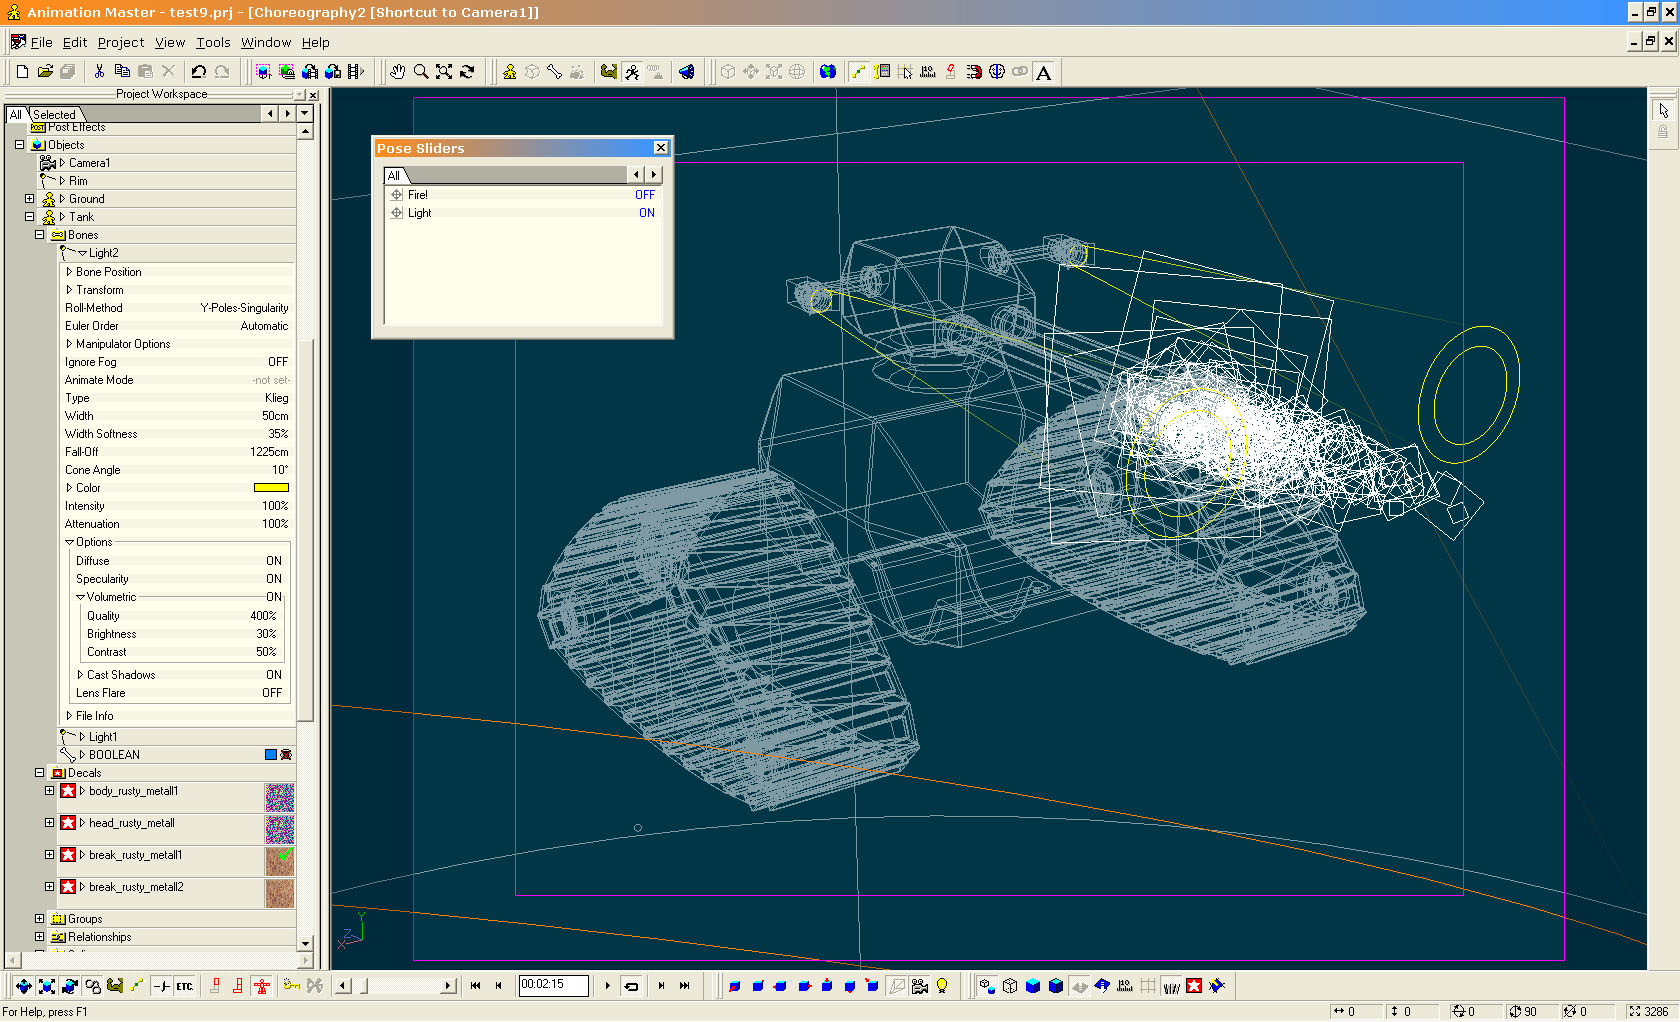
I investigated the problem a bit further and I could find the situations where it occured. It will only occur if you use certain combinations of cone-angle- and width-softness-values. In my test-project it occurs if you use 15 degree for the cone-angle and a value of 50% - 55% for width-softness-value. So I only have to find the right combination for my tank-project to track down this problem. I wrote a detailed report on this one. It isn't very bad if you know the walkaround so. *Fuchur*
-
Hm... You mean fall-off? That is regulating the length of the volumetric light... I played a bit around and found the property which seems to cause this problem. It is the width-softness... If I drag that to 0% the problem is gone. But I loose a bit of realism there... Thanks for your answers anyway I will write a report to Hash on this issue. *Fuchur*
-
It is already. The bone of the light is already ahead of the geometry. I dragged it even further away so that nothing from the light-gizmo was touching the geometry at all, but it didn't make any difference. Thanks for your answer anyway *Fuchur*
-
I modelled a tank which I want to model again in a videotutorial about mechanical modelling in A:M. But I have a problem with a volumetric light. It has a strange ray in the middle. Maybe someone can tell me what is happening there. Thanks in advance *Fuchur*

-
If the hair-emitter isn't showing through after you applied the materiel to the head, you have to activate particles. That can be done by pressing "Shift+8" or using the draw-toolbar (rightclick in an empty toolbar space, "View->Draw" and it is although useful to activate "View->Views"). *Fuchur*
-
Happy new Year! *Fuchur*
-

Animated Logo for Funk Monkey Productions
Fuchur replied to Jeetman's topic in Work In Progress / Sweatbox
Very nice... The idea is great and it looks nice... you should think about fasten some of the animations to make it more appealing, but in the end it already works okay... *Fuchur* -
Happy new year... I cant wait to see the movie... it is very very promising! *Fuchur*
-
Thanks I'll do it as soon as I can borrow a credit card from a friend... I don't have one by myself (its a pitty that there are no other payment-methodes like Paypal, Candlelight or just a banktransfer). *Fuchur*
-
Hi! Is the subscription-order automated, or do I have to wait till january to get it? *Fuchur*
-
Did you try MapZone? It is free(better to say there is a free and a commercial version) and it is powerful... Textures are great to use with BitMapPlus-Plugin or as Patch-Images... Worth a look anyway: Map Zone 2.5 It is not only for seamless textures but it can do them too in a very nice way... *Fuchur*
-
Nice and entertaining! Good job for your first one! *Fuchur*
-
I think you have to use the TARGA-format. A:M can now render to TGAs but v11 wasnt capable of that. The image-types png, jpg and exr where implemented in v12. -> Feature-List v12 Another tipp: If you use activate, you should although use the animate-button (deactivate it) or go at least to frame 0 before using the activate-option. The Animate-Button is the button in the right top-corner which shows an big "A" on it. It will prevent A:M from setting keyframes, so that the models are of for all the time and don't animate to be active or not on a specific time. DONT FORGET TO REACTIVATE THE A-Button BEFORE YOU ANIMATE ANYTHING. That would destroy your animation because without the A button you can control the default-position of your bones, cps, models, etc.
-
Do you have a problem with a specific model? Or do you just dont know where to start? *Fuchur*
-
Could you be a bit more specific where you need help? *Fuchur*
-
Self-illumination in A:M = Ambience Color + Intensity(you can find both at the surface-properties of a group or the whole model). You can although play with the diffuse fall-off. But after that you have to do something with your lights. You can delete them and you will see your model anyway, but it will look very flat. Another approach is Ambient Occlusion. You can set a color or in combination with an image-based-lightening an image to tell the model how it should look. Try it out and find the setting which is most suited for your needs. You can find some more indeepth-informations about Ambient Occlusion HERE. *Fuchur*
-
What happens if the stars behind "Won Contests" fill the whole line? *Fuchur*
-
In the Manual you can find some tutorials. Other Tutorials can be found here: Modeling-Tuts Some are offline, but some are still on. Depending on what you are searching for, ARM can help you much. There are other websites of course... If you like it printed and very well written: David Rogers - A:M 200X *Fuchur*