Zaryin
-
Posts
2,728 -
Joined
-
Last visited
-
Days Won
4
Content Type
Profiles
Forums
Events
Everything posted by Zaryin
-
I'd let him in, haha. I loved it.
-
Yeah, I love those vegatables. Especually your decal on the mushroom. What's your lighting set-up for this one?
-
You're starting to piss me off with all this talent, dangit! I think the cloth look very good. THe only problem to me is the inside elbow, but I would have no idea what to do about it.
-

Oz Map -- Another v13 Displacement Fun Thread
Zaryin replied to Zaryin's topic in Work In Progress / Sweatbox
No problem. I am finding useful info. Plus I moved the map thread over to the TWO Props area. Keep going if you want, I'm enjoying it. -
Yet another v13 Displacement Fun Thread
Zaryin replied to aaver's topic in Work In Progress / Sweatbox
Thanks alot. It might be nothing to you, but I appreciate it. -
Oz Map -- Another v13 Displacement Fun Thread
Zaryin replied to Zaryin's topic in Work In Progress / Sweatbox
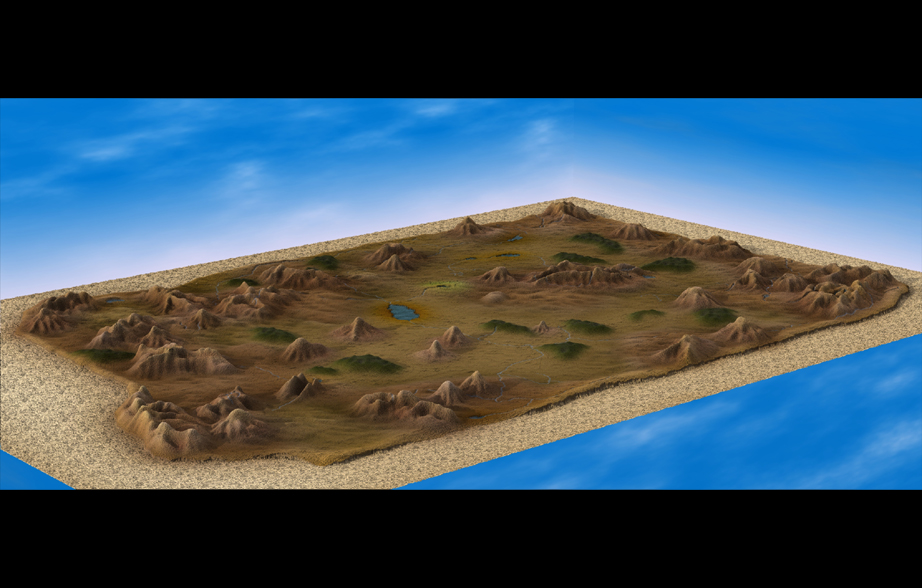
You asked for it, now you got it. I hid all patches that I knew wouldn't be in the picture. This render is of the two mountains on the bottom right of the map. At this size, using only 4 passes, it took 15 and a half minutes to render. I am wondering if scale of model might be an issue with the time. I'll try and resize it larger tomorrow to see if it will make a difference. It still looks pretty damn cool to me though. If they can get the renderspeeds up, we'll be able to make some serious landscapes. I posted the pic like this so everyone know that it was made and rendered in A:M. I looked at it at first and thought I was looking at a pic out of a Terrain Program that I will not mention. Lovin' it! I will be posting all other Ozmap WIP stuff in the TWO Props area since it is a WIP and not just showcasing . If you like the map follow me there and give me advice. Thanks.
-
Oz Map -- Another v13 Displacement Fun Thread
Zaryin replied to Zaryin's topic in Work In Progress / Sweatbox
Thanks Robert. Vern: Sorry, wish I had some anwsers for you. Dan: Yeah, I painted this color map of Oz to see if it could be used as a prop for the movie (map wall hanging, map on a table, etc...), but nobody commented on it so I stopped working on it. So it sat on my pc for months and then the new displacement came out for v13. I said what the hell and made a height map from the color map and here we are. I know it's not as detailed as a real hieght map, but I still like the look . So now I am thinking of finishing it in the hopes that it might be used on the inevitable TWO webpage with links to pictures and concept art and stuff of the area on the map that you click. Or something like that, haha. Now three questions for you. What colors are set for the ambeint map you just made? It look great. Where can I find real height maps? Are the artifacts in the pic from the modeling window or in the choreography? -
Oz Map -- Another v13 Displacement Fun Thread
Zaryin replied to Zaryin's topic in Work In Progress / Sweatbox
I'm not very good with spotting bugs for the simple reason is I never know if it is a bug or just a memory thing. How would I report it if I did? Ok, rendered two versions now. The first is with 100% Normal Map, the second is with 200%. Let me know which one looks better. I also raised the Spec Size and Intensity to 100% for the entire model. It brightens it up . I do like the way the normal map brings out the shadow details.
-
Haha, that great. I think the feet seem to be stomping a little too much. Shouldn't they roll more?
-
Oz Map -- Another v13 Displacement Fun Thread
Zaryin replied to Zaryin's topic in Work In Progress / Sweatbox
Thanks again, Matt. I was planning on using a spec and reflectivity map with the finished map. I can definately see the difference. Paul: I tried it with 1 and 200 patches both versions took way too long to render, but Ill try the culling method and see how that works. THanks for the info, also. I will have to add snow, change the color of some of the mountains add roads (mainly the Yellow One ), and see if i can add villages and citys with displacement well. With the normal mapping it might be easier. EDIT: Who can I get to move this thread to the WIP section? I think that's what this has turned into, haha. -
Oz Map -- Another v13 Displacement Fun Thread
Zaryin replied to Zaryin's topic in Work In Progress / Sweatbox
Thanks for the info, Matt. -
Oz Map -- Another v13 Displacement Fun Thread
Zaryin replied to Zaryin's topic in Work In Progress / Sweatbox
Really? The tests I did had high thumbs up for the use of normal maps. This is the normal map I came up with. Put this in the same decal as your displacement. Set your dispalcement to 0 and change the values on the normal map until they look like your mountains would. If their backwards, which sometimes happens, just use negative values for the normal map. Ummmm.... My Normal Map didn't turn out near as good as that, haha. Your's is so clear and good. Can you post the setting you used to make that in Photoshop? Then I can make the large version into a Normal Map using those settings. I guess I don't have any skills with the Normal Map plug-in. *sigh* Thanks . EDIT: I forgot to add. I would love to be able to "bake" these as well. I can't render this map from close up. My pc locks up trying to do it. It would be nice is this could be added to the terrain plug-in. -
As always, Stian, it's beautiful. I also love the clean alpha for the comp. Nice.
-
I would think the if you change the light properties then save out the Cho it would save the light data as well...
-
Oz Map -- Another v13 Displacement Fun Thread
Zaryin replied to Zaryin's topic in Work In Progress / Sweatbox
Ken: Yeah, that's one of the thing I was planning on adding for the terrain. And thanks Dan: I made a normal map for the terrain, but it really didn't make a difference at all. To get a result I have to crank it pretty high and it doesn't really add anything, so I decided not to use it. I think my displacement map is just pushing the terrain too high for the normal map to help with this. I haven't had any difficulties with AO and displacement that I am aware of. Tell me what problems you've had, and I'll let you know if something like that has happened with me. -
Love the leather!
-
Hey John, is this Darktree or Simbiot?
-
Well, I can't say I hate it . Great job on this so far.
-
Wow! Great first model.
-
Hey John, that looking awsome so far. I really don't see that much of a difference betweeen the bump and displace. It might jsut be the view though. Looks great either way.
-
Oz Map -- Another v13 Displacement Fun Thread
Zaryin replied to Zaryin's topic in Work In Progress / Sweatbox
Ok, here's the newest render. I rendered it at 2400X1021. It took about 1 hour and 50 minutes to render with 15% AO Sampling. I will probably still be adding the cizilization details and maybe some color differences to areas, but this will probably be my last post of this until I actually finish it. This is the SHowcase area, not the WIP. Thanks.
-
I love the lighting. The outside could use some "dirtying" up though.
-
It's looking great so far.
-
First model I ever made was a little lamp with shade that sits on a desk. Model that .
-
Oz Map -- Another v13 Displacement Fun Thread
Zaryin replied to Zaryin's topic in Work In Progress / Sweatbox
Thanks everyone. I did try a shot where it was in the mountains. It actually looked pretty cool, but it took forever to render. I just realized not long ago that I forgot to turn the AO down from 100% when I tried that. I now have it at 15% and the pic (above), now with sky, renders in about 15 minutes at that size. I'll post that one when I finish rendering my big version of it (2400X1021). I'll also see if I can do that pic from in the mountains when I'm done. OH, and I tried putting The Emerald City in with displacement, but it didn't look all that good so I took it out, haha. Thanks again.