Zaryin
-
Posts
2,728 -
Joined
-
Last visited
-
Days Won
4
Content Type
Profiles
Forums
Events
Everything posted by Zaryin
-
Power up with lensflares and darktree materials
Zaryin replied to johnl3d's topic in Work In Progress / Sweatbox
I'm tellin' you John, one of these days you just got to make some type of short. -
Power up with lensflares and darktree materials
Zaryin replied to johnl3d's topic in Work In Progress / Sweatbox
That is an awesome effect, John. I like how you showing of your liitle projects have improved also. Great. -
Looks pretty good for just getting the software. You should post a wire of the pic, also. THere seems to be a little problem with the top of the -- um -- "photonic sword"
-
You, sir, are the grooviest. Thanks.
-
Thanks alot, David. I'm d/ling it now. I can't wait to watch it . Are you still doing the FACE tut? Sorry to keep asking.
-
That I didn't know. Thanks .
-
Ok, I recreated the normal map for the right arm. I lightened the colors and rendered with the same settings as the one with the white bg. So now the model is showing up better, but I am missing the look of the layered version. It looks too much like the comic's colors and I am trying to lean towards a combination of the movie look and the comics. I am just not of fan of the lighter colors. I think I am going to stick with my layered look for the image I am making since I am doing this just for an image and not an animation. I am thinking the tweaking involved in getting it to look like the layered version is going to take way too long. Since it's not doing this for an image contest I don't see the reason not to use PS to get a great looking pic. Thanks everybody.

-
Yeah, I agree about those side windows, but the rest is great.
-
I have that at 100%. Thanks though The colors seem good to me in the modeling window. I'll adjust them lighter and see what they look like. I guess it's the final render that matters. Thanks, guys.
-
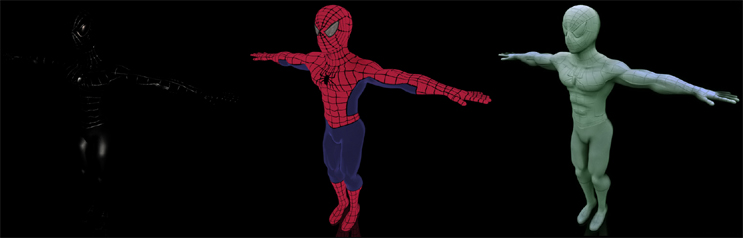
Ok, this render is straight out of A:M. I set the background and ground color to white. AO settings are at 100%, sampling is at 30. I have two lights in this scene. In earlier renders one of the lights cast diffuse, spec and shadows. The other light was set to cast spec and shadows. In this image both are set to just cast spec only. It renders a little darker than I would hope, even with a white background. So I thought if I added a diffuse light it would brighten it up -- which it did, but then it took away the nice AO look as you saw from the earlier verisons. I thought by splitting up the layers I would get more control over the layers. I did it in PS because I knew how to do it in there. I will probably do some tests in the near future to see if I can do it in A:M Composite. I should also mention that all the pics are just screen grabs. I never do a render to file until I am doing the final render.
-
I tried rendering it all together and I get either the look you saw or if I render it with just AO and no diffuse lighting it comes out too dark. The only way I could get that last pic was putting it all together from seperate layers. It might be that I just don't know enough. I am using a material that I call Costume Gradient which uses an ambient gradient around the edges of the model. I used this on both versions of the model. Well I found a little info on these boards. I might just read all of it and see if I can learn a thing or three . Thanks guys!
-
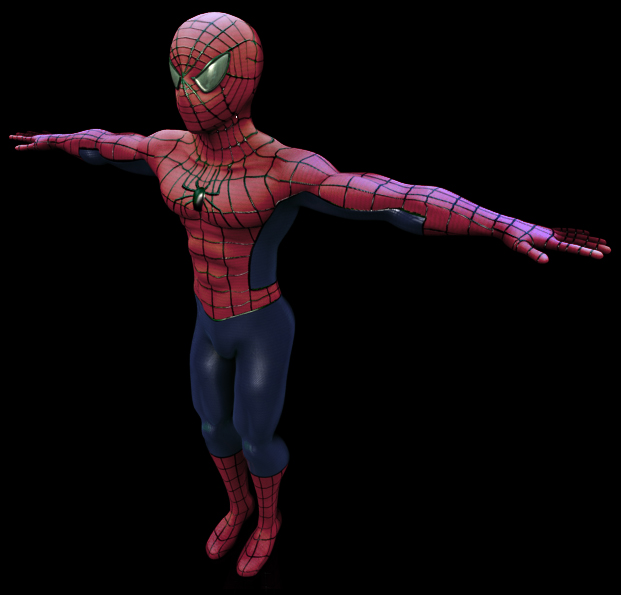
Sorry everybody for using Photoshop, haha. Let's just say I am new to the v12 and v13 world and have no idea how to use A:M Composite so I used Photoshop to put my three layers together (below). 1: A Spec Layer set to Linier Dodge 2: A Flat Color Layer set to Overlay 3: An AO layer that I tweaked the color on and Used the Burn tool to darken some of the harsher highlights. If anyone knows of a better way to lighten or darken areas in PS please let me know because using the Burn tool causes color change -- as you can see by the pic on the forearm area. If this can be done with A:M composite please let me know. And/or posting a link to any relevant information would be appreciated. Thanks again for the comments. And once again, I would have used A:M Composite but am way more familiar with PS and really have no idea how to use A:M C.
-
Thanks guys. I will probably be rigging him so since I can't think of an idea for the IMage Contest yet. Here's a render I did in three layers and then merged them in Photoshop. I realize I went overboard on the spec for the blue area . EDIT: I changed out the picture with the fixed specular.
-
Thanks, Marcos. That webbing was real hard to do .
-
That looks pretty cool.
-
Thanks alot for the help, Patrick. I don't know when I'll get to rigging this one and making an image. I am thinking about what I can do for the Mechanical Image contest now and might start working on that. Thanks again.
-
Love the animation. The lighting is great as well. THe only problem I saw was right in the beginning the lip sync seemed a little stacatto, but then it got smoother right after that. Great job.
-
Ok, here's the finished webbing with one render as the black costume. Time for rigging. If anyone can think of a cool pose and/or scene, let me know . Thanks.
-
Wow, she is lookin' good.
-
Thanks alot for that info Dan. I'm going to screw around with it to see if I can flip it. I thought something wasn't exaclty right about the way the webbing looks. Until then, here is my latest render. I tweaked the body, and for the hell of it I threw in a render with the focal length set to 25.
-
Thought I would post how I was doing the webbing. Inside A:M I lay extruded 4 cp tubes down as the webs. I color them black. I then bring it into PS and tweak it so it will look right on the mesh. The spec map is just an opposite of the color, except saved as 24 bit. And since I made the webbing as tubes I can used Marcel's Normal Map Color Mat to make a normal map of the webbing.
-
I agree about the blur, but it looks fantastic as it is.
-
Mechanic expression use with hypnotic mat
Zaryin replied to johnl3d's topic in Work In Progress / Sweatbox
Haha, you crack me up, lol. -
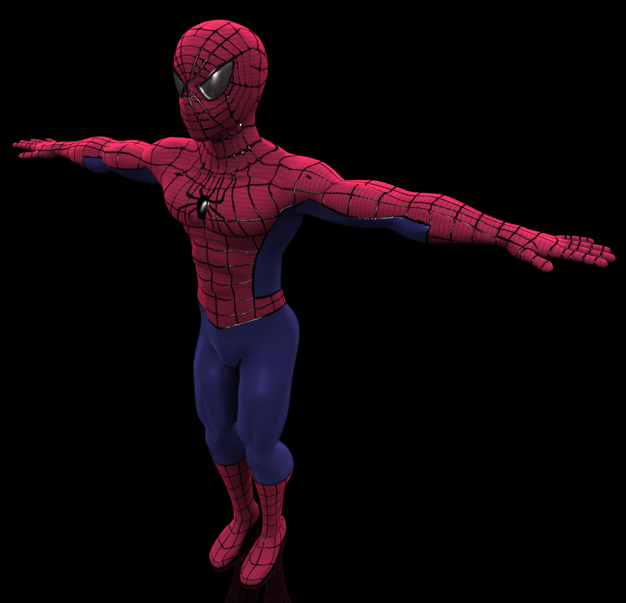
Thanks John. Where do you think I'm getting my reference from . Thanks Patrick. When I get all the webbing done I will do some real tweaking on the splinage. Until then you will have to live with the old version, haha. By the way, these are AO renders against black. Ok here is the back torso webbing basically done. Still needs some tweaking to geet it perfect. I might also add another line in there in an area that's not seen in the render. I also tweaked the front webbimg a little. EDIT: I changed the picture to show the fixed back webbing. Now onto the arms.
-
Ok, this was done very quickly just to see if I could tweak him with the webbing on and get away with it. I did it in about two minutes, and it looks like I will be able to. So once all my webbing is done I will tweak the proportions again, and better than they look in this pic. I changed the eyes to white and have to agree -- they do look better. So I will leaving them white. Thanks guys.