Jeetman
Film-
Posts
902 -
Joined
-
Last visited
Content Type
Profiles
Forums
Events
Everything posted by Jeetman
-
David, I can't wait till you and Mark create the "instant" rig. One push of a button postitions bones, attaches and weights cp's and deletes install bones. It works on bipeds, tripeds, quadpeds, and any peds I can dream can't I? As I said in Mark's post, I'm very grateful that you dedicate your personal time to work on the rigging part of AM. Without guys/gals like you, animation would be near impossible and incredibly hard to do. Thank you for all you do David and keep up the excellent work you've been doing. George
-
Looks great Holmes!!!! George
-
I think I showed my feelings on this in my last post about Mark and David being GODs!! when it comes to rigging George
-
Sorry Mark. I haven't been following the rigging threads probably due to my severe inability to even comprehend rigging. When it comes to rigging, you and David are GODS to me. I'm amazed at your rigging abilities and I think you are doing an incredible job. Without your participation to the rig, there was NO way I could animate the TWO characters with the ease that I do. Thank you very much for all you do and PLEASE keep going!!!! I'll someday learn how to use this rig and as long as you keep tweeking it, it will get better and better each day. George
-
Katt, This looks great!!! I love the lighting and toon settings. George
-
Excellent help here!!! Thank you Rodney and Luuk. This is really good to know! George
-
Hi all, Can anyone tell me what determines the start of a path? I'm working on a SO shot and I have a crow constrained to a path that I had to modify by adding a few splines and now It's starting at the end of the path. I know I could use ease to make it work but I just want to understand how it works. So what controls where the start of a path for a model is. I need to get the crow on the other end of the path spline. George
-
I could be wrong but I believe the dictionary is for the dopesheet. George
-
Hi Bruce, Nice tut on showing how to manipulate the scaling to show how to squash and stretch but you left out a very important part that should have been addressed. When showing "squash and stretch", the volume needs to be maintained. That is if you squish rabbit in the "Y" 50%, you must stretch him out in the "X" approx. 50% for it to look right. If all you do is squish in the "Y", then the illusion looks more like he's shrinking. George Here's a crude example rabbit_stretch.mov rabbit_squash_and_stretch.prj
-
WOW!! That's really good. Yeah the walk cycles need to be polished a bit but the camera work, your voice acting is really quite good. I really feel that it's definitely good enough for TV. (maybe cartoon network). Knowing the amount of work it requires to put out a production like this, I'm very impressed with your work. The story drew me in completely. A VERY good job IMO!!! George
-
I like the march towards the rabbit. And the animation looks good! The thing that did jumped out at me is when knight reaches for the rabbit, there's popping in the arms or a rotation issue. If it's popping, that's easily fixed by putting a little more of a bend in the elbow. To determine if it's a rotational issue, go into spline mode for the key frames and look at the rotation keys. I had one with a monkey animation I made before. His arm was rotating to the next pose. It drove me crazy till I realized to look at the splines and sure enough I saw a long drop in my "x" rotation. I adjusted the spline and all was good. Definitely a good start! George
-
Welcome aboard Blue . Bighop said it best hehe (Love the reference to "What about Bob" LOL). Take it slow and I'll just chime in with the same suggestion to go through the TaoAM. You WILL face some challenges but there's an excellent support group here! George
-
First I would create the walkcycle without the hands moving. Save this one to an external file, rename it to "action_no_hands" (for example) and reimport it again. (By this you can copy the action). Now embed all by rightclicking in the PWS at the project (first entry at the top) -> embedd all. Now animate the hands in the second action (name it "action_with_hands"). Now you should be able to blend these two actions without problems. *Fuchur* When you say "without the hands moving" Are you saying to not add keys for the arms and hands? If so, then you are basically having to animate the hands through out the entire walk cycle it seems. If you are animating the hands separately, you still need to animating the arm swing for the walk cycle. If you want to add the different arm movement if I'm understanding you and forgive me if I'm not, you would then have to animate the arm swing to the hand change and finish the cycle with the arm swing? If Stian is only trying to do a small hand change (like in the waving tutorial), then it's easier to just overload the animation by creating the small change in a separate action and blending it at the right time in the animation as shown in the "walk and wave" tutorial. George
-
Hi Stian, Blending is the way to go if you're making the change during the walk cycle but it can be a little tricky to get it the way you want. George
-
Depends on the quality of your drawings. I've made faces without using a rotoscope and I've never made one I liked. However, when I use a good reference rotoscope, it's like night and day. So if your goal is to create a realistic human face then the answer is definitely yes. Tracing (which is pretty much what you do with ref pics) a rotoscope is pretty much the way it's done professionally and if you look at really good work, you can be sure reference pics were used in the creation. George
-
The quickest way I know to access the "Device Manager" which shows you what video card drive you are using is like this: Right click on "my computer" (accessed either directly from your desktop or in the start menu). Click on properties (at the bottom of the list). Click on the "Hardware" tab and click the "Device Manager" button. Click on the "+" next to "Display adapters". Viola.... your video card driver. Understand that this will only display the driver your have installed. The only way I know how to really find out what your video card is, is to open your computer and actually read the model off the card itself. George
-
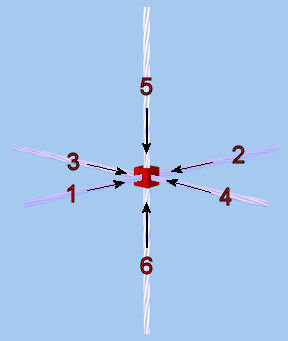
Mark, I really like your visual explaination of a control point. I hope you don't mind, I took your pic and crudely modified it to show what I think you mean by "6 holes" for each control point. George
-
Eric, That looks awesome!!!!! George
-
Hey Tot, I think the model looks great! it looks like a very 68-70ish style. I'd like to help you with your rig question but I can't seem to grasp the rigging part of the program. Can't wait to see the music video! George
-
Thanks for replying I think I know what I was doing wrong. I had the arm is FK instead of IK. I'll try it again tonight only in IK. I've been using the "translate to" and the "orient like" constraints. Is this OK to do or should I only use the "translate to"? Thanks again for the help!
-
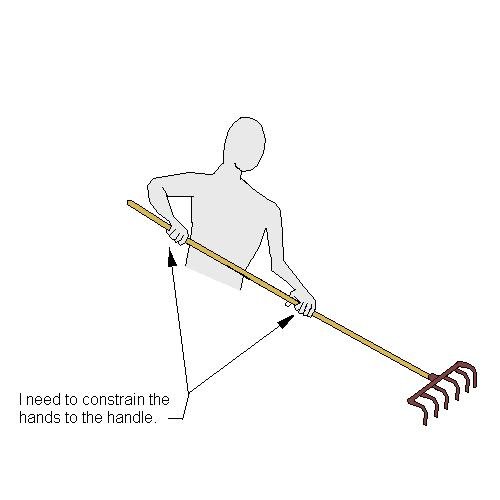
Hello, I need to create an animation of a Winkie raking grass. What's the best way to constrain a long handle (the rake) to both of the characters hands? If I constrain the handle bone to only one of the hand bones, It works fine for that hand. Which means the other hand has to be manually placed. This causes me to have to line up and create a lot of keys to make the other hand appear to be holding on to the rake. If I try to constrain the other hand (to hold the handle) to the same bone or a child bone of the rake, I get a drifted attachment to both hand bones making it impossible to work with. I think it's because the contraints of each hand are compensating for each other. I need a rig setup that attaches both hands to the handle so all I need to do is move the handle and maybe tweak the rotation a little. What would be the best way to do this and should I use IK or FK? I drew a quick picture illustrating what I'm trying to do. Because My computer crashed and I haven't gotten around to installing my paint program, I had to use PC Paint LOL so please excuse the crudeness of the drawing. Thanks, George
-
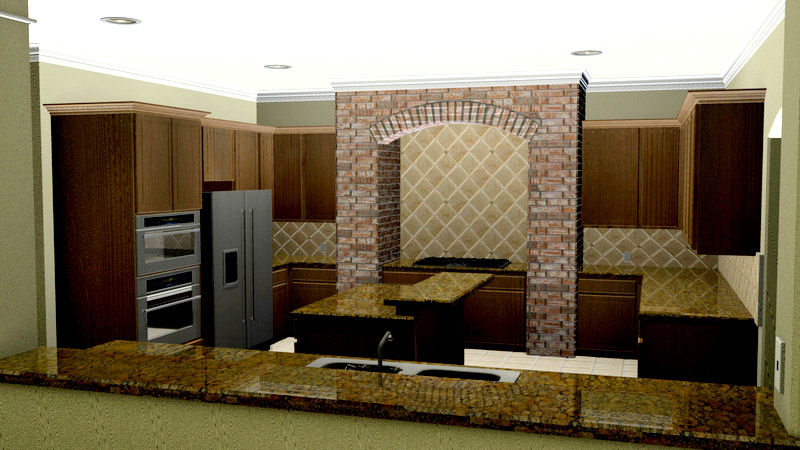
Your kitchen looks incredible!!! However the lighting does not do it justice so I took the liberties to lighten the pic up to really see what your kitchen design looks like. All I did was add some brightness and contrast in Paintshop Pro 9. Here's a brighter look at your outstanding work!! George
-
Welcome Ryan As Robert pointed out, the TaoA:M tutorials are the best way to learn this software without having to pay for the knowledge that is. It's provided free. Rodney has a certification program that once you complete TaoA:M, you get a certificate of completion. It's a way I guess of motivating people by giving you a feeling of accomplishment. It's a great way to stay motivated in using A:M especially when you're having particular trouble in an area. Also (as you should know by now), other's are here in the forum to help answer any questions you have. Checkout the tech talks. A lot of good tuts there as well. Jason Simonds, Holmes Bryant (HomeSlice) and James have done an outstanding job explaining the inner workings of A:M. I wish you the best in your A:M journey, George
-
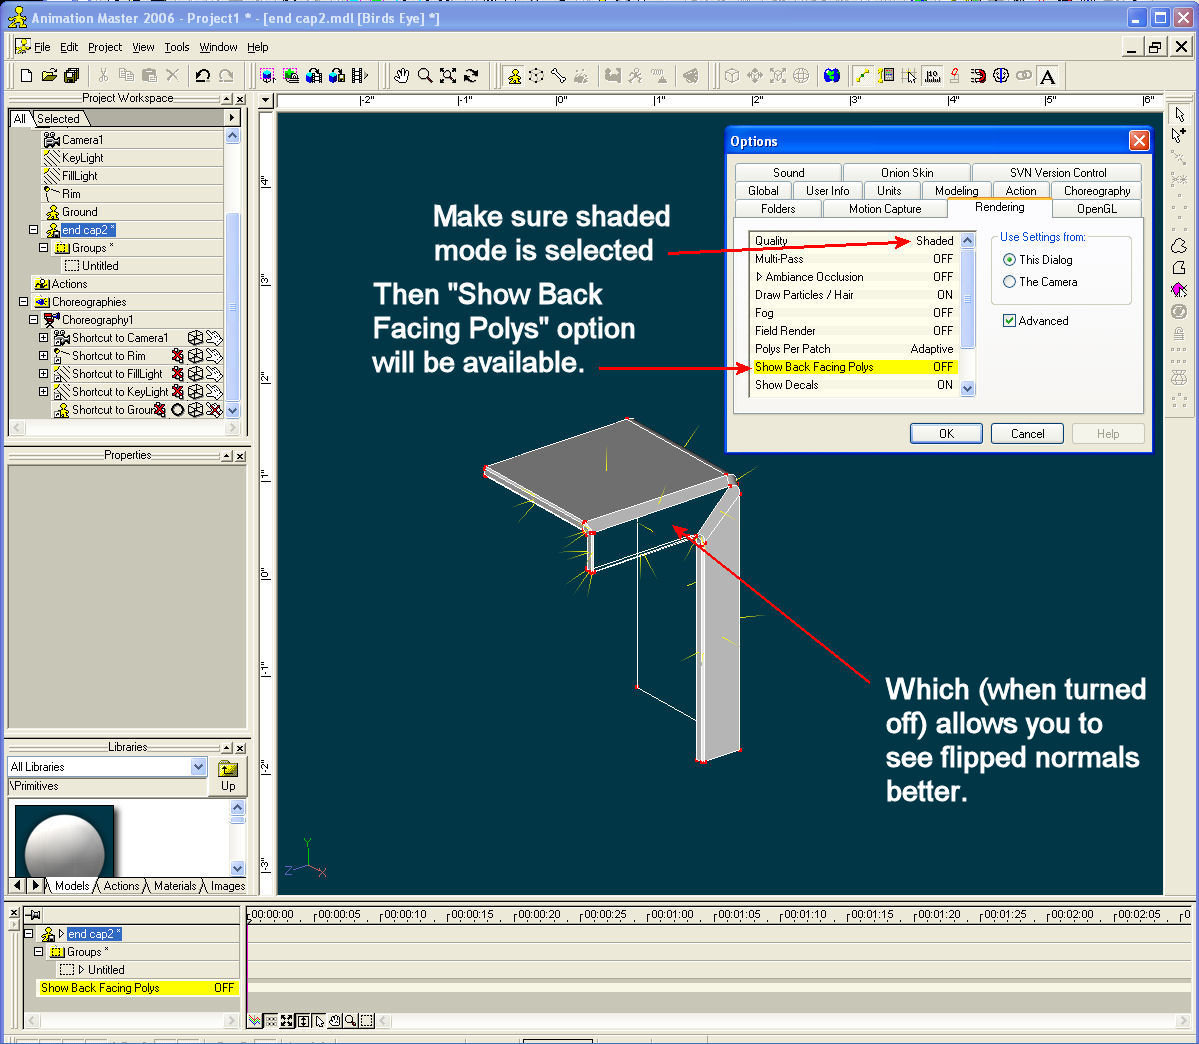
Hello, I forgot how to NOT display back faces in the modeling window. Would someone be so kind to enlighten me as to how I turn them off? Thanks, George [edit] I found it! For anyone else wondering, to set your model display to not show the back faces (makes it a lot easier to see where to flip normals), first you have to set your render mode to shaded (the default is final). Then the option to "show back facing poly's" is available in the render options. Check out the pic. George
-
It looks good but why is the animation on your blog backwards? George


